Ctgriffi
-
Posts
634 -
Joined
-
Last visited
Content Type
Events
Profiles
Forums
Gallery
Everything posted by Ctgriffi
-
I've been happy with the Emerson 1E78-140 model that I bought cheaply on eBay. Runs the furnace just fine. Also nice to have in the summer even, while driving, so we can glance to the back and easily see if the coach is staying reasonable (for the pooches).
-
Good LED flashlight. Mini 12V air compressor with long cord: I always have my Viair model handy to top off tires and adjust air bags. Works great!
-
If it's the original power converter, it's probably the obsolete MagneTek 6332 (or similar model). Mine (in '91 Warrior) had a loud, persistent hum as well. Really, it's overdue for a replacement, if it's the original. Newer units are not very expensive and will make your coach battery last much longer, due to intelligent, multi-stage charging circuitry. Opinions vary, but I've been pretty happy with the PowerMax 35A converter—it doesn't seem to hum much at all, although the fan does kick on frequently (not too annoying, for me). Installation was pretty simple, as well. http://a.co/85ype5z
-
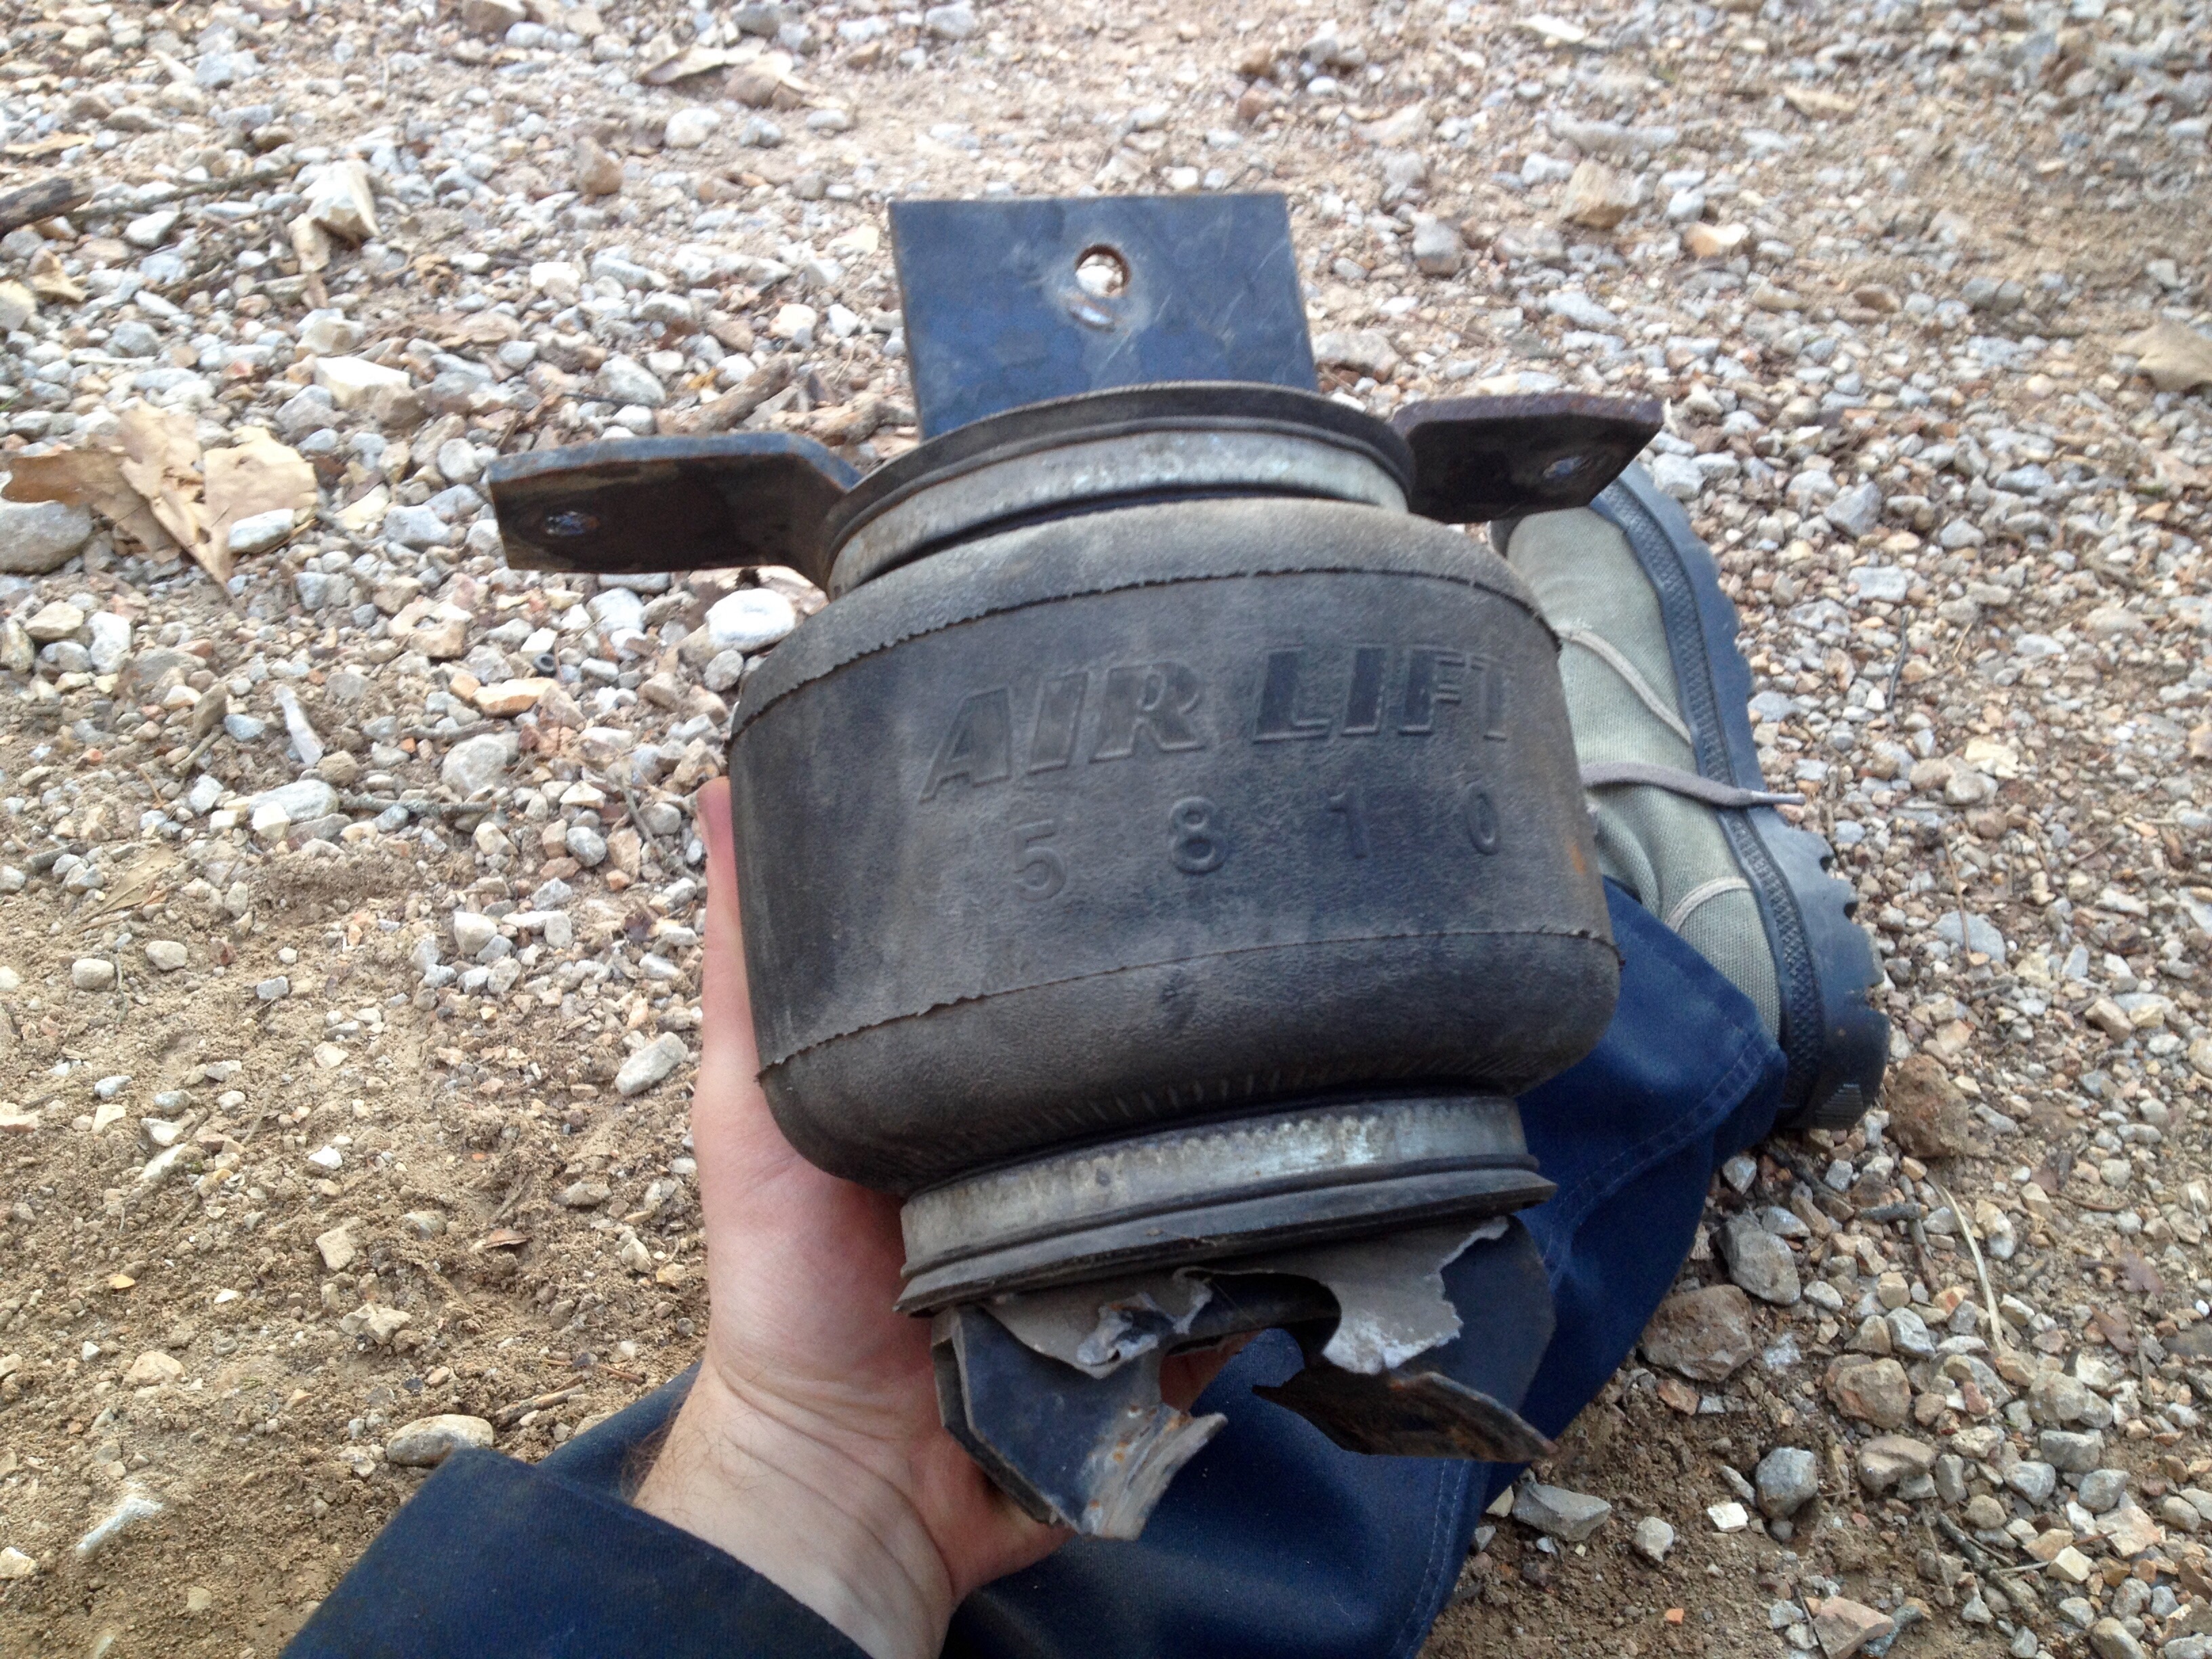
 I don't know if anybody scanned my recent thread on this same repair, but AirLift has a lifetime warranty on the LoadLifter 5000, if that's the system in question. I am not the "original purchaser" by a long shot, nor did I have any of the original paperwork, but they still shipped me out a new bag + hardware in just a couple days! Amazing service.
 -
I hope this isn't off-topic, but it does seem relevant for boondockers: We've stopped a couple of times at large truck stops, thinking that they must have some kind of dump facility: never been able to find them. I've driven all around a couple of those places (which aren't exactly inviting to the general public) and could never see any signs or indicators. Anybody have some suggestions or insights for finding convenient dump stations close to the highway?
-
A bit of deja vu here... guess you might remember when I covered this in a post last year; I ended up connecting my rear-view camera setup to the running/clearance lights—it's still working out really well. And, I agree with Derek: always a good idea to have those lights on anyways.
-
I would suggest that you are probably okay, for now, at 65K. However, I can speak from experience that some very tight clearances can develop on the 3.0 by the time you hit 85K (when I did the job on mine). I'm glad I didn't wait longer, and I could definitely tell a difference in the smoothness of idle and ability to accelerate, after the fact. I'm sure you've googled this stuff already and seen that opinions vary as to whether or not the adjustment is a must-do. Still, the comments from your mechanic (they didn't know it was a shim-over-bucket setup until they pulled the valve covers?!) indicate that they know very little about the 3VZE. And, I also think that dealerships just don't like to do the job either because it's a real stinker to get to the shims—even once you can see them, just removing them can be pretty difficult.
-
Having done this job, I would suggest that $300 is a scary low price, and I'd want to know how familiar they are with the 3.0, if they've done the job before. Still if it seems like a good shop, with a good rep, I guess you could run with it, let them find out the hard way... Wherever you have it done, I think it's reasonable to ask what the clearances were initially vs after the adjustment. They've got to jot down those numbers somewhere anyway, to know which shims to use, and it would give you some peace of mind (which is the main reason to pursue the dreaded valve adjustment).
-
I'm thinking that wax seals are not used on RVs... I put a new Thetford in my rig a year or two ago, and it came with a rubber seal; probably works better than wax with constant motion/vibration. The rubber seal should be reusable if it's still in good shape.
-
Replacing wood in cab - 87’ Toyota New Horizon
Ctgriffi replied to IndigoWanderer's topic in General Discussion
This is a very common issue and can turn into a really big job, depending on how far the damage extends and how thorough you want to be. There are a lot of threads (and opinions) on the subject; here's what I did with a similar situation: -
Yeah I had the whole leaf off and on the bench to make it easier to swap bushings. (Not much fun lugging that around yourself or trying to get it back in position, while laying in a gravel driveway, but got 'er done.) I'm impressed with AirLift Co. They didn't give me any trouble with the warranty replacement on the bag; even included some new mounting hardware and a new air fitting (all-metal, better than the original fitting).

-
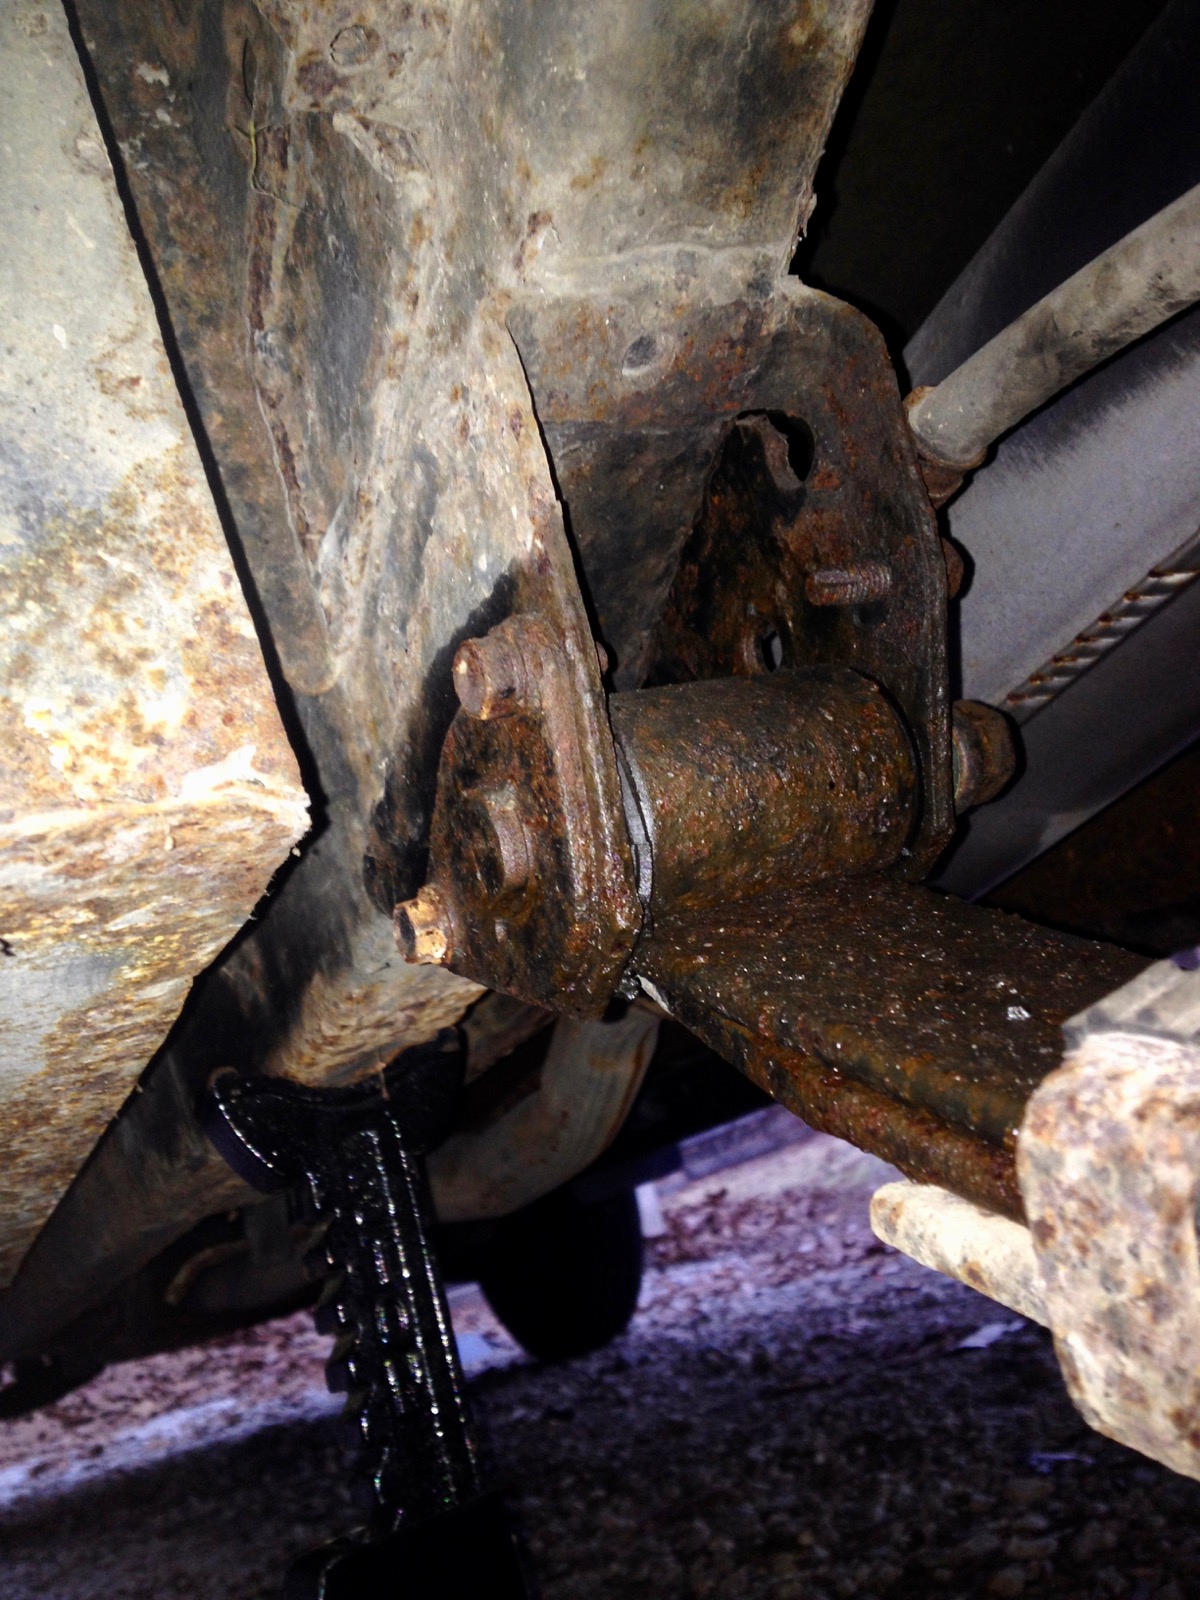
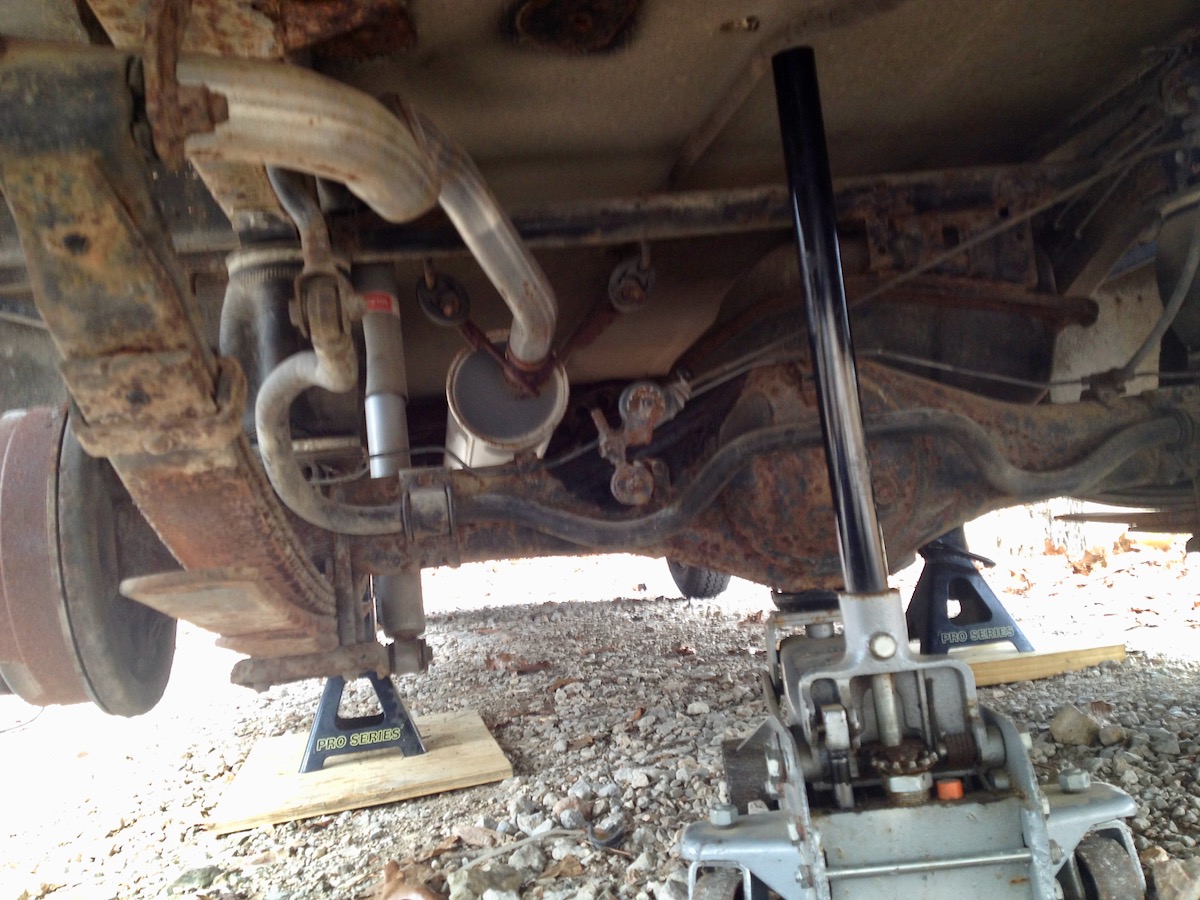
Got it done and back on the road with a new bag and some new poly bushings! I lucked out on that front hanger pin and didn't have to do anything extreme with it: broke the flange on the pin free by beating it hard with sledge and cold chisel. Then, since I already had the rear end of the leaf free, I realized I could wiggle and twist things enough to slide that pin down and out, even with the nearby obstruction. The old girl is riding well again and I'm pleased.
-
I wonder what kind of air bag setup you have...? My 91 Warrior has the air bags on top of the axle, directly against the frame above; so with both bags fully inflated, it's basically impossible for the rear to sag. (AirLift LoadLifter5000 system)
-
Tire Size for a Warrior? Is the correct size 205/75R14??
Ctgriffi replied to TimFresh's topic in General Discussion
And yet you can easily order the correct, low-priced tires from their website, have 'em shipped to store for free, and then mounted, which plenty of us have done and continue to do... there are very few things left in this world that incline me to visit a retailer and ask the advice of so-called-experts, when other, better sources are so readily available (yes, this forum is a great example!). But that's just me. -
I came up with a new cab/coach curtain last year, and it's working well for us! Looks a lot nicer than the original Winnebago-issue curtain, insulates better, and keeps out the light, too. I picked out a "black out panel" for $13 at our local Walmart, cut it to length and hemmed the bottom. Used some heavy-duty metal snaps to attach it to both sides of the cab/coach opening—two snaps on each side (Winnebago used one on each side, but this setup keeps the curtain nice and tight, all the way across). This kit has the snaps I used; just fasten the "button" portion to the fabric (with a piece of thick felt on the backside for strength) and attach each snap-base to the side wall and/or cabover bed floor with a small screw. Easy-peasy to snap it in place when camping or remove for traveling. Here are a few random photos of the process...
-
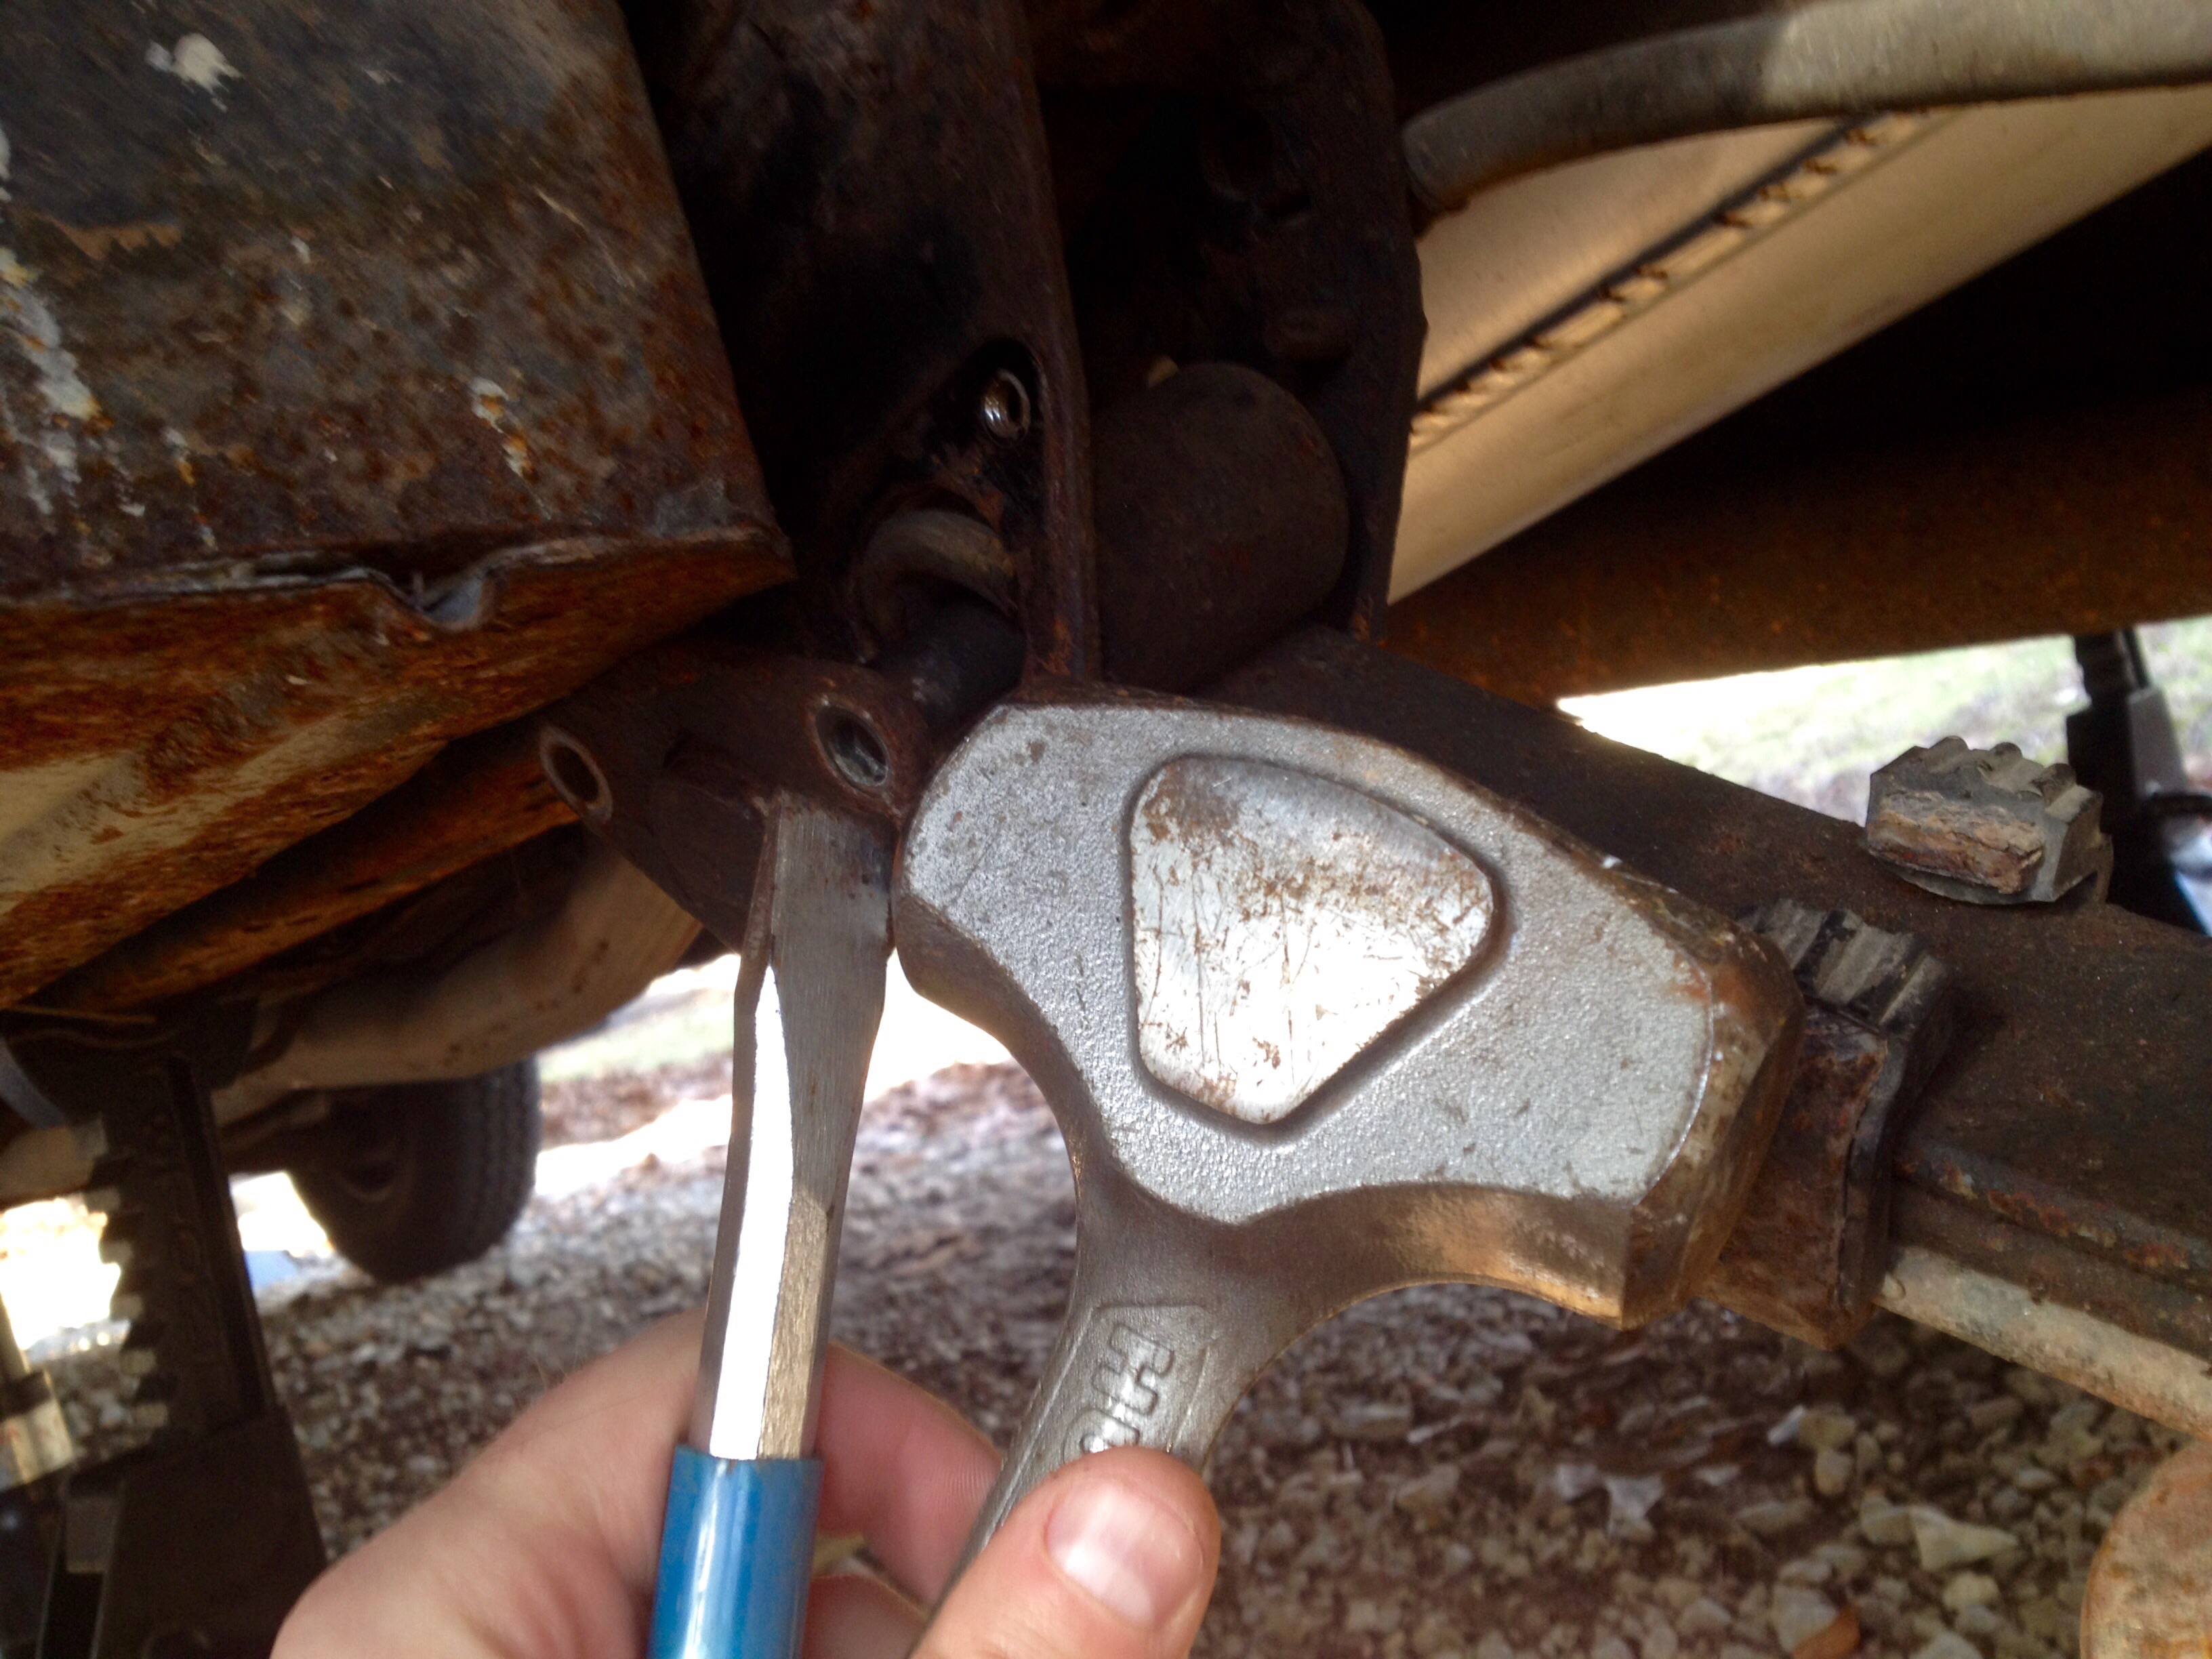
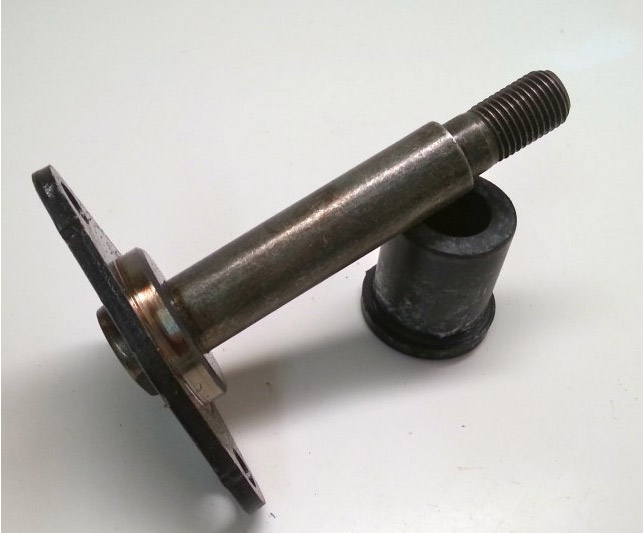
WME, did you use the same kind of bolt as the original or some other grade-8 type, when you put "...the bolt in backwards and all was good" ? Just for reference, here's a picture of this front pin/bolt thingy, all by itself:
-
And used a new bolt to finish up yeah? Ok, I could see that working; might do that myself, thank you.
-
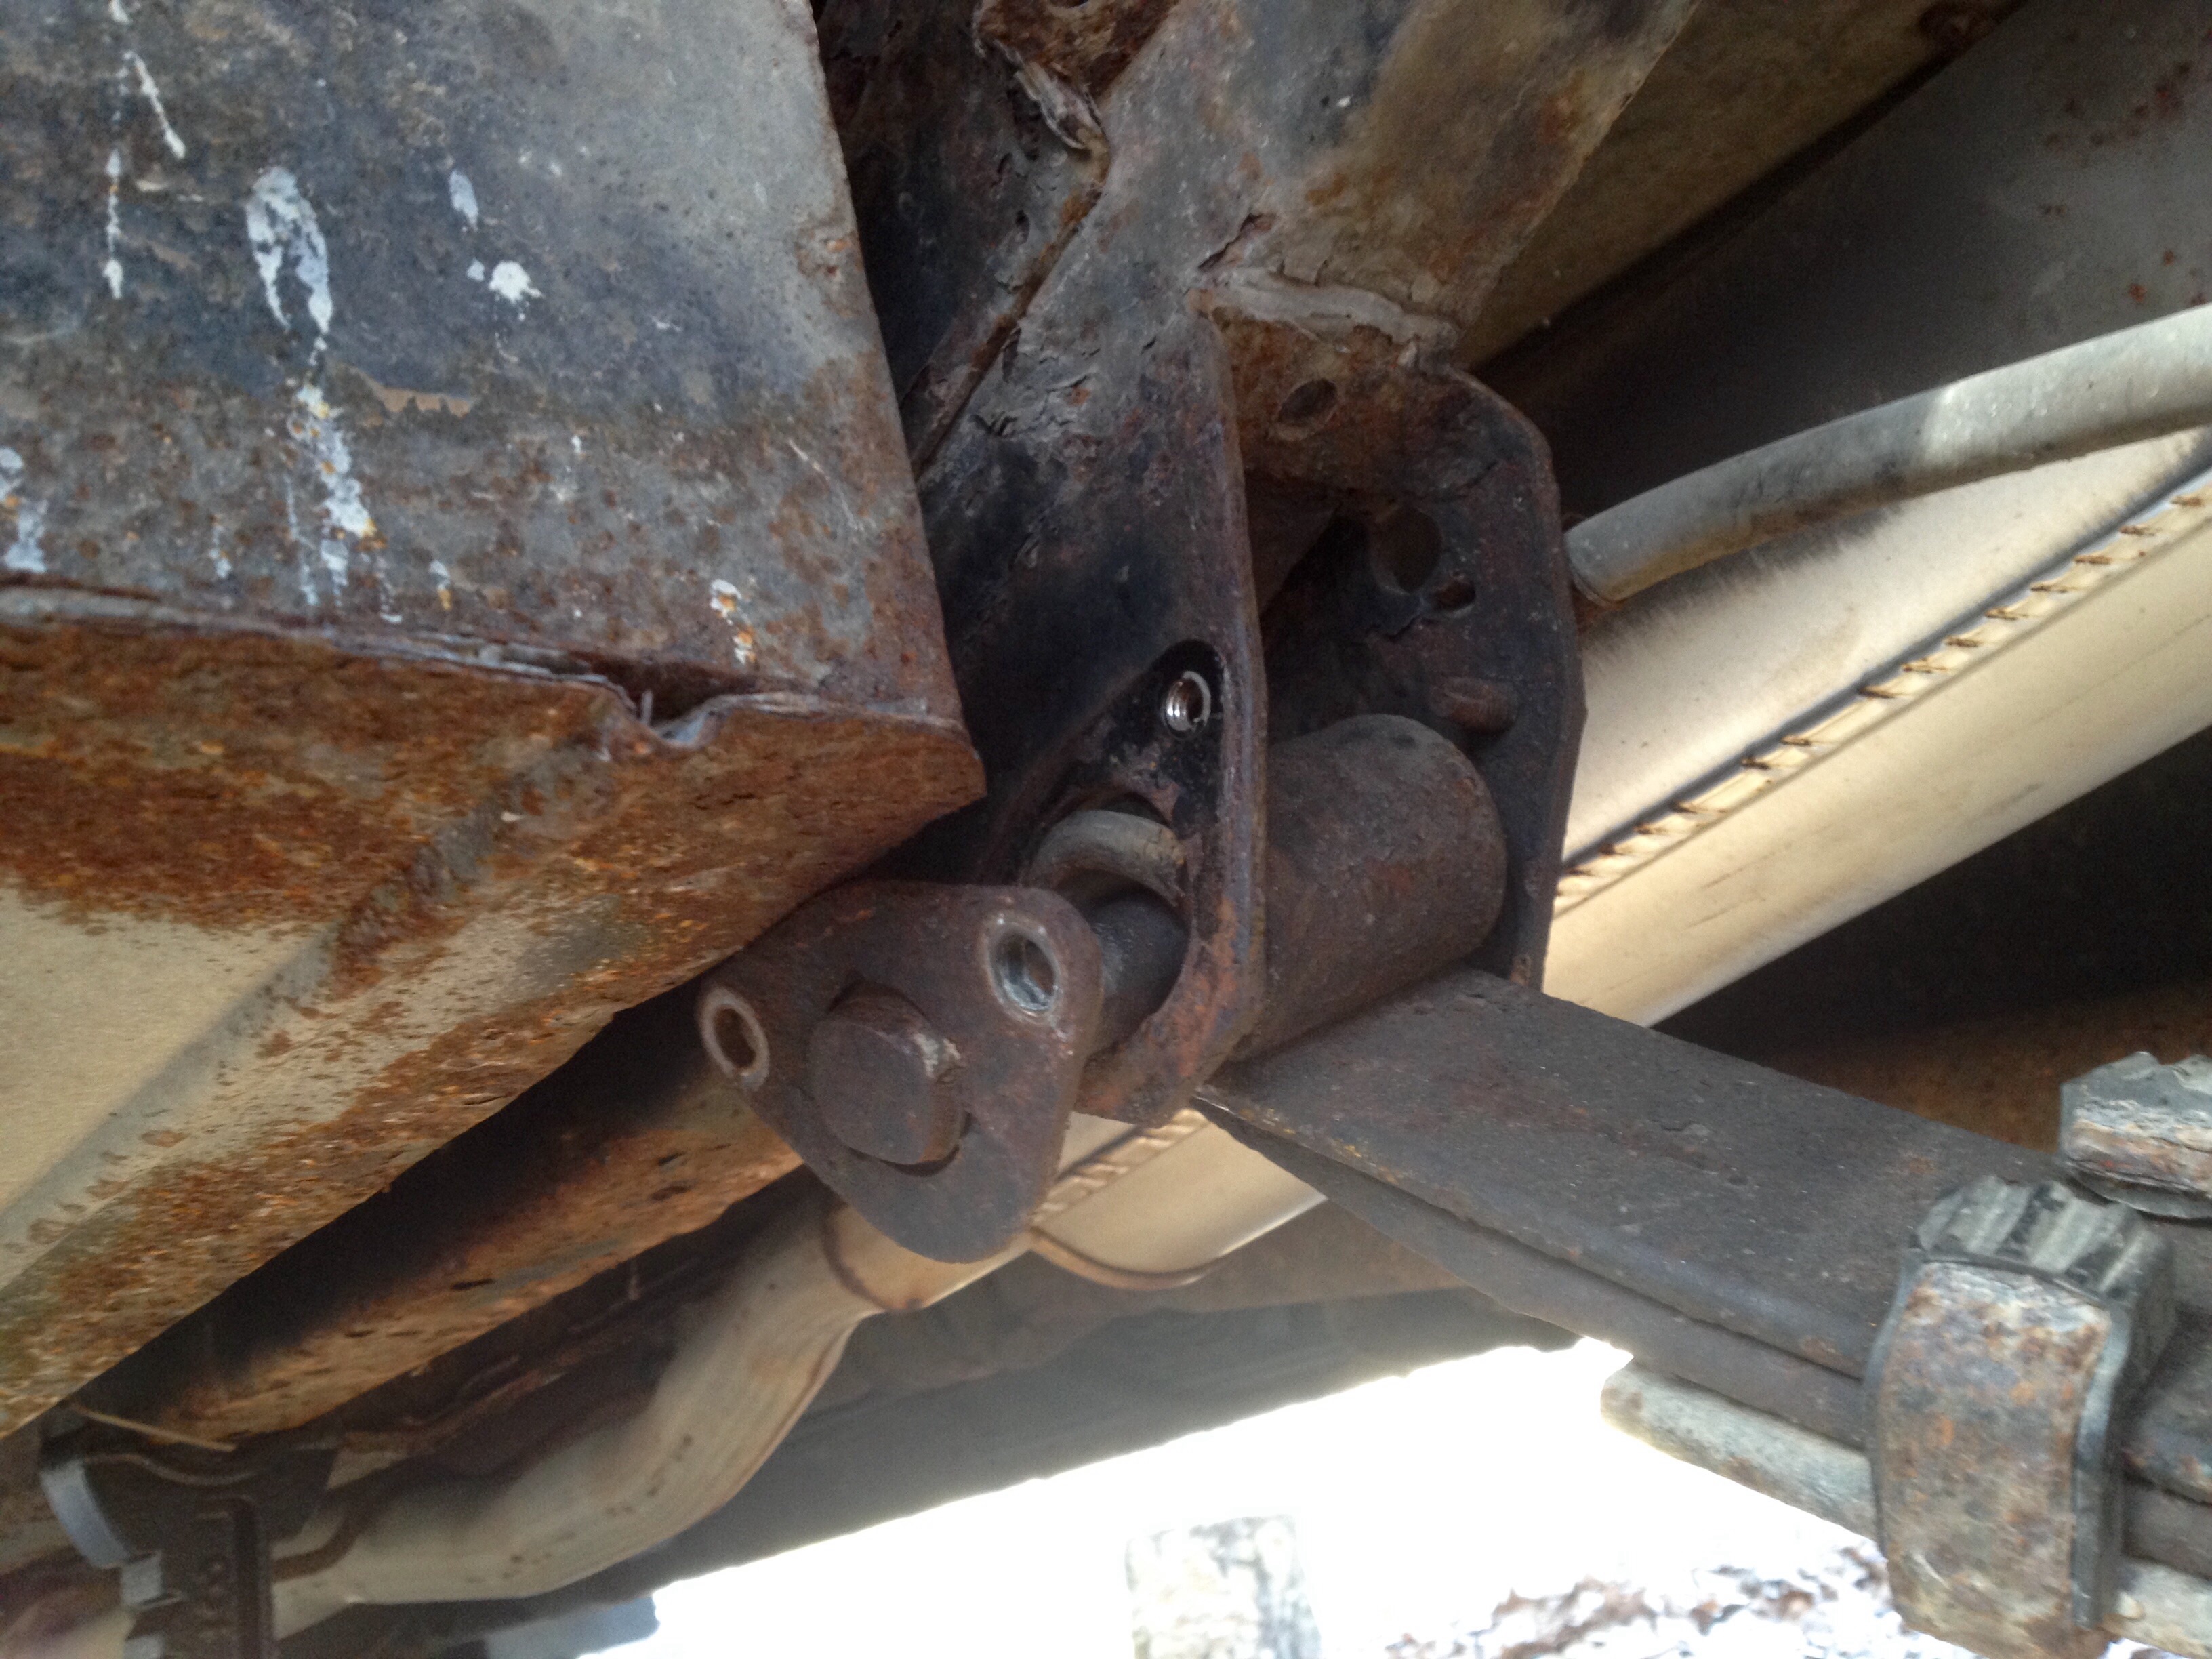
I'm also going to try and replace any of the leaf spring bushings that are bad while I'm in here... this front hanger pin, however, seems to be blocked by a nearby cargo compartment (like 1" clearance). Anybody come up against this and have an idea on how to remove that pin?
-
Recommended checklist before buying one of these older Rigs?
Ctgriffi replied to TimFresh's topic in General Discussion
Head gasket recall: you'll find plenty of info on the forum if you search for this—there was a major recall on these motors and Toyota offered free HG replacements on many of them. You should double-check if this Warrior was affected, and whether or not the special service was performed (dealer can tell you, usually). Valve Adjustment: Yeah, this is part of the scheduled maintenance, and I'm attaching Schedule A from the Toyota manual to demonstrate this (Sched. A is for vehicles that get particularly heavy use, i.e. motorhomes, etc.) There is some debate out there on the necessity of the valve adjustment, but I can tell you that several of the exhaust valves were well out of spec (too tight) when I did my adjustment at ~85K miles.
-
Eh, maybe I was being over cautious. Went ahead with tear down and got everything free, no broken bones etc. Here's the old leaky bag...
-
Took our first trip of the year last week and noticed that the driver's side air bag would no longer hold pressure. Oklahoma roads were, uh, pretty iffy in the rural areas (sometimes, miles of nothing but gravel), and the banging/crashing did not make for a pleasant adventure. Tried the Slime® option a few times, with very limited success. Well, at least we got home okay, with no other difficulties... So, I got up under the back-end with a spray bottle of soap/water and quickly found a pinhole leak near the top of the bag. I contacted AirLift and explained the problem with my LoadLifter5000 system (P/N 57113), offered to provide photos and all that. Without any question, they took down my address and shipped me a new bag. "Limited Lifetime Warranty" means something after all! I now have the vehicle frame up on 3-ton jack stands and have PB Blaster-ed all the bolts/nuts in the vicinity of the bag, including the dreaded u-bolts. I am monkeying with a jack under the differential in order to raise the axle to the point where "tension is relieved from the leaf springs," as my repair manual puts it. Problem is, I can't tell when that happens. Can somebody provide a little insight here, please? I can move the axle up and down just fine, but at no point is it obvious that the leafs are no longer under tension. Don't really want to start pulling stuff apart until I get this straight. What am I missing? Here's a reference photo, so you can see where I'm at... literally. Thanks for any help!
-
Recommended checklist before buying one of these older Rigs?
Ctgriffi replied to TimFresh's topic in General Discussion
I'm sure others will chime in with more info, but this is what comes to my mind as an owner of a 91 Warrior: Check for water damage in the coach, especially around the cabover area (pull out the mattress and feel under it). Some signs of moisture are very common, but mushiness in the floor of the cabover bed or nearby walls is bad and will require significant repair (expensive! or at least very time-consuming, if you do the work yourself). Check all appliances. No reason that you shouldn't be able to test the roof A/C, hot water heater, refer, stovetop, water pump, furnace, etc. With water pump turned on, look underneath coach to make sure water isn't pouring out anywhere (busted pipe/hose/fittings). As we head into summer, I'd also like to know if the dash A/C works. Check condition/age of coach deep-cycle battery. Tires are very important! You want to see good tread and none aged beyond 7 years (date can be translated from codes on tire sidewall). Ask to see any record/receipts that were kept. For the V6 motor, you need to be sure that the headgasket repair has been performed, also verify if timing belt has ever been replaced (especially if miles are 80K or upward), and valve adjustment is another expensive/difficult item that probably should've been done around 65K to keep it running well and ensure that you're not burning up valves. If there are airbags on the rear suspension, fill them up to ~60psi and make sure they hold pressure (no hissing under there). Drive test: these things are slow but an empty Warrior should get around okay with the V6, keep up on the highway at 65mph. Also, keep in mind that these vehicles take more time/distance to stop, but should still have a decent, positive braking feel. Good luck and keep us posted! -
Dealing with a bit of rot in the cabover bunk base.
Ctgriffi replied to LittleShack's topic in General Discussion
Glad to hear about your progress. So... pictures would be a big help, in terms of anyone informing your decision, although it's ultimately a judgement call you'll have to make. But, to be on the safe side, I would lean towards: don't take the project any further, until you've got the RV in a place where you can park it permanently, until the job is completed. I mean, what do you really gain by continuing to tear into the cabover area now, if you don't have access to the tools you'll need to finish it - ? (If you do need to drive it somewhere at this point, I would take it slow and keep off the highways.) -
What she meant: you keep talking about "camper parts" when you are really looking for Toyota truck parts. Totally different subject, different part sources for cab/chassis versus camper/coach. Really, you're probably going to need a lot of both if you plan on keeping the motorhome for any length of time. (And Linda knows how to find both.)
-
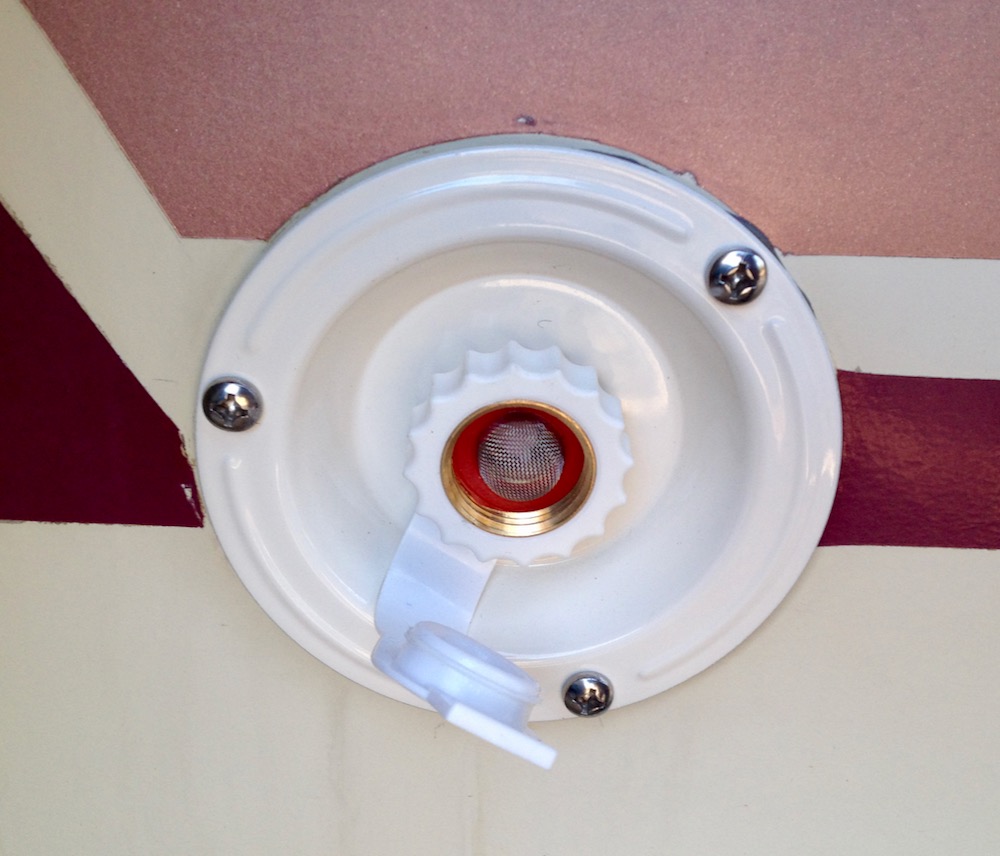
Here's the city water inlet photo... pretty straightforward installation, although much easier with another set of hands. I used my own (beefy) stainless steel screws because I'm tired of everything rusting.