

Odyssey 4x4
-
Posts
851 -
Joined
-
Last visited
Content Type
Events
Profiles
Forums
Gallery
Posts posted by Odyssey 4x4
-
-
There has to be some type of compatible compressor, maybe pull that compressor off and stop by an Auto AC shop and get their opinion?
-
I had the same issue, and actually same exact compressor. This thread may be of help from when I replaced mine...
-
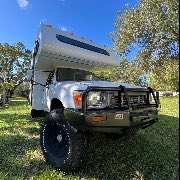
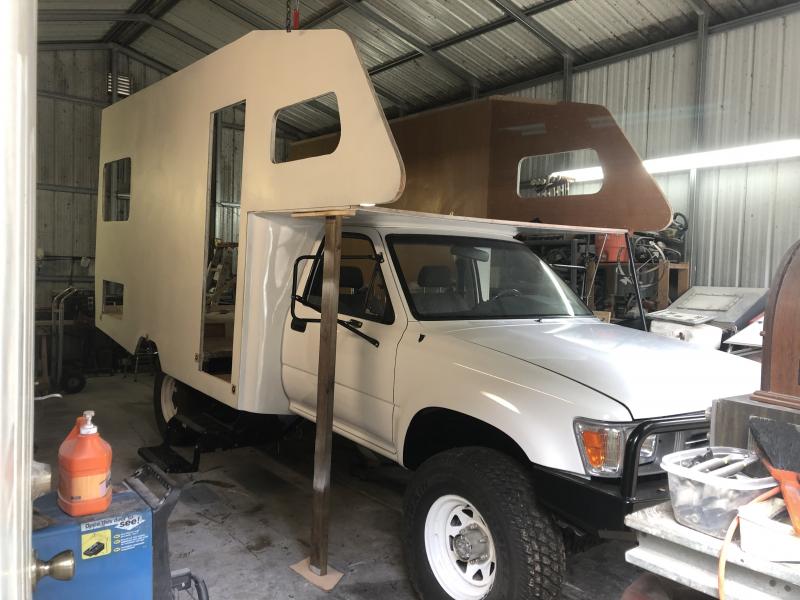
The roof is about finished and on the truck.

Rear wall is also near complete (with outdoor shower)...
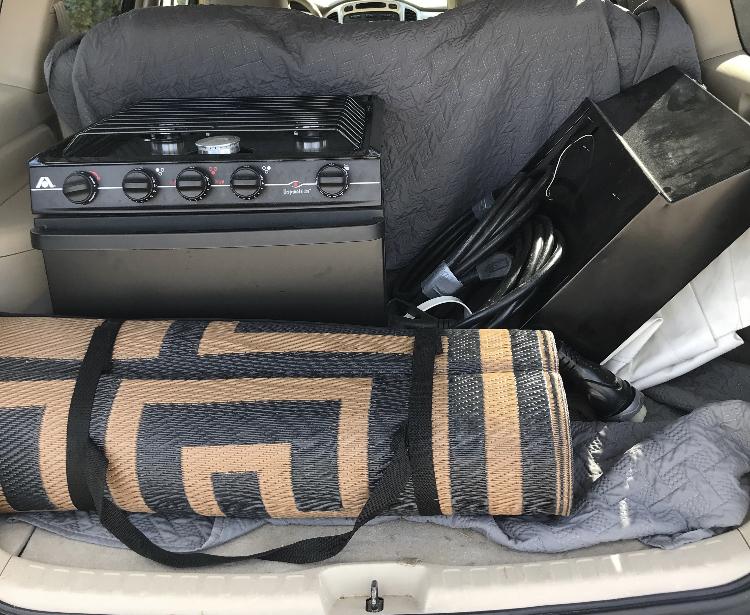
My daily craigslist searching has also again paid off and I grabbed this oven for $75.00 from a very nice couple. They had never used it in their new rig and replaced with an induction cooktop. They also gave me the matching vent hood with it, 2 large 30 amp cords, a wrap around front window and side window covers, and some other stuff. I'm super excited!
-
1 hour ago, Boundfornowhere said:
Super stoked to see this project coming along the way it has. The last time I saw it you guys had just begun so it's great to see all this progress!
Thanks guys! It’s been neat watching your adventures as well!
-
4 hours ago, Gulfstream Greg said:
We owned a 86 Sunrader 4x4 turbo 4 IFS front. Main issue was weight. Reducing the interior coach weight could make a difference. We kept ours stock almost. Larger downtube from the turbo and 2 1/2 inch exhaust. Added extra leaf in the rear. When loaded for a week long trip it was heavy. Turbo with an automatic at high elevations? Sometimes could not get the turbo to spin up when in gear. Found that out by trying to back up onto a big rock to get level. Could not develop enough power to even try. First gear low was ok but reverse no way. I have to say though it did pretty well out on some sorta bad roads. My Bronco VS Sunrader
You have me drooling at that bronco!
-
Does he have a title with it?
-
Just hit the garage at about 50, you’ll make it in
-
54 minutes ago, WME said:
Any arc to the outer roof? Rain run off.
The original design didn’t have an arch and I didn’t think to add one...maybe I should have!
-
44 minutes ago, Derek up North said:
Some love it. Each to their own.
Don’t get me wrong, I’ve built my fair share of big trucks, these wheels just don’t look right on the sunrader to me, of course that is just my opinion and worth exactly that. That 4 banger has a hard enough time pushing that camper, those huge wheels probably suck up a few more hp!
-
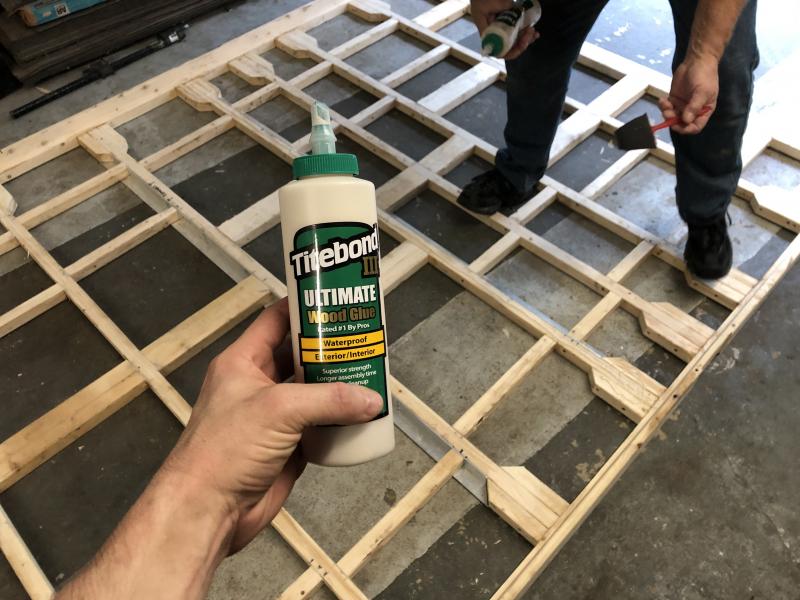
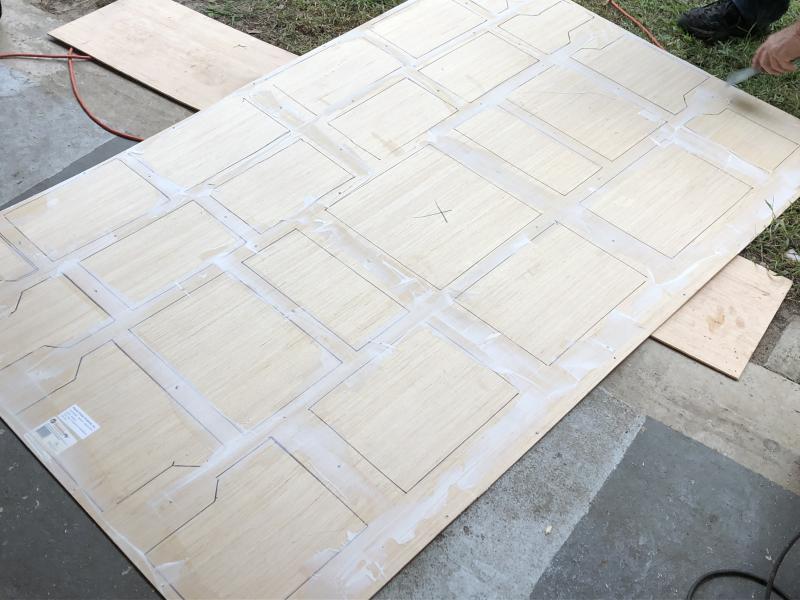
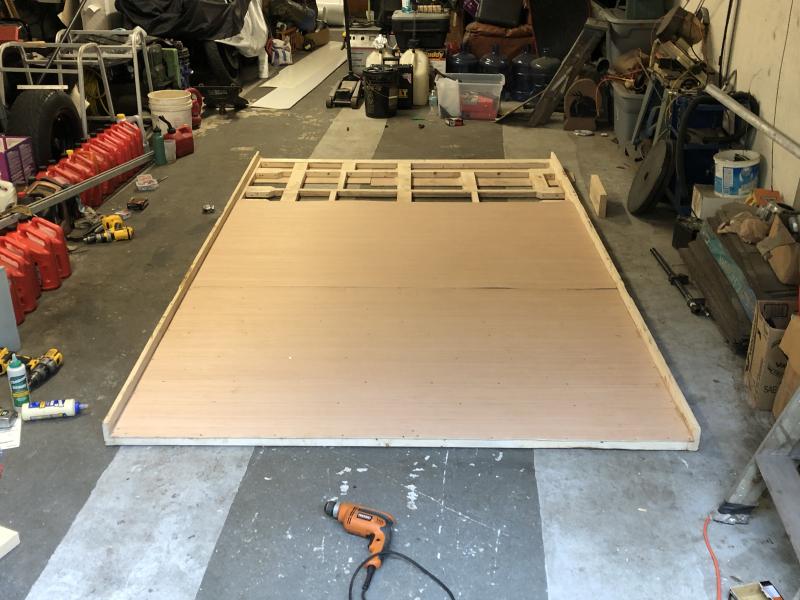
We got the majority of the roof finished up. We first framed it with the two outer main boards running parallel the length of the truck, followed by the front and rear main boards running perpendicular. We tied those together to keep it square to the true shape of the truck, followed by removing it from the vehicle and onto "flat" ground. We measured the locations for the bathroom vent, ac, rear dinette vent, and rear ladder supports, and then framed around that. A piece of aluminum L channel was added to the front and rear framing of the AC unit to assist with the weight and prevent sagging. Everything else was framed out from there, traced onto our interior ceiling luan board, holes pre-drilled and counter sank, and then wood glued and screwed together. The main roof plywood will go on once this roof is on the truck.
We are also now ordering the flooring material, I really like the Marmoleum sound deadening flooring. It is all natural and the exact interior width of the truck (79") which means the entire floor can be put it in once piece. I am probably going with they neutral grey color.
-
On 12/23/2019 at 2:22 PM, Derek up North said:
I believe they made that adapters for 'Atlas'. Around $450/pair.
Am I only the one that finds those wheels horrendous the Sunrader? Looks like a disproportionate matchbox car.
-
On 12/17/2019 at 8:18 AM, Derek up North said:
A couple of questions:-
What's your planned for inside height?
I see you are supporting the bunk from the ground during construction. Does climbing aboard to work on the bunk from inside not throw things off? Or do you also have the truck frame supported to stop this happening?
The way we are doing the roof design brings the interior height to about 6'4", maybe the tallest interior height of all Toy homes now? I'm 6'1" and got tired of my head scraping the roof in toy homes.
What you see supporting the bunk is actually just holding the fiberglass petition piece so it isn't hanging on its own free weight prior to permanent attachment. It's now properly attached to the wall structures via screws from the interior out and exterior in. The walls support a majority of the weight of the bunk area believe it or not. Kinda confusing to type out but I hope this helps
-
1 hour ago, ednelson100 said:
I agree with Anthony,
I have seen in California Toys going for almost double what you can get for them here in San Antonio.
That California surcharge is no joke!
-
Your best bet would be to take a look around Craigslist in yours and the surrounding areas to see what other toy campers are going for.
-
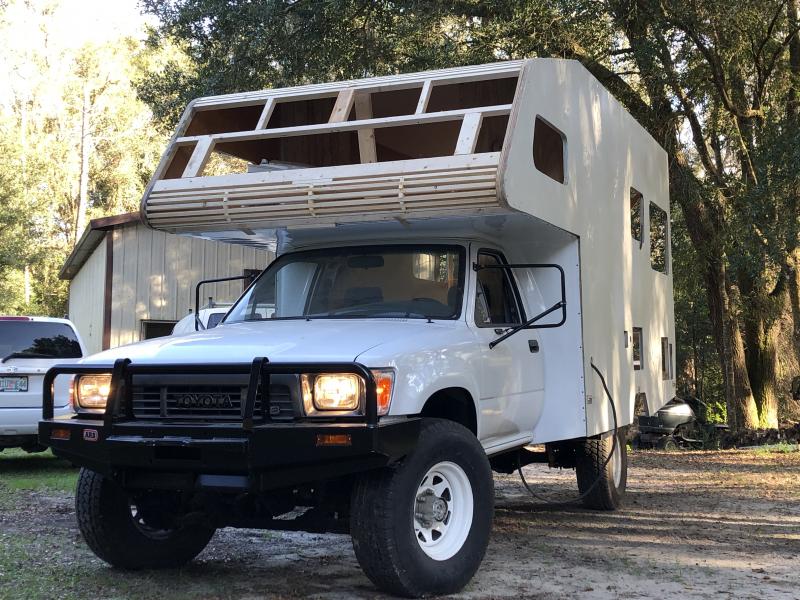
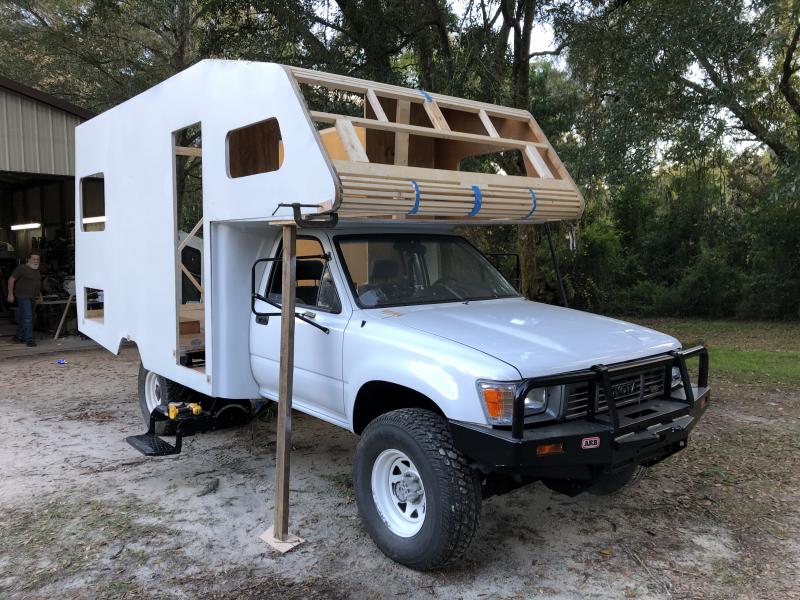
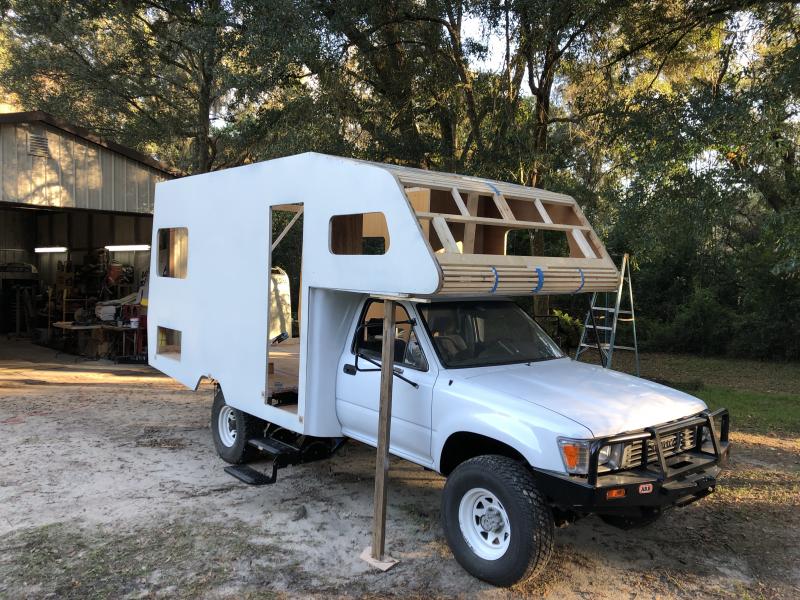
Some more progress! The walls are on and in place, front overcab section is built and mostly complete, front bunk roof partially built, interior layout rough drafting in place!
We will be completing the roof build next week.
-
An RV water system is only so complex. Trace every single water line from origin to end and you should be able to find the leak. Try it with the pump on/off and the faucets open/closed, try hooked to city water, try with water tanks empty/full, etc etc
-
1 minute ago, linda s said:
I may be almost as excited to see the little camper your building. What 3d printer do you have.
Linda S
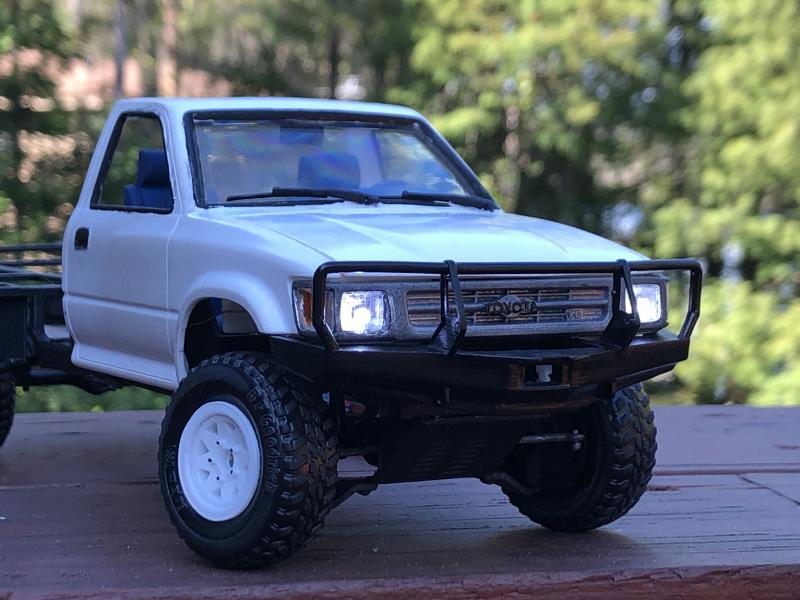
I have a Maker Select V2 that I've modded a bit to get okay prints out of. For a cheap Chinese printer, it does well. For the more intricate parts of the build I am using a FormLabs Form 2 SLA printer which prints in ridiculously detailed quality! A few pics of the model build BEFORE the cat knocked it off my window seal and broke a bunch of parts off of it!
Custom functional headlights!
SLA printed replica ARB bumper and matching wagon wheel rims to the actual truck. Kinda close to the real thing!
Mostly scale subfloor with entry step.
First rough draft of custom designed cab-to-coach partition piece!
-
1 hour ago, Derek up North said:
Ah Doing the good work, thank you! Even better, here's the filon install video...
-
Haven’t posted here in a while but the walls are on the truck! We will be applying the filon soon. The first filon application failed as it showed way too many imperfections, more info in my YouTube video. To ensure getting the walls as smooth as possible we filled and sanded them several times with a marine fairing compound.
-
On 9/11/2019 at 1:38 AM, Sandune24 said:
Beautiful work !! I was happy to see you working on an Escaper.
Thank you! That Escaper was a lot of fun.
-
Lay under the fuel tank with your ear to it and have someone turn the ignition on (don't start the truck), and see if you hear the pump priming. It will be a low humming noise. Check fuses and relay if pump is not priming.
-
51 minutes ago, Alvin said:
Had great ac in our 1989 Odyssey until just this year. I’m going to be looking for the obvious before I take it to someone to do an expensive leak check and recharge...because it went down after the long cold winter and seems kinda sudden. I’m ‘about’ to look at the ac compressor belt and electrical connections. We did call an ac shop who said they don’t work on 89 toyota trucks because they’re too old. They also said it would need a conversion.
It's probably already been converted, I haven't come across a Toy home that hasn't. You can usually tell because there will be a conversion adapter on the low pressure side of the ac system where you charge it. Start by turning your AC on high and seeing if the compressor is even running and the clutch is engaging (given the belt is still there). AC systems have a low pressure switch that will stop the compressor from turning on if the system is low on refrigerant to prevent the system from burning up if out of refrigerant. If the compressor isn't turning you can try adding some refrigerant to the system with a can of refrigerant and simple gauge from walmart or wherever else, auto parts stores usually overprice these btw. once the system reaches adequate pressure it should start turning the compressor.
If you want to do a leak test yourself you can rent a set of gauges and a vacuum pump from an auto store usually for free. You can find YouTube videos that will explain how to use the gauges. Use caution with high pressure side and make sure you trust yourself before attempting this. The gauges will tell you if there is any refrigerant/ pressure in your system at all. If not, you can do a vacuum test to pull a vacuum on the system and then let the system sit for a few hours and see if the system is still under vacuum, if not, you know you've got a leak (or multiple).
-
Are you mechanically inclined? Is your compressor running? Is the system charged? There's a checklist to start with with these kind of things but if you're not mechanically inclined AC repairs get expensive really fast.
-
If it was well cared for and maintained over time (windows and seals always maintained and recaulked) it's possible that it's water damage free. You won't know until you see it and give it a thorough inspection. That being said, I've never seen one that didn't have SOME type of water damage.


A/C Compressor Issue 87 Dolphin
in General Discussion
Posted
I saw that one too, not sure I'd want to trust it!