


Odyssey 4x4
-
Posts
850 -
Joined
-
Last visited
Content Type
Events
Profiles
Forums
Gallery
Posts posted by Odyssey 4x4
-
-
I put this window in mine, it’s nice to have the privacy. Although if you have a permanent screen door, you won’t be able to open or close the window shade while door is shut.
Lippert Components 806621 Thin Shade Complete Window Kit for RV Entry Doors, Black https://a.co/d/7VJiE59
-
Another update after the fuel system rebuild! No longer getting a rich / lean check engine light, fuel economy increased to 11.5 which i’m pretty happy with considering the vehicle and being a 4x4 house!
-
-
15 minutes ago, Scott iv said:
I had an astro and wasn't impressed. Myriad small problems and irritations. Uncomfortable small driver compartment and I am not a tall man. Bad gas mileage stock; as a camper probably comparable to the other big America class C's. Looks neat but a pass from me.
We have a “normal” astro we use as an extra vehicle / parts getter. Reliable little van, and being able to fit 8x4 sheets in the back is awesome. Agreed the driver compartment is pretty cramped.
-
That’s really awesome. I always wanted an astro tiger awd to build out, they’re just too hard to find!
-
always nice to know you’re cruising on fresh rubber!
-
Well it’s a completely custom build including the frame rails so it probably won’t apply too well to an existing chassis. Regardless, here’s a build video I made for the bumper…
-
6 hours ago, IdahoDoug said:
Wow, well done. It indeed takes skill and patience to bend your own fuel lines and then worm their way into place without getting junk into them during the process on a dirty chassis. Well done and it sounds like you are back on the road. Nice back bumper - who's is that one?
Doug
No kidding, without masking tape on the end we would have definitely gotten crud in the line!
And thanks on the bumper, we made it!
-
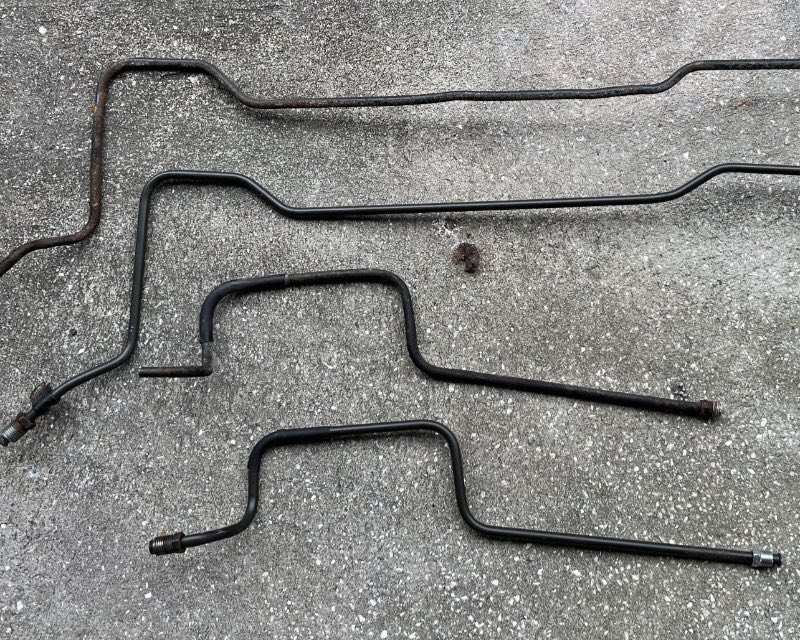
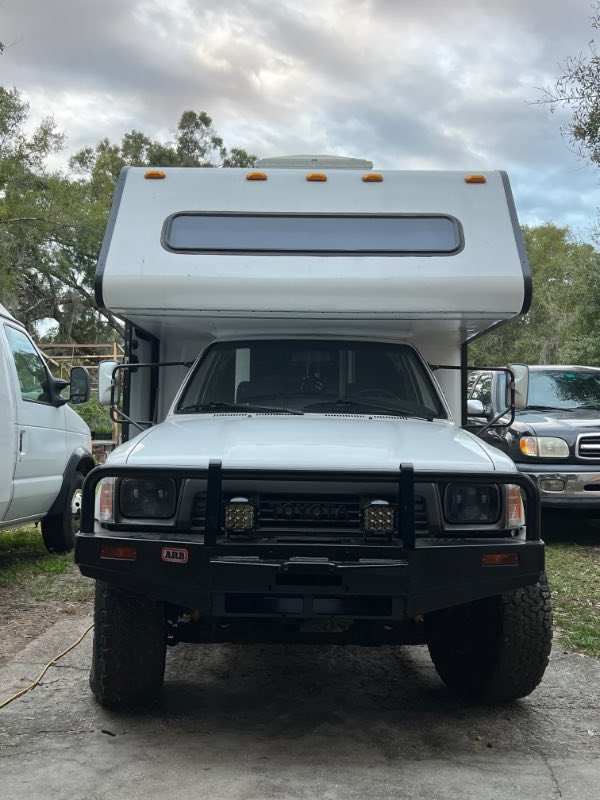
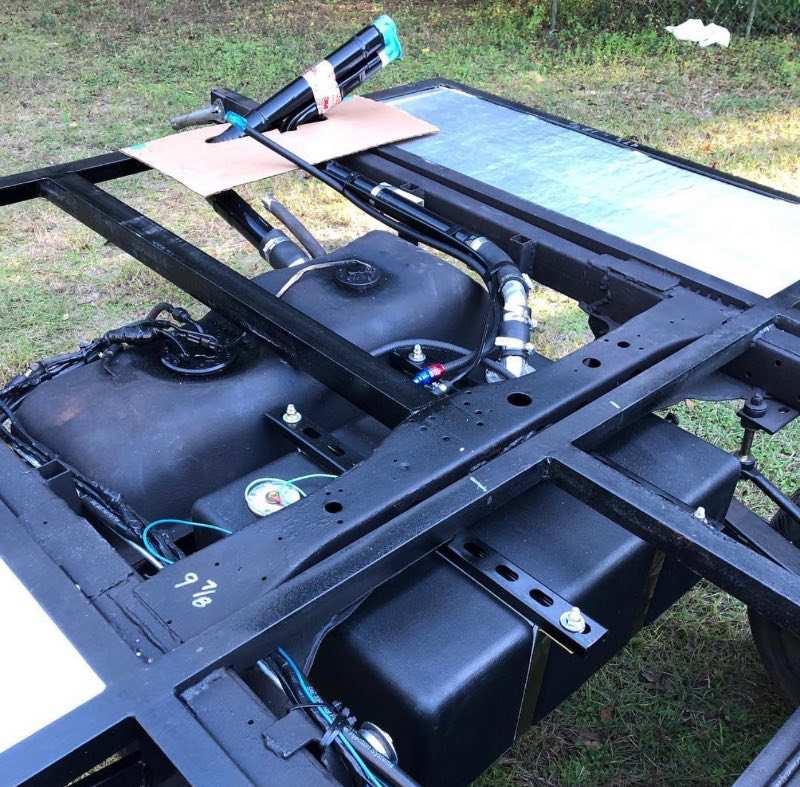
Okay so this should (hopefully) be the last post in this thread! The Toyota is up and running, she fired right up and seems happy.
We did not want to reuse the existing fuel lines since everything seemed to be rust contaminated so we bent up new fuel lines, recreating the OEM shape to the best of our ability. We used a cheap tubing bender from amazon that worked quite well!

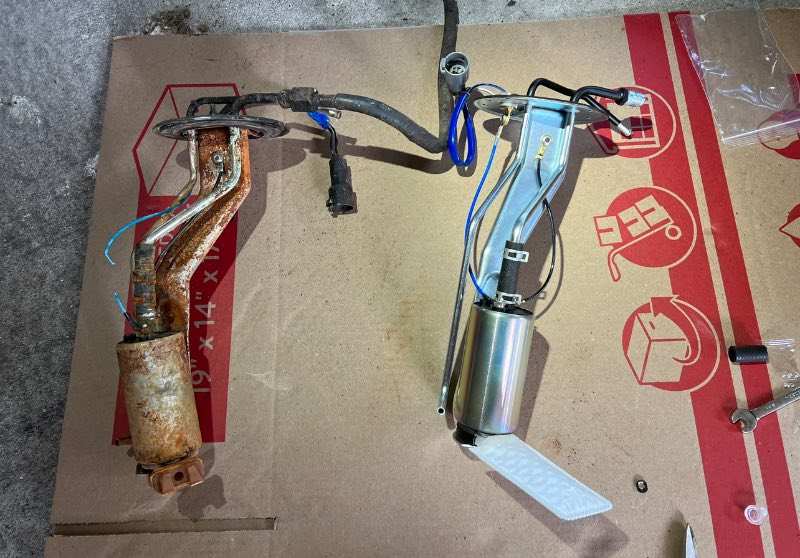
I also installed a new OEM fuel pump bracket directly from Toyota, as well as the main fuel line coming off of it. These two pieces alone were over $200! Maybe it was silly to spend the cash on OEM but I've learned time and time again you get what you pay for, and you definitely don't want to have to drop a fuel tank more than once. OEM Denso fuel pumps were out of stock everywhere I looked. I ended up going with a Delphi pump and sock which seemed next best in quality.
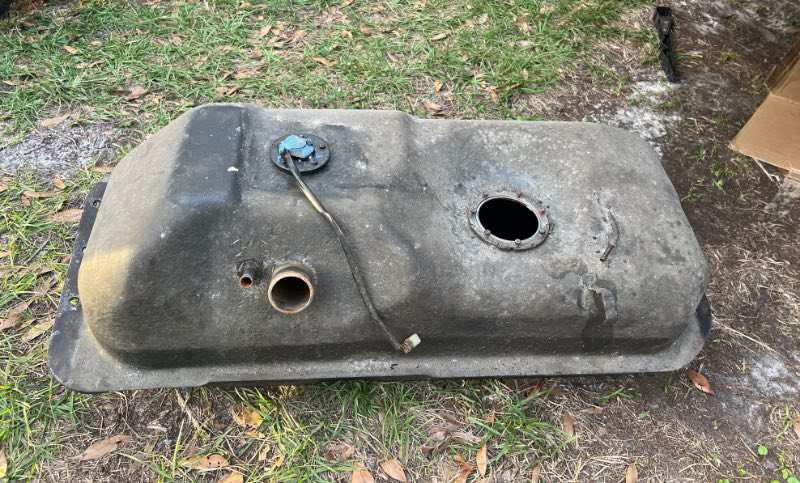
My original sending unit was functional but also nasty with rust. I did all kinds of research and couldn't find a replacement anywhere. I contacted a Toyota parts dealer asking about the sending unit only to find out that they have been discontinued for the 19 gallon tank (part number 8332080128). I couldn't even find a cheap aftermarket one. One last search on ebay and I was lucky enough to find a single OEM sending unit for $50 bucks! This made my day. T
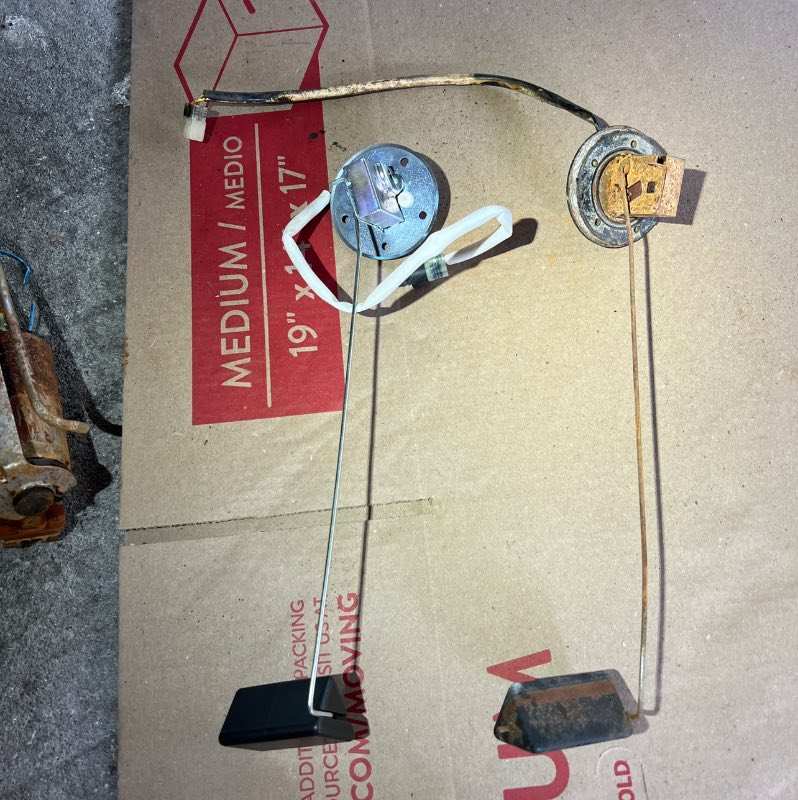
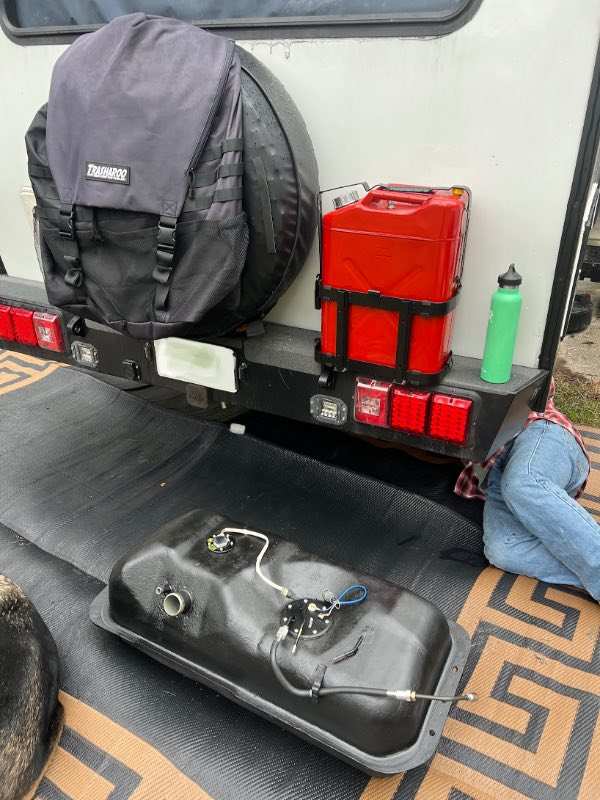
So we slapped everything into the tank with new gaskets and screws and had her ready to go in.
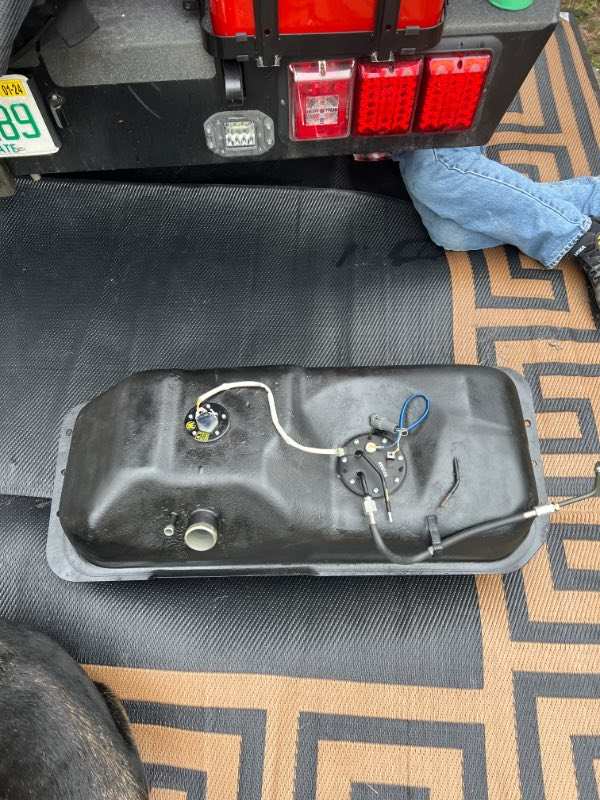
The most difficult part of this install was probably getting the fuel lines back in. It's quite a puzzle to get the routing right and working with all of the bends in the line. Regardless, we got them all in, got a new fuel filter in, and purged the fuel line with some fuel before making the connection to the fuel rail. So now, the toyota has a nearly 100% new fuel system including injectors, tank lining, fuel pump, sending unit, lines, and filter. I also. broke the bimetal vacuum valve that's responsible for directing the fuel tank venting gases between charcoal canister and atmosphere while removing the intake manifold, so I replaced that too. I also found that the fuel pulsation damper on the back of my main fuel rail had the screw fallen completely out of it, so I replaced that as well while I had the intake manifold off. Lastly, I also replaced the valve cover gaskets while we had it apart since they were leaking a bit!
So now she is back together and ready for a test drive. Oh yeah, she also got a set of very bright LED aux lights in her bumper! I still need to wire them in, but I dig the look.
If you've made it this far, thanks for the read and sorry for the novel of information!
-
24 minutes ago, IdahoDoug said:
Boy, after running that mixer all night you wouldn't HAVE any neighbors any more!!😂
I was waiting for one of my neighbors to complain! It’s definitely not a pleasant sound.
-
3 hours ago, IdahoDoug said:
Wow, Odyssey - that is an impressive bit of work and a FANTASTIC result. I did not use a system like that a few years back to clean a Mark III Supra tank and it was indeed fatiguing. It sat in a barn for 19 years and had thick dried fuel but no rust. I hung a 4x4 off the LandCruiser and suspended it from that with cleaner/nuts/bolts and my 18yo son and I took turns shaking it and rotating it until we were exhausted. Came back to it the next day and did it again. Still not clean. Finally, I put my platform hitch carrier on the Cruiser, strapped the tank to that, and simply used it for daily errands and such (usually sits for outdoor adventure). I could hear it sloshing around back there the whole time. After about a week of that, I got a result like yours.
Looks like you have some skills - well done!!
It's the type of thing you gotta get creative about! I'm surprised mine cleaned up as well as it did. This is certainly the most sore my body has been in years!
-
1 hour ago, WME said:
You guys are working too hard...work smarter...https://www.youtube.com/watch?v=HovJTohrOrg
Funny, I was considering if I had any neighbors with cement mixers!
-
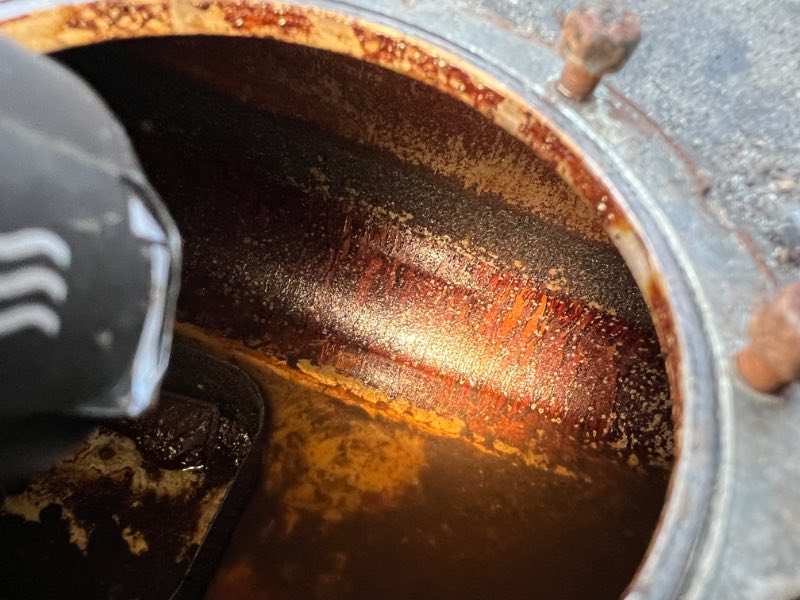
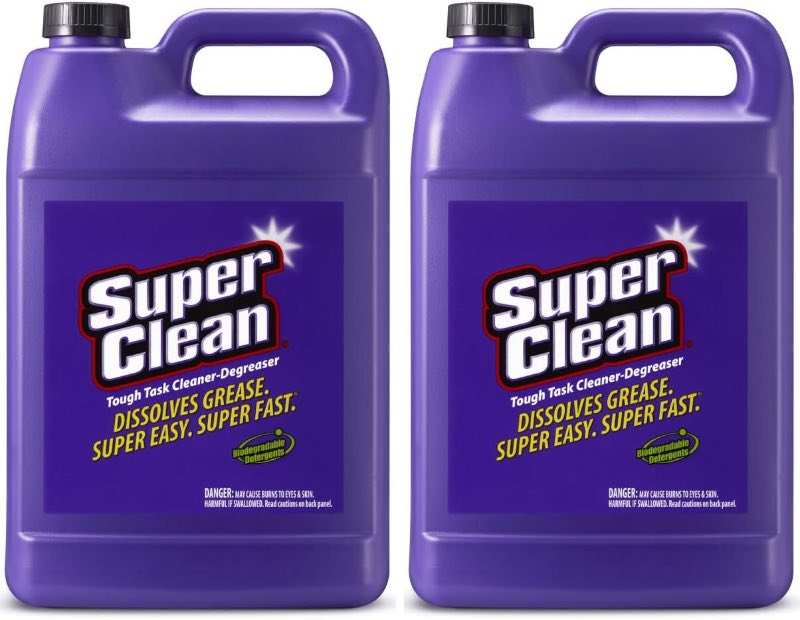
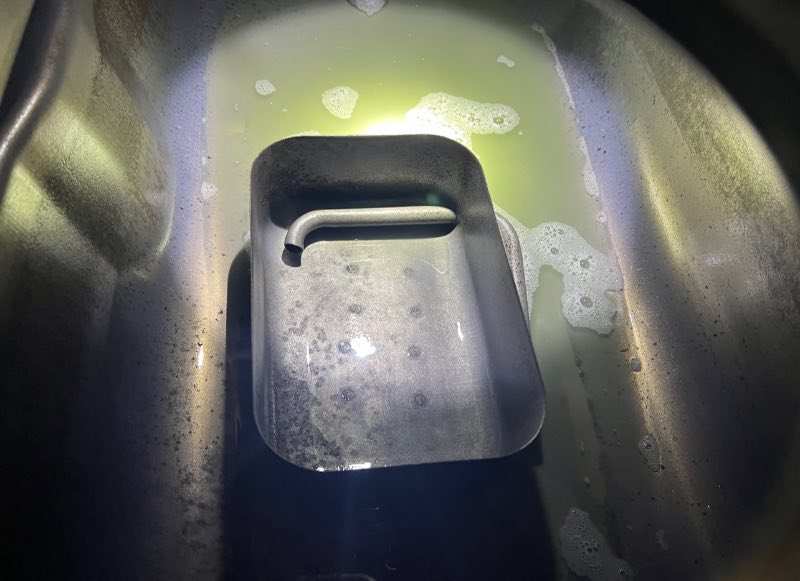
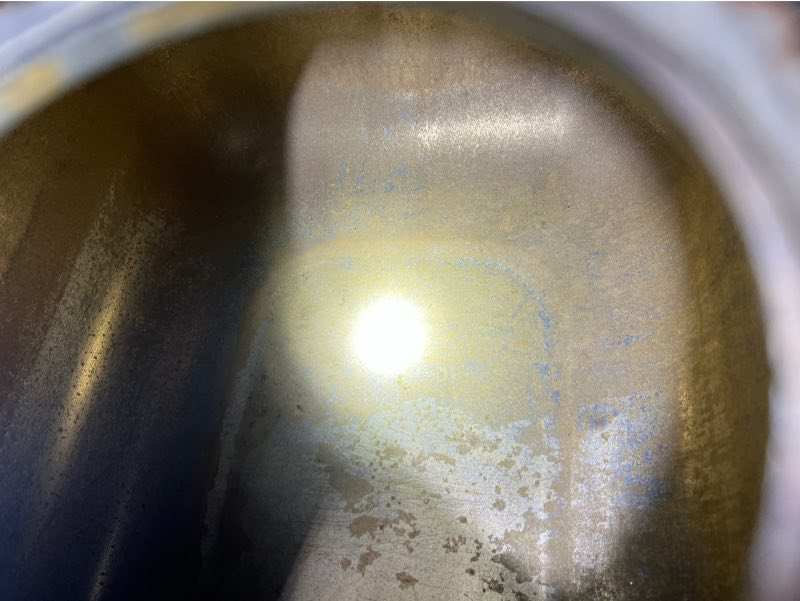
Time for an update! I cleaned the living hell out of the tank. First with probably 5-7 intense SuperClean degreaser cleanings and multiple hands full of screws, nuts, and bolts, and shook the tank as violently as I could on all sides for as long as my body could take. I flushed it multiple times and repeated, and finally let it sit overnight with undiluted cleaner in it, rotating the tank every few hours to cover a new side. Here's what I started with...
And 3 days of repetitive cleaning and shakings later, I had this...
I then did a "dry" shake with just the screws and bolts in it for quite a while. I was getting pretty sore at this point so I rigged up a contraption using a vibrating foot massager to vibrate each side of the tank for a few hours with the screws in it lol. Unfortunately, I didn't get a photo of this.
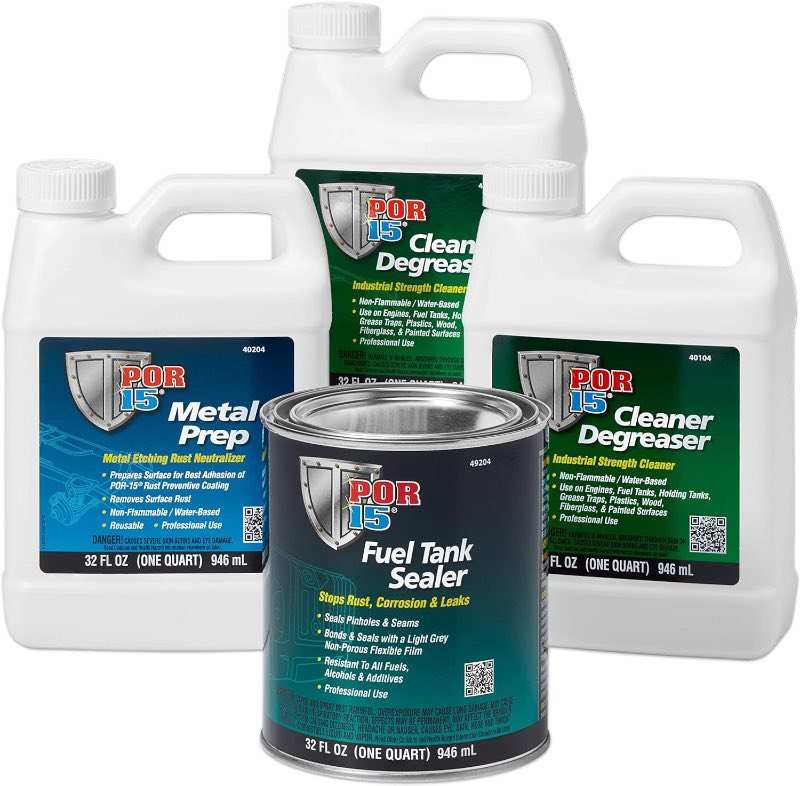
At this point I began the POR15 3 part treatment. First is 2 rounds of cleaning with their degreaser (I continued to use the screws and bolts inside of the tank to help with abrasion and knocking the crap loose). Followed with 4 rinsing sessions with super hot water. This is what I ended up with.
The last step before coating was the metal prep. This acts as the rust remover and etcher. After this step it is said to get tank BONE DRY, coating WILL NOT adhere if there is any moisture at all.. After getting the tank, it will flash rust, this is normal and the liner is said to adhere normally to flash rust. I dried the tank by running a high powered heat gun through it for about 4 hours. I only burnt myself twice 😀
Here is the tank after metal prep and prior to coating (the final step).
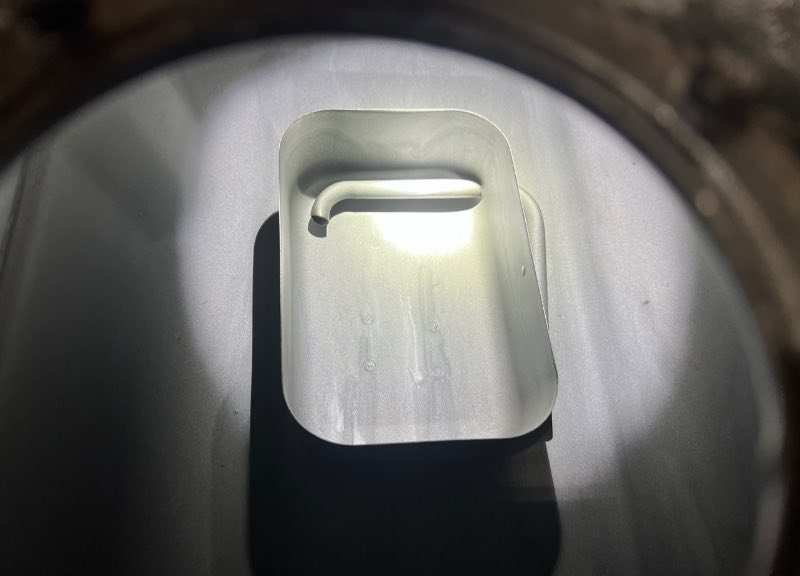
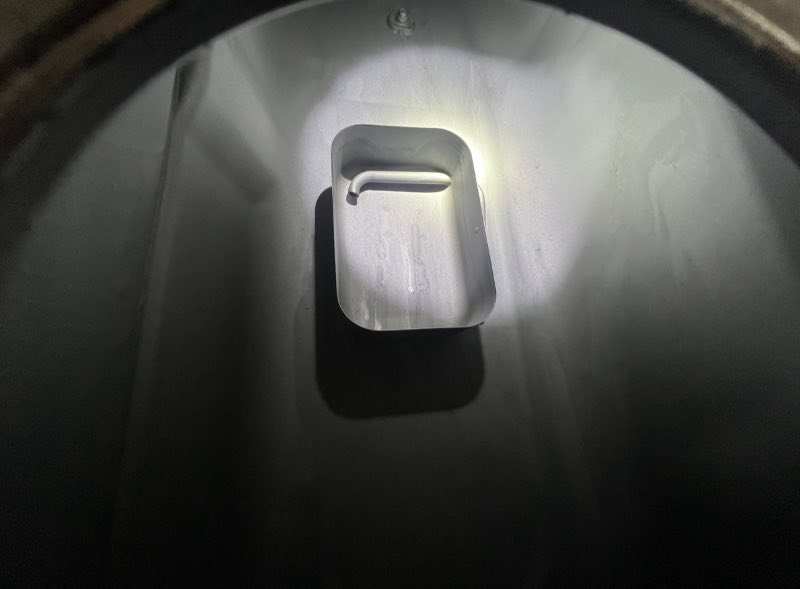
And finally, after coating and drying for a day. I made sure to blow some low pressure, dry air through the vent holes to make sure nothing got plugged with sealer. It will dry for at least 4 days before any gasoline is introduced to the tank. Overall I am happy with how it came out, the coating looks nice and looks like it will do its job. Now I just need to come up with a chunk of cash for a fuel pump, fuel filter, pump hanger, and sending unit. We ran all new fuel lines from the tank to the fuel rail just to make sure there was no chance of rust/junk getting into the injectors again.
VS
-
-
1 hour ago, Toycollector47 said:
Wow…. Looks like the inside of my 87 4Runners tank after 20 years sitting without a fuel cap!
It’s pretty skanky! I assume 33 years of build up considering it’s a 1990. I’m 33 as well and hoping i’m a little cleaner on the inside 😆
-
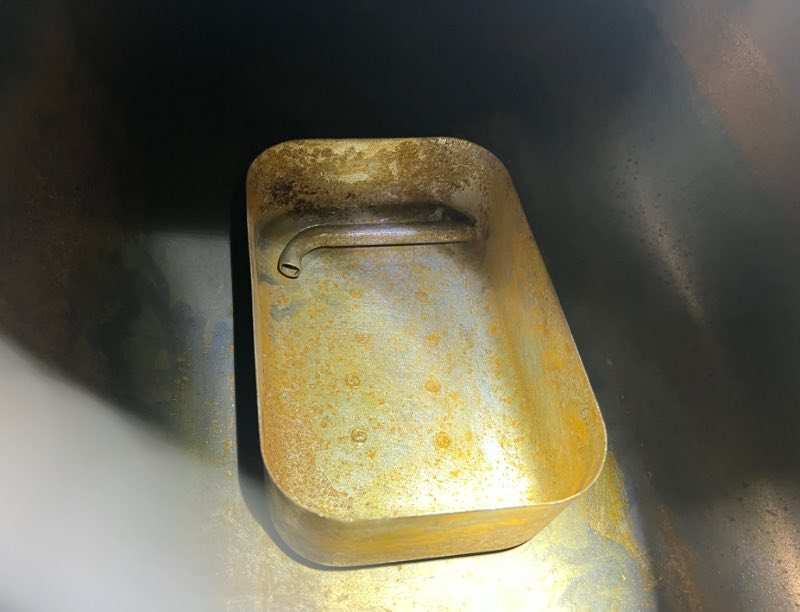
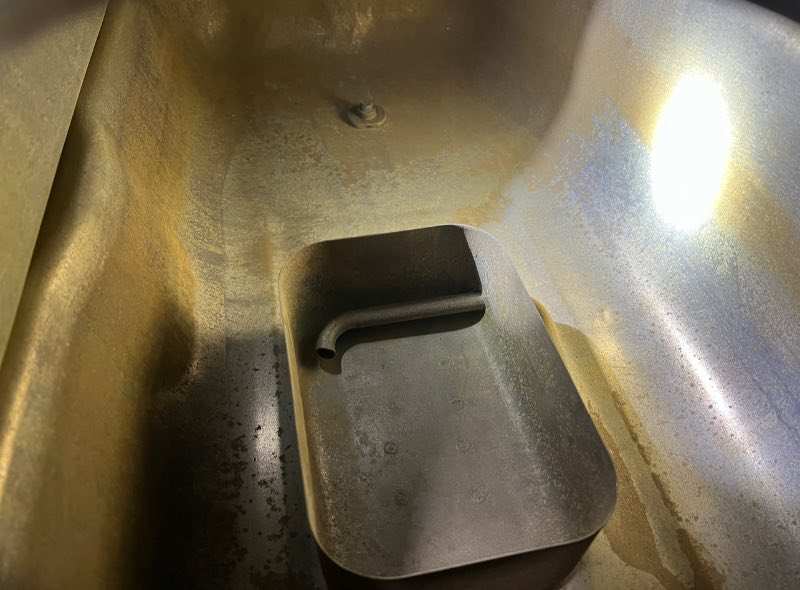
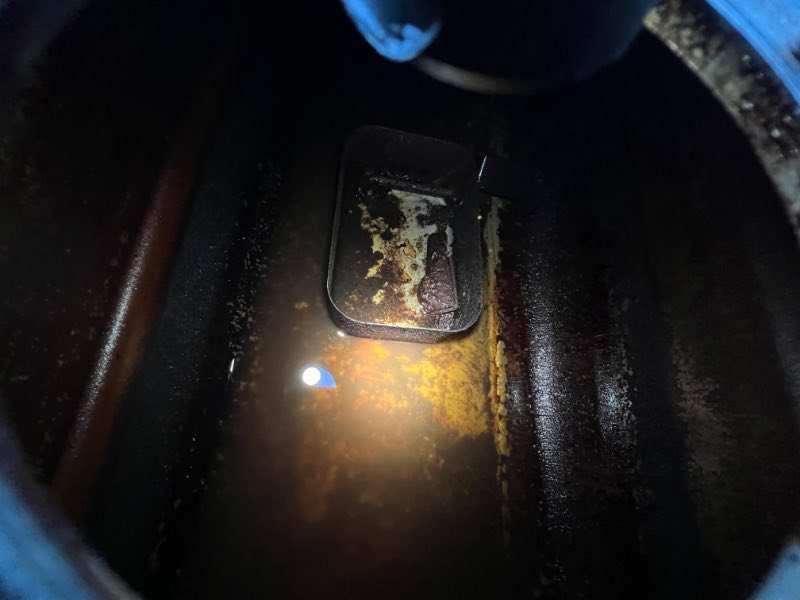
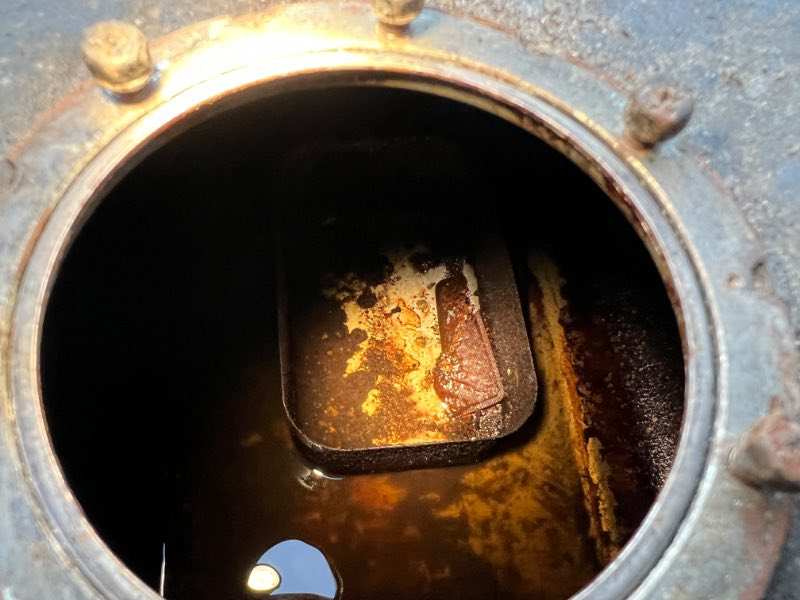
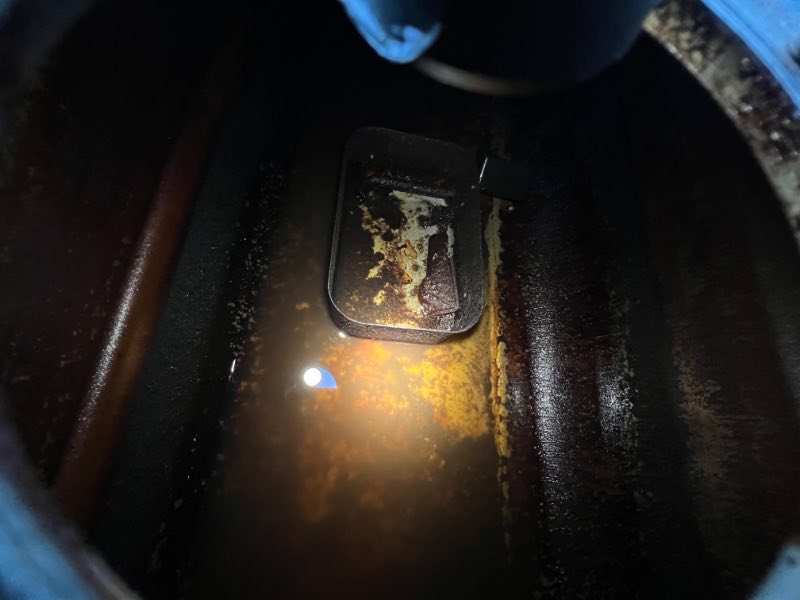
I’ve got the injectors installed back in, ALL fuel lines (from tank all the way to fuel rails) are being cleaned or replaced depending on condition. I am going to por15 clean and seal the tank, it’s in good condition, just super nasty inside. The majority of the trash inside of it is just build up and minimal rust.
Here’s some pics of the tank inside that I snapped earlier.
Keeping thread updated for anyone interested
Here’s a pic of the fuel filter that we cut in half to see how it looked inside…
You can see the remnants of the fuel pump screen that appears to have disintegrated.
-
23 minutes ago, WME said:
Spectra TO7D 1990 Toyota V-6, 19 gal.
I saw that one as well and it appears to be a similar low quality as the dorman according to some reviews.
-
22 minutes ago, linda s said:
Stupid expensive. I'd offer way less. On the other hand the nissan tank is brand new. Too wet here for me to get exact measurements.
Linda S
At this point I think I am going to attempt to reseal the factory tank with the POR15 treatment. If prepped properly and done right, it’s a good product. I’d love to get another (new) tank in but it would take a lot of fabrication work that I’d hate to have to mess with (routed fuel lines, tank mounts, aux tank transfer pump, etc).
My tank isn’t in bad condition at all. Just your expected typical build up from years of fuel and then the surface rust, nothing crazy.
-
4 hours ago, linda s said:
Or maybe used? This one looks like it would clean up nicely. Same tank as yours and not far from you
Linda S
I just called out of curiously, $325 for a used tank! That seems steep. The nissan tank is another interesting option.
-
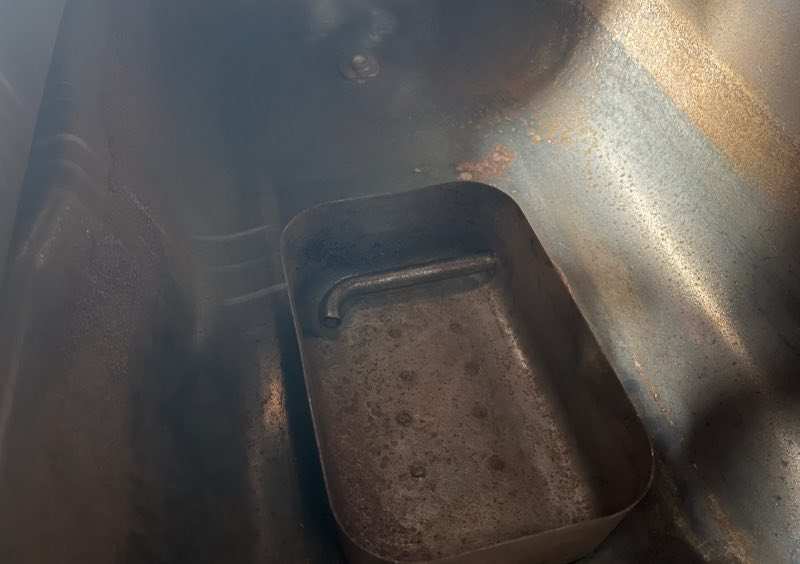
We will be crawling back under it tomorrow with a tape measure and seeing what we could make work. Keep in mind I also have a 15 gallon auxiliary tank we installed when we built the camper! This thing chugs some serious fuel down so I'd like to be able to have as much fuel as possible when I hit the long routes without gas stops (Alaska, rural states, etc). This photo gives you a good view of what's going on with the fuel system. With some modification it looks like we could probably make a bigger aftermarket tank work in place of where the Toyota factory tank is currently at.
-
Linda, It appears to be the 19 gallon factory Toyota tank and was apparently relocated by the RV builder.
-
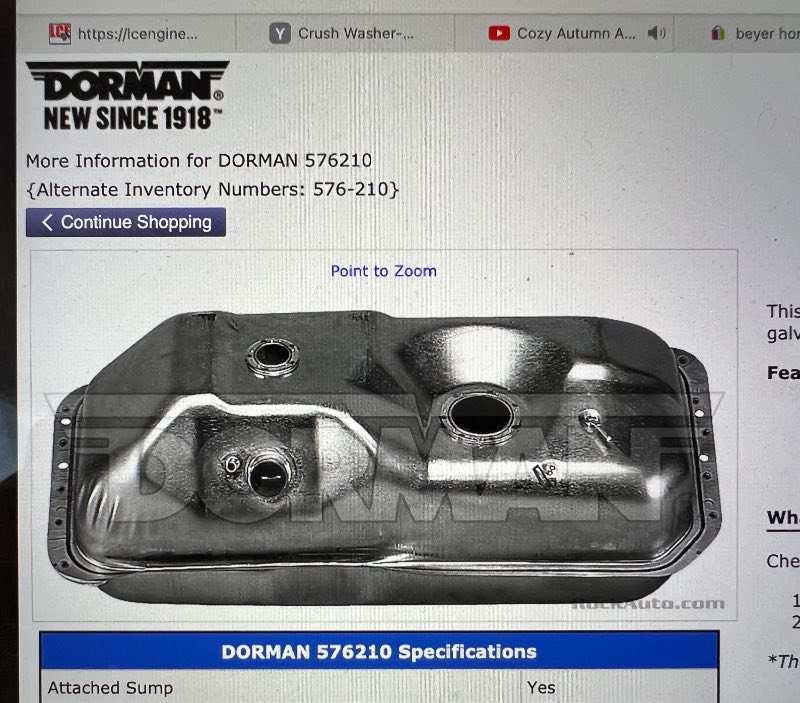
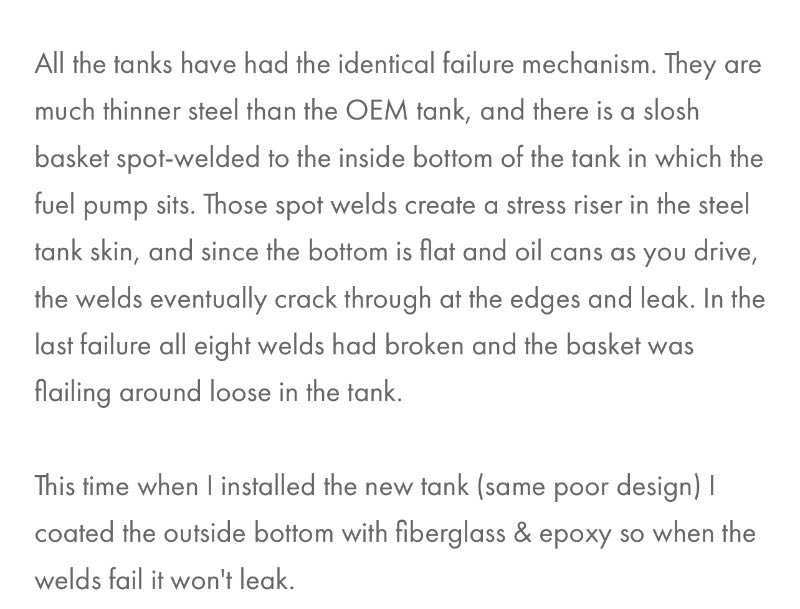
I'm still a bit unsure what route I'm gonna take at this point. I have found several online reviews for the Dorman tanks stating poor quality and prone to failure to due to thin metal and poor construction. My tank is not in poor condition but does have slight rust inside from this happening. This specific review on advance autos website pretty much explains it all, and oddly enough, they mention it's on a Toyota RV. I went to a Toyota dealership yesterday and obviously these tanks have been discontinued a while ago by Toyota, and when they had them they were over $1000.
So my options are to...
-Risk it and get a Dorman tank, and reinforce the dorman tank before install like the person above said they did and hope for the best.
-Restore my current tank with an interior rust removal process and relining it, doable but a pain in the butt.
-Find another tank at a junkyard, the chances of finding a 19 gallon 4x4 tank for my year sitting at a yard seem pretty slim.
-Order a used tank on ebay which would be expensive and expensive shipping.
-Install a completely aftermarket tank and have to fabricate a new mounting system in the truck, this would be a nice way to gain a few gallons in fuel capacity but comes with the work of fabricating the mounts.
I'll keep the thread updated on what route I choose, and I'm open to input from anyone and would still love to hear if anyone has any experience on replacement tanks used in the past. I see a few threads on this site but would love any info I could get.
-
7 minutes ago, extech said:
wow. where are you getting your gas? lots of water in there. keeping the tank full will help reduce rusting
Well, we restored the tank and it was good and clean a few years ago while we built the “house” portion. I suppose it sitting with very little fuel in it for that time did the damage.
-
Hey all, if you saw one of my previous posts, you know I had some super clogged dirty injectors. Well, I installed all new injectors and one didn’t seat correctly (my fault), and was leaking after a test drive. I pulled it back apart and looked at all the injectors and sure enough, one was already pretty gunked up again. Long explanation short, I traced rust throughout the entire fuel system and ended up dropping the tank.
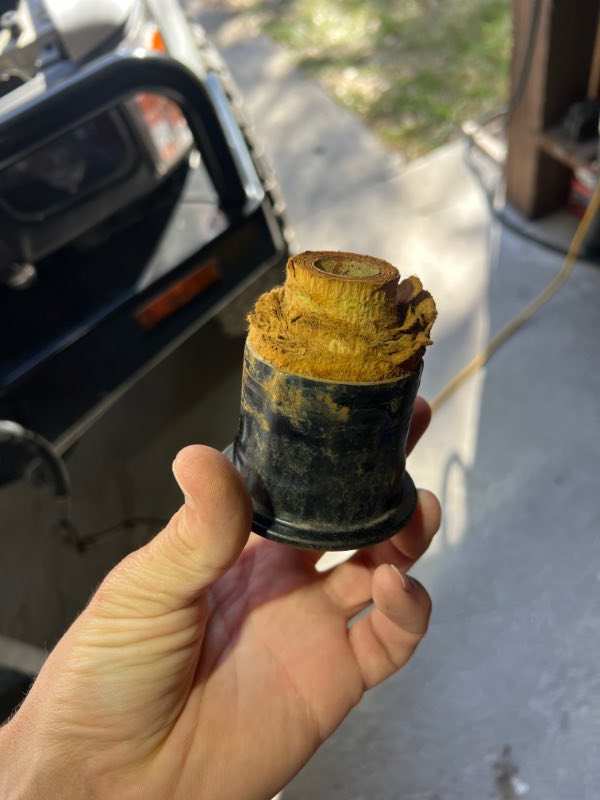
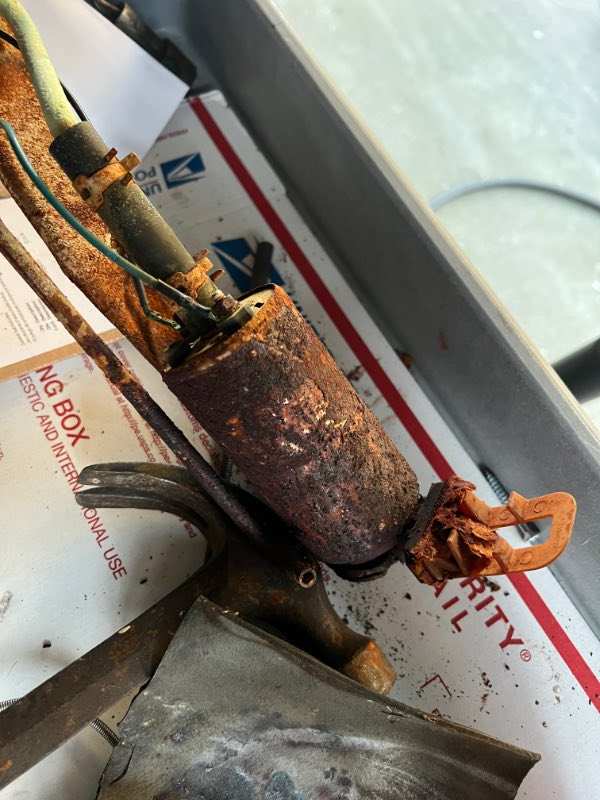
It was a rusty mess inside. This was a tank we dropped and cleaned, also putting in a new fuel pump, during the rv build. Well here is the pump now, with less than a few thousand miles on it.
The sock is completely gone, and rust everywhere. I’m not sure if I got sold a fake pump (ordered oem), or what happened, but here I am. The inside of the tank is pretty nasty too.
I see a Dorman replacement tank for about $160, (part number 576210). Has anyone used these? Any idea of the quality of them? I’ve heard some horror stories on replacement tanks. I’ll obviously be replacing the pump and mount as well.
Thanks for any help!


Ceiling Panels
in General Discussion
Posted
Stay away from plywood, too heavy. You can use lauan board and put an frp panel over that.