MontanaChinook
-
Posts
1,838 -
Joined
-
Last visited
Content Type
Events
Profiles
Forums
Gallery
Everything posted by MontanaChinook
-
Ok, thank you. I will ignore the wires going through the floor and run my own grounds. I'll also post my photos of the converter and wiring diagram next time I run to my house.
-
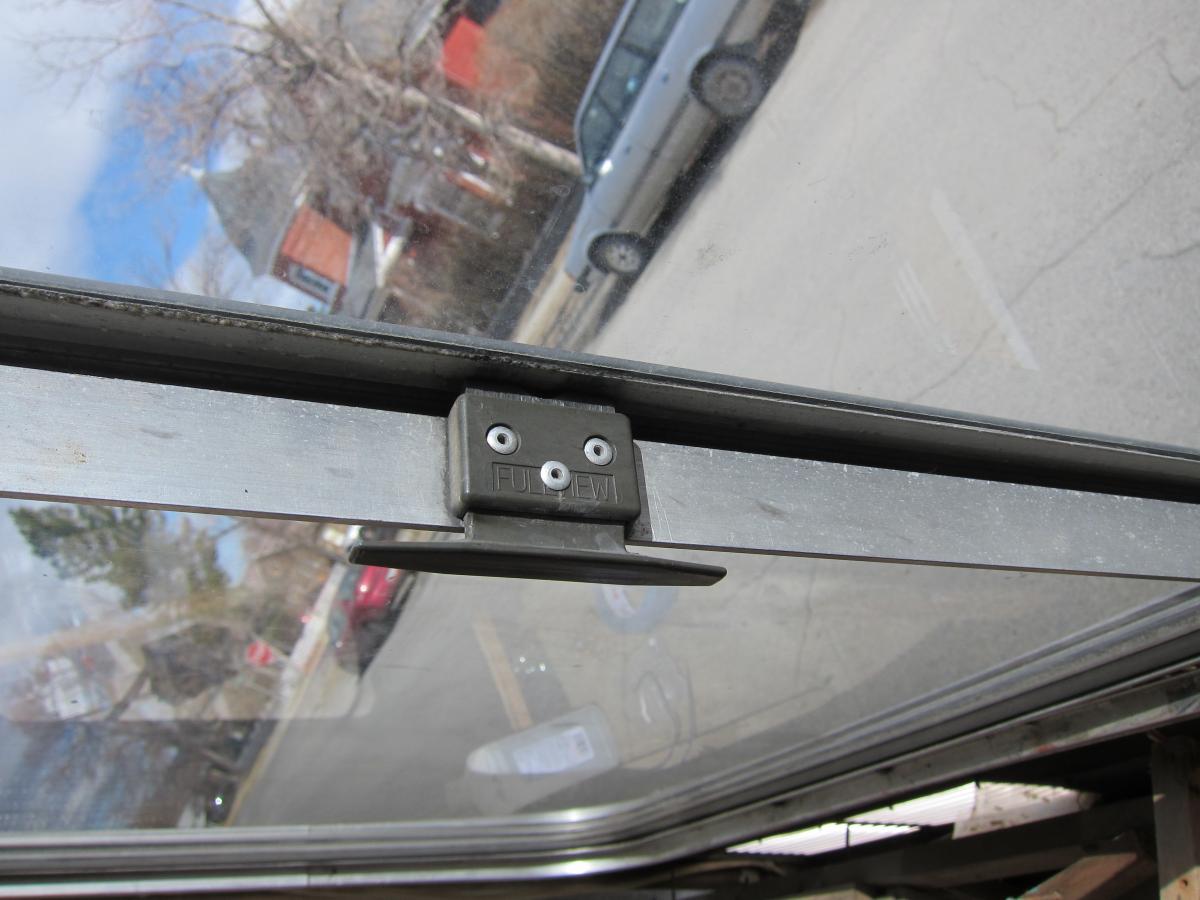
There's only a way for me to know if anything on this isnt original if there's evidence of it being changed out, or if they did a crappy Job. Otherwise I have no way of knowing. There aren't a lot of these around...I'm just assuming its original, especially with the rivets. This is a 78 Newport model. Yes, plastic. The other one is missing the piece that actually holds the window closed.
-
I have a couple questions, hopefully not a ton of dumb ones. I'm starting to more or less replace the wires in my Chinook, and at least all the connectors. So I have some very basic questions, just so I know I'm on the right track. If, behind my converter, wires are going down through the floor of the camper, should I assume those wires are going to a ground? I'm guessing I should probably check the connection of those grounds to make sure they're good, but is that an ok assumption? Wires going down into the floor instead of into the converter are grounds? When I wire things like the lights into the converter, in the most basic sense, I am connecting the positive wire to a wire coming out of the back of the converter (and adding a fuse to that place in the converter), and tying the negative into a ground, right? But I know I can share wires into a fuse in the converter, each electronic doesn't need its own location/fuse in the converter. ? Second issue is my new furnace. I could just wire it the same as it was...but it's done a little screwy. This is why I need to make sure I know where the ground is. They spliced a lot of wires and shared a lot of + and - , which I'm sure makes sense, but it's confusing me since it's not as straightforward as it could be. I want to know, before I reconnect things, that I know why they are the way they are. It's got a positive and negative, plus the two thermostat wires. No big deal. But it says in the instructions that if the furnace is going to be wired into a converter, that "the converter must be wired in parallel to the battery". What does this mean? I have a more specific question...the way the old stuff was wired, the positive wire coming off the furnace connects to two wires. One going down through the floor, the other going into the converter. Then the negative wire also goes into a ground, but is also spliced with a wire going to the lights. I would guess the lights just tie into the same ground as the furnace, so that's fine and makes sense that those three wires would be spliced together. But why is the positive wire also spliced into what I would assume is a ground, since it's going down through the floor? Sorry if that's a lot to visualize...
-
One is broken, the other might as well be replaced. I can't find my exact latch. This is the closest to it I can find. http://www.all-rite.com/kinro-window-latch-p-412.html I'm sure I could make it work. But even working right, it's not very secure. Any know of an upgrade, or what would be involved in upgrading?

-
The previous owner sealed the vent shut, since he was sick of it leaking. I'd like to get it working again, and figure I should just replace it. It would be nice to buy one with a powered fan. The problem is that they all seem to be 14"x14". I measured my cutout, and its more like 16"x24". Derek pointed out vents that would fit that opening, but they don't have a powered fan. Am I just asking for endless leaks if I put in a 14x14 vent, and make something to cover the few inch gap? Or is there a pretty good way to make that work? Otherwise I'll just go with a non-fan vent that actually fits.
-
This is a huge pet peeve of mine. I have two yip dogs and one barking lab (same house) behind my house and four German shepards with one bulldog to the front of my house. All of them think its their job to bark. Literally. Dogs all need jobs. These people didn't ever train their dogs not to bark, dont do much with them except live with them, and the dogs have taken it on themselves to decide that running around the yard barking at anyone they can see is their JOB. The ones who live behind me come out the back door barking, when let out. Then they start looking for something to actually bark AT. They truly believe its their job to alert the neighborhood that they're out in the yard and you better watch out. I cannot step outside into my backyard or front yard without being barked at. Needless to say I don't have a great relationship with my neighbors. I have a dog, and I don't have any illusions that when I'm not home and he's out in the yard, he barks at people who walk by. But any time I catch him, l let him know he is NOT a guard dog. I don't tolerate barking in my dogs.
-
 Yeah theoretically. You'd be better off pushing it as far up the hill as you could and pop starting it. Even if it was only a couple feet that you could push it. Or...putting the back up on the jack, and trying to spin the wheels?? Still a little dangerous...
 -
I'm sure it's been done. There's a guy right now working on putting a Chinook on his T-100. Pretty much anything is possible if you have either the skills or money.
-
I've got 5 of them sitting on my porch right now, waiting for a good time to get them mounted. I'll be interest to see how they handle. Mine were $87 or $89 each, plus shipping.
-
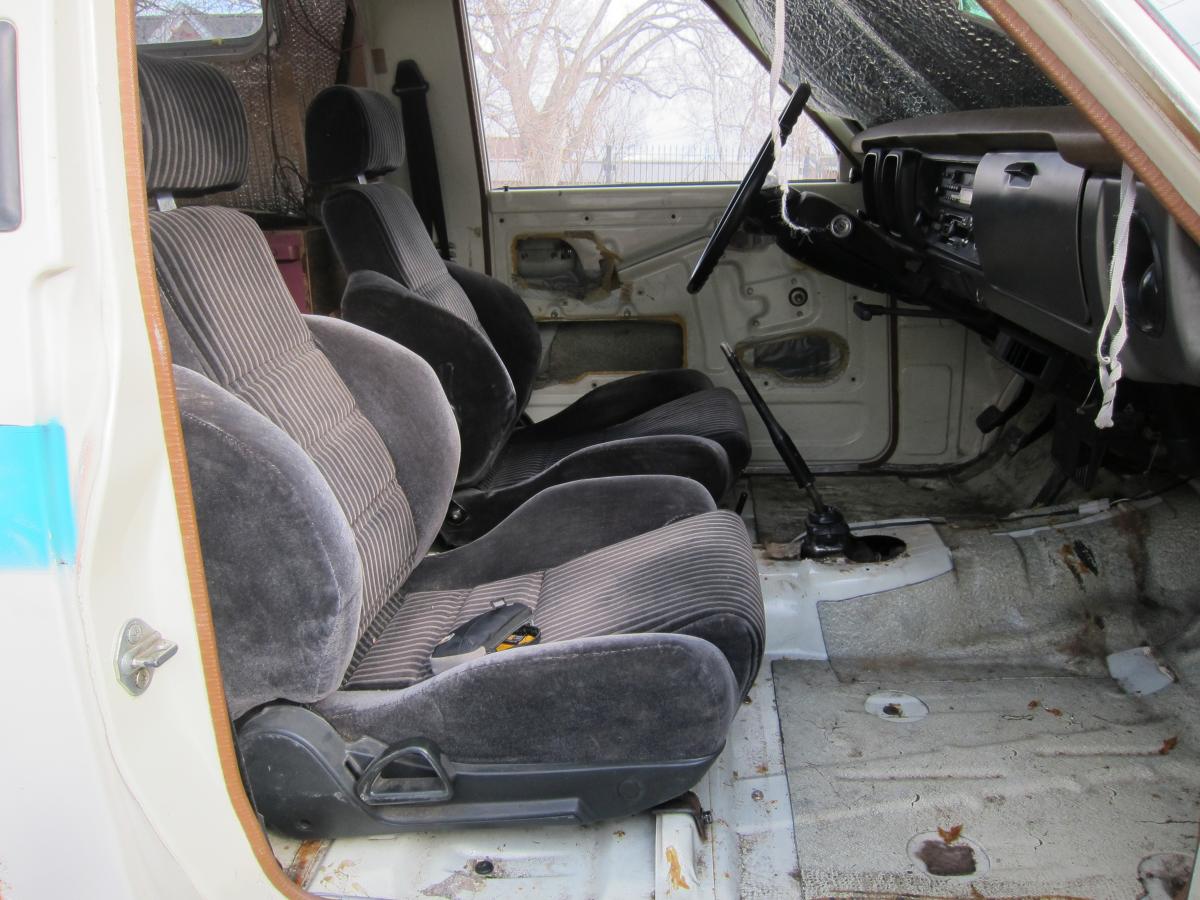
No...in fact I might even be lying. I went to a guys house in Missoula who had a little mini-junkyard going in his backyard. Mostly 90s Hondas and Acuras. I was looking for Acura seats, since I figured they'd be a little nicer than straight up Honda. But I know I went back & forth between a couple cars, and the ones in the Honda may have actually turned out to be the nicer ones. I don't quite remember any more, but I like saying Acura since it's fancier than Honda. And they're essentially the same thing. I think that conventional wisdom is that early 90s Acura and Honda seats fit well with minimal modifications, and are a huge upgrade for 70's-90's Toyota pickups. My guess would be that any seats from whatever style cars Honda/Acura was making around the late 80's and early 90's would be more or less the same, especially as far as size and how the tracks/mounts work. Everyone else I've seen so far, though, has either welded something to make them fit, or drilled new holes in the cab, or made some sort of bracket to get them to fit. I was very excited when I realized that my idea of just swapping the tracks over from the old seats to the new would work, and work so well.
-
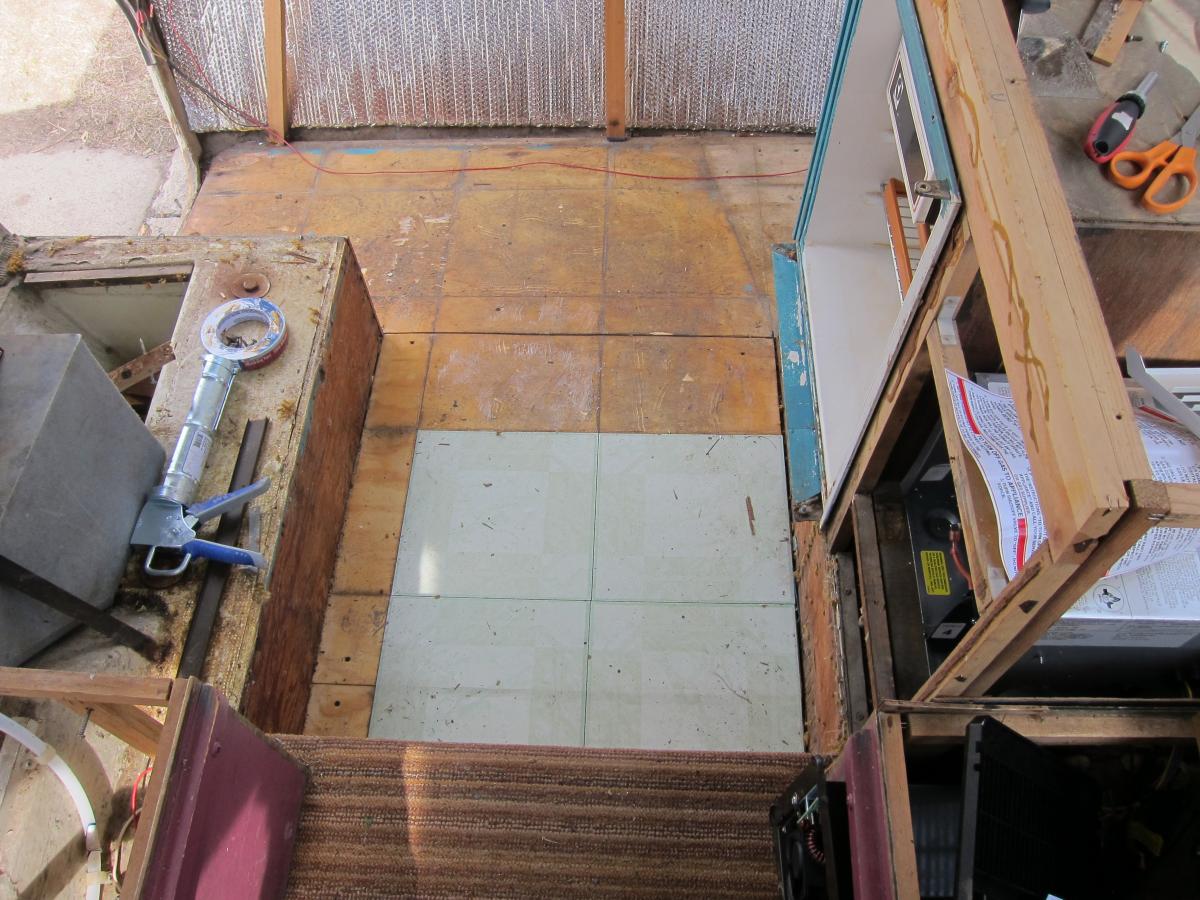
I taped the seams of the foil, pulled up almost all the tiles from the old floor, and this...this makes me very happy. The old seat was uncomfortable. Not uncomfortable after a long drive, an hour or so, or even a half hour. Just immediately uncomfortable when I sat down. Things poking me in the lumbar, padding worn out etc. It was really nice...since I don't weld, or really have a lot of fabrication skills, I brainstormed quite a bit on how to get around welding new tracks, or of course, doing a cheap hack job of it. All I had to do was drill 4 holes in my old seat tracks, one for each of the four tracks, so I could bolt my existing tracks onto the new seats, and just bolt the tracks into the existing holes in the floor. They feel solid, and slide smoothly. Pretty nice!
-
That's great! I'll be interested to see how you mount them. I brainstormed for a while on how to get some Acura seats into my Chinook...since I don't weld and I'm not much of a fabricator, yet. What I just found out today will work is taking the mounts off the old seats and putting them on the new seats. The seats are close enough in width that the bolt holes line up width-wise. And since I'm using the tracks/mounts from my old seats, I know they're the right length front to back. The only thing I had to do was drill new holes for the back of each track, where they bolt into the seat. So 4 holes drilled, and no modification to my cab or floorboards, and I've got some nice 90s Acura seats in the Chinook. When I get it all finished I'll post with photos in my project thread.
-
Dometic LP/Electric refrigerator repairs
MontanaChinook replied to zero's topic in Coach ApplianceTech Issues
I think he said six-fifty for the fridge. $650. I'm sure it's different when you hit retirement age, but at my age, the thought of sticking with a job that seems Iike a waste of my time, and I'm bored at, just so that if I live long enough to make retirement worth it ill have a comfortable retirement...doesn't seem worth it. Obviously I'm planning for the future, but I'm not going to put all of my life towards a time that I might not see...or might not get to enjoy much of, or might be too messed up from health issues to enjoy.... So while trying not to shoot my retirement self in the foot, I'm doing my best to live life now. If something doesn't seem worth my time, it's probably not. -
Drain valve for water storage???
MontanaChinook replied to hawk's topic in Coach ApplianceTech Issues
Yeah. Where have you looked? Obviously check outside, down low, on the same side your water tank is on, in the general area of where your water tank is sitting. -
Our first trip of the year YAHOO!!!!!!!!!!!
MontanaChinook replied to siouxindian's topic in General Discussion
None for me! It's just a matter of putting the Chinook back together. -
Our first trip of the year YAHOO!!!!!!!!!!!
MontanaChinook replied to siouxindian's topic in General Discussion
That's exciting! Have fun. Will be another couple months, for me... -
Interesting... That would probably get those last screws out of the side windows, and all the screws that won't come out of the cab-over windows, which are the ones that are really bothering me, since I can't get enough of them out to even loosen up the frame and get the pleather material and foam out from behind them. Thanks.
-
Tools I don't have...but we'll see. I don't disagree that your way is more the "right" way. Either way..my windows aren't coming out at this stage of the project. Going to be rainy season soon, still the possibility of snow, the Chinook won't fit in my garage, and I want to be using it by the time the weather will be nice enough to take the windows out.
-
Yes mine are that way, too. But if, for example, I cut the panelling in a U shape to fit around the window, problem fixed. Depending on what type of panelling I use and how i lay it out, you wouldn't even be able to see the seam. But I won't disagree that getting the frames out would be the best way to do it, and its best to not have seams. If the seam was on the top, the cabinets that run along the ceiling would cover the seam. If I put it along the bottom, the bench cushions, sink and stove cabinets would cover it. Plus, since there are only a couple screws on the side windows that wouldn't come out, the frames are dangling there pretty loosely. I actually think I could get them around a one-piece panel.
-
Either ours are different, or our definition of decent is different. The walls came out fine, I don't really see why they won't go back in ok.
-
Yes, you're doing it right! I got the interior frames off as much as I could, then just pulled the walls out. They'll go back in the same way. Would have been easier to do it with the windows out, and it would be nice having all freshly sealed windows...but it didn't happen for me. I'll get the panelling in hopefully more or less how it came out. Just work it in behind the frame, since I've got it pretty loose. It's not going to be perfect, but it won't exactly be a joke, anyways, and it will look a lot better than it did when I bought it. Well, I'll see about the windows.
-
Ok. I also think that the early Chinooks did some things "different", and my Newport model is a little more in line with a typical motorhome. I might be missing something, but those photos I saw of JDs don't look like my windows or gaskets. I think he might have something different going on. If I can do it with the windows in place, I'll be doing it. I don't want to remove the windows...now would be the time, since the thing is still gutted right now, but the windows have actually been my biggest problem area. All the screws are corroded, but especially the ones along the inside bottom of the window frames. The only inner frame I've actually been able to get fully off is the rear window frame. There are one or two screws I cannot get out from the side window frames, and I can't get more than a few screws out of each of the front cab-over window frames. So not having to take the windows out would be really nice... But it looks like I'll be doing this as a summer project. Wait till it's warm. For now, I'll worry about getting it back together and usable. There are endless things I could and will do to this thing...but I'm trying to focus my money and time on things that will get it usable, things that really should be done while it's all torn apart, and stuff like that. Outside window gaskets, if they can be done with the windows in place, can wait until it's all put back together and it's summer. Thanks!
-
Wow. I wonder if I could just do the Chinook wall paneling with that stuff... I haven't done any pricing yet for materials so I don't really know what's expensive and what's cheap. That stuff looks like it would be expensive...but I don't need much. Looks like a 4x8' panel is $99. I'd probably only need two...
-
Toyota Chinook weep-holes for side windows
MontanaChinook replied to zero's topic in General Discussion
Great! I'll be ordering some soon. Even the weep holes that are still on my Chinook crumble if I touch them. -
Shopping for Toyota/ 6-cylinder vs. 4-cylinder.
MontanaChinook replied to mikebrez's topic in General Discussion
I've been everywhere in 4 cylinder vehicles. It's not an issue of whether they'll make it up a mtn, they will if they're indecent shape. It's a matter of how angry you get when going slow. If 3rd gear at 45mph up a pass as people zip by you sounds like hell, then probably almost any toyota motorhome is not for you...but definitely not 4 cyl. If they have compression over the levels requiring a rebuild, and are tuned properly, there's nothing they won't climb.