


Back East Don
-
Posts
849 -
Joined
-
Last visited
Content Type
Events
Profiles
Forums
Gallery
Everything posted by Back East Don
-
From the album: 87 Itasca RV Remodel
With the cargo box on the tray. -
From the album: 87 Itasca RV Remodel
Welded a raw receiver tube I picked up at amazon for $6 and fitted the cargo tray from the Curt Cargo Carrier I took the platform off of. -
From the album: 87 Itasca RV Remodel
Welded the 4" tubing to the old bumper channel and laid the cover material over it to measure the cut off length. -
From the album: 87 Itasca RV Remodel
Cut 20" of the original bumper ends using a metal cutting blade on a skill saw. -
As an admitted coffee snob I found the best solution to RV coffee is either the Melitta manual pour over or if it is just my wife and I and I need just a couple of cups, I also travel with the Aero Press. Both require you boil water on the stove top but is quick and easy to clean up after. I'm not a fan of the percolator method but that is a taste and preference issue. I also find the two methods I use to be more efficient with regard to gas consumption. The Melitta can be found at some stores (I've seen it in grocery and department stores) and direct at the Melitta web site. The Aero press can be had at Amazon.
-
From the album: 87 Itasca RV Remodel
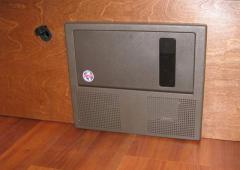
updated the electric. Still have a bunch of adds left to do. -
From the album: 87 Itasca RV Remodel
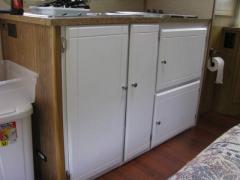
Ripped out the slide out bins and added shelving inside and painted the doors and front frame. -
From the album: 87 Itasca RV Remodel
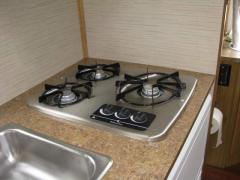
New stove and countertop. -

From the album: 87 Itasca RV Remodel
New walls and ceiling . The whole front was a mess. Ripped it all out and replaced the bed deck. -

From the album: 87 Itasca RV Remodel
Replaced the fridge with a smaller unit than what the previous owner shoe horned in. Left extra space for the toaster overn. Took the door out of the upper cabinet and added the microwave oven. -
From the album: 87 Itasca RV Remodel
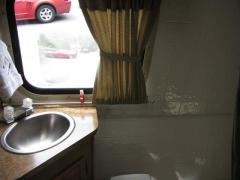
new sink, counter and wall -
From the album: 87 Itasca RV Remodel
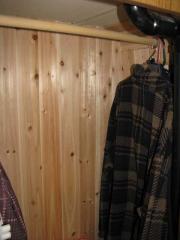
My favorite part. Cedar paneling is really light. Wife wasn't really fond of the look so only did the closet. -
From the album: 87 Itasca RV Remodel
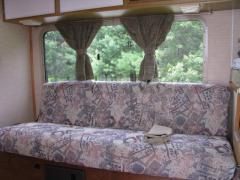
$20 Craigslist bargain. Needed to fabricate the base for storage and water tank. -
From the album: 87 Itasca RV Remodel
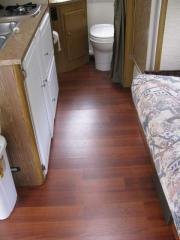
Ripped up the carpet and put luan underlayment and new flooring. Much cleaner looking. -
From the album: 87 Itasca RV Remodel
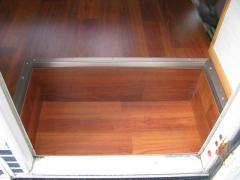
Used leftover flooring pieces and carpet edging to frame it. -
In reading the technical data on much of this, one thing I am realizing is that in order to adhere EDPM, I'll need to apply adhesive to both surfaces which seems like a pain. Given the added cost of the underlayment membrane listed and that it is not permeable, it seems to have limited benefit. I've contacted Best Materials and they recommended a different adhesive for metal but it is the same issue (has to be applied to both surfaces). So far what I am thinking for this is to use 1/8" luan which is available at a specialty lumber source near me. Having used it to re-do my ceilings and walls, it is very light. Likely lighter than the polymer underlayment. The advantage is that it is porous and then I can use the latex EPDM adhesives that can be wet applied. This is much more forgiving. I've done plenty of work over the years with contact cement and laminates. At least those were solid sheets. I envision this coming out more wrinkled than a bad pool liner, never mind the mess of gluing both the roof surface and EPDM. I know liquid nails will adhere the luan to metal. I can easily roto zip or even trim using a drywall saw or utility knife. I also figure it will be less expensive. I really appreciate you input Dave. It pooled a bunch of data in one place but reading the techical material is what leads me to believe that it is going to be more effort than I am looking for. In the end, I don't do this for a living and so it needs to be novice friendly. Being able to lay the material on wet adhesive will be more forgiving and much less effort. My 2 cents Don
-
 And here I was wondering if I would get any response. I figured well, the subject was tires. This has turned into a lively discussion. Linda was exactly correct. The issue has always been about balancing preservation and still letting people use the coastline. They will very quickly tell you that you don't have to drive your vehicle on the beach. It used to be a lot stricter as they also had a list of acceptable tires. If you want to play, you have to play by their rules. I very much want to play. I'm just happy as it seems I'll be able to. As to the pressure being that low, it has always been so. You lower the pressure when you arrive, drive really slow (no more than 5mph) for a limited distance and park. When you are ready to leave there is a air station to refil. I never had any trouble with the landcruiser. They issue 2000 permits a year to vehicles and everyone has the same issue. There used to be large 4x4 conversion RV on the sand. They limit the number of RV's to 200 a night and it is sometime difficult to get on because it is full. I've basically decided to just pull the trigger and go for it. Last weekend was our first outing with the RV. Sort of a dry run up to Maine to make sure all systems were working. Still have many small finish details left like hooking up the TV and inverter and some misc trim stuff. Thank you all for the help. At least I know the size won't be a hazard issue.
 -
Derek I started reading some of the tire posts this morning and there was some discussion as to the 195 rubbing up against each other. Hence the question. This morning I went out to pick up fan belts (had one squeeling on this trip) and while out I stopped by to get an estimate on the tires. $102 each is not bad but that is before tax and mounting. I took a look at the spacing of the rear tires and there seems to be plenty of space between the two. Keep in mind that in order to go out on the sand, tire pressure is reduced to 7 psi. This was also a question I posed to my tire guy. I used to do this with my landcruiser with no problem but those tires didn't go from 60 psi to 7. The load range diference is a factor but what is on there now is rated at 1710 same as these. So far very useful info. Waiting to find out how long it will take them to get them and then will have to make a decision. Don
-
I too am considering covering my roof later this summer and am very interested in the experience of others. That said, here is what I've come up with my little research into the subject. I have been looking at both standard EPDM and Alpha Ply. All the kits I've seen so far list latex based adhesives and are intended to be applied to a porous surface and not over a metal roof. In doing searches, I've found a couple of places that sell adhesive for application on metal. What I've resigned myself too is having to piece together my own "kit" from various sources. Interested in what other members have gone through. Don
-
I am looking to get a Self Contained Vehicle permit to be able to camp on the beach on the National Seashore on Cape Cod. I've got the vehicle set up and all the required safety gear and the last detail is tires. The minimum specification for 14 inch tire width is 195 in order to pass their inspection. Before I go out and spend a grand on 7 tires (Even the spare has to meet spec) figured I find out what the issues are. The Yokahama is listed as one of the few options available in a load range D that has a street tread which is important for riding on sand. (Tire Rack) I used to have a dune permit years ago with my Landcruiser but feel it would be totally worth spending a grand on tires to be able to camp right on the beach. Even if they wear somewhat prematurely. So what are the issues? Are the 195's that tight? Appreciate your input on this, Don
-
Hey John, are you looking for something specific or only generic rehab pictures. It is still very much a work in progress. Wasn't really thinking much about posting when I started this project, so I took no pictures of the demolition phase. Mainly what I was thinking throughout was that my wife was crazy for picking refurbing an old motorhome as a dream and and that I was likely to be dead before we ever got to hit the road with it. Took it out this holiday weekend and visited friends who have a seasonal campsite in Maine. The good news is everything worked and the effort with all the small details such as replacing all the screens paid off. As I get closer to finishing it, I'll dust off the camera and post some pictures. Don
-
I've not had a chance yet to post any questions or comments as I've been steadily working on the restoration of my 87 Itasca. This weekend marks the first day out with me and the wife in our new toy. I did however spend a great deal of time reading many posts new and old on this forum and the information was invaluable in the effort. So for that, many thanks to all that participate on this board. I really did get into a bit more than I bargained for and wish I had found this forum before purchase but once in, I rolled up the sleeves and dug in. This ended up being a complete strip down of the interior. Walls and ceiling were replaced with panels I fabricated with 1/8" 3 ply luan, along with new sub floor and composite flooring. A new Fridge, stove, sinks and toilet later along with an updated power center and considerable work on re-doing the electrical and plumbing. Re-laminated the cabinets along with gutting them and fabricating new shelves and storage cubbies. Tore out the dinette and replaced it with a folding couch and custom base for storage. Still have a bit more planned but it is more than functional and so far seems perfect for the two of us. So again, many thanks, Back East Don