waiter
-
Posts
2,282 -
Joined
-
Last visited
Content Type
Events
Profiles
Forums
Gallery
Everything posted by waiter
-
Try This one: http://rv.jaxed.com/cgi-bin/mash.cgi?fil=toyota&cat=rvs
-
One option might be; use a couple large body spacer washers when mounting them to offset them 1/8 inch. This would give enough room for the wires behind them. The just run a bead of RTV around them to fill the gap and seal them. I'll swing by Menards (Kind of like Lowes/Home Depot) tonight and see if they have anything that would work. <_<
-
Darn, I see what you mean!!!! How about a big"O"ring, or something like that. Something rubber about 1/4 in diameter would fit in that groove perfectly Think man Think This would also space it out enough so the wires won't be pinched and may also help seal it. Other than this little problem, these look very nice.
-
Hey, Mine came in the mail today also. I was planning on soldering the wires and putting a piece of heat shrink tubing on it. I'll look at them tonight when I get home. Thanks for the heads up on the wire colors, I'll double check with a meter before I solder them.
-
Generally, things that fix themselves always break themselves, at the worst possible time. see if you can reposition the thermocouple so its a little higher up and more in the flame.
-
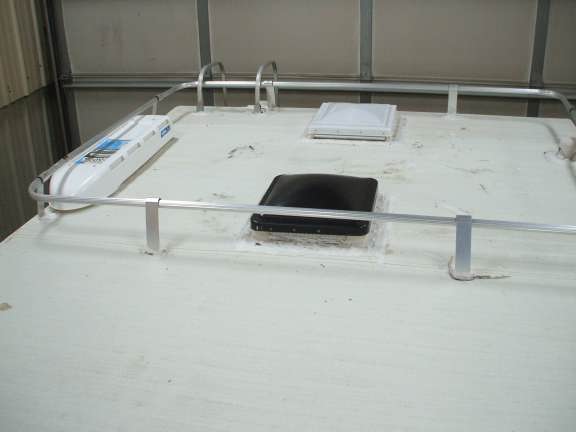
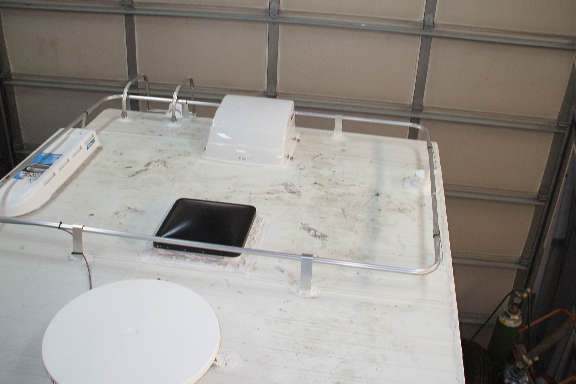
I installed one of the MaxxAir vent covers over the Bathroom vent. With the MaxxAir cover, the vent does not open all the way, it opens about 1/2 - 3/4 This isn't a big deal as the vent surface area is now limited to the MaxxAir opening. The Black vent is where the AirConditioner would be installed on my Dolphin. Its all wired up and even has a thermostat (it controls the powered vent) I would have rather installed the MaxxAir on my vent that has a blower (the black one in the photo), but this vent has a plastic frame. Probably would have been OK, But My intentional use for the MxxAir is when I'm traveling or just to leave a vent open long term when the ToyHouse is not in use. The MaxxAir are cheap enough, I may go ahead and put one on the black powered vent anyway.

-
I would say if the stove is OK, your propane system is probably OK. The Thermocouple needs to detect heat all the time or it closes the fuel valve (Safety Feature). If you light the pilot the thermocouple should be just barely touching the pilot flame. I'm not sure what your exact setup is, but if its posible for the pilot flame to be blown a little and moved away from the Thermocouple, this could cause it. You might want to make sure the thermocouple is sitting nicely in the pilot flame. What model furnace do you have?
-
Turn on one of the burners of the stove and monitor it to see if it also blows out or changes color. This should give you an idea if its bad Propane or a frozen Regulator. If this is OK and its going out when the burner is lit. Does that furnace have a Pilot Light?? (I assume it does as you've mentioned it a couple times) You say "Cuts Out", doe the Pilot light cut out also? Possible Thermocouple bad or not aligned in the flame correctly.
-

Tired of trolling so i joined. Hello folks
waiter replied to hippinikster's topic in General Discussion
Put me on the list for the Mid West ToyIn. Where at in Indiana?, Angola? Early Oct is bad for me as I work for a large cannery and we're in the middle of fall harvest. BUT, would try and make it if its close by (Angola is a little over an hour west of here) -
Derek; Richard said he has an 88, it should be EFI. Cold start on the Carb should be as you mentioned, Slowly all the way to the floor, then may 1 to 5 full presses to the floor (depending how cold) to squirt fuel in the manifold. Warm / should be one press to the floor, then crank. (Been a Long Time since I started a Carb - Last one was an 82 El Camino)
-
Big difference on starting procedures between EFI and Carb. On EFI, You should not touch the gas pedal. (On many EFI, Holding the gas pedal to the floor shuts off fuel in a "Clear Flooded" mode) Is this Electronic Fuel Injected or Carb?? ( I ask that because I have an 88 and its EFI) If its EFI, try this, Turn the key ON for about 5 seconds, but do not attempt to start, turn the key off for 2 seconds. Do this about three times. T The fourth time, go ahead and try and start. Let me know what happens and I'll need to look in the book and see where the check valve is located. (normally its part of the Fuel pump) Here's whats happening ***** The Check Valve is there to keep the fuel system pressurized after you shut the engine down. (It can hold pressure for weeks) If the check valve is sticking open, what happens is, when you shut the engine off, fuel in the lines will drain back to the tank, What aggravates the problem, With a hot engine, as the pressure in the fuel line drops, its boiling point goes down and fuel in the line can boil and push all the fuel in the line back into the tank. When you attempt to start the engine the next time, the pump only runs for X seconds. The short period of time the pump runs isn't long enough to get fuel up to the Injectors, and under to correct pressure. NOTE - If this is the problem, the other item that can cause this is a stuck or leaky injector. If an injector is leaky, it will bleed off the fuel system pressure and the symptoms will be the similiar. A leaky injector won't drain the fuel line, but usually just causes pressure bleed down. May need only one reattempt. I need to verify this, but when you turn the key on and don't attempt a start, you should hear the fuel pump run for a couple seconds, then quit. (Most vehicles run the pump for a couple seconds to build up pressure, However, there are a few (my 97 Camry) that don't run the pump until you actually attempt to start.) The pump will keep running =only after oil pressure is built up and it sees a tach signal that indicates the engine is running
-
I need at least 10 more gallons for my Alaska trip. I may simply carry two 5 gallon containers. But here are some options: I was looking around on the Internet last night. Came up with some ideas: 15 Gal - This one might fit where the spare tire used to be, maybe like GP's setup. (This company has a Lot of gas tanks and accessories) http://alturl.com/cgsz7 Or this one: http://alturl.com/jn7v8 12 Gal, This one might fit in the Generator compartment and can be purchased through Walmart's Web site for $59. http://alturl.com/5v72k Another potential: http://www.justgastanks.com
-
I just ordered them from Super Bright LEDs. 7 Reds and 5 Ambers, $5 each Also got a License plate light ($10) Not sure how I want to do the brake/tail lights yet I'll keep you posted when I get them installed.
-
Yah, Thats what I'm thinking, Keep it as simple as possible.
-
Thinking about painting inside paneling...
waiter replied to Dolphin Lungren's topic in General Discussion
Sounds like what I and others have done. Take a look at this topic. http://toyotamotorhome.org/forums/index.php?showtopic=3458 I wasn't overly concerned about getting all the original wallpaper off, Just get the loose stuff off. ALSO - in the "If I had it to do over again" catagory, I would probably blue tape the little vinyl trim stuff instaed of cutting it off and using RTV to do the trim. The RTV trim solution looks just as good, but its a little more work. -
I've been watching this thread. That tank seems extremely complicated. (looking at the drawings) Would a simpler 10-15 more gallons, be more cost effective. I'll climb under mine tomorrow and see if there's a place to attach a small tank, and just plumb it into the existing tank with a low point and a high point vent.
-
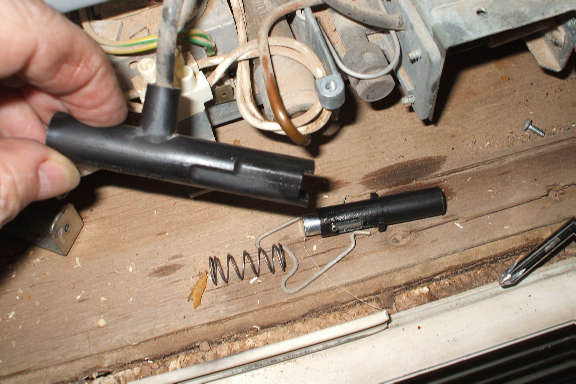
The Frig worked, but I had to light it outside with one of those long fireplace starters. The Piezoelectric igniter wouldn't work. It would push in but wouldn't give that distinctive CLICK and the corresponding spark. My plan was to replace the igniter, but I wanted to take it out first so I could make sure I got the right part. As it happens, I was able to remove it, take it apart, clean it up so it wasn't sticking, put it back together and it works great. Getting to it is a bear, but it can be done; 1) Take the covers off and remove the bottom screw that holds the tubes to the back of the frig. Also remove the propane line. You can see the Igniter, Its that black thing in the center of the photo. 2) I pulled the tubes away from the frig so I could get my fingers and needle nose pliers in there to pull the retaining clip. You can see I jammed a screwdriver handle between the frig and the tubes to hold them out. 3) Very nice closeup of the igniter and the retaining clip. Pull the clip with a pair of needle nose. 4) Take the igniter out of its bracket (one screw on the back. Carefully, Parts and springs will fly everywhere. 5) I completely disassembled it It was caked with dirt and sand and would jam and not CLICK, I cleaned all the parts with WD40 and wiped them dry with paper towels. 6) I reassembled and it worked great. Good spark and good CLICK. I took the control panel apart and cleaned it also, I removed the knobs and buttons, cleaned and wiped dry with WD40. BIG BONUS - I was trying to figure out how the little periscope thing worked, well guess what. With the front panel screws out, I could get the periscope thing out and clean it. (No need to take the door off, the front panel will flex enough to get the periscope in and out. 7) Its a long plastic piece that needs to be clean in the ends. When I put everything back together, I was able to start the frig and I could see the flame in the periscope pretty good.
-
From the photos, the lenses look like they snap on after you mount the base. Did you put any RTV or anything to seal the lens to the base?
-
Side Seal and door clips
waiter replied to waiter's topic in Improvement and Do-It-Yourself Projects you have done to Share!
I like the clips for two reasons; 1) I don't need to hold the door open with my head and 2) We have a rule in Aircraft that can easily apply to RV door. If you open the canopy, you open it all the way. You NEVER, NEVER, NEVER close a canopy without locking it. This rule has significantly reduced the "Canopy Opened on Takeoff accidents" How this relates to the Toy House: If I open the Propane door, I open it all the way and use the catch to hold it open. When I close the propane door, I always latch it. -
I was looking at these: goto: http://www.superbrightleds.com type "M9" in their search box and then click on "M9 Series Marker Lamp" They are $5.00 each. They don't appear to be a sealed unit, but this may not be a big deal.
-
Dayoff; Take a look under your hood and see if its the same servo. If I can't get this to work, I'll install one of the Rostra units. They run about $230. I'm pretty sure I can get it to work by making the adjustments. Also. If I can't come up with a diagram for the unit, I'll try installing a relay that's energized by the brake switch, and then take the cruise disconnect off the brake switch and put it on the relay contacts, That should completely isolate the cruise from the light circuit. I believe the turn signals are back-feeding into the brake switch and this causes the cruise to trip when the turn signals are used.
-
This forum limits the size of your JPG. You need to shrink / compress it. The JPGs I attach are around 30k each. The originals are 2 meg and are WAY TO BIG to be uploaded. I use a program called "Advanced JPG Compressor" to take those large, high resolution, megabyte size files, and shrink/compress them down to a small size that is easily displayed on we browsers. This is the key - If you want a high resolution version of any of my photographs, let me know and I'll e-mail it to you, Advanced JPG Compressor is a for sale program, but I'm sure there may be programs out there that do basically the same thing for free.
-
I just bought new blinds at Menard's (Home Depot or Lowe's can do the same) They have metal or vinyl, my originals were metal (I like the vinyl as they let a light in when they are pulled) My back window and kitchen window are the same size (width). Menards (or the others) can cut the blinds to the correct width. However, they won't modify the blinds for the correct length. Not a big deal. Although the as-bought length could be used, I'll disassemble the bottoms and reassemble them so they are the correct length. (easy job, just takes time a patience.
-
OMG - A wood stove - I seen posts about this but never seen the pix.
-
My 88 Dolphin has cruise control. I believe this unit was installed by National and others when they manufactured the coach. I've attached photos soyou can see if its the same unit that you may have. I've Google "cruise Control..." and have looked at thousands of photos and haven't found one single photo of a similar unit. This unit does work, and holds speed reasonably well, even in hilly country. It does have some issues that I believe can be fixed by making adjustments to the controller, and a wiring change. I don't want to install a new unit ($200) if I can get this one working correctly. I strongly suspect that these CC's were never tested or adjusted properly when they left the factory, and the issues I have could be resolved without needing to resort to replacing the unit. I've installed aftermarket Cruise controls in other vehicles, so I have an idea what/how adjustments need to be made. Problems - 1) Unit will not accept a speed greater than 59 mph. If attempting to engage, say at 65, it will drop back to 59 and hold that speed. I suspect this is a "Frequency" adjustment. The max Pulses per mile is being exceeded. This is a common adjustment in newer units. 2) Unit responds to fast, i.e. To much throttle to fast, or easing up on the throttle to fast. This is resulting in "Hunting" and can decrease gas mileage. This is a gain adjustment. needs to be turned down a little to slow down the response. ( Operating the unit near its "Max Pulses per Mile" can aggravate this problem. 3) Unit trips off when turn signals are used. I suspect this is a wiring error to the brake light switch. 4) Unit occasionally trips for no reason. I suspect this is related to the brake light switch and a bad connection at the brake light. Maybe) Before I replace the entire unit with a new CC, I'll play with the adjustments to see if I can resolve these problems, but I would rather have a manual or install instructions to help guide me before I start turning screws. Thanks ahead of time. JOhn Mc 88 Dolphin 4 Auto Photos 1, 2, and 3 Under dash control box. close up shows sticker on box for adjustments Photo 4 Engine compartment servo unit - I don't believe this is a vacuum driven servo, as I don't see a vacuum line connected to it.