Bob the Builder
-
Posts
85 -
Joined
-
Last visited
Content Type
Events
Profiles
Forums
Gallery
Everything posted by Bob the Builder
-
Passive Auxilliary Hot Water Heater Assist??
Bob the Builder replied to Bob the Builder's topic in General Discussion
With my bare to the walls shell, I'm starting with nothing. I do not plan on carrying any propane for anything, so I'm relying on alternate methods for heating the water. In my other little camper I had a 7 gallon water heater and ran a 2000 watt gen or shore power for heating the water. It is sufficient, I'm just looking for a possible alternate to that. Using the coils like I'm describing has been proven to heat the water from 70 or so degrees to start up to 140 passively depending on your volume. I'm just curious as to what the 7 gallons could be heated to with a coil on the roof and traveling for the day. It's the overnight stops enroute to somewhere that I'm trying to not use the gen for. Too much going on with the build right now, but was garnering info in case it was worth plumbing for it. Keep the ideas coming and thanks to all. -
Passive Auxilliary Hot Water Heater Assist??
Bob the Builder replied to Bob the Builder's topic in General Discussion
Yep. I was thinking a coil of pex, paint it black, laying flat in a flat frame laying on the roof under plexiglass to keep wind off of it and a small fountain pump or similar with valves to circulate entire hot water heater volume slowly through it. Would probably heat all of the water enough for a shower or so when you stop for the day. Three-way valves to control flow through system normal or through roof solar heater. Panel to run little pump. Keep it low and no wind resistance to speak of. -
Just curious, has anyone tried running water through a flat coil of pex tubing on the roof and circulating it through the water heater during the day so as to have water already heated in their hot water heater when they stop at night for a shower, etc?
-
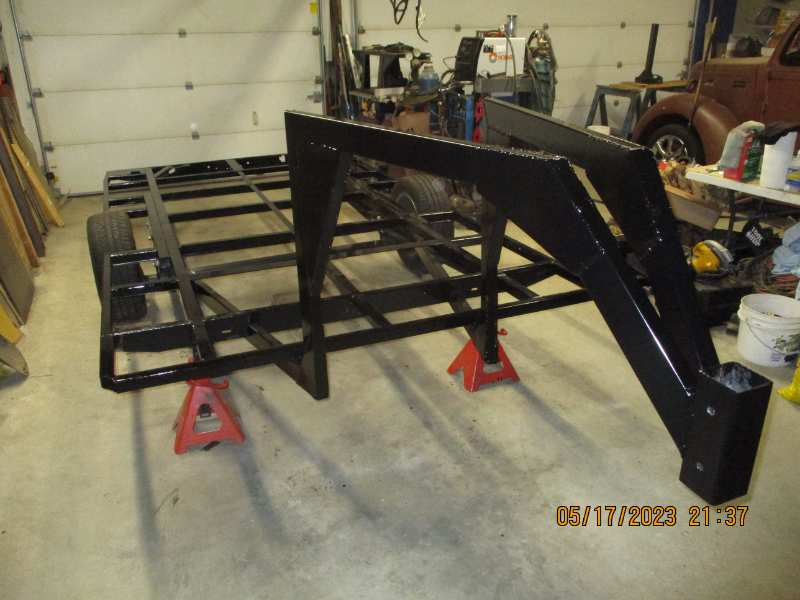
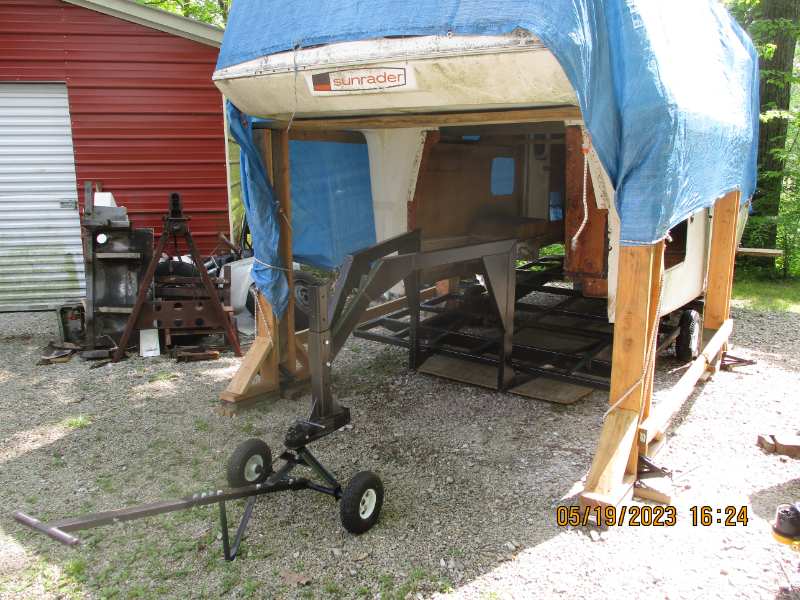
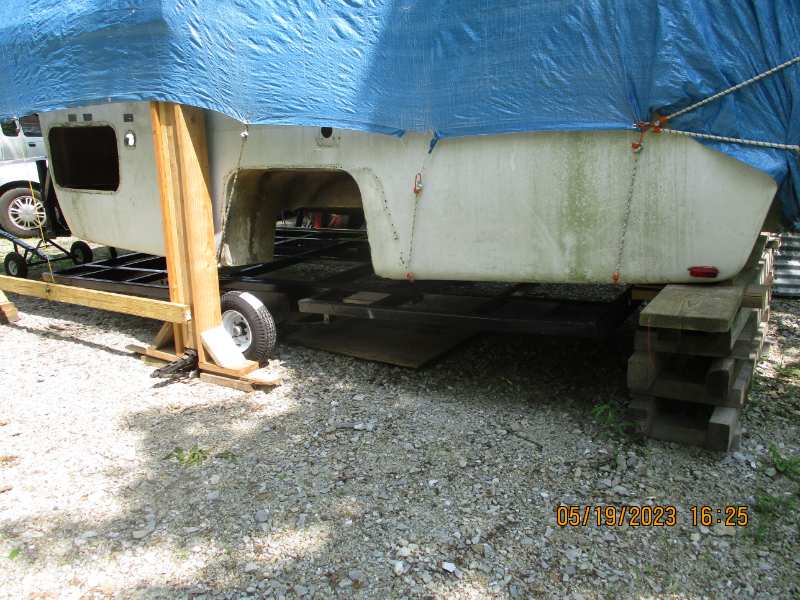
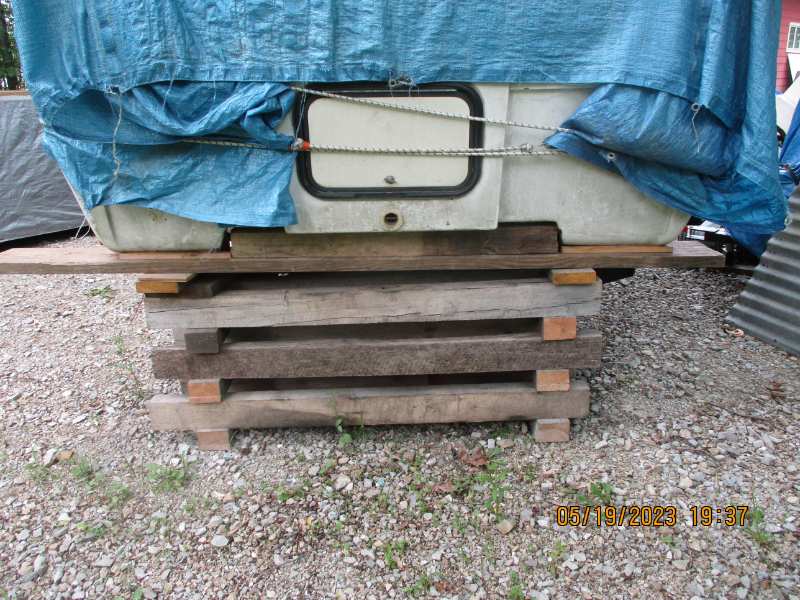
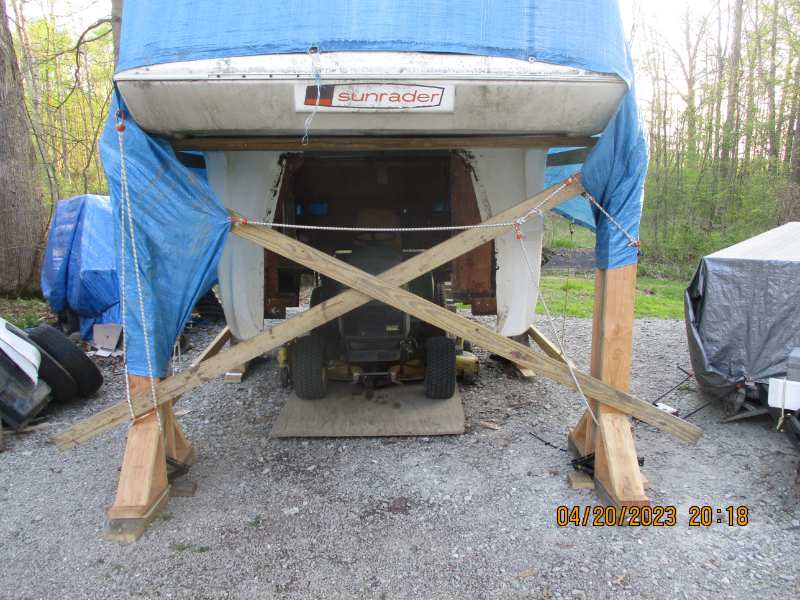
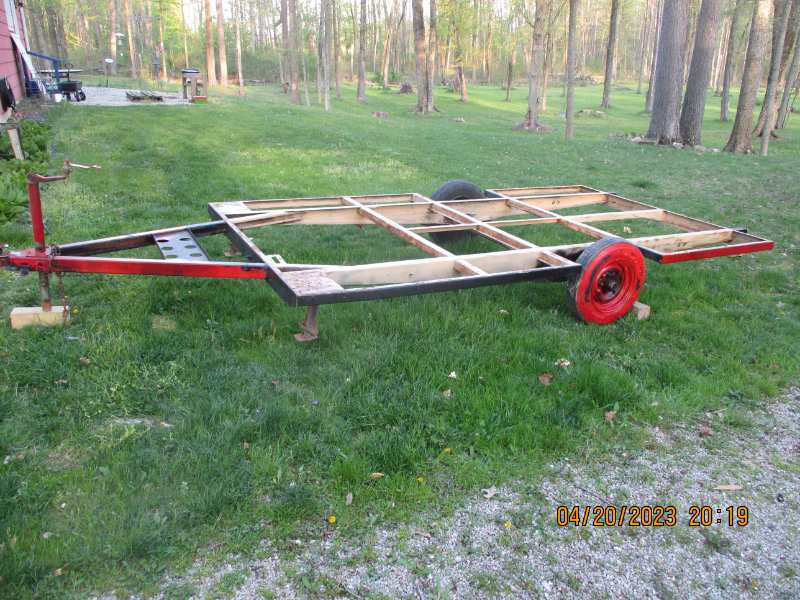
OK, finally Stage 2 is basically done. The little camper trailer is basically now a gooseneck with adjustable hitch that will fit on my 1936 Ford Sedan, and more importantly fit what should end up being my main tow vehicle, the 1938 Diamond T pick up truck. (This tow vehicle will be a while coming, the main focus now is the gooseneck Sunrader). The trailer frame ended up with a dry weight of 480lbs so far but there are a few more braces, and under camper overhang storage rack to add to the weight tally plus the final choice on tire and wheel combo. Tongue weight at present is 90lbs but that is highly adjustable with storage and final weight of additional Sunrader configuration. I finished painting under the trailer this morning, took it to the local quarry to weigh and just couldn't resist slipping it under the shell to see if my computations were going to be anywhere close to joining the two. The little wheel and tire combo worked great (2" axle to ground clearance), to allow the frame to slip under the shell. I can't slide it all the way back, because my rear cribbing is going to be in the way so I will have to make two more short adjustable columns under the outside of my rear cross brace and remove the cribbing. Minor setback, but happy with the results so far.

-
Good idea, WME. I can put that process together with ToyoGuy's conduit idea and use a hollow tube through from the wall to the center, glass the rib in leaving the tube holes open and have a way to wire in any center interior lights. Excellent! Thanks.
-
ToyoGuy, I really appreciate your interest in my project. You have excellent ideas. Gets the thoughts going. Inside window AC over fridge, (checked out many posts about that so that I would know where I was headed with that). I will have power roof vents, front and rear, so there goes some height. I'm 6' even or was, (my kids keep telling me that I'm shrinking due to age), so that might give me a little. I plan on glassing in aluminum roof bows, (that darned semi trailer background), some are a hat type section and they already have a bow in them 1" tall, and I can save a bit on them by getting the old stock for 96' wide trailers, they aren't in demand any more. Led light strips will keep the lighting at a whisper of height. I was planning on doing your excellent idea of mocking up everything for road height,etc. Part of the reason for the adjustable column stands for the shell, (good for leveling also). The main tow vehicle, (the Diamond T), will more than likely have air ride at the rear and my gooseneck hitch height is adjustable up and down so I will have a little "fudge" in there. Some of the older semi trailers had 1" I sections for roof bows. I'm thinking about glassing them in for some wall uprights and something to screw to although I'm pretty sure my stringers are still there. Haven't been thinking a lot about the inside dynamics right now, I'm mocking up the gooseneck end on the trailer out of 2x4's for correct angles and lengths to cut the steel. You would think that drawing everything out on graph paper several times would be enough, but the truth is I don't trust Bob's thought process entirely anymore. (Don't tell Bob)! Again, input is golden. It's too easy to miss something. Keep the comments coming! Sorry for the ramblin' on.
-
Thanks ToyoGuy. Here's where I'm at. Measured shell sitting on stilts waiting for trailer and it's 106" outside top of the exterior roof, (no AC or vents). Will come down approx 9-10" when sitting on settled trailer frame without interior. I'm gluing 1/4" duraplate (superior tensile strength, waterproof and easily fiberglassed) down on the trailer frame first and fiberglass it to the wall. Then glue a layer of the pink closed cell styro board down and then glue a layer of the Birch 3/8" plwood, fiberglass it to the walls and a coat over the floor (hope I get it as smooth as yours). For the door well step and height, I'm going to put the floor level with the edge of the entry door with a 2" deep step down across the opening inside the door so that I can get at those screws and a drain hole. I'm going to make a waterproof block to lay inside that carve out so that stepping inside to the floor will be level with the door. that will have me lowerering the floor about 5" which will give me 76" clear height inside to the bare roof. I'm trying to get to an 84" total exterior height because my garage door is right there. If I can get reasonably close, I can always have a set of smaller wheels & tires to use when putting in the garage for maintenance, etc. I appreciate everyone's feedback as there is a lot to consider with so many parameters, etc. It helps trigger a lot of thought, and I don't want to miss the most of it,(there is always something afterwards). I think this should be extremely strong with the double connection at the wall and I can move on up from the floor.
-
Short update post on the build. ToyoGuy, I tried out a variation of sanding the edges of the remaining fiberglass from when I cut the floor out. I bought a $19 oscillating tool (HF), and shaved that extra ridge off in about 40 min. (Half round blade worked the best). I still have to clean up the corners a little, but it sure did the job! Almost zero dust although I did wear the respirator and gloves. Still trying to decide how far to drop the floor. Originally I was going level to the bottom of the door, but it won't be entirely smooth because of the transom anyway. It's 7 inches if I go below the floor level at the door, a bit too much for me, but if I only go 5 or 6 inches, I have to do something goofy to be able to get to the inside door trim screws. Suggestions? Trying to keep the overall height down as low as possible but my trailer floor will end up around 18 - 20 inches from the ground at the least. How tall is the roof off of the ground on a stock Sunrader? I measured mine before I started, but didn't write that down. The bottom of my overhead, (over the cab part), looks like it will be about 5'2" or so. Just curious.
-
I struggled with that one myself, WME. I have a torsion under my first attempt at a unique camper and love it. Very comfortable tow and easy on the equipment. I'll post some pics. I went with the axle I had because of the unknowns I might end up encountering with the gooseneck design. I can always shell out the bucks and convert if I absolutely hate it.
-
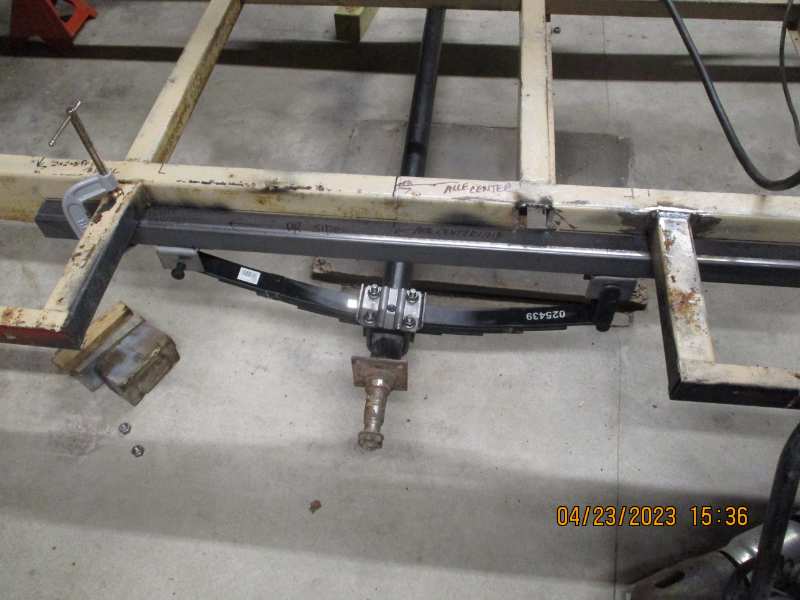
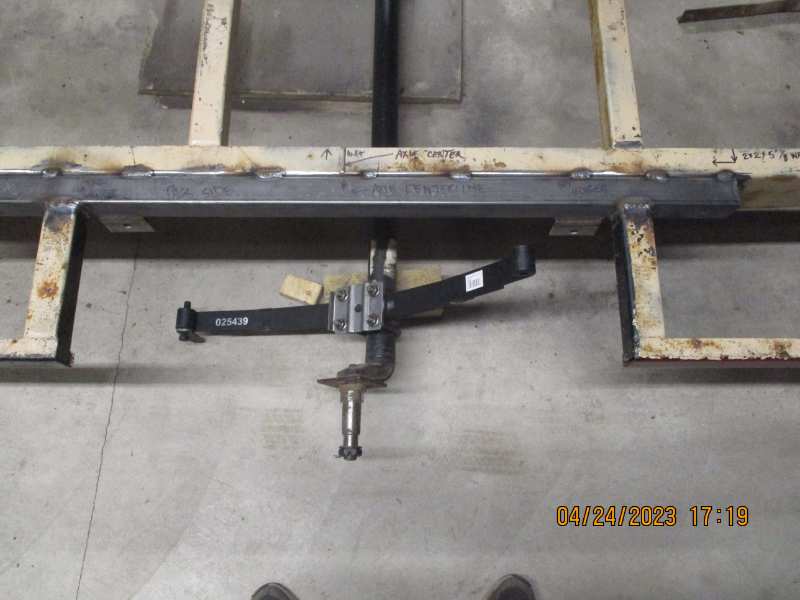
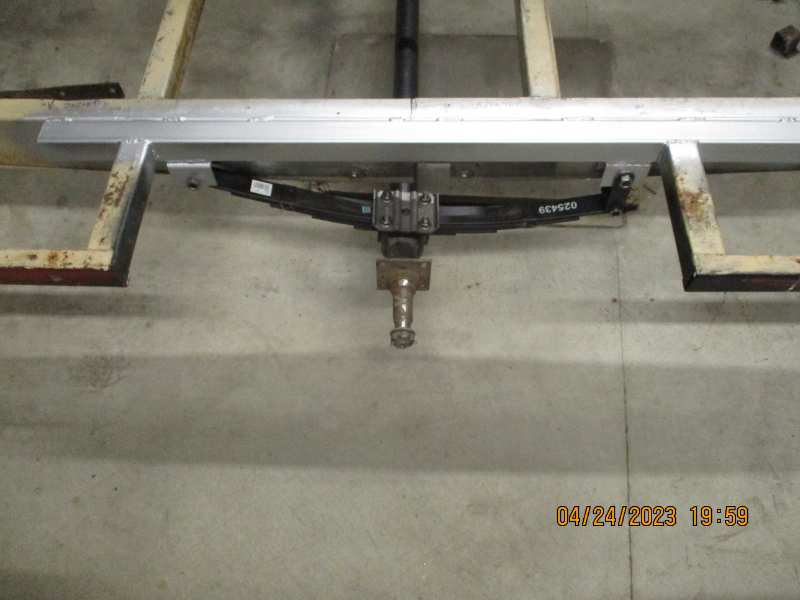
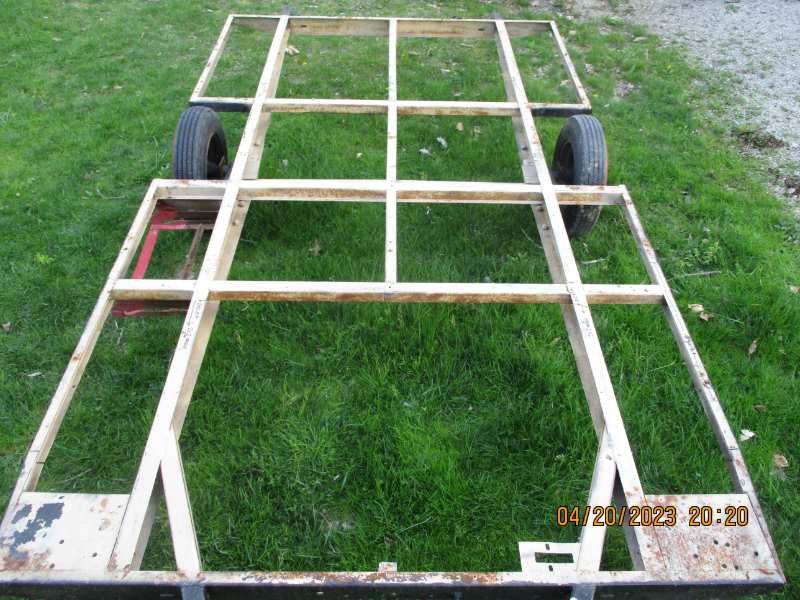
Thanks much WME. I agree with him entirely about the 8020. I spent last year building my brother's 7x16 cargo van into a toy hauler. the rear eight foot for the two Harley's, (drop down king size bed on 4-12 volt actuators gives him 28" sleeping over the Harleys and the front 8 foot includes front cabinets with sink, 4.3 frig, 30 x 36 wet bath, black water and grey water tanks, 7 gal hot water heater and 28 gal fresh. I looked a lot at builds before starting, and I ruled out the 8020 because of the restrictions it imposes. While not close to being the same kind of build as his toy hauler, my gooseneck Sunrader will definitely need the lightweight approach like the guy in the video takes. Consider the weight of everything used in it. Borrowed the wife's parking spot this weekend and rolled the trailer in to change the axles. 2000# torsion out, and 3500# drop leaf spring in. I know that I'm lowering the floor of the Sunrader shell by 5" but I'm also raising the height of the trailer from where it sat on the torsion axle. I also need to maintain a certain amount of clearance height for the black and grey water tanks, as I want them below floor level. It took some additional effort, but as you can see in the pics, I went ahead and cut the side ribs so I could raise my axle reinforcement up to floor level, (that also dropped the trailer floor that 2 inches). Putting the 1/8" 2x2 tube on the outside of the main rail puts it exactly at the same width as the leaf spring perches and makes the undercarriage very stout. Talked to my steel guy today and he assures me that for the gooseneck runners, dual 1 1/2 x 3 tubes of 1/8" wall will be fine so I ordered those. I know some of the pics I put on here are not a Sunrader, but in the end they will all mesh with the finished product and are part of the whole build. I did get to a new Harbour Freight that just opened 9 miles from me and got my zip suit for the upcoming fiberglass trim job (thanks ToyoGuy).
-
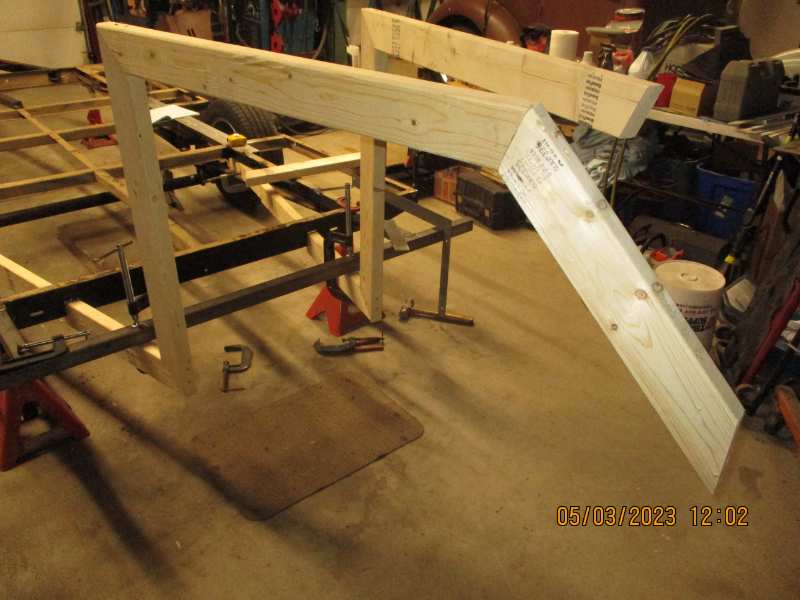
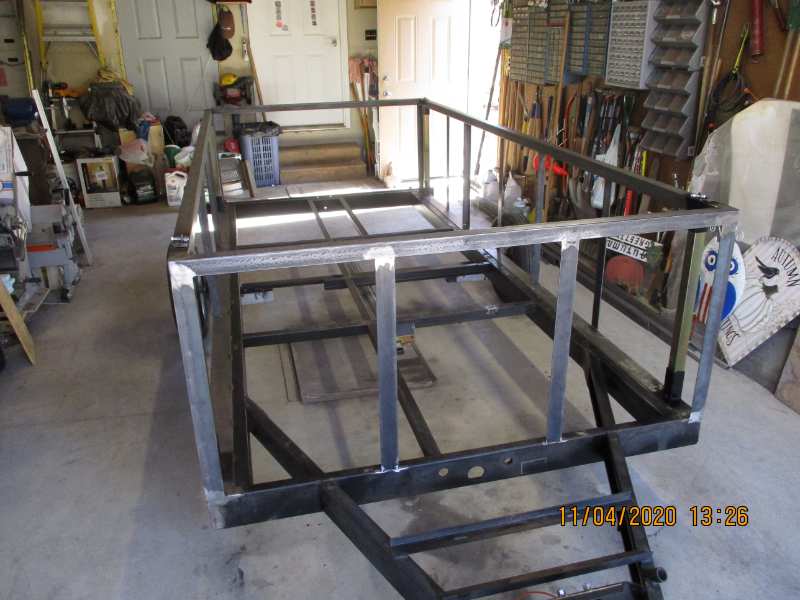
OK, time to post the start of Phase 2: the trailer mods and how they will (hopefully) mesh with the Sunrader shell. First, we've been having some rather blustery weather and I was worried about movement of the shell up on those stilts. So I parked my 455 John Deere inside (just barely fits between the wheel wells of the Sunrader ), and tied the shell down. I know, it looks stupid, but I sleep good! I'll post a picture of the trailer frame I'm starting with but please reserve judgement until I get further along with it, it only cost me 200 bucks. I pinched the last 14 inches of the front, which will become the rear so that it fits the slope of the rear of the shell 5 inches below the original floor line which will be my new floor. That will make my floor level when I walk in the door and gives me more than enough headroom to miss the ceiling even with some insulation in the floor. The main rails of the trailer are C-channel that start at 2 inches front and back and graduate to 6 for the middle five feet where there is a 2000# torsion axle mounted. I am removing the torsion axle and instead will be using a new 3500# 4 inch drop axle I've had hanging around for probably 25 years. Already got 30 inch long 5 leaf springs (spread the mounts a bit further apart), and 5 on 4 1/2 bolt pattern spindles. This gives me a lot of options on wheel selection, including back spacing, width and height. I will be reinforcing the center five feet on the outside of the C-channel both sides with 2x2 rectangular 1/8 wall steel. Spring hangers welded to the 2x2 to center the axle in the wheel wells of the Sunrader which is 72" from the rear wall. I will slip 1 3/4" rectangular tubing into the center tubes and on to the front since I need to stretch my trailer to 148", (it was a little short). The center pieces are a little overkill so the 1 3/4 pieces are thinner walled. Trying to save a little weight here and there. I will put the same 1 3/4 tubing out to the back to reinforce since my grey and black water tanks will be in the middle at the very back, 14 gallons each. I'm sure this is a long enough post for now, I'll ad some pics and post again later.
-
No problem Acar, just let me know if you need other numbers. I'm going to keep these around, they might be handy for someone else also.
-
Acar, I have many, many measurements. I will post a few now and we can work from there. I am not sure how they determine an 18 footer, etc. I don't know if they are measuring total length including chassis, or??? Any measurements I give unless otherwise stated are from bare walls inside. At floor level: Back wall to bulkhead @ center opening 148". Back wall to wheel well rear side L&R 57 3/4". Front wall to wheel well front side L 58 1/2", R58". Wheel well across front to back L&R 31 1/2". Wheel well from wall to inside L 18 1/2", R 19". Wall to wall across: along back wall 76 3/4", back of door opening 78 1/4", front of door opening 80 1/4", back of wheel wells 80 1/2", front of wheel wells 80", across top of wheel wells 81 1/4". across floor @ bulkhead opening 78 1/2", across the overhead opening @ upper level 79 1/4' @ the middle of the side windows in overhead 78". Floor to ceiling height (Inside of lower side ridges), @ rear 72", @ rear of wheel wells 71 1/2", @ front of wheel wells 71 1/2", @ center of coach side windows 71". I'll stop here until I get some feedback on what else you might want, (I have more). But don't want to confuse the issue. The overhead ridge that drops down in the ceiling at the back on either side and runs up to the overhead is 4-4 1/4" tall and 71" across inside @ the center of the large side windows. Ceiling height and ridges taper into each other at the pass-thru bulkhead.
-
Acar, I have mine stripped entirely to the inside walls all the way around and suspended off of the chassis. Keep this in mind when I give you the measurements. Do you want the measurements at floor level or middle of the walls? They change as they go up. I will measure any dimension I can, just making sure we are on the same page. You give me what you want, and I can do them tomorrow. The measurements that I have now are at 5 inches below floor level which will me my new floor height, so I will make new measurements at exactly where the floor was attached as I haven't shaved that off yet. Also, I don't think mine is an 18 footer. My inside floor, extreme rear to inside bulkhead center length is 147ish. Some length stuff might not help you but I will do what I can.
-
WME, excellent. I was hoping to hear from you. Really interested in your opinion on this. The stuff is Fundermax high pressure laminate phenolic panels, exterior grade. Used a lot for facade and such on buildings and counter tops, separator panel in hospitals, offices, etc. Thanks
-
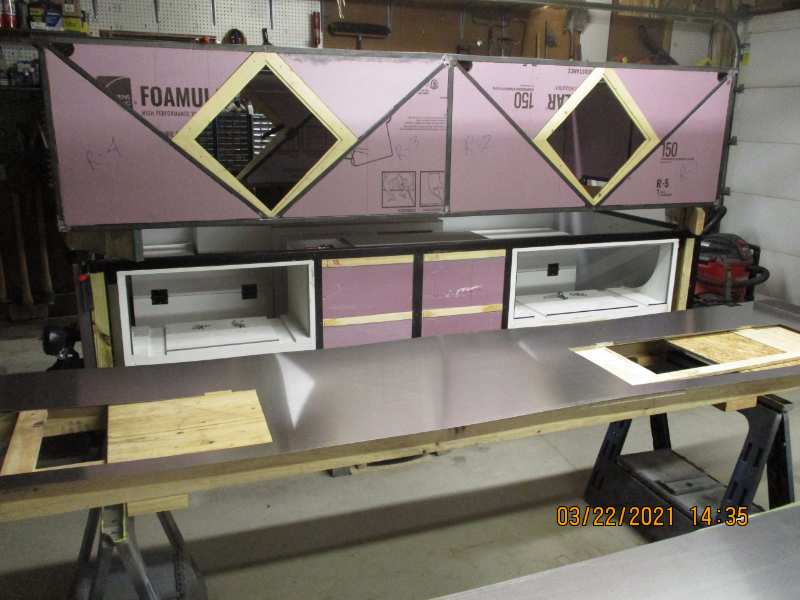
Here's the plan for the floor so far. I can get the HPL (exterior rated, uv resistant, water resistant, white surface) in 51" x 76" panels for $20 (not the main point but good for the build cost). The wider size allows me to use only three and cover the length I need (149") which means only 2 seams. Glass these to the outside wall. Put down either 3/4 or 1 inch styrofoam closed cell insulation, put down 3/8 plywood and glass to the wall. Fasten this all down to my frame using elevator blots so the heads are virtually flat with the plywood and cover entire interior surface to the walls with linoleum. Seal the linoleum against the walls also and then build everything on top of that. It would be sealed from the bottom, (road debris, water, etc) and sealed from the top in case of any interior leaks, spills, etc. It would be double glassed to the walls and insulated somewhat in between. Ready for any and all comments now, it's all knowledge and I'll take all I can get before I do this. Thanks
-
Looking for posible alternatives to original Sunrader flooring. Exploring HPL panels for floor on bottom 10mm thick (.394) and laminate3/8 plywood on top of that, seal the plywood then linoleum for the final surface. Can possibly get cut off sheets of HPL 51x60 for $20. Using the HPL for road debris barrier and plywood for additional strength although the HPL will hold 220+ lbs over 3ft open span. Trying to save time and expense without sacrificing strength. Welcome opinions, etc.
-
Saw that picture a while back. There is another one somewhere of just what appears to be the same dually in a driveway without the camper. I hope to keep my gooseneck about that low. I think the hitch arrangement won't be much over 30-36 inches off of the ground. The top of the truck frame is at 24" right now. I'm thinking I will build a storage rack from the top of the gooseneck boom on up to support the forward sleeper of the camper body. The hitch post will be adjustable up & down for the difference in height of my two tow vehicles. Back to the floor, what was used to laminate the different layers of the SIP flooring? Were there any ribs or internal wood framework to keep the two layers of plywood connected? Surely just the styrofoam won't hold it together? Actually I wouldn't mind having the insulation of the dead air space between the floor.
-
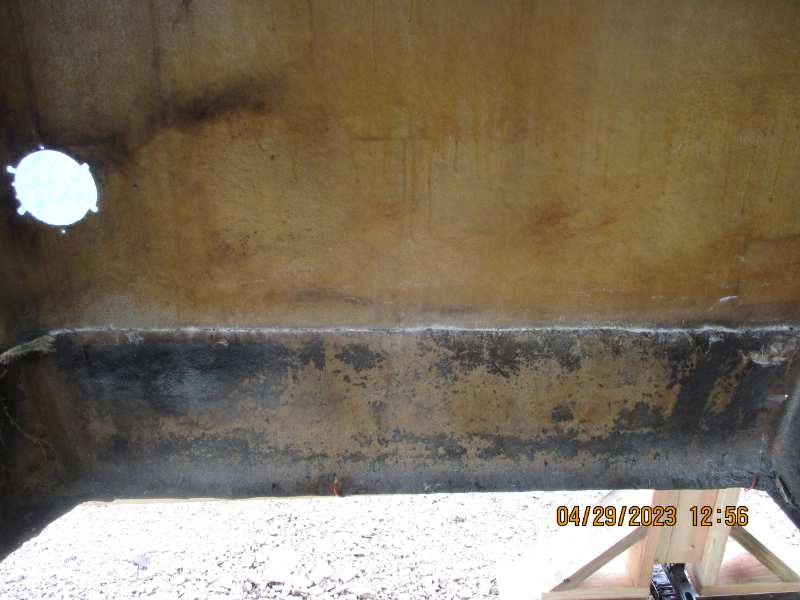
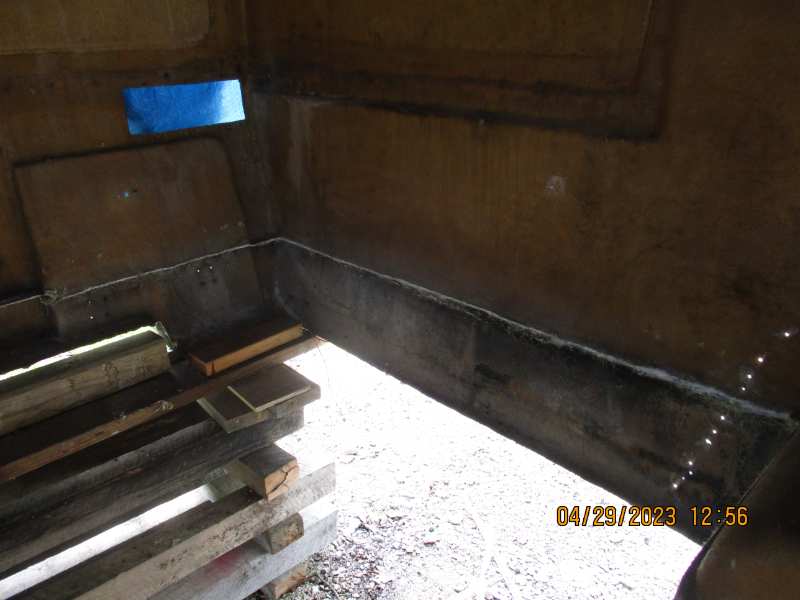
WME, when I cut the floor to remove the center section with the chassis, I didn't find any styrofoam between the plywood layers like it shows in the Sunrader ad. What I found was a thin sheet of aluminum on the bottom to start, then a thin layer of plywood, then either what looked to be pink fiberglass insulation or what looked like furring strip material, and then the final layer of the plywood top. I got the impression that the whole floor was made up of a sandwich of latticework squares of furring strips with pink insulation inside the squares and sandwiched between the two thicknesses of plywood with aluminum on the bottom. My Sunrader is a 1982, was the floor constructed differently back then? As in the previous pics, the top layer all the way around the perimeter had the fiberglass clearly attached to the wall then slightly drooped into the crevice at the edge and out onto the floor so I'm thinking it was original. I think that I've gotten rid of all the pieces of the actual flooring, but I'm going to check again. It sounds like you are leaning toward reconstructing the floor like in the ad, (laminating all of those layers of material together in sheets and using them) as opposed to using the trailer style laminate that is already in a sheet? Just checking?
-
Thank God I didn't have those wrap over windows WME. Couldn't imagine keeping them sealed. TG, I am considering FRP panels for my flooring. Now hear me out before you laugh me off the page. My background is practically everything automotive and particularly big trucks (as in tractor trailers). So when I say FRP, I'm not talking any of that thin plastic type stuff all the box stores are gluing on the wall. I'm talking fiberglass reinforced plywood, meaning like the semi trailer door panels are made with. And still a lot of the semi trailers on the road yet have complete walls of the stuff. 3/4" and also available in 1/2" thick. Fairly expensive but I'm thinking with my connections with trucking, I can probably score what I would need out of some removed sections of wrecked wall. The trailer frame I will be using (modified by me of course), is an old camper frame so there won't be a two foot square section of flooring in it without support, and the perimeter will all be supported by a steel tube within an inch alongside everywhere. I'm thinking I can probably get by with the 1/2" even, (less weight). That would put aluminum back on the bottom like the original, and the white frp facing up would be a nice interior surface to start with. I'm sure the strength would definitely not be a problem. Scuff the frp, push the wall out, run the resin over the edge a plenty, let the wall retract back in against the floor, then put the cloth and mat down, hopefully that will seal and create a good bond in both the wood end and the frp. I know, it sounds simple. We will see. I tend to think things to death and overbuild a bit. Let me know what you think.
-
ToyoGuy, I thank you for a most excellent reply. That's the kind of information I'm looking for on this build. Had planned on the suit, respirator, etc. as I've had the experience with fiberglass a long time ago. Did you treat the bottom side of the marine plywood with anything or just screw it down to the framework? Also, from what I'm reading online nowadays I see they have many different kinds of fiberglass and resin. What did you use on yours? I'm used to doing mat and cloth for strength, resin, hardener according to curing temp and time to work and that's about my experience. I suppose when I go to fill some of the many holes in the walls, I'll have to get into it with more finesse like with kitty hair, gelcoat and such on the outside but all I'm worried about now is the floor to wall joint. I plan on raising the whole trailer frame up into position and starting with the rearmost piece of flooring going crossways. Any help from anybody is appreciated.
-
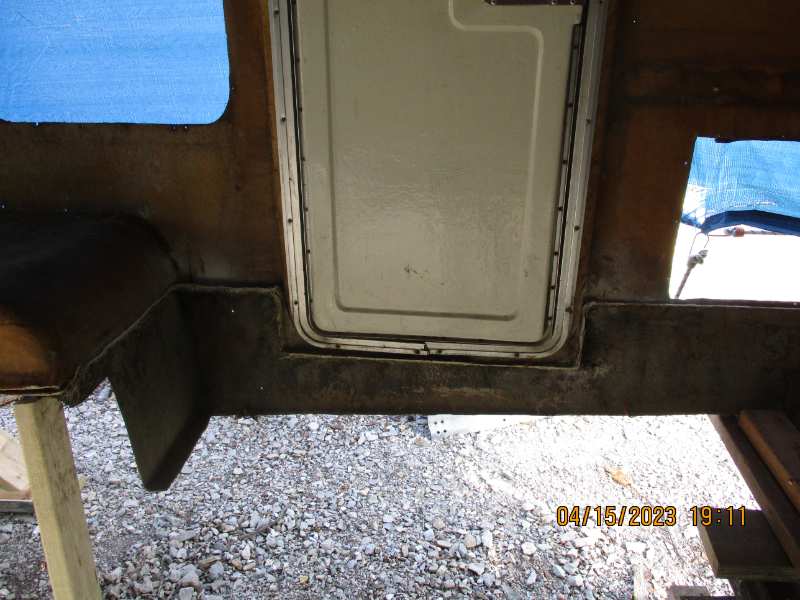
Here are a few pics of the shell standing there waiting for me to get busy. First thing will be to trim the old floor attaching fiberglass smooth to the wall. Not looking forward to this.
-
Yes, linda s please group altogether with the build posts.
-
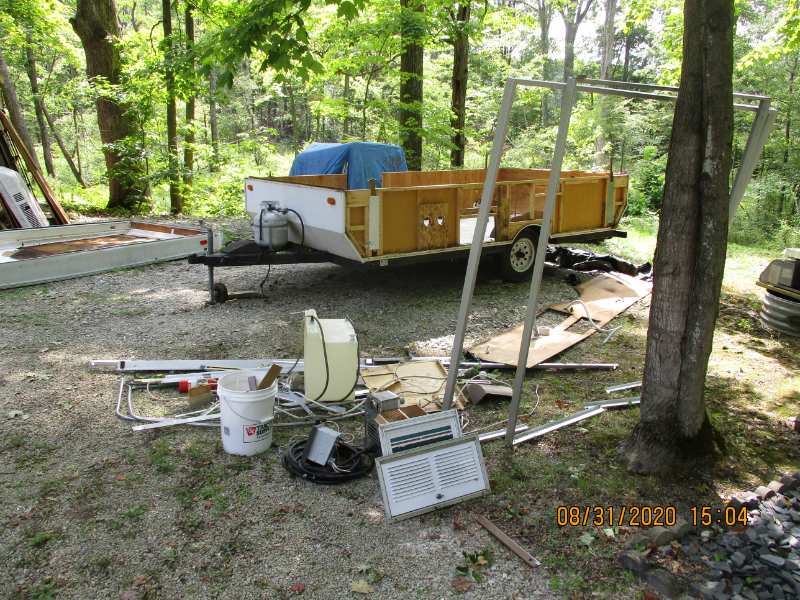
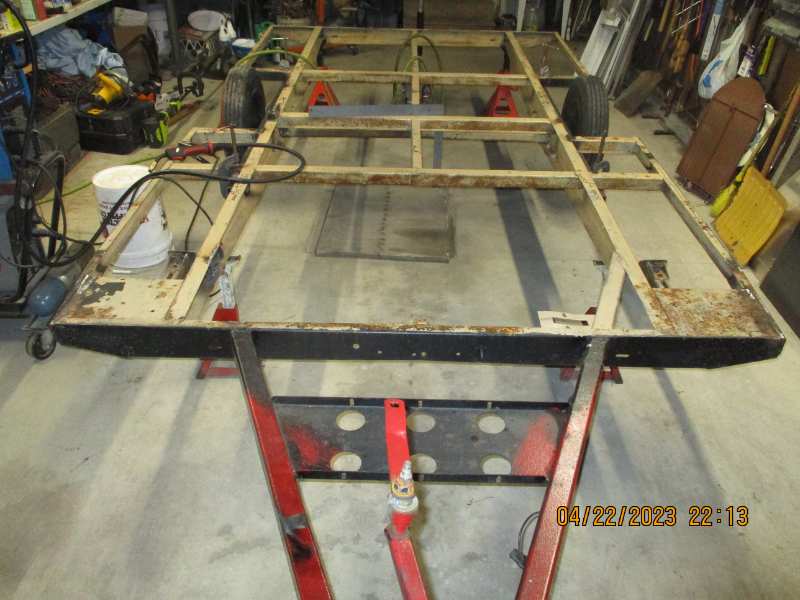
Got the end of Phase 1 done today, finally. Old Sunrader chassis back so rear end could be scavenged by previous owner as promised. Now on to Phase 2 with a clear mind.
-
OK, so after perusing the website for a bit, I've come to the conclusion that my build ie (Bob the Builder's Build) should be in the "IMPROVEMENT and DO IT YOURSELF PROJECTS" section so I will self-moderate any further posts on my progress to that arena. I'm thinking questions and such are all right in the General section to garner the information, but actual pics and history on the build should stick with the build under that topic? Perhaps an experienced member can verify this for me. I'm entirely new to this type of activity and don't want to confuse the issue. Thanks