

powdrhound
-
Posts
120 -
Joined
-
Last visited
Content Type
Events
Profiles
Forums
Gallery
Posts posted by powdrhound
-
-
I hope you fight the ticket. That is crazy.
-
When we first got the rig, my lady insisted that the rocking was too much, making her feel odd. So I got some of the aluminum trailer jacks. We used them for our first camping trip to the lake.
I have not used them since. It is just not that much of a problem.
-
I am getting real tired of forgetting to turn off the headlights before exiting and locking the cab.
Thank you to toyotanation.com for the idea to add a $10 Radio Shack chime to the headlight circuit.
I had been toying with the idea of adding a couple more clearance lights, right outside the doors, so I see the lights on before I lock up... Something...
Adding the chime was super easy. I mounted the chime under the dash cover, next to the speaker.
Remove the lower dash cover (unplugging the dimmer switch) and the kick panel cover.
The chime I bought has three wires. The red wire is tapped into the dash light circuit, the black wire to a grounding bolt, and the blue wire tapped into the door switch wire. The door switch creates a ground connection for the cab light when the door is opened. It now also fires off the chime. Working Excellently now.
My most accessible place for the Green wired dash light circuit was under the steering column, the wire going to the drive indicator light. (Also used this tap to power the lights in the upgraded Toyota radio and the lights in the new pillar post gauges. If you want to control the new lights with the dimmer switch, hook up the lights ground wires to the the dash light ground wire in the harness, a Red/Black wire. My tach did not have a separate ground wire for the lighting, so that and the radio lights cannot be dimmed. The transmission temperature guage did not have a separate ground connector for the light, so I did a little trimming of the lights ground connection, soldered on a trimmed spade terminal and attached the assembly back to the gauge with JB Weld. Voila', dimmable.)
While I had it all apart, I added Whitney's variable speed wiper controller. Removing the lower steering column cover exposed a connector. The wires on the driver side are wiper motor.
For my 1986, Blue is ignition, Blue/Black is Low speed (the one you will cut), Blue/Orange is High speed, and Blue/White is the Return power. On the controller, Red wire to fused power, Black to ground, Green to the switched side of the Blue/Black, White to the motor side of the Blue/Black. The controllers Blue wire is tapped into the Blue/White wire. Other than the Mist button on the controller not working (going to have to talk to Whitney's about that) I now have dialable speeds between 2 seconds and 20 seconds.
A busy couple days completing projects that have been on the table for months.
I am rewarding myself with a few days of Summer skiing at Mammoth this next week.
The SkiBumMobile rides again, improved.

-
Some signs that a Reflect-o-lite 1400 has a bad ground connection:
Right Brake light is dim when lights are not on, no right brake when lights are on (and turns off tail light too); right flasher not working sometimes; right turn light on dash and front right turn light dimly lit when lights on.
This evidently had been a problem for quite a while before I got the SkiBumMobile. All the back right side wires had been hacked for probing and taped. I finally discovered the bad connection after replacing all the wires from the end of the Toyota wires to the fixture and adding a ground lug to the chassis.
The ground wire going to the unit is riveted to a strip of metal. The strip is screwed to the back of the three fixtures. The screw to the stop/tail fixture appeared tight, but still gave an intermittent lack of ground. Cleaned the surfaces and re-tightened the screws. Lights now working!
Toyota Ground - White\black stripe
Fixture Ground - White
Toyota Tail\Clearance - Green
Fixture Tail - Green
Toyota Brake - Green\white stripe
Fixture Brake - Red
Toyota R Turn - Green\yellow stripe
Fixture Turn - Yellow
(Toyota L Turn - Green\black stripe)
Toyota Back Up - Red\black stripe
Fixture Back Up - Blue
-
I would get the two lights when I got a trip of the automatic-reset circuit breaker installed between the alternator and the isolator. The breaker quickly resets, so I still read power with my voltmeter, but the two indicator lights would stay on until an engine restart. But then it would trip again, depending how dead my batteries were and how hard the alternator was working. I could hear it click when it tripped. I could see the two indicator lights momentarily dim when it tripped again. And again.
One time when both batteries were down and I had to use the lights, I could not get it to last more than seconds. Finally disconnected the coach battery until the chassis battery was charged.
I do not recall seeing the problem until after I had replaced the isolator solenoid with the solid state isolator. I tried replacing the original 25 amp breaker with a 50 amp breaker. Still got the trip unless I just by-passed the breaker. Finally decided that I did not want a breaker in this position. I do not want to limit the output of my alternator. The standard pickup does not have this breaker and there is a breaker next to the coach battery. I left the breaker there to use as a terminal block. Maybe the original purpose is to protect against a hot wire rubbing through...
Do cover all of the hot terminals for the breaker and the isolator, they are just hanging out there exposed. I do not want to accidentally make a fat short to ground. I used a crutch tip for the breaker and a piece of milk jug for the isolator.
Good luck
John
-
I just had the muffler and all the tailpipe replaced for $155.
-
... I have some great backup lights on our rig. Got them at Jc whitney.
http://www.jcwhitney.com/autoparts/Product...t=utility+light
I have them mounted on the top of the rig on the rear corners. Lights up everything behind the rig. A rear back up camera would be a plus! They are connected into a rocker toggle switch so that I can have them on with out being in reverse. You will find that you will want to be able to walk to the rear with them on and survey the area your backing into and having the lights on is the way to go with out being in reverse. Use some sort of switch with a on light in it so that you can see that its on. Wiring them into the reverse circuit along with the switch is a good idea as then when you do hit reverse they come on and then you also have the option to activate them when not in reverse.
Greg
My learning for the additional backup lights was using too small of a fuse holder in the wiring to the Rear Window Heater rocker switch. (It lights up when turned on. Couldn't find a Toyota switch that day at Pic-n-Pull, but a Volvo was a willing donor.
I have nice heavy wire all the way, except for the section around the fuse - used a holder I had in the wiring drawer... While backing up a snowy winding road that went nowhere after all, I had them on for a couple minutes. Then they stopped working. Later found that the fuse holder has melted enough to nearly cover one of the contacts and held the fuse away from the contact. Took a while to find. Did not take long to replace the whole section with a good fat fuse holder and real wire. Fixed.
They are really handy. Hope you have a Fresnel Lens in your rear window too.
Onward to Spokane this week, with stops on the way home at Mount Hood's Timberline Lodge and the Palmer Glacier, then a few days at Mount Bachelor. Ski season is NOT over yet!
-
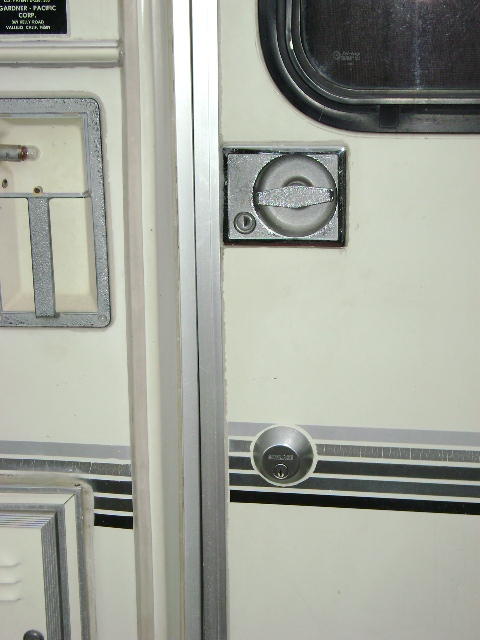
One of today's projects was installing the Bargman assist handle. Only had to widen the hole ~ 3/16". The new assembly is a bit shorter than the old one, so had to be Very careful with vertical placement. Otherwise, went pretty smoothly. May never use the light, but at least now it is covered...
Going back to Kirkwood tomorrow for another set of spring snow storms. Have only frozen the pipes on two nights this winter, one 9 degree night and one 7 degree night. Running the generator overnight is NOT considered bad form in this parking lot. Foil insulation in all the windows at night. Dual pane windows would be real handy...
John
-
My search for the 3 pod a-pillar led me to http://www.truckpillars.com/
He has them for 1984-1995 Toyota trucks. 2 or 3 pod. $79.50 to your door.
They look nice.
-
PartsAmerica (Kragen) shows 4 clutch kits for an 84 Toyota Pickup, ranging from $83 for their cheapo to $169 for the HD Performance kit.
Refinishing the flywheel, tranny oil, clutch cylinder rebuild kits & fluid - add another $50 - $100.
http://www.partsamerica.com/ProductList.as...244&PTSet=A
A clutch is really not that hard to replace, if you have the tools and patience. Loosening the flywheel bolt is always the hardest part for me.
-
Following the instructions that came with the trans temp/filter kit, I put the plastic bags over the open ends of the trans hoses, cranked the engine a couple turns (coil wire removed). Confirmed that the forward trans line is the outlet pipe & the aft line is the return to the trans.
If all else fails, read the instructions.
-
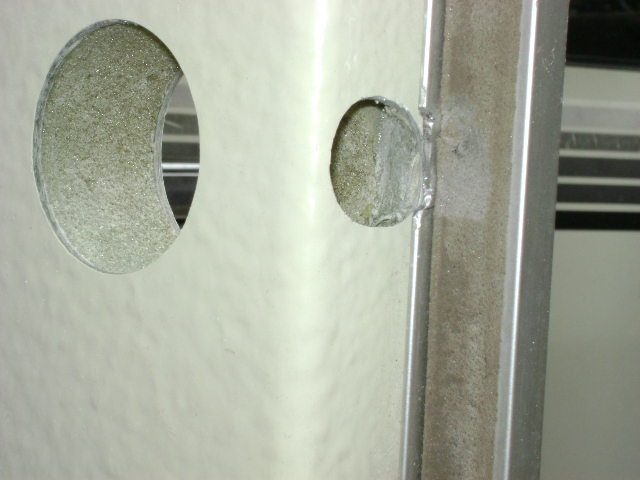
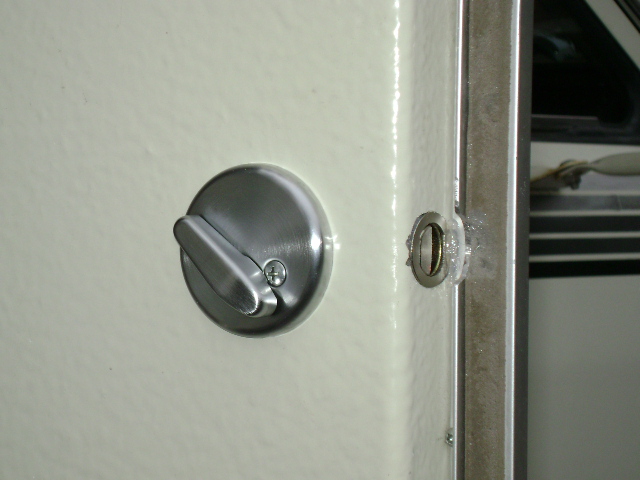
I installed a deadbolt in my Sunrader yesterday.
Was getting Real Tired of the door opening while on the road. The chain latch kept it from opening too far, but...
Had to use the die grinder to cut the 1" hole, and shape the aluminum door frame. Cut just enough of the frame to slide in the latch.
As Nibs said, ground off half of the bolt so it catches behind the outside frame.
I had Lowe's setup the pins to match my Schlage house key.
This feels Much Better now.
John
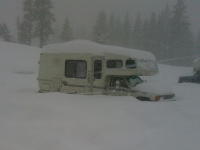
ps. The SkiBumMobile, with foil insulation in the windows and a little generator keeping the heater going and the battery from being dead in the morning, has been working great in the snow. Seven degrees on Wednesday morning, and I was warm and happy. In the ski area campground (dirt parking lot), it is Not considered bad form to run the generator at night.
And I LOVE my Nokian Hakkapeliitta CS tires.
-
And the per fillup MPG over the first 4,200 miles ranged from a high of 17.2, mostly downhill and freeway, but included a real good climb, to a low of 13.5 mpg on my first trip up the Sierra's. Total Average is running ~ 15.14 mpg.
John
-
I find that my '86 Sunrader with a 22RE automatic is a bit slower than that uphill. Any hill slows me a bit, and when it gets steep, I keep downshifting as I slow down. Around 40, I drop it into 2nd. REAL steep puts me in 1st, maxing at ~ 25 mph.
Maybe I should get the filters and headers... Or just take my time uphill. I had no problems taking it over the 8,000' pass near Kirkwood. Try not to stop while facing uphill. But I am still learning my rig.
John
-
My complication is that the 2800 is bigger than the available compartment on my 86 Sunrader.
-
What drives this relay? Not the wire, but what/where is the device that picks up the elevation change - it has to be a pressure switch somewhere.
Starting around 2,000', mine starts clattering like castinettes for the next couple thousand feet. Finally settles down and shut up. Overdrive stops at the beginning of the clattering.
I have been considering installing a manual switch to override the relay input. I really don't need a relay to tell me that I am liable to lug the engine.
-
You were there. Once you hit the Confirm button, your account is charged, and will get the e-mail confirmation from PayPal.
-
Mill Supply. The are a StepVan store, but have the mirrors.
-
I have been wondering that myself. Thanks for the push.
I found this in a google search for: BUTYL RUBBER TAPE VS PUTTY TAPE difference.
http://rvtravel.com/blog/lowtech/2007/04/i...-tape-time.html
According to Tiña, "For our purposes, there are two types of "putty tape," in play: Regular putty tape
is cheap, easy to work with, but dries out over time. Butyl tape is much more expensive (nearly twice the price as the regular), is harder to work with, but doesn't have the nasty way of drying out."
That works for me.
-
Toyota Motorhome Forums > Gallery > Toyota Motorhomes Files & Manuals
-
Toyota Motorhome Forums > Gallery > Toyota Motorhomes Files & Manuals
-
I needed tires to take me to the snow. Nearly every tire I see are Summer Rib, don't-go-anywhere-near-snow tires.
From a VW Van site, I found Nokian Hakkapeliitta CS 185R14 D-load.
MOST EXCELLENT!!!!
They are a winter rated M&S tire.
Just took them on a trip to Spokane, WA from central Calif. First test was Battle Mountain Pass.
Snowing hard, 2-3" of snow on the road. The SkiBumMobile driving like it is on dry pavement. Sweet.
Fled the area with the Big Freeze on our tail, back thru Idaho. In all probably put 800 - 900 miles on snow & ice covered roads.
The only time I got worried was on the way home, after skiing Kirkwood. CalTrans had the R2 signs out - 4WD w\ snow tires or 2WD w\ chains - and it was some of the best road I had been on in the past week. No way I could see putting on the chains. The worry was that the local CHP would disagree with me.
In summary, these tires have proven themselves beyond my imagination.
http://www.tiresbyweb.com/p-7330-nokian-ha...eliitta-cs.aspx $144 ea.
Six of the tires have a DOT date of 1008 - March of 2008. The spare is a 4207.
Mounted by America's Tire in Turlock. Jeremy has been Very Good to me in the past.
Let it Snow!
John
-
Good morning.
I am looking for a person who has remodeled a Sunrader, and has an extra 19" wide rollup door. One of mine was broken and was glued into position.
Also, is it a possibility that someone has an unused Sunrader rear storage box?
If you have such a spare part, please contact me.
Thank you.
powdrhound.
-
Since everybody went to Ryder Fleet Supply to replace their mirrors, by the time I got there, they were sold out...
I found the Velvac mirrors at Mill Supply, Inc.
http://www.rustrepair.com/app2/onlinecat.htm?r=ms&p=wi
They have replacement mirrors, replacement glass, and replacement outside gaskets. And new unrusted mirror clamps.
Aggie, Thanks for the pointout.


Adding a headlight warning chime, variable speed wipers
in Coach ApplianceTech Issues
Posted
I used the 273-0071 chime. My lady says it sound like a two-tone doorbell. I don't care. It will get me to turn the lights off.
Yeah, they had all sorts of buzzers, but who knows what they each sound like. This will work fine.
Changed out the spark plugs today after loosening a couple of the valve clearances (#4 exhaust valve had zero clearance). Amazing how worn spark plug electrodes can get. Should run like a sewing machine now.