canadasunrader
-
Posts
175 -
Joined
-
Last visited
Content Type
Events
Profiles
Forums
Gallery
Everything posted by canadasunrader
-
SunRader Interior Walls/Roof Support for rebuild
canadasunrader replied to whittlesey001's topic in General Discussion
Jay. The wood bracing is not the dream arch I was hoping for, but holding fine. If I could do it again I would follow BR's advice and go aluminum. Seems like a no brainer. I want an accentuated arch up top to stop water from pooling up there. I won't have an air con and not planning to party up there... Eventually a rack and new vents, but any advantage in getting water off is a postive. Rick -
SunRader Interior Walls/Roof Support for rebuild
canadasunrader replied to whittlesey001's topic in General Discussion
Thanks for all that great info, BR. It is much appreciated. I couldn't wait and I went ahead and just used wood and glue and fiberglass on my ceiling. It seems very solid now and has managed to keep a pretty good curve. Once I get building the inside I will prop up the roof with the help of a post on each side about half way down that will live as part of the shelves or cabinets. Mine is a 1986 21' RD that had been damaged by a large tree branch. Before this, it had been neglected and suffered quite a bit of water damage. Although, it is always uplifting - if that's the right word - to see others have dealt with far worse and managed to come out the other end. I drove it from central California where we bought it, up here to Canada. Runs ok but goes through a bit of oil and probably needs a clutch. But I have to deal with the home side first before digging into any mechanical issues. All the cabinets and appliances and the dinette were pretty far gone and had to go. The floor was nasty deep into the rear corner. I fixed it and hoisted that side up an inch or two underneath. Could not afford to do a full steel wing job, but this works. And now I'm finished with the floor. Cleaned it all up. Shored up the weak spots. And put down a solid 3/4" top screwed and glued and fiberglassed to the shell in some spots. Those aluminium side pieces you made are an interesting addition. I may look into that as I move forward. I have fiberglassed in all the voids and have started filling a few holes on the roof. Both vents are in rough shape and have to be replaced. All the windows have to come off and be cleaned up and put back in. Then I guess I will have to get at those dreaded curved front windows. Otherwise, all good and moving steadily forward. Rick -
Ouch, Jay, what a pain. Good that you know how to do all of this. I'm good with what I did. All I was saying is that in retrospect I wish..... As for the dream ceiling.... there are a couple of ways to go in my mostly uneducated opinion. You could get aluminium beams built mirroring the curve at the back. Not sure what that would cost but I envision that being pretty nice and very effective in creating some head space below and a good shape on the shell above. Or you could build it out of wood by simply having hardwood 2x2s or whatever you like fixed and supported at the sides with a curved shape made of thick ply epoxied in on top to create and hold the curve. If you look at the pictures posted by Bound For Nowhere you see that they did the latter made out of wood. And although they don't focus too much on how it all worked they seemed pretty happy with it. Rick
-
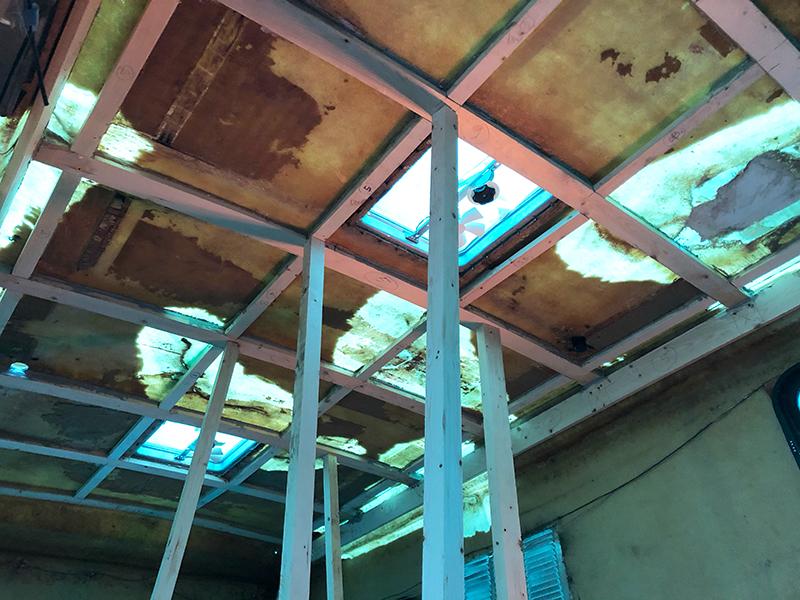
Upward and onward. Last few days I have been shoring up the ceiling. Overall I'm happy with it, but if I could do again I would build or have built custom curved beams. Perhaps in my next Sunrader life? I am about 6'1" and I was hoping for a curved ceiling with some head room down the middle. And this one ended up a little flatter than I had hoped. Today I pulled out the aluminium gas cabinet. And plan to fill the hole in the floor and eventually fiberglass the outside. A little bit of wood rood here but not too much fortunately. There are two steel 1x2 wings coming out from the frame that help stabilize the floor there. I will screw into those to find some strength for the new bit of flooring. Hoping to move on soon to finish the floor and get onto filling some fiberglass holes on the exterior. Rick

-
Jay. Began my first attempt at fiberglass yesterday. It's hovering around 50 degrees here +- and the resin is not curing. Not the easiest material to work with. And adding fiberglass to the beams now that theyre in is a challenge. Having another run at it today.
-
Now that's the way to do it. I'm sure someone could make a living welding wings on sunraders.....
-
Jay. It is pissing rain here so everything is under tarps. Once you get the old ceiling off you will see the curve of the roof line at the very back. I began there and just worked my way forward. There is no need to jack anything. Just place the beam and prop it up with wood. Rick
-
Derek. Yes, but for me it all comes down to what I can afford. The 5200, like some of the excellent epoxy glues, is outside of my range. Sikaflex is about $12 Canadian and by all accounts is excellent. I also used some PL PRemium, both the 3X and the 8X versions, and I like them because they are strong, flexible, and around $8 CDN. Rick
-
Thanks Linda. The boat builders I spoke with said that Sikaflex is one of the best glues available outside of epoxy. Their big worry wasn't that it isn't strong enough or that it can't handle the movement, rather they were concerned that you can't get this stuff off of anything once it's on. When you say "first crossbeam" do you mean the one at the very back? Or the beam closest in the picture [that would be almost the middle of the house]. I think that's a good plan to get one in very solid and then do all the other ends. I will also fiberglass the long pieces I plan to run the length of the wall underneath all of the beams. This will allow me to better tie it all together. Thanks again for your great advice. Rick
-
Linda you are too kind. After using enough Sikaflex to choke a small rhino do I really need to go back and fiberglass the beams? Maybe I can just fiberglass the ends against the shell? Rick
-
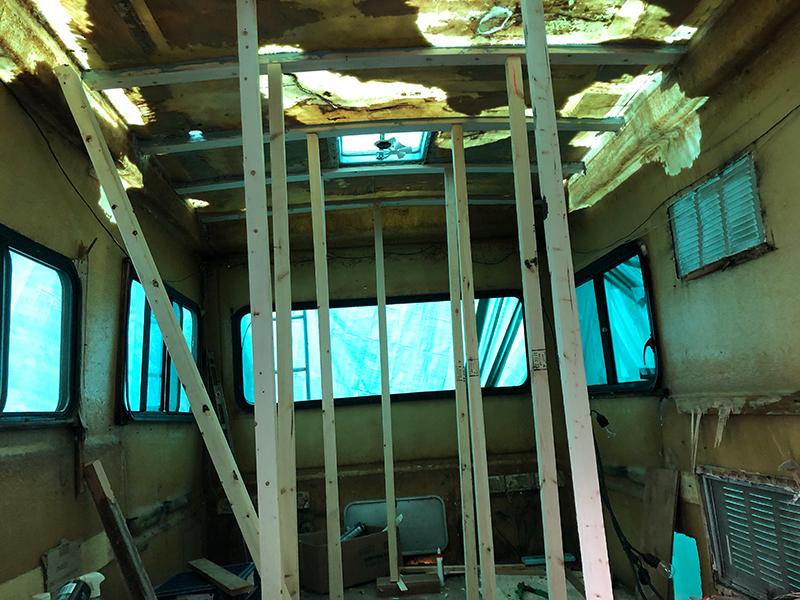
Here's a pic of the ceiling so far. I have read everything I can find here and elsewhere. Seems to be no consensus on how best to do it. Would love to hear from some of the folks here with a lot of experience with all of this. I guess folks are busy with holidays. After a lot of work stripping out what was left of the ceiling and cleaning with acetone I glued in seven 1x3s, cutting them about 1/4" longer than the space making them bow to almost the original shape of the shell. I have no idea if this will work or not but so far so good. This Sunrader took a bad blow to the roof from a tree branch and the shell will never be perfect. I used the best glues I can afford - Sikaflex and PL Premium in various ways. And I plan to glue long 1x4s to the sides for added support where these pieces attach to the shell. I placed the 1x3s on 16" more or less keeping the two vents in mind and plan to add 1x2 cross pieces to connect it all. Then insulation in between. You can go crazy and buy epoxy glues in tubes that cost $40 ea, but I did not go that way. As you can see I have a lot more work ahead with various holes in need of fiberglass and all the windows need to be taken out, cleaned, painted etc and put back in. I haven't even looked at the cab over yet. The windows there look like they leak a bit and of course will have to be taken out and put back in but I am interested to see what kind of rot there is up there.... Rick
-
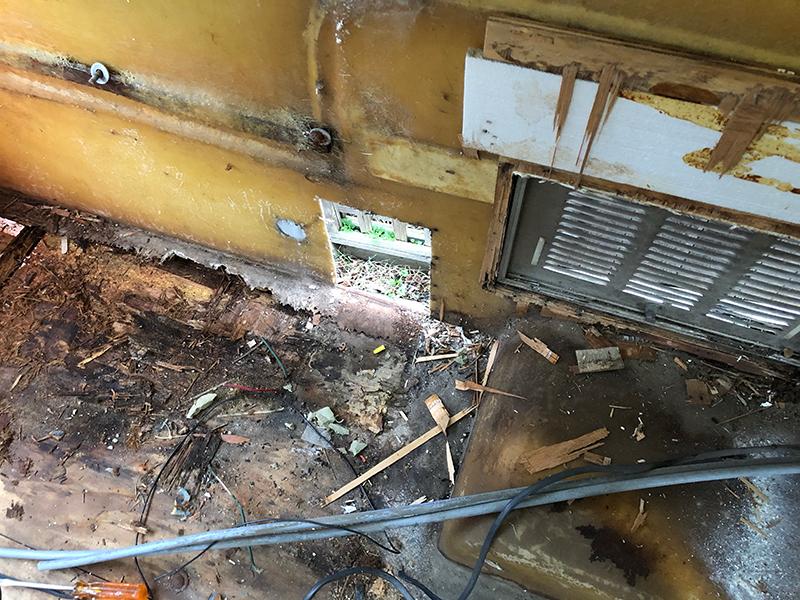
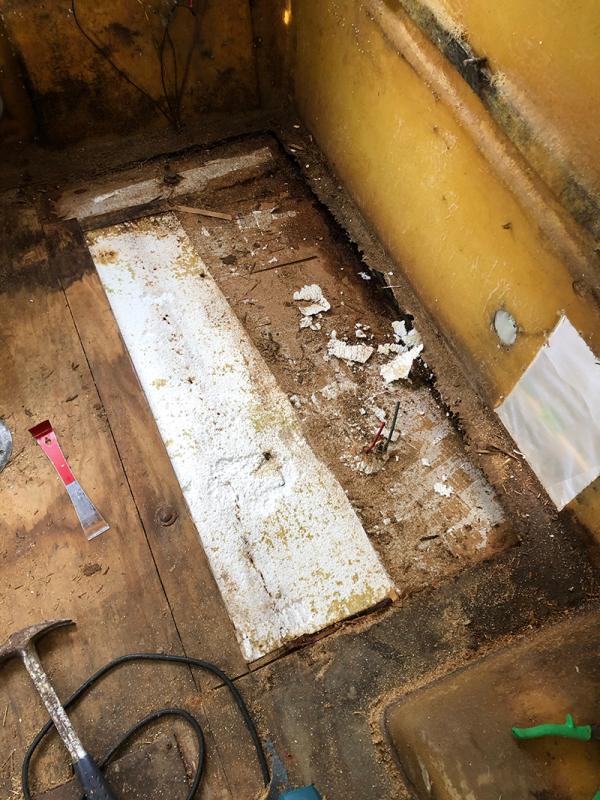
I don't have any photos from underneath but as said the way I adddressed this was to cut out most of the rot. I got right down to the first piece of ply. Then dried it out. There is no support at the wall for the floor on either side. The easiest solution is to weld some braces to the frame underneath extending out to the shell propping up the floor. I did not afford this and went for a cheaper but hopefully effective method. I glued and screwed a piece of angle iron aluminium to the shell under the floor propping it up to its original level. Now I need to fill the voids and plan to glue and screw a new plywood floor over the entire floor. Here are the before and after pics. Right now I am rebuilding the ceiling. I am a complete newbie and am learning as I go. Its all very interesting and frustrating at the same time. Rick
-
As well, if I may ask. In anticipation of rebuilding this ceiling, I have read many threads here. I am not an engineer, or a pro fabricator. Generally I see two schools of thought on the ceiling rebuild. 2x?s cut to match the curve, or 1x2s bent that hold the curve on their own. Any thoughts on which way to go? I plan to get them in next week and then add stiff insulation inbetween. And eventually finish with plywood. Any advice is greatly appreciated. Rick
-
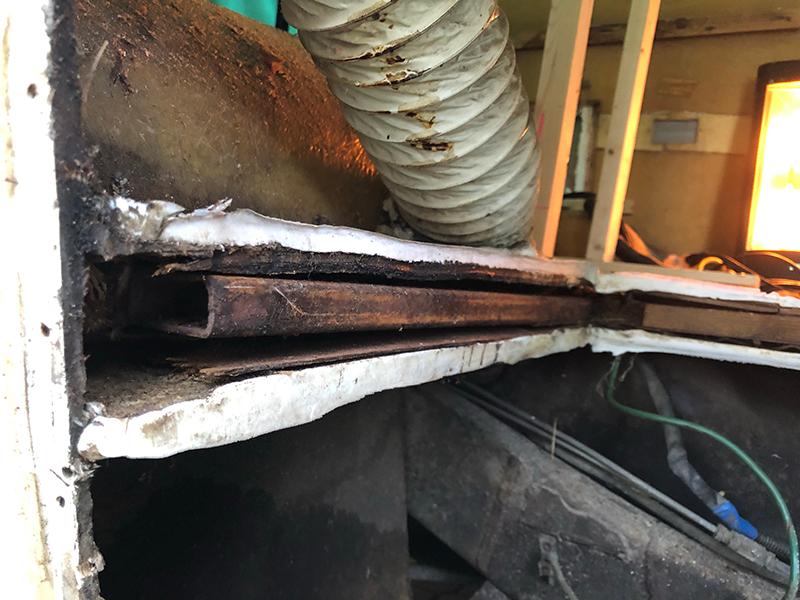
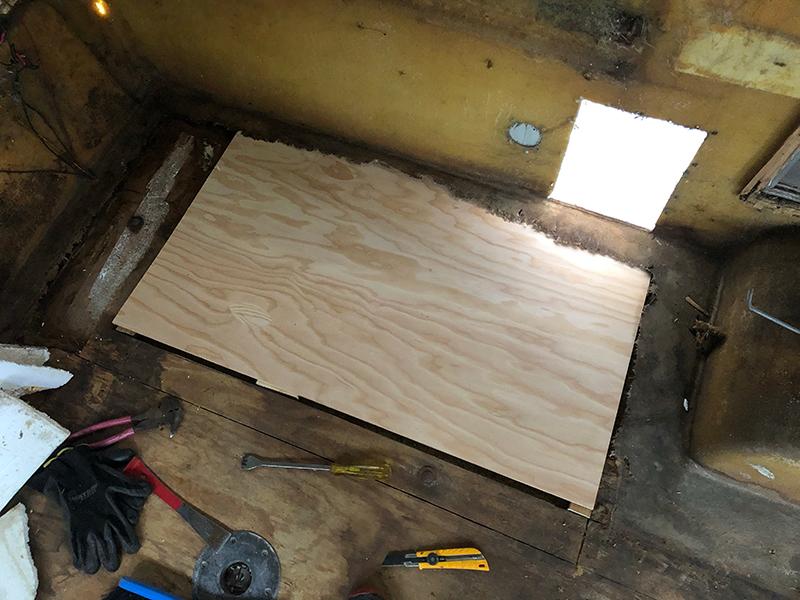
Yes, you are correct. There is no support out there on the sides. Well, at least not on this 21 foot 86 Sunrader. It looks like that would be a good fix, or preventitive measure - welding some braces out to the sides to support the ever sagging shell. However, for now I just went with a driveway fix. Cleaned up the entire area. Dried it all out. Removed quite a bit of the rotten wood and in some places right down to the first layer of plywood. Replaced the styrofoam in that area and topped it with fresh 3/8 ply. Underneath, cleaned the area and propped up the sag to its original level. Bolted and glued an aluminium angle iron onto the shell from the tires back running tight against the aluminium floor. Will now screw and glue plywood down to make a good floor top... onward and upward.
-
Thanks Linda. The area is drying out nicely. I don't have the means or desire to jack anything up. And I've had a good look all around the shell and it may not be perfect after nearly 40 years, but it's the least of my worries. My plan is to do an epoxy pour over the corner area. Then replace the styrofoam and a top piece of plywood. I will glue and screw a piece of aluminium onto the shell between the wheel well and the back corner that will prop up the sagging floor back up to its original level. Looks pretty straight forward. Then I will glue and screw a new plywood top over the entire floor to solidify. Next will begin building the ceiling. I have mostly gutted the whole inside. Every window needs addressing. And two new vents are a must up top. Was not planning this to be a complete rebuild, but that's life. Rick
-
Thanks Linda. How is the shell attached to the wood floor? Is the shell also somehow tied into the steel frame below? Rick
-
Thanks L. Appreciate it. Dug out what was remaining of the top layer of plywood in the most affected area, and then took off the styrofoam to reveal the bottom layer of plywood. It's thin and fragile but after drying seems good. Will build back up with a new layer of insulation, then an epoxy pour finished with a new top layer of plywood. One question: There is quite a bow in the floor from the centre down to each side. Is this how they were built? Rick
-
I spoke with the Rot Doctor this morning and was advised that the styrofoam could disintegrate with certain epoxy pours. I have cleaned the area thoroughly throughout the day and continue to dry it out. Now to prop up the sag and build back up.....
-
Thanks Derek.
-
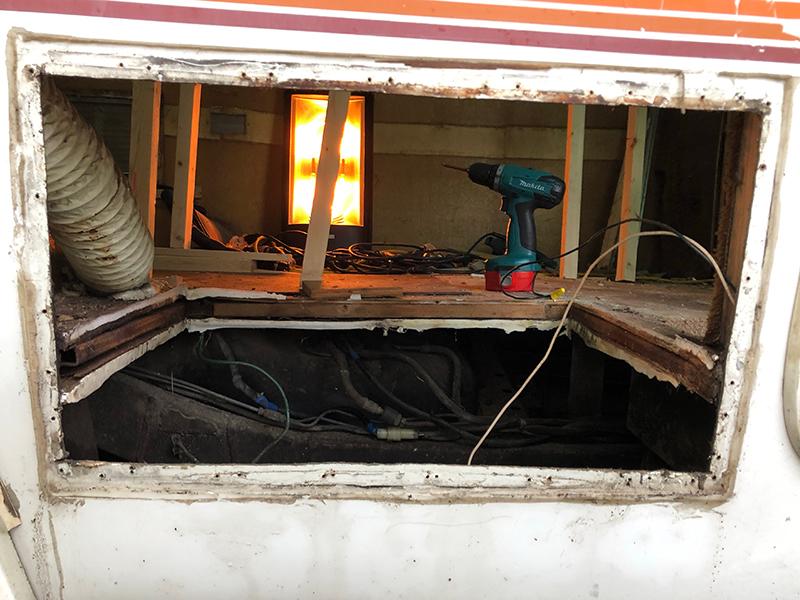
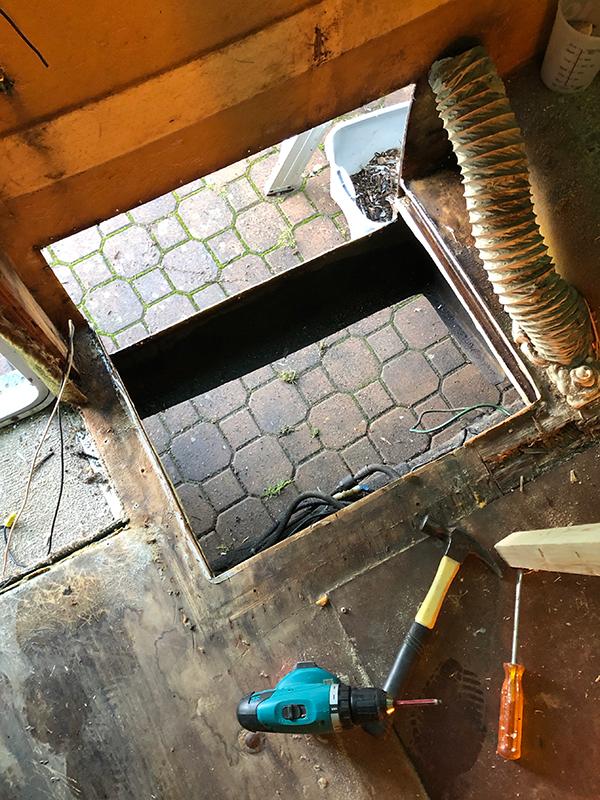
Ok, spent the afternoon digging into the back left corner. Photos attached here. As you can see it is pretty soft. I looked underneath and the aluminium sheet is in good shape. Although is sagging slightly on that back side. It does not seem to be 'attached' to anything on the side. I am contemplating using epoxy glue and putting an aluminium piece on the fibeerglass under there as a brace. Good idea or no? As well, Linda is suggesting drying it out and taking some rot out but leaving what I can. Ok with me. And much preferred compared to completely taking the floor out. However, in this corner the plywood top has completely disintegrated in places exposing the styrofoam core. I see that there is an 1/8 sheet of plywood underneath this foam that sits on top of the aluminium. The foam is what it is but what if that 1/8 sheet of plywood is soaking wet and rotten underneath up against the aluminium? What do I know? But this sounds like it would lead to problems.... no? And what does one secure plywood to on that outside edge? There is nothing there but fiberglass. Do I build a shallow frame all along the outside edges expoxy glued on in order to have a frame to work with? Thanks again. I do appreciate all your experience and expertise. Rick
-
Thank you, Linda. I will do some more research on just how to do that. Rick
-
Hello again. I have read through the many related threads here and elsewhere with regards to rot. We just got our new to us 1986 21' Sunrader home and I am digging in. I knew I would have to pretty much empty him out and build back up as he suffered neglect over the past few years and then had a large tree branch fall across the house. The guy I bought him from did a quick and not so loving fiberglass job using 2x2s across the inside to prop it up. And he covered the cracks outside. My goal is to empty the inside and address the rot. It's worse than I thought. I had not anticipated most of the floor being wet and rotten. And in some areas it's very deep. After reading through a few threads I see that I am not alone in this and many have suffered similarly. I guess what I am hoping is that someone can give me a clear idea on how to deal with the floor. Do I cut it all out and start frest with a plywood insulation sandwich? Or do I go down only so far and build back on top of what is here? Thanks. Rick
-
New to me 86 Sunrader damaged and heading home
canadasunrader replied to canadasunrader's topic in General Discussion
Thank you, but tires are good. And axle good. Two goods out of a lot of not so goods.... -
SunRader Interior Walls/Roof Support for rebuild
canadasunrader replied to whittlesey001's topic in General Discussion
Hello there. I'm not sure why there aren't any responses to your post here. Did you find any threads to help? I'm interested because we are just beginning our project with an 86 Sunrader that I will have to fully gut and build out. Appreciate any help anyone can provide. Thanks. Rick -
Hello everyone. I am new here, and greatly appreciate all of you and your postings. I bought an 86 Sunrader this week. It is in California and my wife and I will drive it home to BC Canada next week. It seems fine mechanically [for a nearly 40 year old vehicle], but the inside of the home is in rough shape. A tree limb fell on the shell and damaged it and some of the cupboards inside. There has been some basic fiberglassing done on the exterior, and it is water tight, however, inside the person who did the work fiberglassed a few 1x2 beams across the ceiling in a few places as a bit of a structure and I can only hope we can make it home without some mishap. I don't really have any questions right now. Just making contact here. And I will post some pictures of our progress forward. Thanks. Rick