


canadasunrader
-
Posts
182 -
Joined
-
Last visited
Content Type
Events
Profiles
Forums
Gallery
Posts posted by canadasunrader
-
-
Jay. Maybe post a picture of the window/windows you are looking to fix?
Yes, there is a plethora of info on those front plexi windows here.I am not building out my home specifically as an RV. More on that later. Rather, it will be mixed use for me, with a little business and a little pleasure.
So, I will have no bathroom/shower. And no built-in stove.I want a fridge, counters, storage, lights, seating.
As to your question on wiring: the led lights require very light wiring... search that. They require specific dimmers, if using.
Otherwise, the wire I am using is pretty basic and not heavy duty at all. Just needs good, solid ground.Overall, I am doing this unconventionally with little to no expertise or talent - like a lot of newbies here
")
I'm making it all up as I go along, with lots of help here and on other forums and sites.Here's a photo.
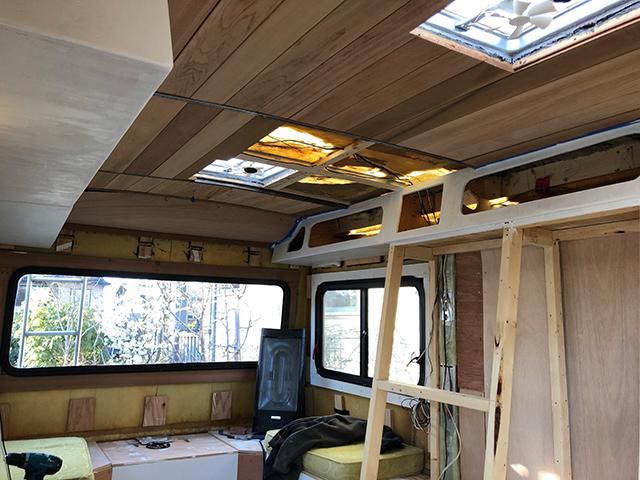
I put cedar tongue and groove on the ceiling. It smells great, is very light and looks like we actually know what we are doing.
Also it's easy to find here in the PNW and relatively cheap.I did not have any of the original cabinets when I bought this Sunrader. So I just made some up from scratch.
I have limited tools here so it was a challenge. But I made some out of cardboard and trimmed here and there until I had something I can live with, then made them out of plywood, screws, glue, bondo and paint. I'm excited to be able to use a couple of excellent B+W speakers I had in my kitchen a while back, and they will sit in the middle rectangles.
These upper cabinets will have doors at some point, and a colour - who knows on that?Also, on the drivers' side wall over the wheel well I am building a large safe out of steel. The door will be two feet square.
ibuilt one of these in my van and it has saved us a lot of headaches.... and does not cost that much to build.
It works with a simple Master lock and key. And is very difficult to break into.
I hate how easy these RVs are to get into and I don't want to have to worry about what little expensive stuff I have when I want to go hiking etc.
Anyway.... I'm just making all of this up as I go along and appreciate the sounding board here.
I love the fact that it's taking way longer to do all of this than anticipated, as it has allowed the project to evolve and change with new ideas.On a positive note: we went to Mexico a few weeks ago [made it back just under the deadline] and dropped the Sunrader off with a mechanic. We were very worried as we had no idea what condition he is in mechanically and we wanted to just get a good baseline reading on everything. Good news, motor, trans, clutch etc all in "excellent condition." His words.
And now we can spend that money that we didn't have on getting new airbags, shocks etc underneath, and making sure everything is mechanically as sound as we can afford to make it. Yay!! Onward now and upward on the inside as we slowly moved towards.... well, somewhere. Who knows what we will end up with.
Rick -
Looks really great Jay.
Nice work.
Which gasket are you talking about on your windows?
There are hundreds of posts in here to look through with windows as the subject. I'm sure all your answers are there.
Let me know if you need any specific help.
For me, I am just finishing the ceiling and attempting to get my wiring diagram together....
Can't afford to get the batteries etc just yet, but planning.
Also built all the upper cabinets and they are now in. And have moved to building my safe and a lower cabinet etc.
Take care in this crazy time.
Rick -
I used fiberglass resin on the inside, but switched to epoxy on the outside.
There is no need to use much mat on the outside. Just a few small bits here and there where the screws went in.
I used a grinder and ground out space where the screw holes were and used epoxy and small pieces of mat to fill.
Filling the void from the inside is the easy part. It's the fairing outside and the sanding and more sanding and more fairing that is less fun.
Good luck....
-
Hmmmm. With all due respect, the easiest way to fill those large holes in the fiberglass shell is:
1. Cut a piece of plywood that is about three inches bigger all around than the hole. And put a good layer of packing tape on one side.
2. Screw the ply to the outside tightly covering the hole, making sure packing tape side is inside.
3. Grind off the screw tips inside as close to the fiberglass shell as possible.
4. Gather your epoxy, or resin, materials together. Fibreglass mat is best for this use as it is much stronger than cloth.
Cut several pieces of mat beginning smaller than the hole gradually getting bigger until you have about 4 or 5 layers ending with one that is two or three inches bigger than the hole.
Use the roller to roll to the outside all of the extra epoxy.
When completely dry, remove the plywood and begin the process of finishing the outside.Rick
-
Thanks Linda.
MIxing up a good batch of epoxy paste is probably best, but you can't beat how cheap bondo is and how easy it is to work with.There are a lot of mixed reviews on the web, but many pros use it regularly with great results for a lot of different projects.
-
All I'm saying.... is it works for me. And I am simply passing on the info.
-
Thanks Derek.
I used it in various places inside my Chevy Express van conversion three years ago and have not seen any cracks.
It's plyable, sandable and holds paint well. Not using it for structure, just filler and great for curves and difficult areas. -
As a newbie here I want to encourage others with DIY aspirations to consider bondo for its many excellent uses.
It's a cheap alternative to epoxy and it's great for filling gaps in almost any material. It sets up very quickly and can be sanded soon after application.It's great for creating curves in those difficult to finish areas when everything seems out of whack and a straight line is as elusive as a sunny day here in the PNW.
I am currently building a couple of upper cabinets and using bondo to fill that often difficult space where the plywood meets at an angle that needs to be softened.
Over and out for now, Rick
-
Thank you.
I will take all of that great advice.
Rick
-
Hello there.
I have been rebuilding the interior of my 1986 21' Sunrader for a few months now.All good so far.
Last week I dropped him off at the mechanic's for a good once over and to address all things mechanical.
All good so far.One issue I would love to get some advice on is the rear end.
I have the six lug axle etc so I am assuming I am fine there, however, I am wondering if anyone can chime in with suggestions on what is a proper and good set up for a 'normal' 21' Sunrader as far as shocks and springs and airbags go?
I don't see any airbags on mine, and the mechanic says the shocks are very old and rusty.
And when I drive him over even small bumps in the road there is a pretty significant bang in the back as if there are no shocks etc at all.So... just wondering if someone can advise on what is ideal? What to buy and where to go from here?
Thanks again so much. Hoping to actually get on the road soon.
Rick -
Looks great. I am definitely interested.
Rick -
Jay. If you can afford it you should use 3m adhesive.
5200 if it absolutely has to hold forever and will never be able to be removed.4200 has good hold as well, but in a pinch can be taken out.
I went with Sika polyurathane....
But you can also use an epoxy that comes in a tube.... but it is the most expensive option.The steel studs I used are just the regular sized ones you find at any hardware store.
They come as eight footers and I cut them down.
Also, I doubled them up. Two together make for a nice tight rectangle of light but strong steel.
As for fiberglassing, if you heat up the space inside and mix the epoxy properly.... it should cure fine.
-
Jay, looks like a nice clean slate.
I glued the headers in and they aren't going anywhere. I wouldn't drill more holes into the shell unless necessary...
And I used steel beams because they are easy to find, very light, and actually quite strong, especially when glassed in.
Rick
-
Jay.
I bent the beams in the garden. Ha!
I have some solid raised beds and I used your advice and went slow bending a little at a time here and there until I had a reasonable shape.
This is not a perfect science. And I am such a poser, it hurts. But I am having fun and doing my best.
I wouldn't worry too much about perfecting those beams now that you have them in. I would think function is paramount.
As well, once you get your ceiling cover in, the beams, exposed or not, will seem light years away with everything else you are doing.
I am not going to glass mine in. I used a few screws into the wood, and a good amount of Sika polyurethane adhesive. I want to make sure the beams are attached and doing their job without being too rigid. The poly is great for RV work because it is a great glue but becomes rubber and flexible. I don't like the curing time of 5 - 7 days, but it all takes time.
I now have a bunch of 2x2s holding it all up a little higher than it will finally settle to, and I always hold my breath when those are finally removed.
As for the insulation, I am just finishing up my four vertical steel beams. They are glassed in, but I also added some rubber bumpers into the space behind them.
Again, I'm just making this up as I go. Instead of just filling the space behind with spray foam, I first put in a few small pieces of plywood using polyurethane to glue it to the shell and to the steel beam. The poly cures nicely into a rubber-like fill that will allow some movement.
I am planning to use the wool. I cut it down to one inch sheets with a bread knife and used 3M spray glue to hold it to the shell.
I am waiting until I pull some wire before I can even think about getting the wall and ceiling panels going.Voids? Fiberglass. I just followed what has been advised here and on the web. For my initial cover I did not use epoxy because it is expensive. Instead, I used resin, and it's about a 1/4 of the cost.
It's good, and fine, but a little trickier to work with than epoxy. It is very toxic to work with and you have to wear all the protective gear, masks etc.
I screwed thin plywood pieces onto the outside of all the voids.You take packing tape and stick it to one side of the plywood before screwing it on. Resin does not stick to the tape making it easy to remove the ply once you have the insides done.
On the inside you need to grind off the screws so you have a flat, clean space.
Then use sheets of fiberglass gradually larger matt and build up layers until you have five or six layers ending with one sheet of matt that covers the hole and about three inches all around.
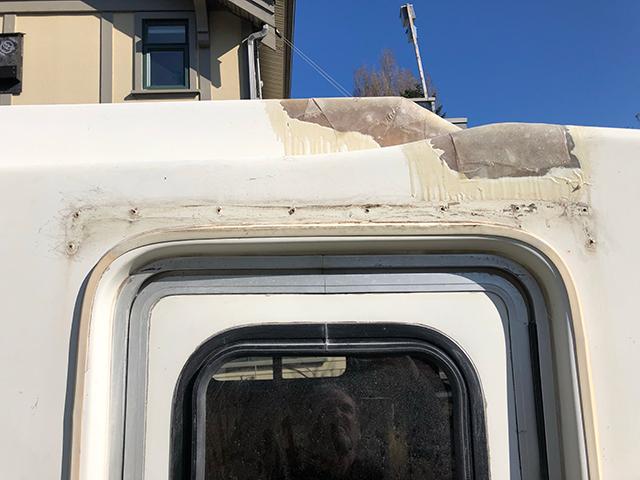
Those Bound for Nowhere folks have some pretty good pictures, video and info on how they did it.I am still working on the outside of the voids. It takes a lot of patience to sand and fair all of this.
I am not sure what vents I will need in the end, so I am just covering up everything.
I am not going with propane so I don't need a big hole for that.
I am not sure what fridge I will get and if I even need a vent for that.
I always cook outside, so no stove vent.
Who knows where this will all end up, but for now I will just get the outside as good as I can, with plans to paint.
Rick -
Jay. I followed your lead and installed 3/4" steel beams.
I bent three of them into a curve and after notching the headers, I glued and screwed the beams onto the wood structure I built to replace the rotten ceiling.
As you said, the steel seems to hold the curve well.... so far. -
Hey Jay.
How goes the battle?
Did you glass your ceiling beams in?
How is it all shaping up?
Rick -
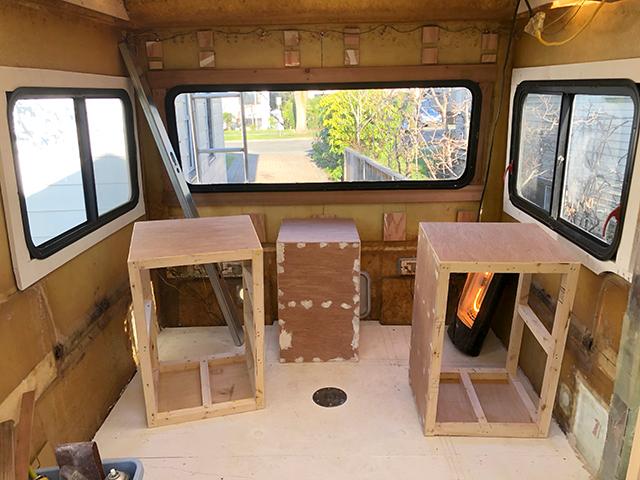
Here are some recent pictures.
I have been at this 86 Sunrader now for about seven weeks.
Was not the plan, but you know what they say about plans?
And just so you are aware I am doing all of this on a very tight budget.I have tackled this so far:
Gutted the entire home.
Cleaned and cleaned and cleaned some more.
Pulled out rot in the floor.
Jacked up one side of the floor that was badly sagging.
Replaced some flooring, then glued and screwed a final layer of 3/4 in plywood down.
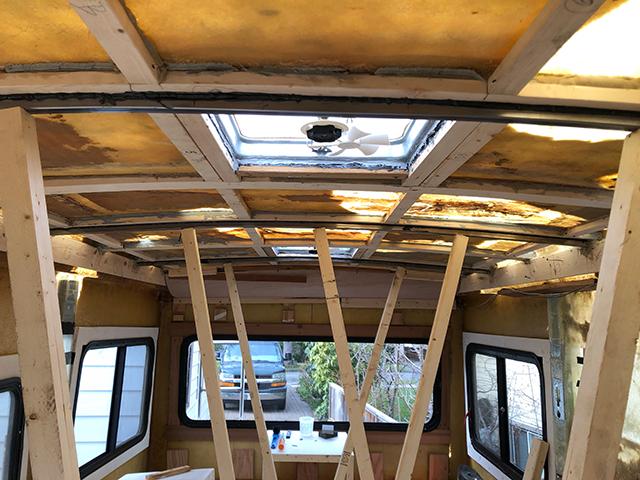
Pulled out badly built 2x2 beams glassed in by the previous owner to help with a major repair on roof that was damaged by falling tree branch.
The previous owner repaired the roof and some of the side walls split by the tree, but he did a very quick haphazard job. Perhaps that's why I got it so cheap?
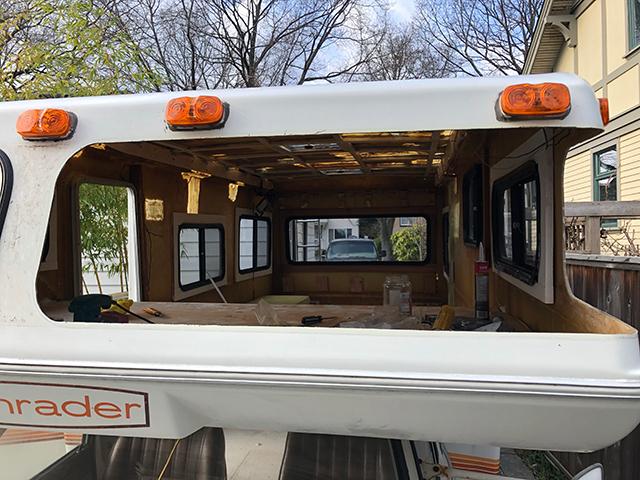
Replaced the entire ceiling using wood beams and support.
I used 1x3 and 1x2 to do this with screws and glue holding it all together.
Now I am seeing that I should create a couple of steel or aluminum ceiling beams to shore everything up and reistablish a good solid curve. It's on the to do list.
Fiberglassed all of the voids left by various vent and exterior cabinets. I am now in the process of fairing all of this out. Again, more to do.
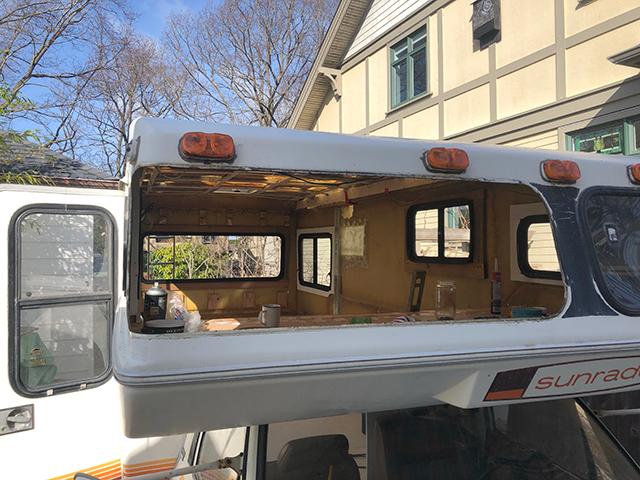
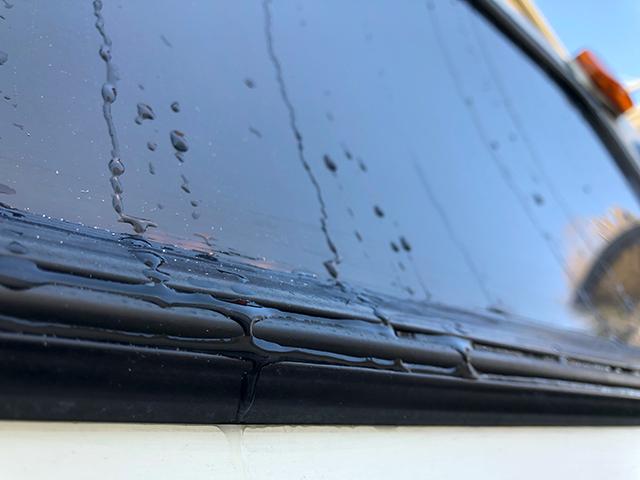
The side walls took a pretty good blow by the tree so I am glassing in two vertical steel beams on either side. Two down, two to go.Pulled all the windows out. They were all leaking and all wood near them was completely rotten.
Cleaned inside and out around the window voids. Built new frames. Butyled all windows and put them back in.
I added a thin bead of some very good polyurethane caulk to outside of all the windows.
Replaced the smoked glass in the bathroom window with clear glass.
Pulled out the two front plexiglass windows. Cleaned cleaned cleaned sanded etc.
Then soaked the two different gaskets in hot water and soap. They cleaned up nice and look like new.
I spent a couple of days heating up the plexi trying to get them to straighten back out with varying degrees of success.
Perhaps in retrospect I would think about taking them to a pro and getting them straightened, if that even exists.
Replaced both windows and gaskets, then sealed the outside with very good polyurethane.
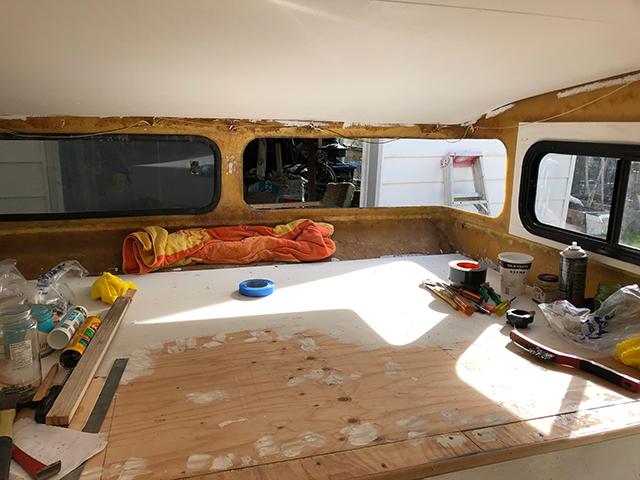
Build the boxes that will live as the rear dinette. Still working on tops, hinges etc.
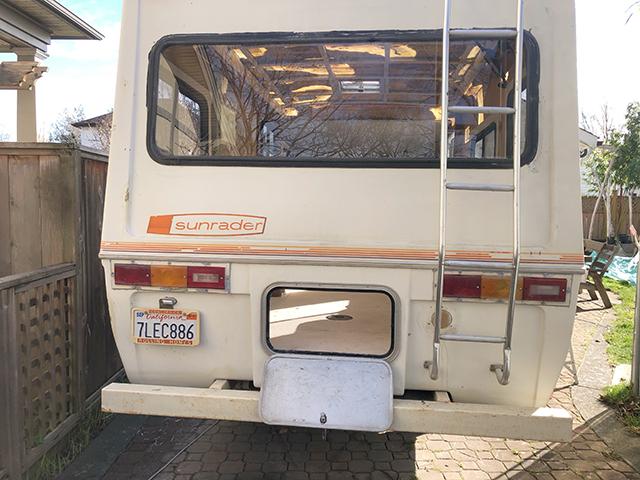
Pulled out the rear lights. Cleaned them, fixed cracks and holes, rewired and put back in.
Pulled out both original ceiling vents. They are in rough shape.... but I cleaned them up, cleaned and sanded the voids, and put them back in... for now.
Cleaned up the "garage door" and replaced the seal. Working good as new now.
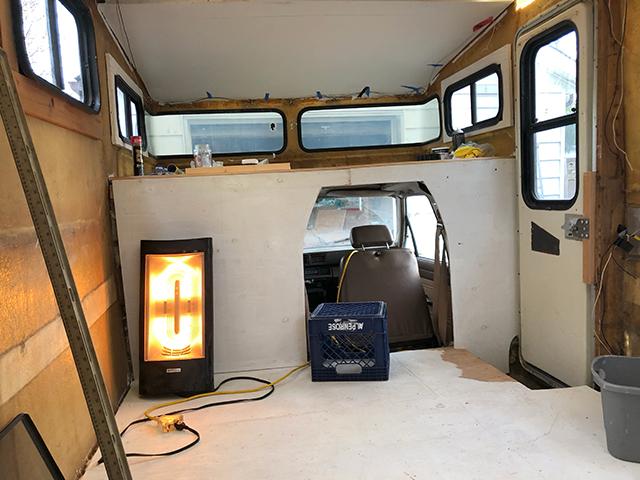
Completely rebuilt the cabover bed area. Now priming and painting the wall panels and ceiling.
Built a funky shaped little pass through and will add a slider with a lock system.
The reason I went with this shape is to allow the passenger to put the seat back in a more comfortable position when we are driving.
Often on the road the passenger wants to rest but doesn't want to go back into the house...
Ok, enough for now.
I appreciate everyone here. I would not have gotten this far without you.
I will again post some photos as I progress....
Rick -
Thank you.
Am just getting them back in now and trying to wiggle it all back together....
-
Under the silly question category:
Can I please ask, what goes in the gap between the side wall panels and the rubber gasket on the inside of the cabover space?
Thank you. -
Jay.
I have not looked into sound deadening materials.
Someone here on the forum should be able to answer that, or just google and one of those van life folks will definitely have a blog or youtube post about it.
I am planning to put a thin layer of cork underlay on my floor before I put a final something on top as a floor. And I know that the cork will provide some help with sound.
And then I plan to put a pretty good layer of the Rockwool onto the wheel wells before I put cabinets in.
I am hoping that will be enough. Who knows?
Windows.
If they are not currently leaking then I wouldn't touch them.
Simply clean them up and move on.Mine were leaking and I had to deal with them while I still have everything exposed.
Rick -
Derek.
There is a big difference between regular fiberglass batts and rockwool.Fiberglass is not recommended for anything moving unless it is completely sealed up, and even then it has a tendancy over time to break apart.
The rockwool is easy to cut as it is stiff. You can easily cut it with a bread knife into any dimensions you like.
As said, it's not my first choice, but it will work.Jay.
Like you, I don't know much, that's why I'm here.
Learning a lot.
Yes, I plan to insulate the wheel wells etc. Not there yet, but that seems like a pretty easy job compared to everything else.
Just finished the second front plexi window now.
They are not easy.
And I tested the first one and it is leaking a bit. I am assuming it is because it is curved.
I heated the plexi up and put some patio stone on top to try and straighten them. The second one seems a bit straighter than the first.
I plan to use some polyurethane caulking around the top and on the inside of the bottom of both these windows just to make sure before I close up the cabover bed area.
Rick -
Compared to rigid foam, the best type that I can't even find here, the rockwool, at R22, and $50cdn a bail is going to be just fine. Some of it will be cut down to 1" thick, but around the wheel wells etc it will be great thicker.
Is it perfect, of course not. But it's going to be fine, and it's what I can afford.
Rick -
Bravo Jay.
Looks good so far.
Rick -
Jay.
This is what I was looking at... but there are lots of different types on the site.https://rti.rockwool.com/products/industrial/prorox-wm-950-es/?selectedCat=industrial - all africa
As well, if you dig deeper into the Rockwool website you can find thinner insulation designed to be used with fabric etc. Similar to Thinsulate.
The wood beams and grid that I built on my ceiling is fine, but I would like a little more curve overall.
My situation is unique in that the roof suffered extensive damage from a large tree limb. It tore large holes in the roof and although I got it after someone had done some epoxy repairs it was in rough shape. I have it now to a point where I believe it is structurally sound and nearly water tight, it is a work in progress.
Also, as Linda was pointing out, structurally it just makes sense when you have everything exposed to put at least a couple of metal beams in.And as for what WME is saying here:
"Take a plate of 1/4" aluminum 4"x4" cut a 1"x1" notch in the in the middle of the top, "U shaped". Cut the cross beam to the EXACT length needed. Install the cross beamput glue in the notch and slide the plates up into place. Bolt the plates in. The walls of the notch will take the shear forces.
I suppose you could even use 1/2" plywood for the U bracket."
If you cut the cross beams to be "the EXACT" length needed, how to you get the curve?
Is WME suggesting that your idea of straight steel tubing will work using his method?The measured curve is about 3/4" at the middle. So in the big scheme it isn't that much.
But as you have pointed out, every 1/2" counts...Rick

Sunrader Floor Repair, Gut and Rebuild
in Improvement and Do-It-Yourself Projects you have done to Share!
Posted
Jay.
The cedar is nice because it is bug and rot resistant.
Usually it comes as 1x but some mills will plane it down thinner.
I thought about putting panels into the ceiling and then painting them, but it was too tempting to do something different.
As far as the windows go....
Take one out to give one a go.
Lay it front side down and take all of the butyl/putty/tape/glazing out. I lightly used a heat gun to soften it up.
Use a wire brush and clean it all up as good as you can. Then wash and let dry.
Clean and sand the window hole inside and out.
Get fresh butyl tape and retape the flat outside area in the back of the window. Put the window back in.
Some of the butyl tape will squish out. Trim that off.
I finished all the windows with some really good polyurethane caulking along the top.
I'm not sure what that is in the photo you posted.
Someone else will have to chime in on that. Looks like the part that holds the window into the frame.
Is it all one piece? Or is it putty that has been put in there and is chipping out?
Rick