thewanderlustking
-
Posts
520 -
Joined
-
Last visited
Content Type
Events
Profiles
Forums
Gallery
Everything posted by thewanderlustking
-
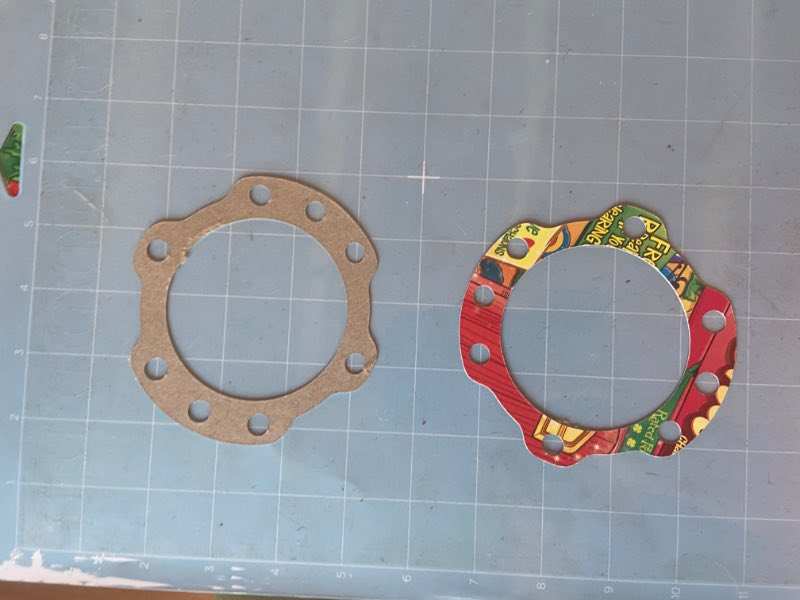
Thank you! I am pretty happy with the results! The Cricut Maker is an interesting tool to find weird and random uses for... Very versatile! The design software has a few, quirks... But overall it is pretty easy to use. It does need an "expert" mode to allow a few more features. Especially to be able to edit material cut settings and create custom profiles there. The gasket took a small struggle to slip it on. It probably needs to be about 1.5mm bigger in diameter to space the holes out just a hair farther. Good enough for now though! It is a free cardboard gasket so I don't really expect it to last another 40yrs haha!
-
Some ultra high tech secret material here!!! Not sure why using a Lucky Charms cereal box amuses me so... Nope, the locking screws aren't in yet.

-
Pictures, I promised pictures! I didn’t take many while doing the brakes but here is one I posted in that thread. Everything was super clean, no wheel cylinder leaks. The problem appears to just have been it needed a clean/lube/adjust and it had bent and rusty pad pins. A whole hardware kit for 4 pins lol… Well I couldn’t get axle flange gaskets locally, or quickly online. The online ones were mostly showing generic pictures. This one though should be correct. The cool thing is with the right picture of the part, I can just make it myself with the Cricut But looking for the above, I found this gem! Most of these are too pricey to bother with, but this one works out to be just over $30 shipped. Unfortunately it would come from China. In the interest in forward momentum I decided to just make the gaskets. Recycling is good! Unfortunately Cricut decided to do maintenance and the software is heavily cloud based. When I went to cut, it showed an error. Now Design Space won’t boot past the initial pop up. Oh well it’s ready to go for tomorrow.
-
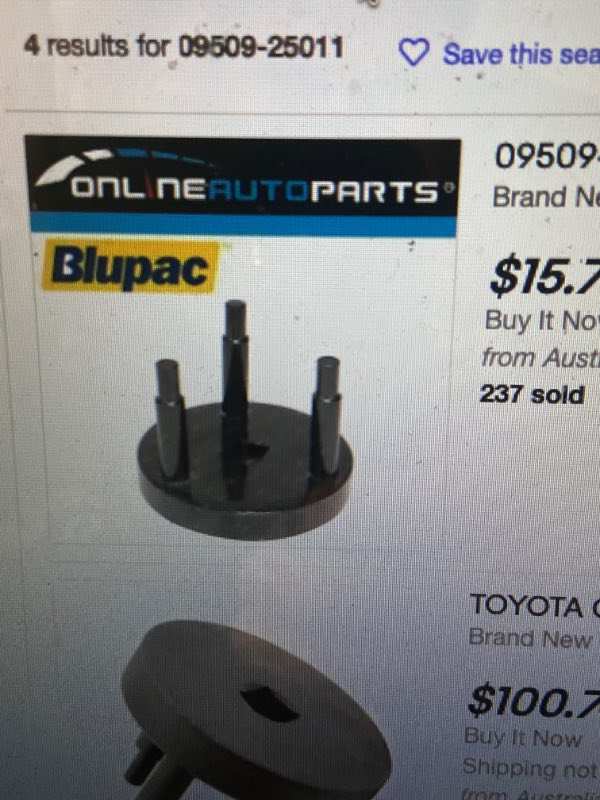
I am in Florida. I just shipped two out to California for Jimijames. They were a little ove $100 each to ship. I charged him $250 for both. I have two more if you want them, but check around locally first as you can almost bet they will be cheaper! And again, you probably need three anyways. The ones I have are the 6 hand hole wheels.
-
Hmmmm... There is one thing I didn't look at closely enough to see if it could be a problem. If the way the front parking brake levers work could possibly cause it to unbalance and not release one side... I can't picture how that could be the case, but a quick glance up there and it wasn't really pretty and clean.
-
They kinda did form a triangule but if it normally is 4, I will look again. It was hard up not moving at all. Like there was still another unseen bolt.
-
Alright I will try that exactly next time (tomorrow probably) I work on it. I did a variation where I tugged on each cable and verified it pulled the internal lever locking the drum. But I also haven’t gotten it to lockup again, other than the initial time today right after putting it back together. For a reference point, I pulled the PB handle 3 clicks at a time until I couldn’t turn the drum anymore. It took 15 clocks. So this probably isn’t a case of I didn’t fully release it. It’s out a significant amount before it stops. I would be much happier I’d I could get it to lock up again before I put it all back together and on the ground…. Adjusting the adjusters…. So with them all the way in, the drums go on snuggly. Not the most reliable reference point, but it’s hard to tell between brake drag and freshly repacked bearing drag on this setup. I am thinking I might pull the parking brake 9-10 clicks asks then adjust until tight. I am thinking I will also loosen the bearings bit more. I didn’t change bearings, so they probably don’t need to be as tight as fresh ones.
-
That was my thought too, a bad hose would lock both sides. Still, I plan on replacing all three soft hoses before I do the super duper flush. I think I grabbed a gallon of DOT 4 for an extra bump up too. Ugh I just lost most of my response... Alright I am going to go beat on the brakes and parking brake some more and see what happens. So far I haven't had another lockup. I will see if another abuse session causes it to occur again. So far it has still only done it the one time. Wheel cylinders appear to have been replaced in the last 5yrs or so, but no record in my piles of receipts. The rubber is soft and both still have modern looking and soft bleeder caps. These seem to crumble here after more than 5-6yrs. Not a very exact carbon-dating methodology... LOL
-
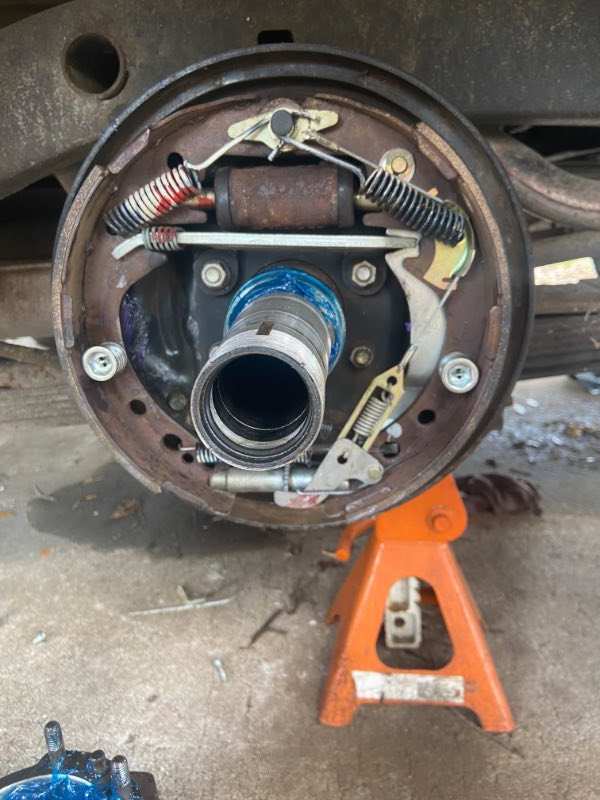
Alright I have both sides back together now with drums back on and bearings adjusted, but not locked down. I went into the cab to pump the brakes and operate the parking brake. My assumption, based on poking about inside here, is that operating the parking brake spins the adjuster out. So I did this about 10-15 times. (This picture makes it look a lot rustier than it actually is. When rinsed off with brake clean, it all looks brand new. Including the shoes.) When I released it and went to check, the left side (above in picture) was again locked up. I had pulled both sides apart, inspected, cleaned up, and put back together. The only issue I found was bent and very rusty brake shoe holding pins. This side had slightly more surface rust where the shoes sit on the backing plate. I took a few extra minutes to clean this up with some emery cloth and extra care in allaying caliper grease. For the self adjusters (on both sides) I used anti seize. High temp wheel bearing grease. I can't stress enough that I found nothing "obviously" wrong, beyond the bent brake pins (now replaced) and the rusty slide surfaces (now cleaned and lubed). But it had again locked up when I did my testing and adjusting. I cycled the parking brake lever again, and it freed right up. Drums feel correctly adjusted, but I haven't puled them back off to double check. I am stuck at a weird crossroad point... I don't know if this is a simple case of "operator error" and I am having this happen due to perhaps the odd dash parking brake lever not releasing that last 1-3 little clicks. It does seem to happen right after releasing the parking brake. I can't swear to it, but I am fairly sure every lockup has occurred right after parking it, and cycling the parking brake... If so I can finish putting it back together and take more care with the parking brake release. I also need to try and adjust the park lever slightly to get the lock to always engage. I could probably not rely on the PB so much if so. But... I do like the extra security of using it. Or perhaps I still have an actual issue that I am simply missing... ??? Parking cables move easily when I tug underneath the truck. I can hear the lever mechanism in the brakes working and releasing. Everything in there looks brand new. No leaks on the wheel cylinders. Fresh pins, retaining springs, and cups now. The only parts I feel aren't fully vetted, are the master and proportioning valve. Everything else has been gone over pretty darn good. I see no reason why the master would do this. And should be able to rule out the valve, as it only locked up on one side. I still have the axles out, makes turning and checking much easier. Not sure how to proceed... I am going to go back out I guess, verify both sides are free then just pump the ever living heck out of the brakes for a few minutes and see what happens. Without touching the parking brake. Then see what happens after I cycle it a bunch of times.
-
(I updated the link above.) Alright, going to make another big push on this today! I am going to be moving to a new shop next week, and really need to get this there before I do to align it. It drives dead straight, but the steering feels a touch "loose". I am pretty sure I will find it slightly toed out, super bad for wearing down tires. Today's goal is to get the brakes back together, I have all the parts I should need now to do so. And I want to get the transmission temp sensor installed while it is up on the ramps and jack stands. No clear verification on what line is the feed/hot line though... I need to pull off one of them and start the truck up. Ugh, it will be a mess. I am reasonably sure it is the forward line, but I only want to do this once. Sure, I could put two sensors on and monitor temps before and after the cooler, but I don't care enough to waste time/effort/money on installing a second adapter and sensor if I can avoid it. I am going to try to get pictures, but kinda hard to do once my hands are all dirty. Alright time to get to it! Wish me luck!!!
-
HOLY CRAP this AC unit is GLUED to my roof... Like if the labor rate at the local RV places wasn't $170-200+ an hour, it would be getting dropped off to let somebody else fix it... It is pretty bad. Alright, so it is the standard old Coleman 8k BTU unit. How many bolts hold this on, just the three long ones I found??? With it completely unbolted (well at least the bolts I see, the third one was WELL hidden), I can't even budge it the slightest bit. It looks like somebody lifted it up, and then liquid nailed and siliconed it to the roof instead of replacing the gasket. I can't verify they "nailed" it for sure, but it most defiantly has silicone squeezed out between the gasket and the roof frame inside. And then the glue/silicone/tar holding it to the framework on the outside. I am actually concerned I will rip a section of the roof up along with the unit. Unfortunately with labor being what it is now, I am probably looking at a few hours MINIMUM to get this sorted out. I could live with 2, even 3 hours at $170. But it is a catch 22. More than that means the unit had to be carefully cut off the roof, or repairs made to the roof. Past that magic mark of 2hrs, I am likely going to either pay out the butt for labor, or need a new ac unit and pay out the butt for that... At least if I do it and it takes me 3-4 days, it won't cost me too badly I hope. If I don't blow the initial $300-400 on labor, I can stretch up to replacing the AC a lot easier. I am finding some AC units that actually will run on 12 to/or 24v DC. They aren't cheap, but $1500 to be able to run an AC off od color and a battery bank "might" be interesting to consider. But this is a rabbit hole to go down later if I don't save this dumb thing... I don't have a good plan of attack in mind to tackle this. Ugh. I would rather replace a head gasket or even rebuild an engine than tackle this. All about comfort zones! Anyways, I will get my vibratory saw out sometime soon and see if I can safely cut the case off of the support bars. We looked into it the other day and it wasn't going to be a job we could make progress on in the time we had left. My biggest concern is that any attempt to work on this is likely to make it much worse, until it is fixed. This isn'r a project I can tackle a little bit on and then walk away or take a break. If I end up having to replace the unit, I have a hole in my roof until I do...
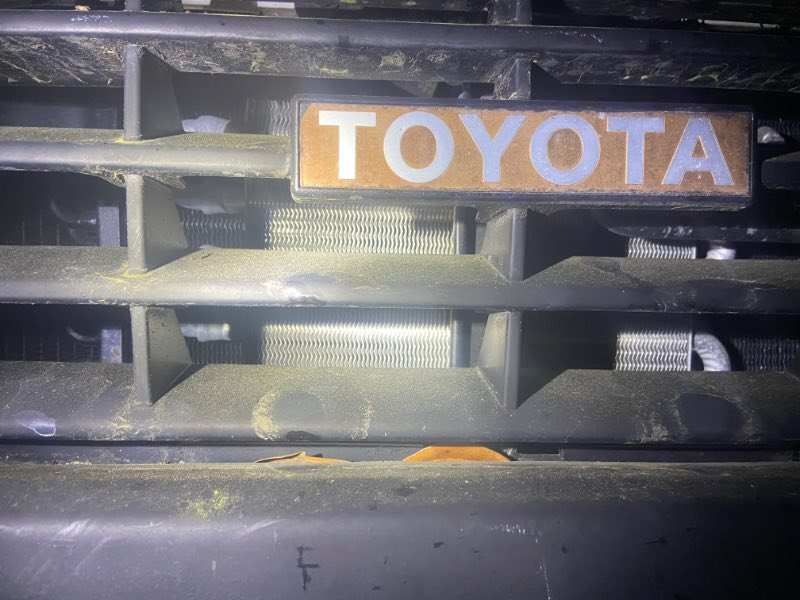
-
Able, there are two main ways to approach this conversion. 1) The hard, but (in my opinion) slightly better way. You will need a "spy network" to find a donor truck. Suitable donors are, as Linda said, any 87-92 Toyota RV. Also there are some utility and haul trucks that were made with full floating rears and dually wheels all around. I won't go into extreme detail here (unless you ask for more), this isn't a hard approach for a lot of us, but it takes some SERIOUS preliminary leg work. I think it took me one a year to find the donor truck, and it was my boss that happened to be at the junkyard at the right time and actually gave me the next day off so I could go get everything! Why is this better? It converts the front brakes to larger rotors and calipers and puts factory parts on it. Again, this is FOR ME. It only took me about 10-15 minutes a side to strip down and pull everything I needed. Putting it back together later that night took on my truck was maybe an hour. 2) Get GOOD adapters. The ones Linda posted up look phenomenal. I suspect the price tag matches too though. I am going to guess they are $300-400. Cheap adapters are DANGEROUS. So you need to be SURE you are getting quality. These are proven, go with them. Both of the above solutions also have a problem to solve, wheels. You can't find the correct dually wheels easily, and you will need/want 7 matching ones. The first solution will HOPEFULLY still have a full set of 6, if lucky 7 wheels. Getting the spare down without the crank tool SUCKS though... You have 4 wheels, so in theory you just need 3 more. I mean going through all this trouble and not having a spare is almost pointless. Again finding the wheels will take time. (I do have two sitting here in need of a good home still.) This isn't a cheap conversion either. I did all the work myself INCLUDING mounting and balancing my tires, it was $1300. This is with me getting tires at cost, pulling all the parts myself, and installing them too. With the hourly rate for mechanical work climbing up RAPIDLY and most shops now at to over $150 and hour, that's easily $600-800 saved... This is the point where putting the adapters on would defiantly save money over the front end conversion, if you can't do that yourself. Anyways if you are interested in more details of that front end swap, let me know. It is on my list of things I should do write ups on.
-
Linda, out of curiosity just how much is a set of those adapters? They are super nice!
-
I mean the line on the transmission itself. Is the line closer to the front of trans closer to the engine the hot or feed line? We are assuming whoever put the cooler in did it right… I will verify the hot is feeding into the top once I verify what line is the feed. Again trying to avoid the mess I know I am likely going to have to make to figure this out….
-
Can anyone verify that the front line is the hot feed line?
-
Those look really nice and the price isn’t horrible. Fortunately mine isn’t in bad shape. Yeah the transmission cooler nipple is broken off, but again I live in Florida so not horribly concerned about that being bypassed. On the other hand it wouldn’t be too hard to repair the broken off nipple….
-
Super interesting! I actually learned a good bit from the grannies cooler article. I would have a few counter arguments with the radiator one though… So yes aluminum is stronger and wider radiator tubes CAN be utilized. But in the realm of direct factory replacements, they usually aren’t very thick. In the aftermarket performance and racing industry, for sure a huge advantage. Problem is most aluminum radiators utilize plastic end caps. These are rare to last much past 10yrs without becoming brittle as the chemicals leach out or into the plastic. While they can last longer for sure, past a certain point they become easily compromised with a bump or slight overheating. Toyota is one of the WORST offenders of this too! Their telltale warning is the plastic turns brown or even tan. A well cared for copper radiator though can easily last 40+ years. I’ve worked on a few cars from the 50’s that still had their original radiators. Something has to be said for that!!! In my experience aluminum radiators are much more prone to electrolysis and getting eaten from the inside out, poor maintenance and being left to sit. Like our vehicles frequently do. Now if my copper one became damaged and not repairable, I would put in a modern aluminum one with plastic end caps. It’s what is readily and reasonably available. I would accept the short lifespan as it might be. If I found a “racing” full aluminum one at a reasonable price, yes. But I suspect I would find re-coring or replacing the copper one to be way cheaper. I don’t know and definitely not an expert. Just my personal observations over the years. I think each has their good and bad points. The transmission cooler article though definitely makes me want to fix the internal radiator cooler.
-
Wadingthroughlife I could be wrong but I am pretty sure the AC is a more modern Dometic unit. If you really want to know look up Dometic Brisk Duo, and count the vent slats to verify it is the same. No idea on the rear box. Zoom in and see if you can compare that to other online pictures. The logo isn't very clear, but you might get lucky there. Heavier flywheel in short will probably not do you any good, but this is speculation as we don't know what you have. Obviously, first off you need to have a manual transmission. Turbos usually like quick reving motors, this does the opposite and slows it down. But it keeps momentum and lets a motor's rpms get much lower. A turbo is NOT operating at these lower speeds. This is meant for a 4x4 setup to crawl along slowly. These seem to be questions better answered in your own dedicated thread, as more specifics of your setup would be needed! And we can go into much more detail without hijacking this thread anymore.
-
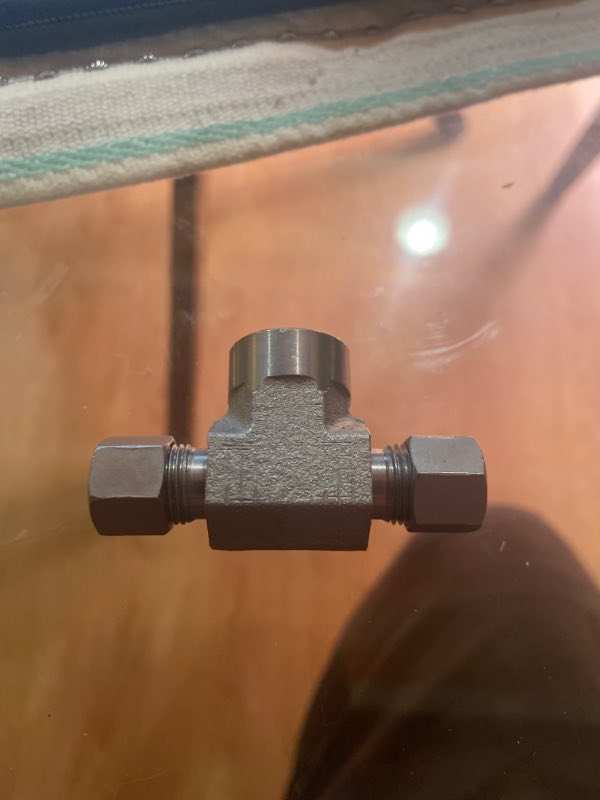
I still have the original copper radiator. But it looks like the line for the internal transmission cooler is broken most of the way off. I just saw that tonight after Linda's comment when I went out to look. So I haven't given any real thought to adding it back in. I want to keep the copper radiator, they are MUCH better than modern aluminum ones. So I would need to repair the broken off nipple. Kinda low on priorities list as I don't like cold weather anyways. But if/when the radiator comes out for any reason, I will likely fix that or have the radiator shop do it. GOOD POINT on warming the fluid up enough to keep it happy in the cold though. As I think about this, I will likely make a point to do this. I kinda wanted to repaint the radiator to protect the copper anyways. I might just hand it over and have our local radiator shop clean, repair, repaint it. At the moment I don't know where the temp sender is, its somewhere in one of my piles of parts. Here is the adapter though. It goes onto one of the hard lines, so I guess whichever is the line out to the cooler(s) makes the most sense. And hard to see it, but here is my cooler up in the front. It is a reasonable size I guess. Would be super easy to put a bigger one in if needed. So I don't exactly have a (dedicated) gauge for the transmission temp... But I have something MUCH better. The temp sensor will actually get hooked up to my MegaSquirt ECU. This means that everything will get datalogged and saved. And that I can also send this data, along with any other parameter I want to watch, to my Perfect Tuning gauge on the dash. I will probably have transmission temp be one of the primary watched data sets. But I can also set warnings and alarms so it displays anything that falls outside of my safety zones.
-
Yes for sure CHECK YOUR TIMING! Mine was way WAY off! Today was a very successful, but bitter sweet day. For a whole days worth of work, the only project that got mostly finished was putting the 4.88 3rd member back in. Axles aren't stabbed back in, drain plug is still out, and so obviously no fluid put back in it. It went pretty easily, but took two of us to comfortable maneuver it up and in due to the limited room underneath. One of the bottom studs must have gotten the threads slightly tweaked during removal. Victor finally got it to thread back on with a gentle hammer tap. While not a smoking gun, it does smell kinda like gunpowder... I think we found the problem with the rear brakes. Everything on the back was replaced, new shoes, springs, adjusters, and cross bar even. Everything was nice and shiny, except for 4 small parts. The shoe retaining pins were rusty and bent. New springs and retainer cups, but bent rusty pins. Odd they would replace everything else. Of course the hardware kit that in theory should have the right pins, is 1-2 weeks out for me... I will take them to work tomorrow and see if I have some in my saved junk drawer. If not, off to the parts house. I am sure they will have some the right length. Or I order the kit, what is two more weeks added to this project after two years? LOL... That kept the brakes from going back together and putting the axles in. Next was the AC/roof leak repair, ATTEMPT. Zero success getting the unit off. I am probably going to go bump that thread up, as it is its own conversation... Roof HELP! Other than setting this on fire, any other more realistic options? And currently I am trying to sort out at least ONE thing completely on the truck today and get the transmission temp sensor mounted up. Installing a Temp sensor on an A43D, hot/pressure line? Well I am off to go take some pictures and answer questions there.
-
Running wires from underneath won't be a big deal, especially since it is decently up in the air on ramps right now. Let's go look! Interesting.... This is looking down on the passenger side. I knew mine has a cooler attached to the radiator, but didn't realize it also normally went through the radiator. Mine bypasses that. I can't tell for sure but it looks like there is a broken off line on the drivers side next to the lower radiator hose. This would explain a few things...
-
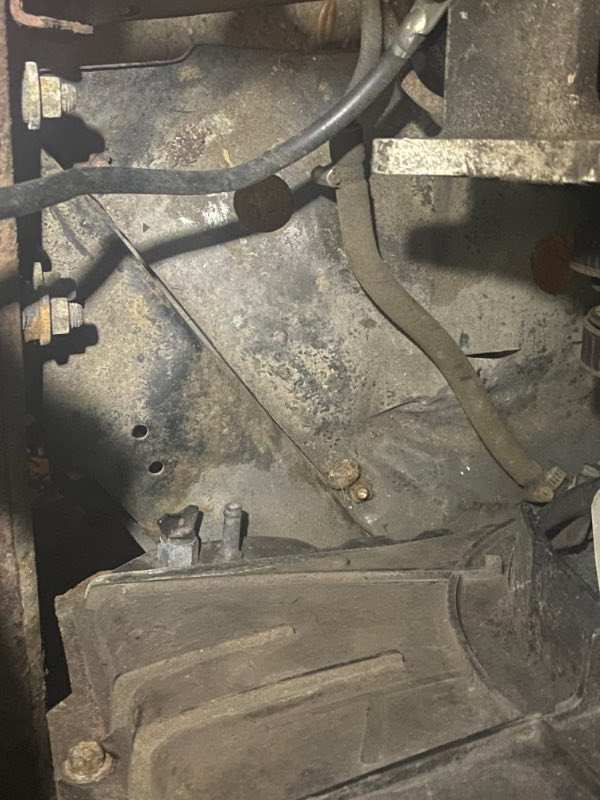
Everyone on the internet seems to have a different opinion as to where a transmission temperature sensor should go... So I will ask you guys. Logic told me I wanted it in the pressure line going out to the cooler. I got a GlowShift line fitting to do this. I am seeing some people saying in the pan is better as it is a more effective "average" of the temp. I am hoping to stick with the line location since I already have those parts, but would reconsider the pan if it is truly a smarter location. I found a thread on here, A43D return line that indicated the forward line is the pressure or hot line out. Looking at my transmission I would have thought it is the solid line on the left, or rear. My front line (in the middle here) has a rubber hose. It is very possible this was a bodge/fix though and that my front line actually blew at some point.... I dug out tha A43D service manual I have and it wasn't clear. I found zero reference to it. Some questions. 1) Is there supposed to be a hard line on the front feed line? (Again, assuming this is the feed. I would check but the back line is ugly and the fitting is a bit rounded so not super easy to get off) 2) If so this has sorta worked for who knows how long, should I bother replacing and fixing it? Doing it when I put the gauge adapter t-fitting in probably won't be too difficult. I just need to find the right line/fititngs and only need a very short run. 3) Is this forward line the best spot for the sensor? I think I had another question but my mind failed me so I will post it up later if it comes back to me... (This is looking from the passenger side with the front of the vehicle to the right.) ESIT FOR UPDATE: The forward line is the feed line. In this picture, it is the middle line with the rubber hose on it.
-
More rpm means the fan spins a little faster and the water pump moves more water. So seeing a temp drop with the engine running where it wants to run isn’t surprising. Every “performance” or “abused” engine can also be if it from a coolant additive like Water Wetter. It changes (lowers) the surface tension of the coolant, so it transfers heat more effectively. It is “snake oil” that actually does what it says!
-
Jack one rear wheel up and so the rotation count to see what ratio you have. Start there! If the engine is at the rpm it wants to run at, temps will drop. Higher rpm doesn’t necessarily mean higher temps. It means more flow. Get a bottle of Redline Water Wetter. Put that in the cooling system. You will see a further temp drop. If you want to monitor trans temps, put a gauge on it. I am doing that tomorrow. But until you verify what you have, I wouldn’t change it out. It sounds like you might already have the 4.88 in there….
-
Probably. We did the tear down and inspection after hours but he reassembled it during work hours the next day. I didn’t get to see every step. He is a perfectionist though. Still hand torques wheels when he sets a car down, even though he can custom program his gun to the right setting. He’s very humble, but if he says he can do something, he can. I have seen his resume. It is impressive, to put it mildly. As a seasoned tech myself, I don’t easily or normally hand my stuff over to anyone else. I had no problems or concerns handing this over to him, and walking away to do other things.