


V6 Seabreeze 92
-
Posts
61 -
Joined
-
Last visited
Content Type
Events
Profiles
Forums
Gallery
Posts posted by V6 Seabreeze 92
-
-
Hi Friends
I can use some help figuring out problems with brakes on my 91, V6Seabreeze:
Couple of months ago my friend helped me with front brakes, basically replaced the pads and bleed the system. All worked fine when I left his place and drove about 8 miles to my house and noticed the brake pedal went down much further to stop the vehicle.
Since then we got together and bleed the lines starting from the farthest point to the last meaning all four brakes. Noticed few air bubbles came out while bleeding
Last week I took out to go camping and noticed the pedal was quite loose in fact I had to pump few times and then brake it. Also the brake light came on. While driving for about half an hour the break light went off and the brakes were working fine as I got off the exit and parked in my camping spot. It seems brakes work after it has been running for a while. And when the vehicle is sitting for a day or two they get loose. Does that make scense ??.
I am thinking some how air gets in the system. No Fluid leaks, I checked for any leaks on all wheels. Brake fluid in the reservoir is at Max. Also not loosing any brake fluid. Visually all seems fine.
-
Thank you all for valuable insight. Thank you Derek up North for the Diagram of Rear Axel. you are amazing.This diagram was very helpful for me to understand all the parts. Defrag4, your Toyota part numbers are correct, I did not look up other numbers.
Pete at Gresham, Toyota dealers parts department was very helpful in locating all parts and ordered them for me. They are pricey but piece of mind that they are regional Toyota parts and will fit as they should. They are being shipped from several dealers on the west coast. I should have them in a couple of days. I will post some photos with Toyota part numbers when i have them.
Again, Thank you all.
-
Hi Friends
I noticed three lug Nuts missing while parked at home. I am shocked but Still alive. Studs sheared off. No idea when this happend on my last 20 mile drive Or on a earlier camping trip at Mt. Rainier, wa.
I can use some help finding the right parts, part number, size, resource, any information will be appreciated. Thank you

-
Thank you all for your insight. Interesting to hear No need for a Inverter. Here is what started it all: at the end of last year I took month and half, 3000 miles driving trip to Southern California and back to Oregon. There were times when I did not want to start the generator, because it is noisy. I am concious of noice in the campgrounds.
When I returned I had conversations with my camping buddies who happen to have newer rigs. They bragged about inverter and having 110 available at all times. One of them even offered to help me install. But I value comments and advise from you all, so experienced in Toyhome issues. Seeked your advise.
Electrical is the least I know. Therefore I have to make sure I am doing the right thing before I start and Have the right parts. I went searching for reading material and YouTube on understanding what's involved. And educate myself. I admit, I did not know Sine Wave until I read articles and realized what I purchased may not be the right Inverter. So there we have it, and I asked for toyhome community advise.
I want to do several long driving trips to parts of USA I have ot seen.
So now back to the Inverter issue. It will be a good addition to have 110 available when I cannot use the generator. I do not want to touch the existing wired system other than the house battery. Have the inverter wired so it is a separate 110 source. May be add another outlet or two somewhere coming from the inverter, where I can plug in Microwave and TV/DVD etc.
Once again, thank you all. Good Day !!
-
Hi Friends
My next project: Considering installing a new inverter in my MH and could use some advise. There is a factory generator and it works. I have tried to educate myself by reading materials and watching Utube but I would prefer listening to some experts who have Toyhomes.
* I want to install 2000 Watt Inverter to run a small MicroWave for heating up food, tea, coffee, power 19" TV with DVD player and some computer work, charge phone etc.
* I purchased a JUPITER 2000 W inverter from Harbour Frieght, for cheap $129, which is Modified Sine Wave. After I read an article I realized I need a PURE SINE WAVE inverter. I would not mind spending little more money for something that will last me few years. May be able to return this one.
I would love to hear comments and recommendations, please. Is Pure Sine Wave necessary ?
* Plan to wire it with a 200 W fuse and #2 AWG cables under the dinnet seat which happens to be right near the house battery. This will be the shortest connection with the house battery. However microwave and coffee maker is on the other side of the Aisle. I need to resolve this tripping hazard.
I would also looking to add a second House battery but there is no room in the existing battery compartment.
* Any one can share sketches, wiring diagram, product cut sheets etc, etc etc will be appreciated.
-
Hi All
I am having issues and could use further advise :
I finally got around to removing the existing hoses, which was no fun as there is no space to put anything to work with. Got the hoses out, got replacement hoses from O'Reillys in the neighbourhood. Installed the Vent hose on the gas Tank.
The problem started with 2" ID reinforced like Dayco Fuel hose. It is clamped tight on the Tank. Connecting the other side has become a problem as the hose is bendable but rather stiff.
Bending new hose creates Kinks in two places one near the tank and other near the fill area. Without the curve the hose will not fit.
Existing hose has a S Curve to fit. See photo below:
I installed and reinstalled the hose couple of times and still have not found a way to create a smooth curve to fit.
I started with a bit longer hose than existing first, then cut it to match the length and now a tad shorter but still cannot get rid of the KINKS.
Any ideas will be appreciated.
-
I thank you all very much for the information provided by few members. It is very helpful.
I am sort of new to this site and very impressed by the knowledge of many of the members and how efficiently questions get answered. It is tremendous help and very much appreciated.
-
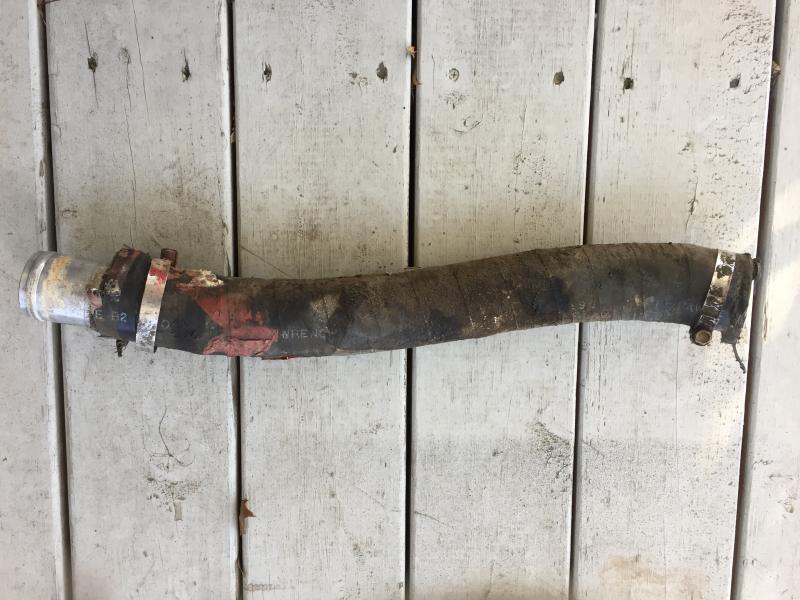
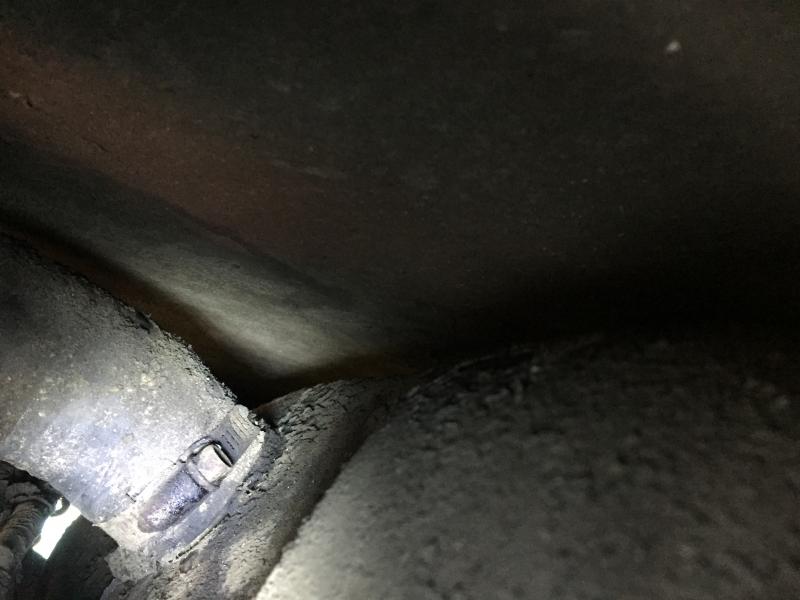
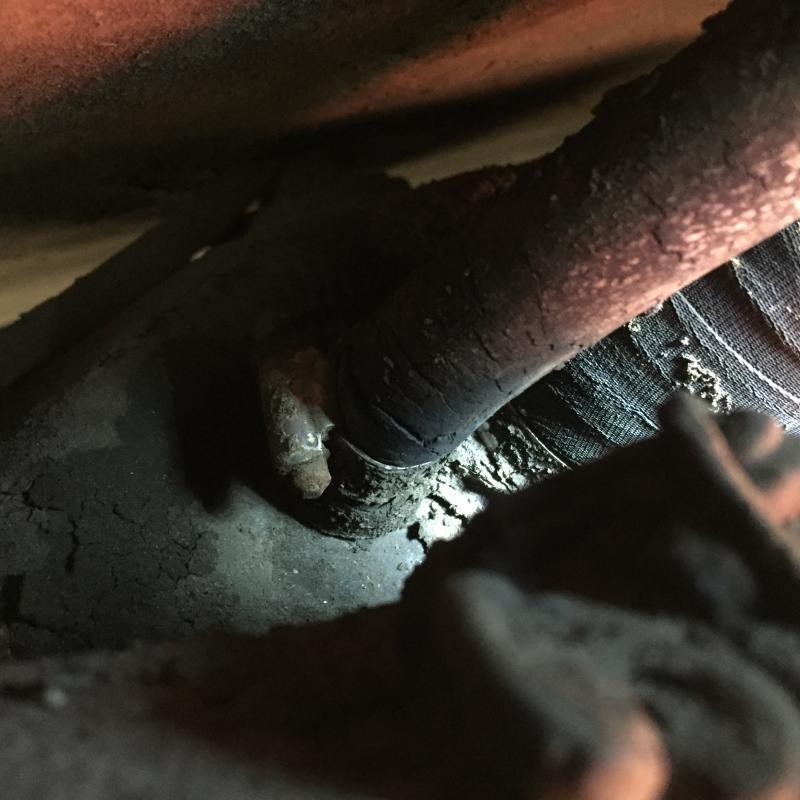
I need some help with one of my issues on 92 Toyota Seabreeze V6. when I fill fuel: If the fuel pump nosel does not stop at right when full, I see fuel dripping on the ground. Some times more than others.
A closer look at the hoses and where it comes out I beleive it is where the fuel hose is attached to the tank.
Clamp is tight enough but the hose seems to be old and rough/cracked under the clamp. There is another hose smaller size right next to it. I do not know what it is and what it does.
My first choice will be to replace the fuel hose. And the second smaller hose.
I am looking for a resource for this hose and any advise of what to do and not to do. Attached are few photos of what is there. Any advise will be appreciated.
Photo 1: is hose coming from the flue cap.
Photo 2: shows main fuel hose and smaller hose at the fuel tank.
Photo 3: Main fuel hose going to the fuel tank.
Photo 4: Main Fuel hose At the tank
-
Thank you very much for the explanation and the photos.
-
Hello
As you can tell I am new to this:
I need help with understanding water heater by pass. Not sure what to do. Please help I am trying to winterize my Seebreeze 92. Below are couple of photos from the area where the water heater is located.
I know there is a kit for by pass. I believe my problem is understanding the concept. I am pretty handy and can install the kit.
Thanks


Fresh Water Pump
in Coach ApplianceTech Issues
Posted
I found water pump in my rigg leaking at the joints. Water seeps out only when the pump is running. Could this be fixed ??
If not, Could some one help me find the right water pump please. I want to make sure I have the right equipment.
Attached photo is of the one I removed from under the sofa bed. It is a Shurflo model number 2088-403-144 , 2.8 GPM
I found one at ebay with different model number but has 3.0 GPM flow:
https://www.ebay.com/itm/New-Shurflo-4008-101-E65-RV-Camper-Marine-12V-Fresh-Water-Pump-3-0-GPM/392432911544?epid=658421542&hash=item5b5ed304b8:g:BrQAAOSwe2JdglQb
I will appreciate your help.
Thank you.