
.jpg.5df1ead341bcc9ca59784c4575ca7073.jpg)

jetalkington
-
Posts
120 -
Joined
-
Last visited
Content Type
Events
Profiles
Forums
Gallery
Posts posted by jetalkington
-
-
yea, i couldn't remember what they did to my Buicks aluminum heads. It was over 50 years ago. i just remember engines i did after were magnafluxed. The Buick had an aluminum engine. That car blew head gaskets every few months until i put a thick gasket in and coated both sides with something called copper coat.
However, he will need to have his magnafluxed, if that is what they still do. Not sure if they have something newer and better.
-
You may want to call liquid nails and tell them what your doing. I was working on a Travel Trailer a few years ago, in cooler weather. I had planned to use liquid nails to bond some wood together, but I was unsure of the what the cooler temps would do. Imagine my surprise when they told me they do not recommend liquid nails in any travel trailer for any reason. It scared me so much I called all the glue people I was using, Gorilla, Titebond, and loctite. They were all really nice but all but loctite told me the temps I was working would weaken the bond and they would likely fail down the road. Loctite ,at the time, had just come out with their grabber 8x. They let me talk to the lab and let me know it would work and it the temps got too low it would slow the curing but it would continue to cure and when temps got over 50 it would finish curing and would be as strong.. So I have been using loctite products every since. I should say except when gluing wood together. I use titebond III. It is amazing stuff.
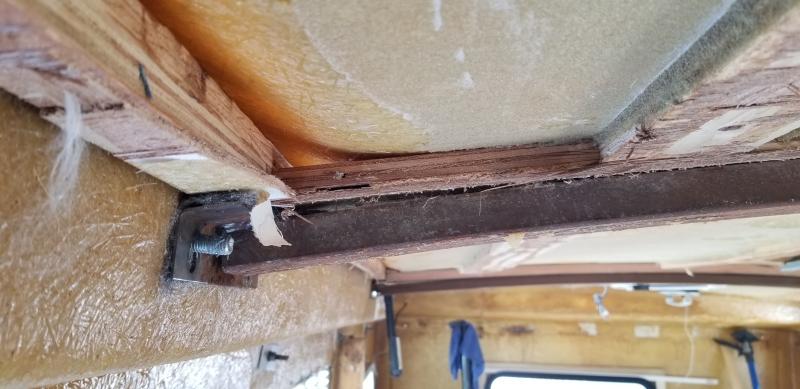
Also, this is what my beams look like in the inside. You can see they welded angle iron to the end and ran carriage bolts through the top. I took my beams down sanded and repainted them with rustoleum and re-installed them with 3/8x1 ss carriage bolts. The heads on the outside are covered with a 2x6 piece of eterna bod tape. I was able to get 5/4 deck boards to put between mine and the fiberglass. My goal is 1 inch spray foam ceiling, R-7 I hope this helps. I have been working 3 months on the outside and underneath of mine. Getting ready to start the inside. Yours looks like it is going to solid.

-
Linda make a good point. You would want to take the head(s) to a shop and have them magnaflux and inspect the head. They will rebuild the head for you and you put it back on. I am not sure if they call it magnaflux anymore. It is a process to look for cracks, both surface and subsurface. On my Buick and several vehicle after that I always did jut the head. If you didn't drive it far and get it really hot, you will likely get away with just a head gasket/ head rebuild.
-
I used to have a 1963 Buick Special that, unknown to me, at 16, it was known for blowing head gaskets. It blew one shortly after I bought it. Broke and barely money for parts I went to the library and got a chilton manual. It was quite detailed and wasn't hard. I drove that Buick for a few years. I know the new one are more complicated but it is a lot cheaper than paying someone and you can learn a lot. I ended up being an ASME mechanic for 30 years. So if you have any mechanical ability and it looks from the video you do, you can probably do it.
-
I found a place to work on my 1990 Sunrader. It is in an old body shop. The guys that runs it used to do body work but now just does Triple A calls. One day he pulls in a new White SUV. The next day I go to work my Sunrader and it has all new decals on it and they look great. I asked him who did them and he tells me his brother is a "Vinyl Artist." He does vinyl art in local shows. I am not sure what that is. I had met him when I rented the space so I called him. Asked if he would look at my Sunrader and see if he could do the decals and stripes. One look and he said no problem, he would have them in a couple weeks. So a couple weeks later he sent me a picture of what he was working on and they were a dead match. I had thought of changing the colors but my wife said she like the shades of grey. My old decals and stripes were faded, chipped, and cracking. You can see in the picture he did a great job. The one around my new fuel fill were put on before I installed the fuel filler and the ones around my new power plug were put on after the plug. You can see he cut them in really nice. He also suggest ed getting reflective ones so when a headlight hits them they reflect back shiny. I liked the idea for when driving in fog or at night. Especially, if I am along side of the road somewhere. You can look at the two picture of the fuel filler and see the difference. I took one with a flash and the other without. I told him I would post them in the forum and let other people know he can do whatever they want. He was very reasonable in price. If anyone is interested PM me and I will send them his information. You can deal directly with him. It looks like he has the setup to do whatever you want.
-
I did not know that. I like the look of the rack. I had taken it off and decided I liked the look better with it on. The only wires going to it was the cable wire. I don't need an antenna and plan to use the hole for the cable wire for my cellular booster antenna.
-
I got my 130 amp alternator installed this week. Then I sat down to make some new couplings for my roof rack. In case anyone is interested I started with a 3/4 barbed nylon coupling.
Then with the help of a Dremel rotary tool cut it and shaped it to fit my roof rail. I had my rail powder coated to flat black and with new coupling installed it on my roof. Now with new Max Flo vent, bath vent and new sewer pipe vent caps I only have my solar panels to go on the roof. But, we are seeing highs of 40 degrees already so unless I can find a place to work on the Sunrader inside I may be stuck until we get an Indian Summer. You can see the new on nearly completed next to the old broken coupling. When I got it done it actually worked just fine. Next phase is to pull all the chrome and have it powder coated and reinstalled.
-
I read through this mostly out of curiosity. Then I got to the part about dumping the waste tanks. There is no way you can seriously be recommending I quote: or at a pinch pull off on a remote road and let her drain.
Maybe you mean only the gray water tank but you do not state it like that.
I live in remote area and this is a disgusting thing to recommend to any one. Please do not tell them that.
It is not only illegal just about everywhere and could get them a big fine, it is also very unsanitary. i would not want to be hiking along my country road and find where some jerk dumped their waste tanks. In a pinch you do not use your tanks and you wait until you can find a dump station. Then dispose of your waste properly.
Never, ever do you find a remote road and let it drain.
-
This is the label in my 1990 Sunrader. Max weight is 20 pounds. So the max weight may vary from year to year.
Thanks for the lead on the hood clamps. They were on my list.
-
We ran into the same thing in an Alabama rest area. It also looked to be an older rest area. It was a nice touch. We have just been camping in an Alabama Wildlife Area with no dumps. It was a surprise to pull into a rest area that night and see the dump station.
-
I removed my roof rail today and found both couplings had broken. I want to put it back. Any one know where to find the coupling? They are .75" in diameter. Hoping I don't have to make a set
-
I have. I watched them pretty much from the beginning. I have spent a lot of time reviewing other peoples builds and ideas online. There are a lot of talented people out there.
We all have different takes on what we want our Sunraders to do and their purpose. I like most of what they did, like the cork floor. Which I am adding to mine. I have no desire to live with out the shower and bathroom. Plus, being from the North, and what I want to do, I have to be able to do everything inside, with heat, and not rely on cooking and other things outside. However, their overall work on the shell and interior construction was excellent. One of my favorite follows is https://www.instagram.com/yotahome4x4/. He works in a boat yard so it is over the top for fiberglass work. Still very cool all the same.
Thanks
-
I originally wasn't going to do a full tear out of my Sunrader, I bouight 1.5 years ago. I planned to do it a little at a time. However, after a few trips with my wife, she kept saying it smelled of something decaying. Bear in mind she has one of the most sensitive noses in the world. I on the other hand smelled just an old home. I also wasn't planning to do much online posting about it. Mostly because of the time and I am not good at getting around to it. But, after some encouragement after my last egg camper rebuild I thought I would try. Plus this forum has some good ideas and experience so I figured I could use the feedback as I know next to nothing about Sunraders.
So, a few weeks ago I took the couch out to see what was around it and it turned out my electrical inlet port was leaking. I took the couch out and found what is likely the original carpet and the corner where the couch and the loft area meet was full of rotten wood. As I removed the couch the screws pulled through the wood. So, I knew what was in for. I decided to do a full gut and find all the leaks. Turns out they were everywhere. The roof rack screws were leaking.The ceiling supports were gone. The rear clearance lights, a couple windows and the water inlets. It is clear that at some point in it's life this Sunrader has had significant water leaks that were patched and the wood never fixed. All of the cabinet frames are/were particle board and clearly had swelled with water. So, I finished the gut last week.
I like the original lay out for the most part and plan to put it back pretty much the way it was with upgraded wood and painted formaldehyde free plywood. I am going to install lithium batteries with solar panels. I know the lithiums are costly but I plan to retire in a year and think I should buy them now while I have good income rather than when I retire. I am a wildlife photographer, as a hobby, and plan to build the Sunrader to be able to go out in the winter -1F or so. I live in the north so it gets cold. Last winter we saw actual -36F. I would not be out in that. But, the batteries will need to be removed and stored. My first goal is to seal all the leaks and prep it for spray insulation. I welcome feedback. I will add to this thread as I move along.
Well, here we are. Wish me luck.
-
I called my local RV dealer with my Dometic Model number and he ordered one for me. Had it in a few days.
-
AmyDC, thanks for posting this. I don't have a lot of background with Sunraders. Which why I joined this forum. I have looked at a lot of pictures of Sunraders and so far it seems the 21 footers with a rear door that this is the normal location for the fuel fill. I am just going to work around it. I finished scrapping insulation off my ceiling yesterday so I am ready to start prepping for building.
You don't have to go through trouble of moving the chair. I have a clean slate now and will build what fits. I do like your fuel trim better than mine.
Thanks again.
-
My curiosity is whether the chair will swivel with out hitting the gas fill pipe. I planned to do a mock up when I got that far. It would be the location closest to the cab passenger. Where the fuel fill neck is of course. If you have the time I would appreciate it.
-
Thanks I will. My gas fill looks to be colonial white. Wonder what it will look like when done.
BTW: I am guessing you have bench seats in your dinette. Right? I am still stuck on seeing if I can get the lounge seat to fit.
I think I hijacked my own thread.
-
Thanks.
I called a local beauty salon and they have the Salon Care 40 in stock. $4
Guess I will try that next.
-
Amydc, does yours look like mine on the outside, or does it have a door over it?
-
Thanks for the tip on Salon Care. I am going to try that.
I am not saying my fuel fill was moved. Sorry if I wasn't clear. I am thinking that they may have moved the gas tank fill to other locations on models other than mine to allow for the door or appliances to be installed up front where my dinette is. I didn't think they would do that.
I got to look at mine and the gas tank fill might interfere with me wanting to put lounge chairs in, instead of putting back my bench seats. The top of the fill tube is above the wheel well. Which I am guessing is the bottom line for the platform. So I am still trying to get an idea on dimensions of the platform and chairs to see if might clear the top of the fill that would be showing..
-
Here they are. I guess I thought this was the way they were always. Is this not the case? While we are looking at gas tubes do you know where I could find a new cover for the fuel. This one looks terrible and I have not seen it on any other Sunrader.
-
Mine is closest to the RSA. In fact there is a little plastic embossed tape on the outside of mine that has 21-RSA on it. Looks like a dealer label. However, mine is flipped. Refrig by rear door and kitchen next to bath. I can't imagine they would put the fuel fill tube in the same box as refrigerator & furnace. Meaning it probably is in a different location. I din't realize they would move it around. Sounds like a lot of trouble.
-
Yes, except the one I have a picture of had a table about the same size as my current one. I should have asked where the fuel fill tube is on the models with the chairs. Mine is on the passenger side, just behind the passenger door, but I have a rear door and rear bath. I don't see my floor plan in the image. It looks like the CG in your image has a rear door and lounge chars but I can't be sure. I looked at a few pictures of Sunraders with lounge chairs but, I don't see the fill tube. Maybe they move it to the drivers side. I didn't expect that. I can work off the wheel wells, if need be.
-
My Sunrader had bench seats on one side of the house, across from the sofa. I have wanted the lounge chairs as I am not a fan of bench seats. I thought due to the fuel fill tube being in the way it was not possible. However, a couple days ago I found a picture of a Sunrader with the lounge chairs and I noticed they were raised on a platform. I am hoping this would raise the chair up enough to clear the fuel fill tube.
Does anyone that has the lounge chairs have the dimensions for this platform? I have been trying to find them but no success. I would appreciate it if someone could get me the measurements so I could see if it is possible to put lounge chairs in my Sunrader when I put back the seating. It would also have an impact on how I fix the hole in my floor. I am not sure if it is even possible.
I am pushing hard on my Sunrader as I can only work on it in September and October until I get it insulated. I work to many hours in the summer to be able to do any work on it.
Thanks
.jpg.c62fa08ab06a70f53543d58ce1533518.jpg)
.jpg.ca4bacdb27445785f1d86f0f1df9746b.jpg)
.jpg.1fe45a42a99c59ce02909b0d8a8aacb7.jpg)
.jpg.cb7e06762ff7697fc68fc53348912745.jpg)
.jpg.20b1125c700fbf8d5dd86b890369a93c.jpg)
.jpg.fff2e4f73f3c912dc853028659def2fd.jpg)
.jpg.1be8a639158fd5a4af6ec6dbc095fd02.jpg)
.jpg.039f167280a3910db34f92d3b2467711.jpg)
.jpg.2e938f9f40be446e1f5b14d93aa47885.jpg)
.jpg.0e78a002a1ec5936346d6e40e8f29a06.jpg)
.jpg.ab45c68bc8cb1e5f59192d2503ec93a6.jpg)
.jpg.95e5a65bb6af4357628fb258d9a74ddd.jpg)


.jpg.1e4960413c2ac2d667930898be55402c.jpg)
.jpg.bd7b491fa290158f2fd604980cdb79c8.jpg)
Decals and Stripes for Sunraders
in Improvement and Do-It-Yourself Projects you have done to Share!
Posted · Edited by jetalkington
He did all of it. He has the pattern in his computer and can do whatever color.
I will get a shot of the over all of the vehicle tomorrow when I go work on it. I thought I had some but I looked and do not.