Jump to content

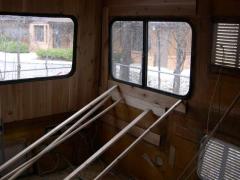
1st layer of cedar paneling


mulwyk

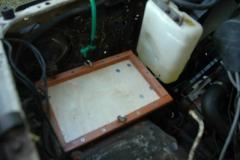
layer 1 of 2 layers cedar paneling being glued onto fiberglass shell, 1x2's wedged against floor hold the panels while adhesive sets

Copyright

© Toyotamotorhome.org

From the album:

'84 Sunrader

· 49 images
  • 49 images
  • 0 comments
  • 13 image comments


Recommended Comments

Hi there, Glueing these could be problematic for you; time consuming and heavy, I did a Sunrader in cedar paneling without using glue instead using the shortest brads (3/4) on an air brad nailer after a discovery of wiring locations. I would be scared to use glue because its a vehicle and unless kept in heated storage with ideal humidity the glue will prevent expansion and contraction and may sever the tongue and groove. Glueing works great on floors because Gravity holds them down flat; but verticle wall surfaces are different. Just trying to help; but if a brad comes under strain it will just pull out and you can rectify the humidty or temperature issue (or let time in storage do that for you ) and re nail it. with no tongue/groove to nail Im not sure how to fix an expansion problem

Link to comment

Hi there, Glueing these could be problematic for you; time consuming and heavy, I did a Sunrader in cedar paneling without using glue instead using the shortest brads (3/4) on an air brad nailer after a discovery of wiring locations. I would be scared to use glue because its a vehicle and unless kept in heated storage with ideal humidity the glue will prevent expansion and contraction and may sever the tongue and groove. Glueing works great on floors because Gravity holds them down flat; but verticle wall surfaces are different. Just trying to help; but if a brad comes under strain it will just pull out and you can rectify the humidty or temperature issue (or let time in storage do that for you ) and re nail it. with no tongue/groove to nail Im not sure how to fix an expansion problem

Hi Tote:

Thanks for the input. Some additional info on the paneling. I stripped the interior down to bare fiberglass, sanded the fiberglass, then installed two layers of T&G cedar. The first layer, shown in the photo, is glued onto the fiberglass with construction adhesive and applied horizontal. The second layer is applied vertical and is nailed and glued to the first layer. I also added long screws through the rain gutters above the windows, through the fiberglass shell, and into the paneling. I did the same thing under the windows by running screws from outside, through the aluminum seam trim and into the paneling.

I don't know how this will work in the long run, but I have some 30 years experience building wood interiors in fiberglass boats and I tried to use the same techniques. So far,the camper has no problems after two winters and one blazing hot and humid summer, but we'll see what happens. (Second thoughts department: I'm actually more worried about the birch plywood ceiling, I wish I would've left more of a gap between the plywood sheets!)

Bob Gustafson

Link to comment

Join the conversation

You can post now and register later. If you have an account, sign in now to post with your account.

Add a comment...

×   Pasted as rich text.   Paste as plain text instead

  Only 75 emoji are allowed.

×   Your link has been automatically embedded.   Display as a link instead

×   Your previous content has been restored.   Clear editor

×   You cannot paste images directly. Upload or insert images from URL.

×
×
  • Create New...