spungo
-
Posts
20 -
Joined
-
Last visited
Content Type
Events
Profiles
Forums
Gallery
Everything posted by spungo
-
Nope, not in vain. The rig has so few issues and I know it so well that there's not much of a reason for me to log on here often. The photos were lost when the site owner migrated to a new message board system, methinks. I still have the pics somewhere and can likely email them to you. Drop me a line at spungo@sbcglobal.net
-
Im 6 ft 5 inchs tall , will I be able to fit in the 78 chinook ?
spungo replied to enolaniaga's topic in General Discussion
I'm 6'5", 36" inseam, and have 2 bad knees, one of which was mangled so horribly that I actually had the interesting experience of putting pieces of knee in my shirt pocket in case the nice people in the ER could make use of 'em. While I'd certainly enjoy more room, I've been pretty comfy driving my Sunrader 800 miles in a single sitting several times. If my creaky drumsticks can hang with it, a normal person should do spiffy. While it's possible to modify anything with the right tools and motivation, repositioning the seat looks to be a pretty tall order. The world seems to be set up for little pipsqueaks, so sometimes ya just gotta make do. -
Flea bomb, eh? Unfortunately, too often our solution to problems is to douse everything in poison. Then, all surfaces in your camper will be coated with poison. Sounds delightful. I'm sure oncologists love those kinds of ideas, for those titanium putters don't exactly pay for themselves, now, do they? I could do without the borax, too. An alternative is diatomaceous earth, available at Lowes, etc. Completely non-toxic, and it also damages the exoskeleton. Very effective. Rub it onto your pet, and it wipes out the critters with none of the ill-effects of that HORRIBLE monthly stuff that's applied between the animal's shoulder blades. I've already saved 4 very sick dogs from ignorant owners who kept mindlessly poisoning their friends with the latest, greatest vet-approved atrocity. The most effective method for me has been a clip-on light with a tray of water under it. Turn off all other lights. The fleas jump at the light, then fall in the water and drown. Those round beer trays they serve oysters in work very well. Add a drop of dish soap to the water to break surface tension so the fleas sink immediately. This has never failed to eliminate the problem in a few days. If you have fleas, the bites should be visible. Check around the top of your socks. It's very effective to walk thru a suspect area to your clip on light, then check your ankles for fleas, pick 'em off, and chunk 'em in the tray of water. Fleas are attracted to walking animals, so if they're present, a slow, heavy gait will bring them to you. It's easy to get rid of fleas without poisoning everything in sight or cracking your wallet open. Good luck.
-
That's about it for now. Since my rebuild, I've driven the bejeesus outta the rig, much of it over brutal backcountry roads and up more Rocky Mountain passes than I can shake a stick at. Just got back from a trip to Colorado to spend two evenings with a guy named Maynard, and about to head back there for an evening with a guy named Geddy. About 10K miles so far on rebuild with nary a lick of trouble. But, if it breaks again, by golly I'll fix it.
-
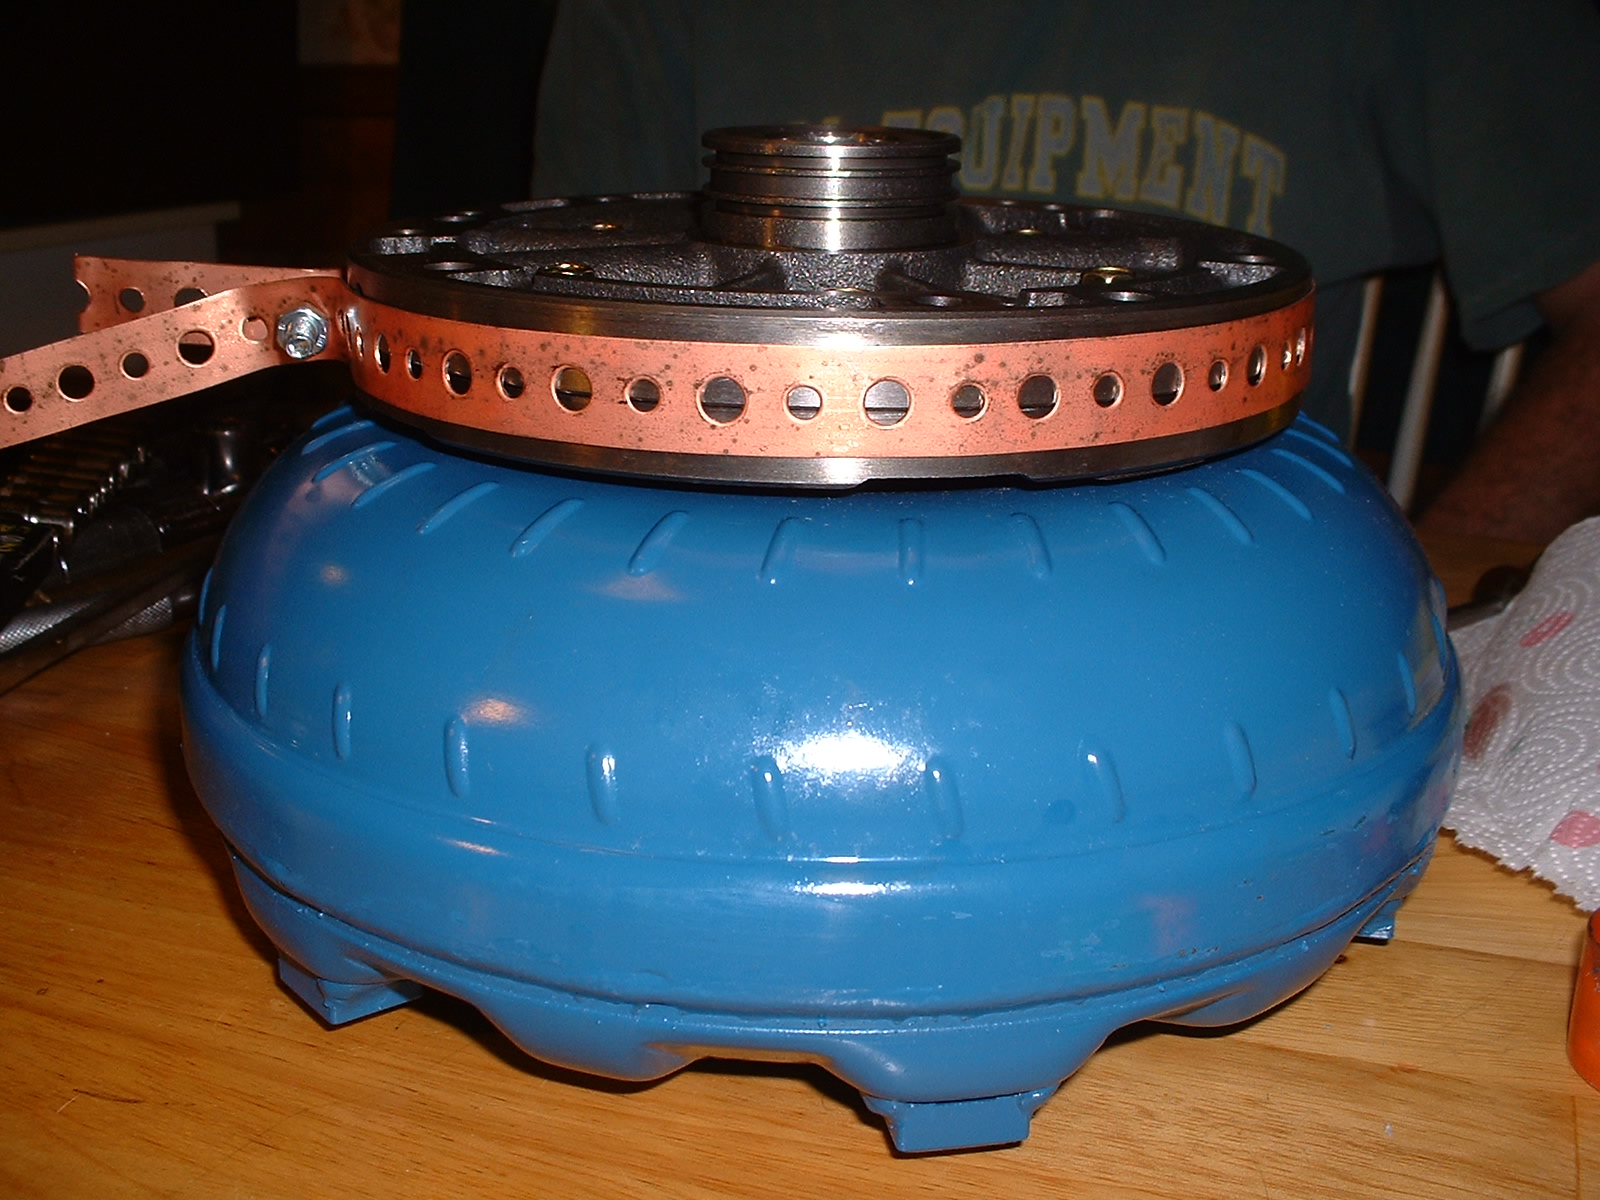
Might as well add an extra thing or two: Toyota sez I need a special tool to precisely align the two halves of the oil pump before buttoning 'em up. Yeah, whatever. A length of pipe strapping plus a machine screw and washer took care of bidness just fine-like. Good thing, too, because if the two parts are not aligned very closely, the oil pump won't want to make the rather tight slide back into the case. Make certain you do this part with great care. As directed by the manual, the purty new blue torque converter is used as a work stand for the oil pump.

-
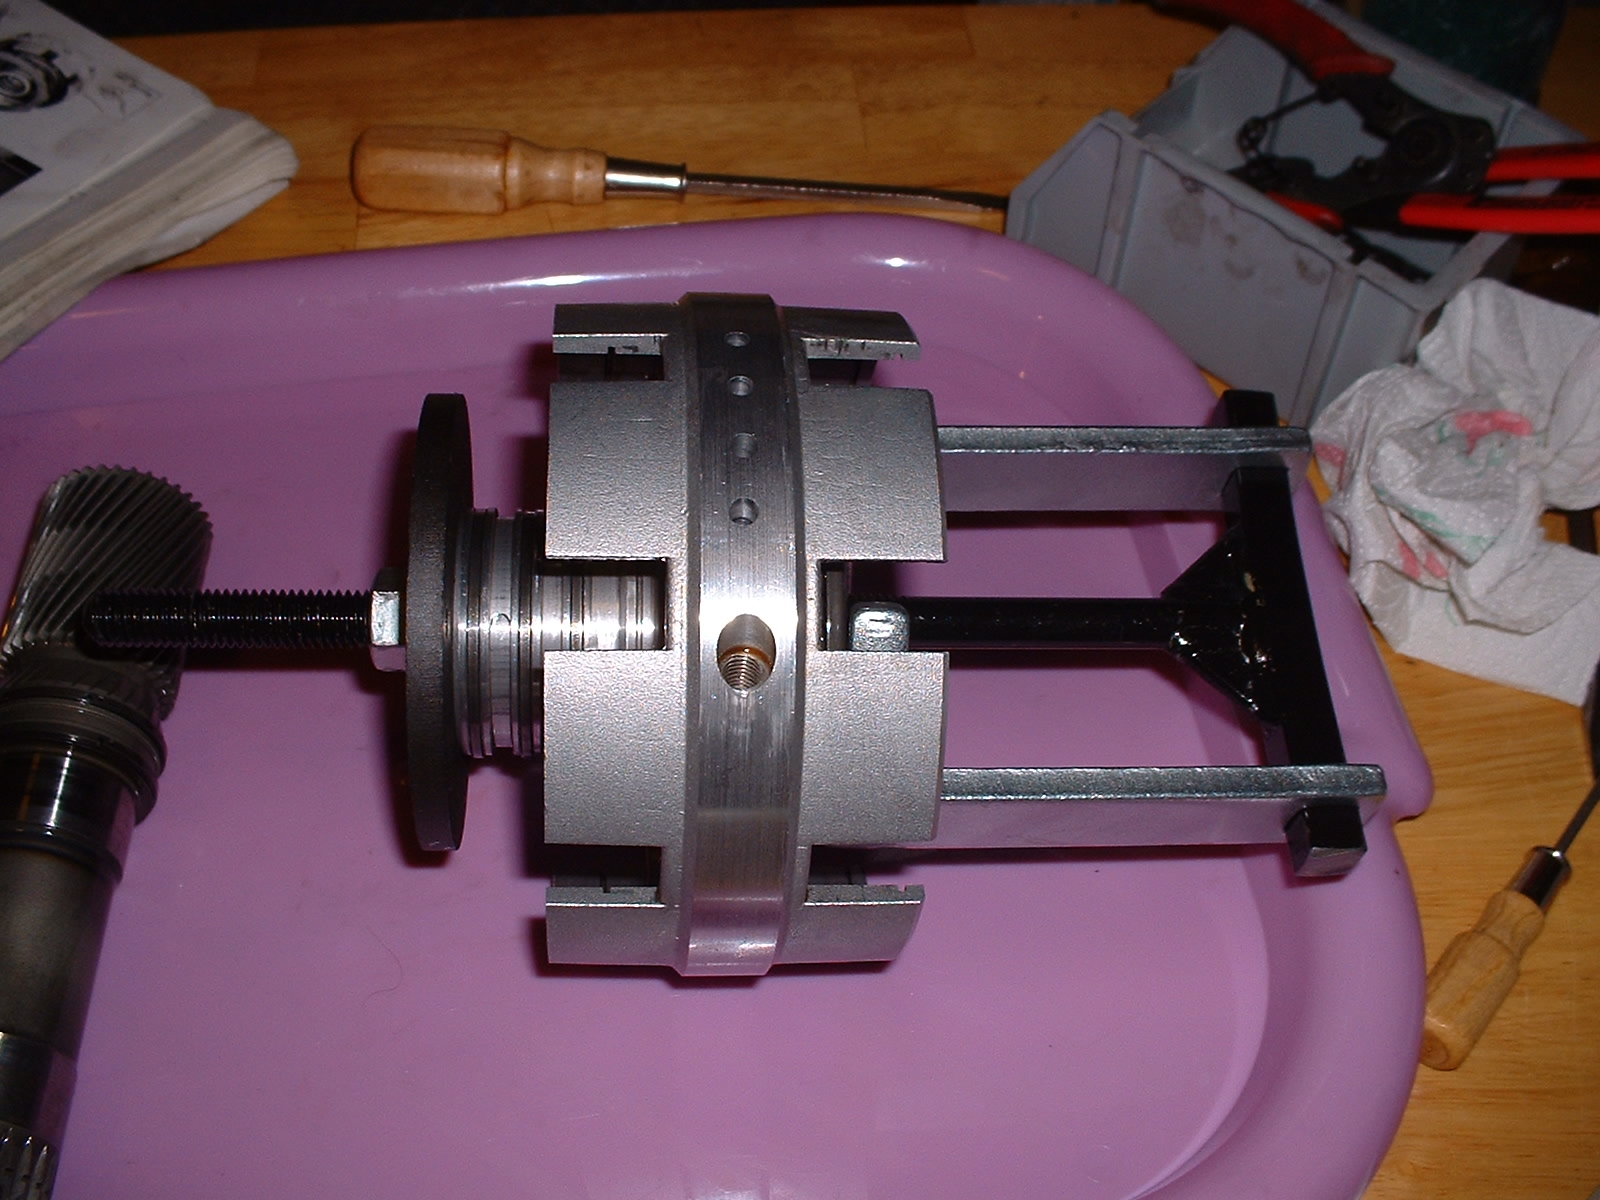
Toyota sez a special tool is needed to pull the oil pump, which is the first step in internal disassembly. I got it out fine by putting a bearing puller on the shaft, then attaching a cheap 3 jaw puller to the bearing puller. Now come on....is that slicker than owl excrement, or WHAT? Yowza!
-
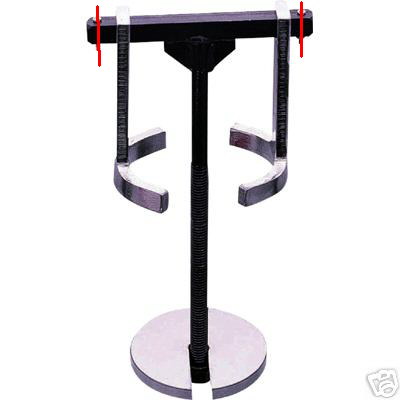
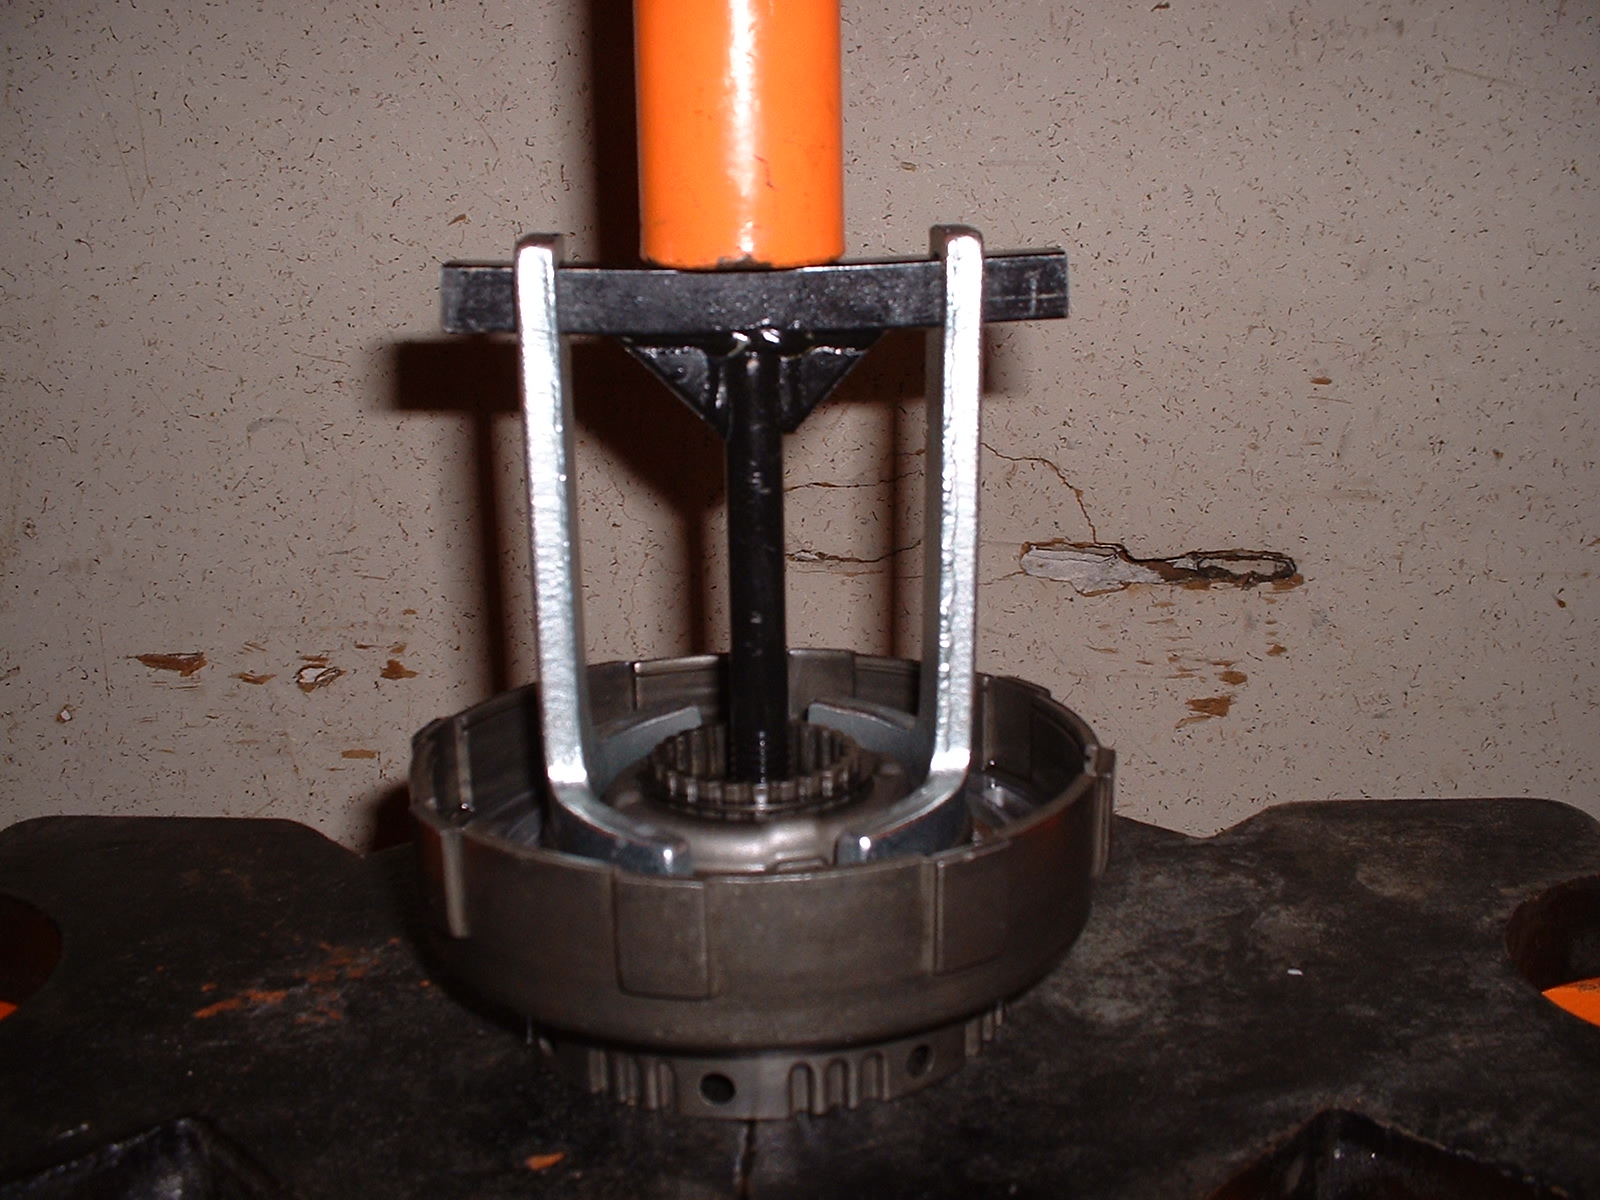
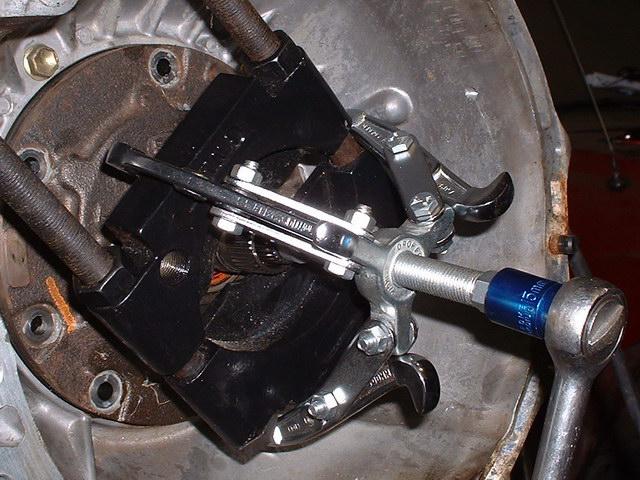
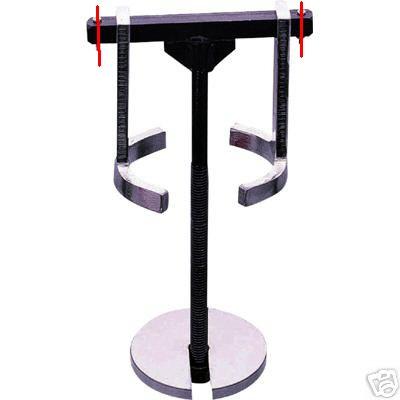
Transmission clutch spring compressor - about $40 plus s/h on eBay. Since this is a little tranny, you have to cut about 3/8" off each arm (red lines on photo) or else it won't fit inside the case to remove and install the No. 3 brake. Most of the clutch packs have a hole in the middle, so you can use the tool inside without a press - a 3/4" wrench tightens the nut for compression. The front clutch has no hole in the center for the threaded shaft to pass thru, so it needs to be done on a press, in which case you merely slide the clamps off the tool and reverse them to point away from the threaded shaft. It appears my staff photographer was off smokin' a bowl or something at the time, so no photo of that arrangement, but here's a shot of using the compressor on the shop press with the clamps in normal position.
-
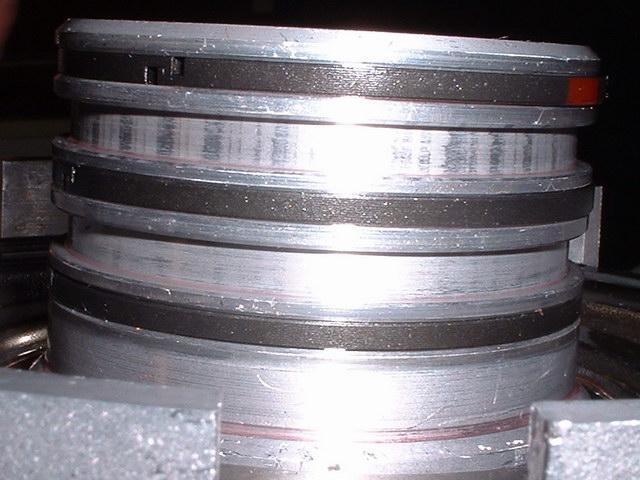
Here's an example of the oil sealing rings, in this case new rings installed on the No. 1 brake on the center support. There are many of these rings in the A43D, but the only ones I've seen fail are on the output shaft.
-
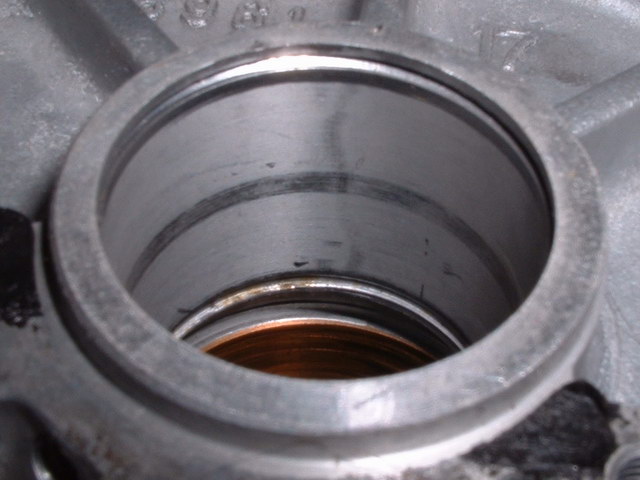
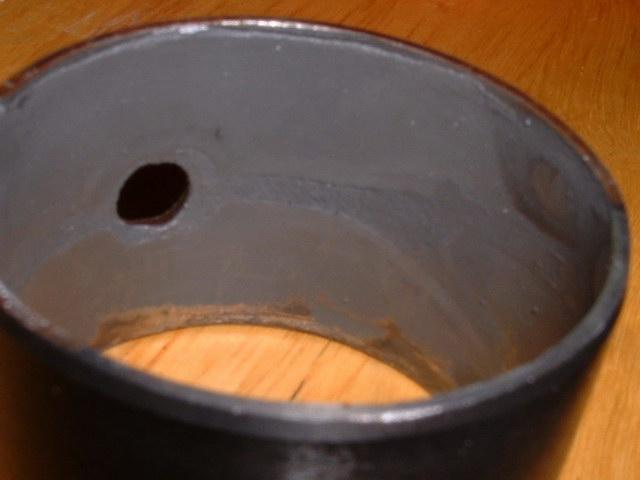
New extension housing bushing installed. See the oil grooves? I thought they were some kind of a later design improvement. Wrong.....the old bushing was so worn that the grooves were no longer prominent. I thought it was supposed to be a smooth bore until I looked closely and saw evidence of the oil grooves. That's one seriously worn bushing and this is what I believed allowed the slop in the shaft causing the oil sealing rings to fail.
-
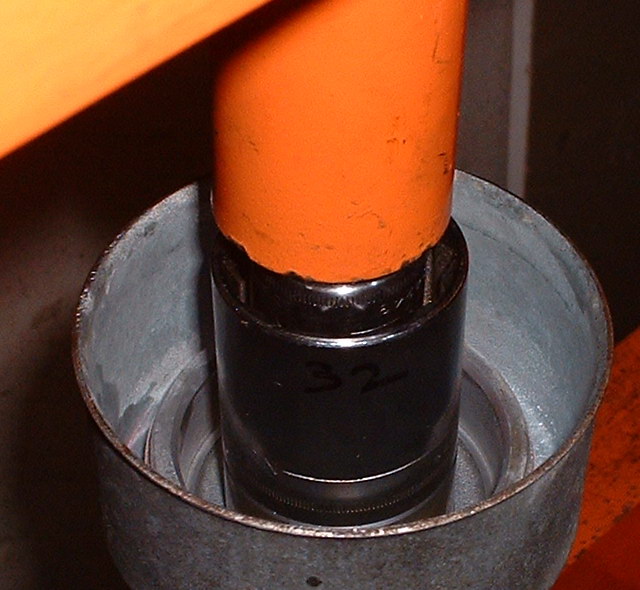
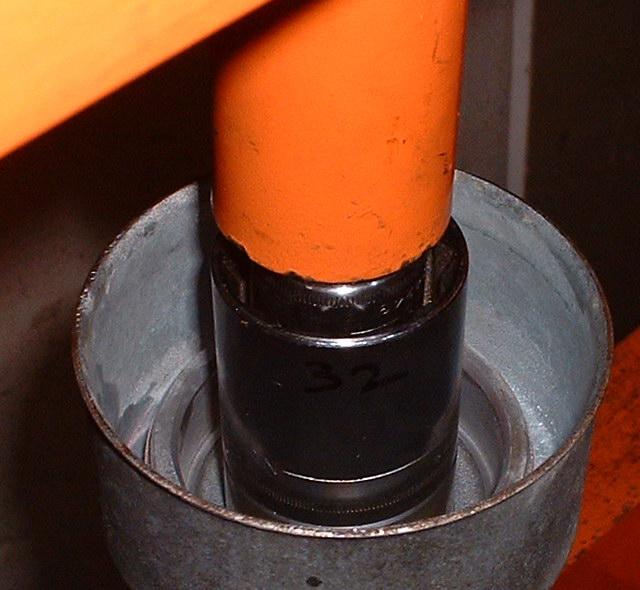
A 32mm Craftsman socket was the perfect size for pressing in a new extension housing bushing. And, I've since started using a reciprocating saw with fine metal blade to get those bushings out. Line up the blade with the oil channel and be careful and there shouldn't be any problem. Cool thing is that once you cut part way thru the bushing, it gets yanked out by the motion of the saw blade.
-
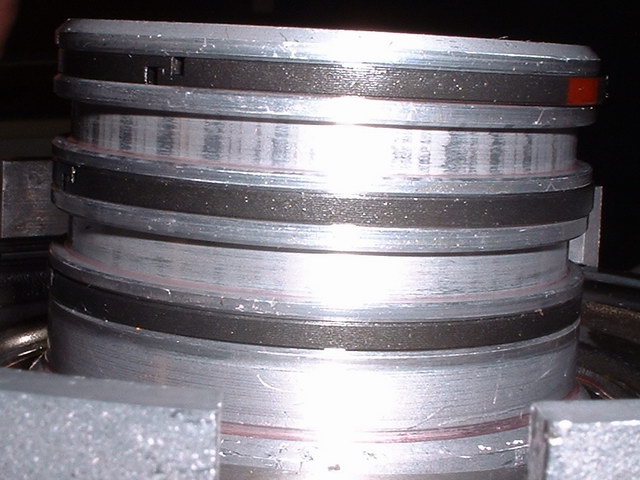
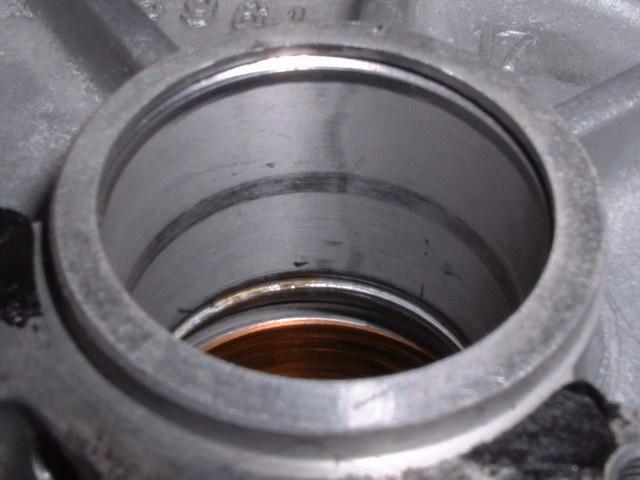
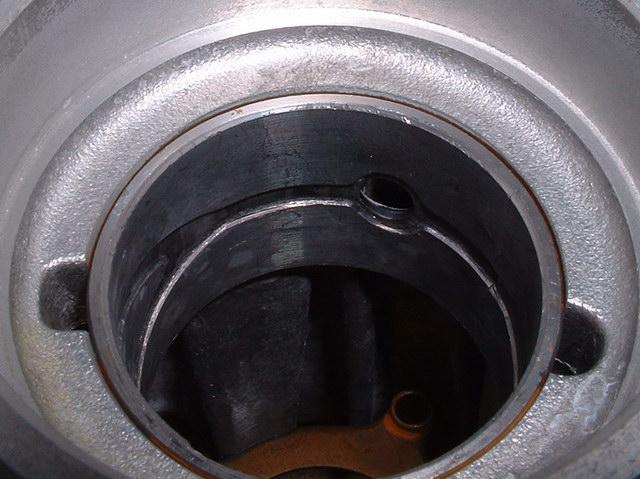
It didn't work out so nicely for the tranny case, though. Behold the grooves cut by the failed first and third rings spinning on the output shaft. Is that hideous or what? The center ring had not failed yet. This case can be saved by boring out the rear and installing a repair sleeve, but I didn't want to fool with that and instead found a donor AW71 (same as A43D except for bellhousing and buttcone) for $100. The worn case bushing,(not the same as the extension housing/buttcone bushing) is visible just under the bore. Unlike the ext housing bushing, it's copper-colored.
-
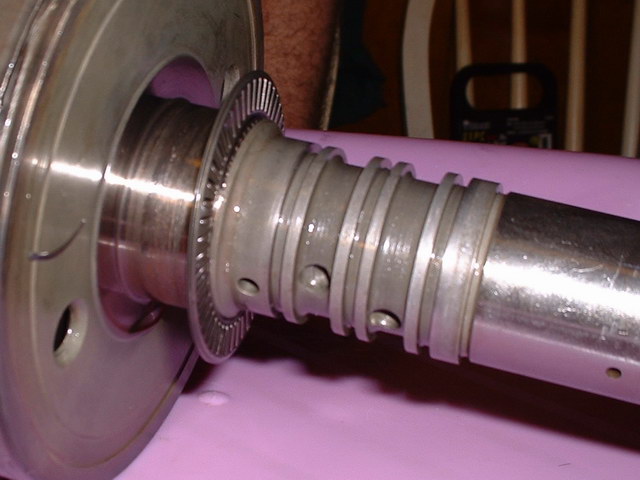
I've received some inquiries regarding the images missing from this thread. Found 'em on my old laptop, so let's try and get those back up there: Output shaft showing where the three failure-prone oil sealing rings are found. Fortunately, the shaft sustained no damage. These sealing rings are metal, somewhat resembling the rings on a notebook, and must be handled with care to avoid messing up the little clips that close them.
-
The 22RE stock exhaust manifold is excellent, I'd not fool with a header. For best performance on your motor, run 2" pipe thru a hi-flow cat and expand to a 2.25" muffler and tail. I used a Magnaflow cat and Raptor muffler I got on eBay, $75 for both to the door. Got 2" center pipe and 2.25" stainless steel flex for muffler-tail at JC Whitney. My system is much straighter with less restriction than the stock school-bus muffler and curvy waterpark slide-lookin' pipe, yet backpressure is kept at a level the 22RE really likes (that's why 2.5" is too big for that motor). When I finished this upgrade, I was astonished at the seat-o'-the pants improvement - one full gear going up grades. Make sure your exhaust manifold gasket has no leaks. If it's the original, it may well be leaking. The best way to get the most power from a 22RE is clean intake + no vac/gasket/exhaust leaks + exhaust + cam. I'd leave a header for last, if at all. They're great on some motors, but not a big plus on this little four banger.
-
An easy way to deal with 22RE valve adjustment is to make absolutely certain you have one or two valves set right, then run down the line and clickety-clackety each rocker arm. If one is out of adjustment, you'll be able to feel and hear it. I got to where I could set one with a feeler gauge, then do the other three by feel (checking with the gauge afterward, of course). Spin the crank 180, then repeat. Make sure the ends of the adjustment screws are not worn, which will make it impossible to set and hold a proper setting.
-
Hi Greg, Your Sunrader is pretty much the nicest Toyhouse I've ever seen. The only one of those we've ever seen in person was at a Home Depot in Dallas, OK plates. Stunning. I really like the extended cab design, especially being 6'5" tall. I'd love to have a little more room to recline. Super rig, man. I'll be adding to the info on this thread soon, thanks for the props and sticky.
-
Torque converter While the torque converter was not fully toasted (the rig would still drive), I believe it must be replaced with every overhaul or incident that produces contamination. But whose converter does one use. The $700 Toyota wanted was unpalatable, and I don't just stroll into AutoZone and buy an important part without doing homework. What I needed was a well-established company that deals only in TC's and has an excellent reputation with pro rebuilders, who suffer greatly when they have to eat the labor to replace a bum converter. There's nothing worse than an enraged customer badmouthing you about a part you had no association with other than sliding it on the input shaft. After learning that Precision of New Hampton has a superb reputation among rebuilders, I looked into their operation and sent them an email. Shortly thereafter the Dallas retailer, a very nice gentleman, called me and we worked out the details. A standard converter was $100, but the mfgr's site indicates that they also do heavy duty RV pieces. He called them and found out that it would need to be custom-built and shipped, total $129 plus tax. The Toy dealer makes me drive up there to pay in advance for a $2 special order bolt, but these guys ordered it for me based on my word over the phone. Picked it up a few days later and paid the fine people. I'm very pleased with my transaction with them, and nowhere else will I buy another TC. http://www.gopnh.com/index.cfm
-
Now's a good time to list the supplies I needed to do this job without any compromise. With the exception of the clutch spring compressor, all the tools are standard mechanic's fare. Transmission clutch spring compressor - about $40 plus s/h on eBay. Since this is a little tranny, you have to cut about 3/8" off each arm (red lines on photo) or else it won't fit inside the case to remove and install the No. 3 brake. Most of the clutch packs have a hole in the middle, so you can use the tool inside without a press - a 3/4" wrench tightens the nut for compression. The front clutch has no hole in the center, so it needs to be done on a press, in which case you merely slide the clamps off the tool and reverse them to point away from the threaded shaft. 8, 10, 12, 14, and 17mm sockets. Air compressor with rubber-tipped blow nozzle to dry parts, check pison strokes, and pop out pistons. Transmission scissor jack from Harbor Freight. I got mine for $29.99 during a pre-Xmas sale there, it's normally about twice that on sale. I like it much better than the floor jack attachments and has come in real handy for many jobs not related to the tranny. For dropping a differential or installing a bumper or tailgate, it's a life-safer. I see them on eBay sometimes. Engine lift and stand - I got mine on eBay from a guy who let me pick it all up, so dirt cheap and no shipping charges. As indicated, I much prefer to pull the motor to get the tranny out. Hydraulic press - for pressing bushings and compressing the one or two spring packs that don't have a hole in the middle. You could get by without it, but mine is among the best $179 I've ever spent at Harbor Freight. Going up to the 20 ton, which has a greater adjustment range allowing long pieces like my 4Runner's rear axle shafts to be pressed out, was a wise use of a few extra bucks. To do the tranny, the smaller ~$100 12 ton press should be fine. At least one decent set of dial calipers. I have a 12" Shars unit that was only $30 on eBay and is very accurate. A couple of digital ones from HF provide backup and confirmation, and I also use micrometer calipers, bought for dirt cheap at HF, when applicable. Bore gauges to measure bushing wear. I got a Shars set for about $20 on eBay - they are T-shaped and generally used to measure the bores in an engine block. Take the right one, compress and lock, stick in the hole, unlock, orient straight horizontally and vertically, remove, and measure with calipers for the internal diameter of a round bore. Take several readings at different locations. A precision streightedge is a good idea for measuring clearance to the OD drum and the front clutch, plus to check the oil pump. Feeler gauges are needed for the latter, plus to check planetary gear clearance. Toyota sez a special tool is needed to pull the oil pump, which is the first step in internal disassembly. I got it out fine by putting a bearing puller on the shaft, then attaching a cheap 3 jaw puller to the bearing puller. Dial gauge and stand, about $20 total at HF. This, used with compressed air in the right hole, is needed to measure piston stroke in several subassemblies. Split ring pliers, a pick/hook set, and a large screwdriver. Various sockets to drive seals and bushings that are too large for my bushing installer kit. I used a slide hammer to remove the extension housing seals, but I'd say a hammer and punch from the inside would also do the job. Lots of degreaser. Be fanatical in your parts cleaning. Many Rubbermaid tubs and the shoeboxes from the dollar store. Lots of little baggies and, in my case, a ton of fishing lure boxes to store the valve body parts. A 3 color hanging bin set from HF was also a big help in keeping things organized. A big Sharpie is critical for labeling your parts storage. Vaseline and shop brushes for assembly lube and holding parts like bearings and races in place during reassembly. Various pin punches. I got hundreds of dollars worth of chisels and punches from a local seller on eBay for $25. Box had several torque wrenches and about 60 screwdrivers in it too, all new. What a steal. For $45 I found a pair of arms that attach to an engine stand and hold the tranny case, making it easy to spin it around while working on it. Search for Norco engine stand transmission adapter. Overhaul kit. I got a good kit with steels included for about $60 on eBay. Grabbed another on there for $45, seller is portland transmission, nice guy. There's still at least one up there now, search A43D. Bushing kit - any tranny shop, brick or online, $20-30. Toyota sez if a bushing is worn, replace the whole subassembly. Yeah, when donkeys fly. The bushings can be changed, and I recommend doing so for the best rebuild possible. Reference - 1986 Truck/4Runner FSM. 1993 Toyota A43D Repair Manual (black cover, found for $4 on eBay). Chilton's Guide to Import Automatic Tranny Repair. ATSG A40 series repair manual (the least useful). And...that's pretty much it, except for the stuff I probably forgot. I see lots of don't try this at home advice for this job. I guess if I were selling hastily-done rebuilds for thousands of dollars I might say the same. But, our standards are elite, we spend more time washing and examining parts than most shops spend on the whole rebuild, and I'd put our work up against any shop's, any day. MODERATOR NOTE - Fixed links to photos - John Mc)
-
Here is a photo of the output shaft showing where the three failure-prone oil sealing rings are found. Fortunately, the shaft sustained no damage. It didn't work out so nicely for the tranny case, though. Behold the grooves cut by the failed first and third rings spinning on the output shaft. Is that hideous or what? The center ring had not failed yet. This case can be saved by boring out the rear and installing a repair sleeve, but I didn't want to fool with that and instead found a donor AW71 for $100. The worn case bushing is visible just under the bore. A 32mm Craftsman socket was the perfect size for pressing in a new extension housing bushing. Installed new extension housing bushing. See the oil grooves? I thought they were some kind of a design improvement. Wrong..... Here's the old bushing. Really, I thought it was supposed to be a smooth bore until I looked closely and saw evidence of the oil grooves. Wow...that's one seriously worn bushing and this is what I believed allowed the slop in the shaft allowing the oil sealing rings to fail. Here's an example of the oil sealing rings, in this case new rings installed on the No. 1 brake on the center support. There are many of these rings in the A43D, but the only ones I've seen fail are on the output shaft. MODERATOR NOTE - Fixed links to photos - John Mc)
-
Whoa there, cowboy....that ain't right. The rest of your post was fine work, though. 2WD Toyota trucks of that era sport an A43D 3 speed plus OD tranny. The A340H is found in 4WD pickups and 4Runners. A43D has no electric controls other than the OD solenoid and relay A340H has a separate computer, a transfer case, and is a completely different unit. The A43D is identical to the Volvo AW71 inside. The ID plate and casting on both units will show 03-71. The extension housing is different from the Toyota, but can be easily swapped out. In my part of the world, the A43D is hard to find, but once I became aware of the Volvo issue, I found a good donor unit a few minutes from home for a mere $100. The advice in this thread for the lack of power problem is sound. Follow it closely. Also, clean the throttle body. The butterfly can look find from the front, but be filthy at the rear. Remove the TPS when doing so - cleaning can kill it - and while it's off, replace the maddening phillips head TPS screws with allen head ones to make future adjustments easy. A Seafoam treatment to the motor can work wonders. One largely unknown problem that can wreak havoc with performance are the unforgivable butt connectors used on the fuel injector wires in the main harness. They corrode and fail after many years of use and can completely confound mechanics who find everything else to check out fine. You have to pull the intake and get inside the harness to repair this, but it's not difficult. I bought an 87 4Runner, no rust at all, for a tiny fraction of its value because the owner couldn't get it to run right. He threw parts at it like a madman, to no avail. 50 cents worth of solder, wire, and heat shrink tubing fixed it.
-
I posted this in the Yahoo group, but since all things Yahoo are wholly lame, I like this forum much better. I've learned a lot about the A43D tranny in the last couple of weeks - I have two broken down in, uh, my kitchen undergoing overhaul. It's actually not difficult at all, and I'll have two excellent rebuilds for $600, including all the tools and reference. There's a good kit on eBay right now for $45, vs. the $250+ plus that's normal for a master kit with steels. My failure, which I wrote about in detail on an earlier post about the saga of picking up my 86 Sunrader, was a loss of gears from OD on down. Made it from St. Pete FL to mid-LA when I started losing gears. Got home to Texas with occasional 3rd gear operation. Maintained the unit, test drove it a bunch, and it was fine. Worked very well, actually. So, being completely nuts, we drove it to Denver to see a concert, then all through the mountains and even some steep, snowy stuff in March. Performance, for a MH, was excellent. We got to commandeer an entire CO state park that hadn't opened yet. Awesome trip. Then, on the way home, we ascended the steep pass east out of Angelfire NM. Near the top, we were almost rolling backwards (and laughing like oooo). That was the only oddity, though, and we made it over the top. Shortly thereafter, it started slipping out of 3rd. The worst part is that it happened while listening to Pink Floyd's Echoes, one of the greatest works in history. How utterly uncool. We pulled over and spent the night with about 100 loud cows (which was pretty fun, really) and limped about 650 miles home. We only got one shift from 1st to 2nd per fluid warm-up. That made for an interesting trip - coundn't go fast enough for the interstate, but lost 2nd gear every time we slowed down. It was like a less-trying version of the film Speed. Too bad Dennis Hopper didn't come with us. Every time I coaxed her into second, we yelled "gooooooooooaaaaaaal" like at the Mexican soccer game. Finally we just said "ta oooo wid it" and jumped on I-20. The 22RE likes being wound up, and we managed 50mph and some of middle fingers from our kind fellow citizens. After the last fuel stop, 100 miles from home with no more slowdowns to cripple us, a TX DPS trooper left his speed trap position and chased us down for not having mudflaps on a dual axle. My understanding is that a MH is not required to have mudflaps, and installing them on a Sunrader is an interesting proposition in itself. Sheeeesh. So we had to sit on the side of I-20, watching The Simpsons on the laptop, waiting on the fluid to cool one more time. Our desire to get home to a city which (on a good day) we loathe was overwhelming. We got underway again and made it home, the last 20 miles being pure insanity, battered by the worst thunderstorms in many years. 3 times now Toyotas that shoudn't have made it have gotten me home. The transmission autopsy was a big event in our home, 'cause we like stuff like that. It's the only part of one of these rigs I've not dismantled and reassambled - I have 89 and 87 4Runners too. What went wrong in my 70K tranny? My 89 4Runner has 168K, towed another 4Runner from MA to TX, and shifts like silk. Being 0-for-6 in major drivetrain repairs from the sleazy mechanics that rule this area, we knew well that we'd do a better job than a rebuilder who gets fired if he takes too much time examining and cleaning parts. I can't tell you how many atrocious tranny rebuilds I've seen. I got one once that lasted less than 100 miles. Stuff like that made me abandon all vehicles outside of the 1st generation 22RE Toy pickup class, build a home workshop, and say goodbye to car payments and outrageous repair bills forever. 3 vehicles heades for the crusher restored to glory for less than half of what my 2001 Chevy cost. An? one of ?em has this rather splendid fiberglass house on the back. The fluid was dark, especially for so little mileage on it, but wasn't full of metal. But, before I originally left FL with the rig, I changed the tranny fluid and had no way to examine it. Subcomponents kept coming out looking good. Valve body looked good. Then, the rear parts group and output shaft didn't want to pull out by hand like they should. Spent an hour coaxing it, then slept on it before putting it on the press. It popped out with a tiny amount of pressure. Woo hoo. I looked at the tailshaft and in my best surly blue collar voice, growled "there's yer problem". On the last inch of the output shaft inside the case (not the extension housing, but the case itself), there are 3 metal interlocking oil sealing rings. Two of them had broken and gouged the bore at the rear of the case. It was pretty nasty. The rings were shaved across their diameter like a deli slicer worked 'em over. I've never seen anything quite like it. The bore looked like it was supposed to be grooved, but got chewed up too. Yes, a worst "case" scenario - the case is the most expensive hard part, but I quickly found a $100 donor unit at the junkyard just 6 miles away. I efficiently broke her down in just a few minutes, and this time the tailshaft group slid out with no problem, but..... TWO OF THE THREE AFOREMENTIONED OIL SEALING RINGS WERE BROKEN! So now we're zero for two trannys with sound sealing rings. Only these had not come out of the grooves to wreak havoc - thank goodness the rear case bore was smooth. But, the rings were shaved down like mine were - one is about 1/4 its original thickness. My original case was gouged so badly that I didn't realize the rear bore was supposed to be smooth until I examined the donor unit. These rings separate fluid passages to the governor, which controls shifting based on fluid pressure and centrifugal force as it rides on the tailshaft. Disrupt pressure to it, and it wreaks havoc on upshifting. Nowadays, the governor is replaced by electronic speed sensors and solenoids on most cars, but the A43D's only electronic control is the OD system. Amazingly, the pieces of metal were mostly stuck to the side of the center support and did no other damage. Hard parts look great, and the clutch discs had plenty of life remaining (but were replaced anyhow). So that solves the mystery of the shifting problem, but what caused this with so little mileage on a pretty durable tranny design? Toyota sez that if a bushing is out of spec, you replace the whole subassembly. Yeah, nice work if you can get it, but I wasn't born yesterday and, consequently, can change bushings. When looking at my nice new extension housing ("asscone") bushing from the A43D kit, I remarked on the apparent design improvement - a big X-shaped oiling groove in the bore. But, when looking closely in my asscone, I saw faint marks of what was once those same oiling grooves. Wowzers! The bushing was so worn that it appeared to be smooth inside! I measured it - 1.536", far in excess of the 1.4996 spec. TOAST. 36 thou might not seem like a lot, but it might as well be a mile in this application. The picture becomes clearer still.... See, the bushing wear was caused by the shaft wallerin' 'round in my asscone. No, really As the wear increased, the rear case bushing began to grind out of spec (only .009" over max, but still bad). What sits between the asscone bushing and the rear case bushing? The three oil seal rings that seem prone to coming apart! The rings are metal and have right-angle claw ends that interlock to make a kind of smooth unit that spins freely in a groove. Many of these in different sizes are found in the A43D, and now they scare the freakin' crud outta me. I theorize that on the first trip, the rings came loose and caused moderate problems. On the second, they held up for 4 days, then came really, really loose and ate up the case. The heat from that malfunctioning comprimised the torque converter which, after we got home, was performing poorly. No surprise there. The junkyard case donor I broke down looked fine too, other than those bleepin' rings. I wonder how many crappy rebuilds certain chain tranny shops have sold when all that was needed was a new TC, oil sealing rings, and two bushings? I wonder how many of those times the victims were told they needed a bunch of hard parts, too? I've seen people almost taken for THREE THOUSAND FROGSKINZ when all they needed was a throttle cable adjustment. So, the last part of the mystery...why did the extension housing, or asscone if you prefer, bushing get waller'd out like that? Research indicates it's not uncommon for Volvos running the same tranny (with a different asscone and bushing) to need the bushing done at 120K. A 21' Sunrader is obviously stressing the drivetrain a bit more than a Swedish turbobrick, so that likely accounts for some of it. I marked the driveshaft, of course, but since I'm not the original owner I can't be sure that my marks mean anything. Some of the work I've found on the rig is below even goober standards. I'll closely examine the driveshaft, center bearing, and probably change the likely-20-year-old U-joints while the shaft's out and pay special attention to good driveshaft phasing. Our recollection is that, especially on the second trip after adding new tires and Bilsteins, the ride was pretty sweet. No strange noises or vibrations, but a long shaft like that can get freaky if installed out of phase. I know why the tranny went nuts now, but can't tell if it was just normal wear or if an imbalance behind the tranny accelerated the wear. Again, we noticed no evidence of such a problem. Sometimes, problems like that are indicated by a leak at the rear seal, but the Toyota is very well sealed - a rubber metal-clad inner riding against a metal-clad felt-lined outer. That's awesome if you hate tranny leaks, but it will help a bushing wearing out of spec go unnoticed. So what in the name of tow trucks are you supposed to do? I'd pull that asscone every few years as part of routine maintenance. Drop the driveshaft, pull the speedo, six bolts holds the tail on. The bushing only costs a few bucks, cuts out easily with a hacksaw blade (large oil channels under it make damaging the bore a nonissue), and presses in easily. Make sure you line up the oil hole just right. A shop shouldn't dream of charging more than $100 to do the whole thing, or $20 to press the bushing. If the bushing looks really bad, check the driveshaft and u-joints. This can save transmission that should have run for many more years. Unfortunately, you can?t access the three oil seal rings without disassembling the transmission. You might have to tap the cone some with a rubber mallet to separate it. The housing gasket, which goes on dry, is likely to be a real nightmare to deal with, especially while under the vehicle. Scraping off the old gasket at the kitchen table was very time-consuming. Actually, it was the worst part of the rebuild so far. I guess that's, in a way, great news. I've always applied a light coat of grease to most gaskets to make future disassembly a snap. All my 22REs are assembled with grease instead of RTV (except a few special spots like half moons, oil pump bolt, etc.) and have never leaked a drop. The tranny is a pain to pull from the vehicle. Unlike on my 4Runners, the crossmember does not pull out. It's welded in. ACK! Getting that thing out from under that low-sitting vehicle is the stuff nightmares are made of. I think, actually, it might be impossible. It's easier for me to pull the motor. Pop the mounts and move the engine/tranny forward and you have easy access to the infamous two upper 17mm bellhousing bolts. Yoink the motor out, then tranny comes out easily through the hood. By watching eBay I was able to equip my home shop for absurdly cheap. Got a rebuild kit on there for $60, then another for $45. Shop equipment was accumulated by watching local auctions for heavy stuff. Got a two ton engine crane, two engine stands, and a load leveler for $100. And, got stuck in the mud in a national forest with all that stuff in the back of my Blazer as a game warden gave me an undeserved ticket. It?s a long story?? Disregard the $400 Toyota SST tool kit. Almost everything I needed was already on the workbench, and I fashioned most of the rest. A clutch spring compressor, $36 eBay, was the only tool I had to buy. Compared to the cost of rolling the dice on a half-assed rebuild, doing it yourself, even if you have to buy a lot of shop gear, is a blast. And, you get to keep the tools. The 1993 A43D Toyota manual is excellent, with much more information than the '80's FSM's. We supplemented the 4 manuals used with lots of notes and dimensions, plus over 1000 photos. What was once the greatest mystery on the vehicle I now know like tha back of my hand. Our attention to detail in measuring, examining, and cleaning was fanatical - much more than any shop would use - and no repair we've done has ever failed. If you can work efficiently and follow directions well, there's no reason why most can't rebuild the A43D. And so goes my strange tranny story, so far. I'm going to rebuild and soup up a spare 22RE for her, so it will be a little while before I'm rolling again. It?s too hot outside to go boondocking anyhow. I'll post more info and photos shortly.
-
The auto parts store should be able to find parts for one ton with dual rear wheels in their system. I've not had a problem, just make sure you don't get parts for a plain ol' Toyota pickup.