LittleShack
-
Posts
120 -
Joined
-
Last visited
Content Type
Events
Profiles
Forums
Gallery
Everything posted by LittleShack
-
 I like this idea!!
 -
 Wow!!
Wow!! -
I'm thinking that replacing the entire outdoor shower is the best bet as the cover for it was attached with velcro when I bought my Toy. AND, there is no shower head. Amazon sells several complete replacements for under $40USD. 6" x 11". Before I get myself into this project, can anyone tell me if it's a difficult replacement or a snap? Just have to preparemyself. Part 2 of help needed...the screen door. Mine, for some reason, fits unevenly around the frame. Not sure if it's the door or the frame. It fits fine everywhere but where the door latch is. It is tight enough there that the screen door touches and you have to push it in (not alot of force, but enough that over time the paint is wearing off). There appears to be a missing latch that would have held the door closed while the coach door is open, but the pressure of the tight fit in this one spot keeps it closed. But, I can see where something has come off on the interior frame of the door. Does anyone have an Itasca (92) that would be willing to post a photo of the complete screen door set up so I can see what I'm missing here? The screen door also will not attach itself to the coach door with the little pressure arm as the plate it is supposed to snug over is broken. Any suggestions? Thanks one and all! Sue
-
Thanks, Maineah and markwilliam1! I keep wandering out to the RV just to look at it, lol!
-
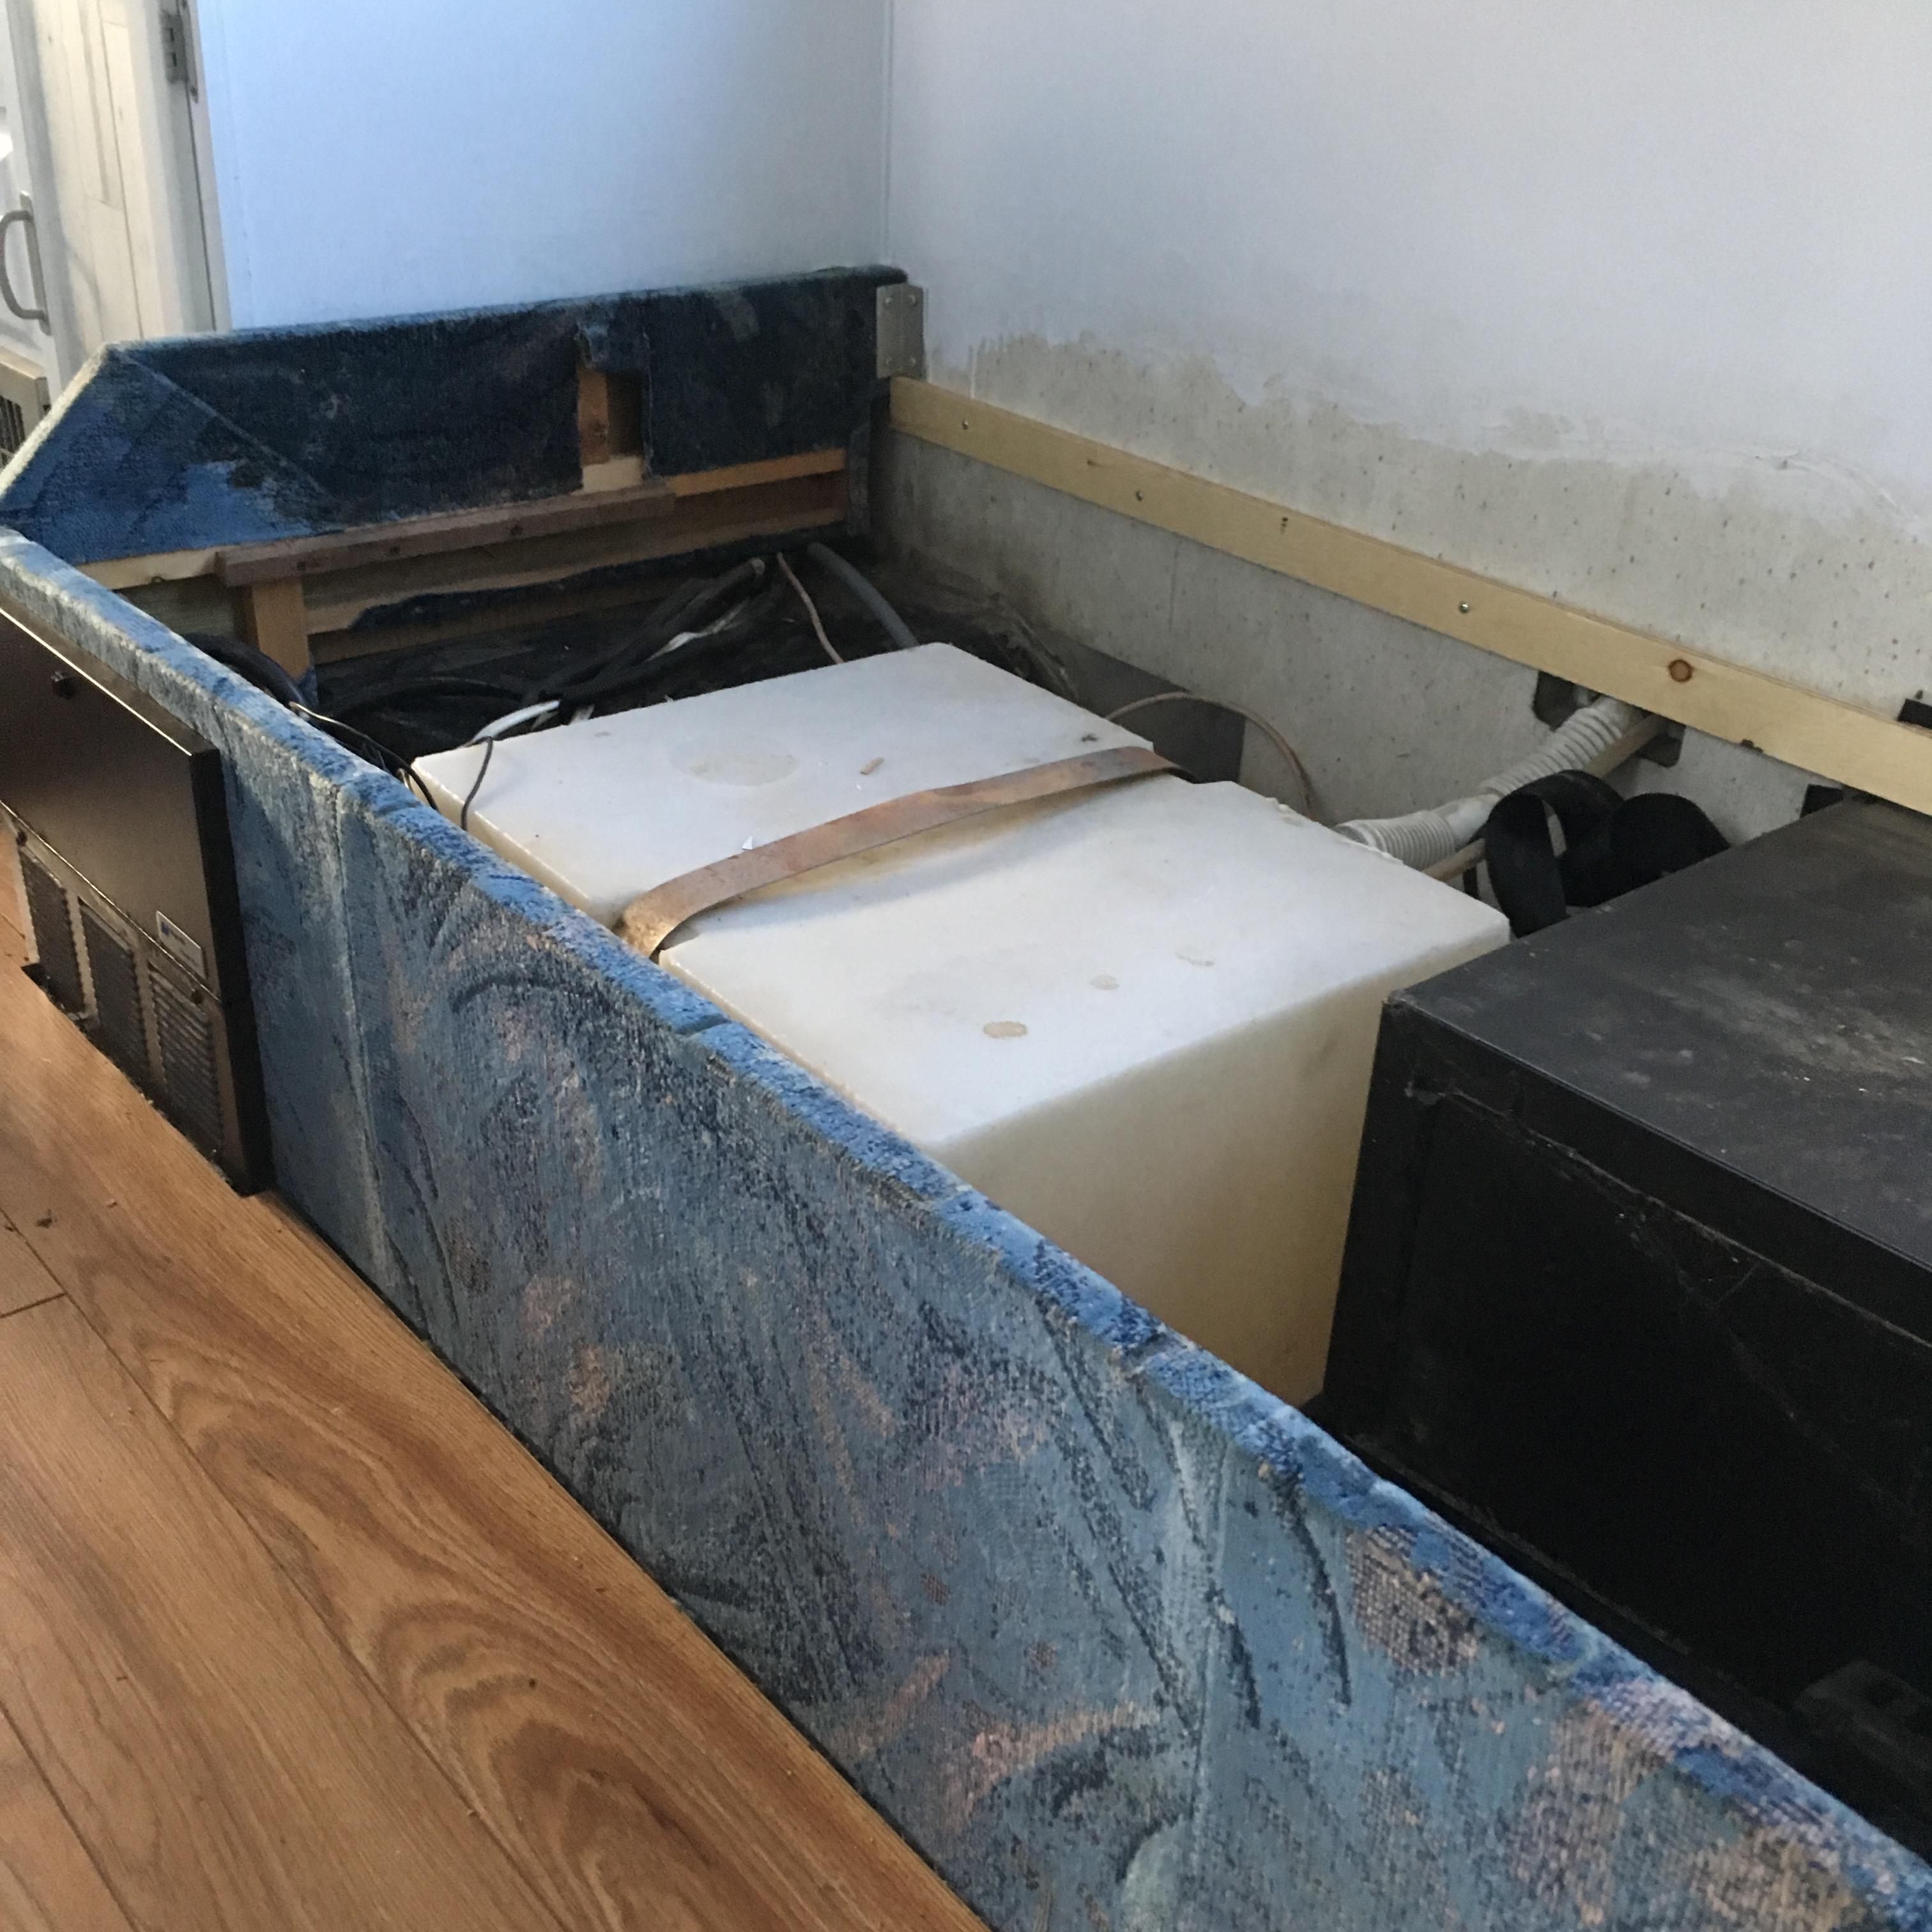
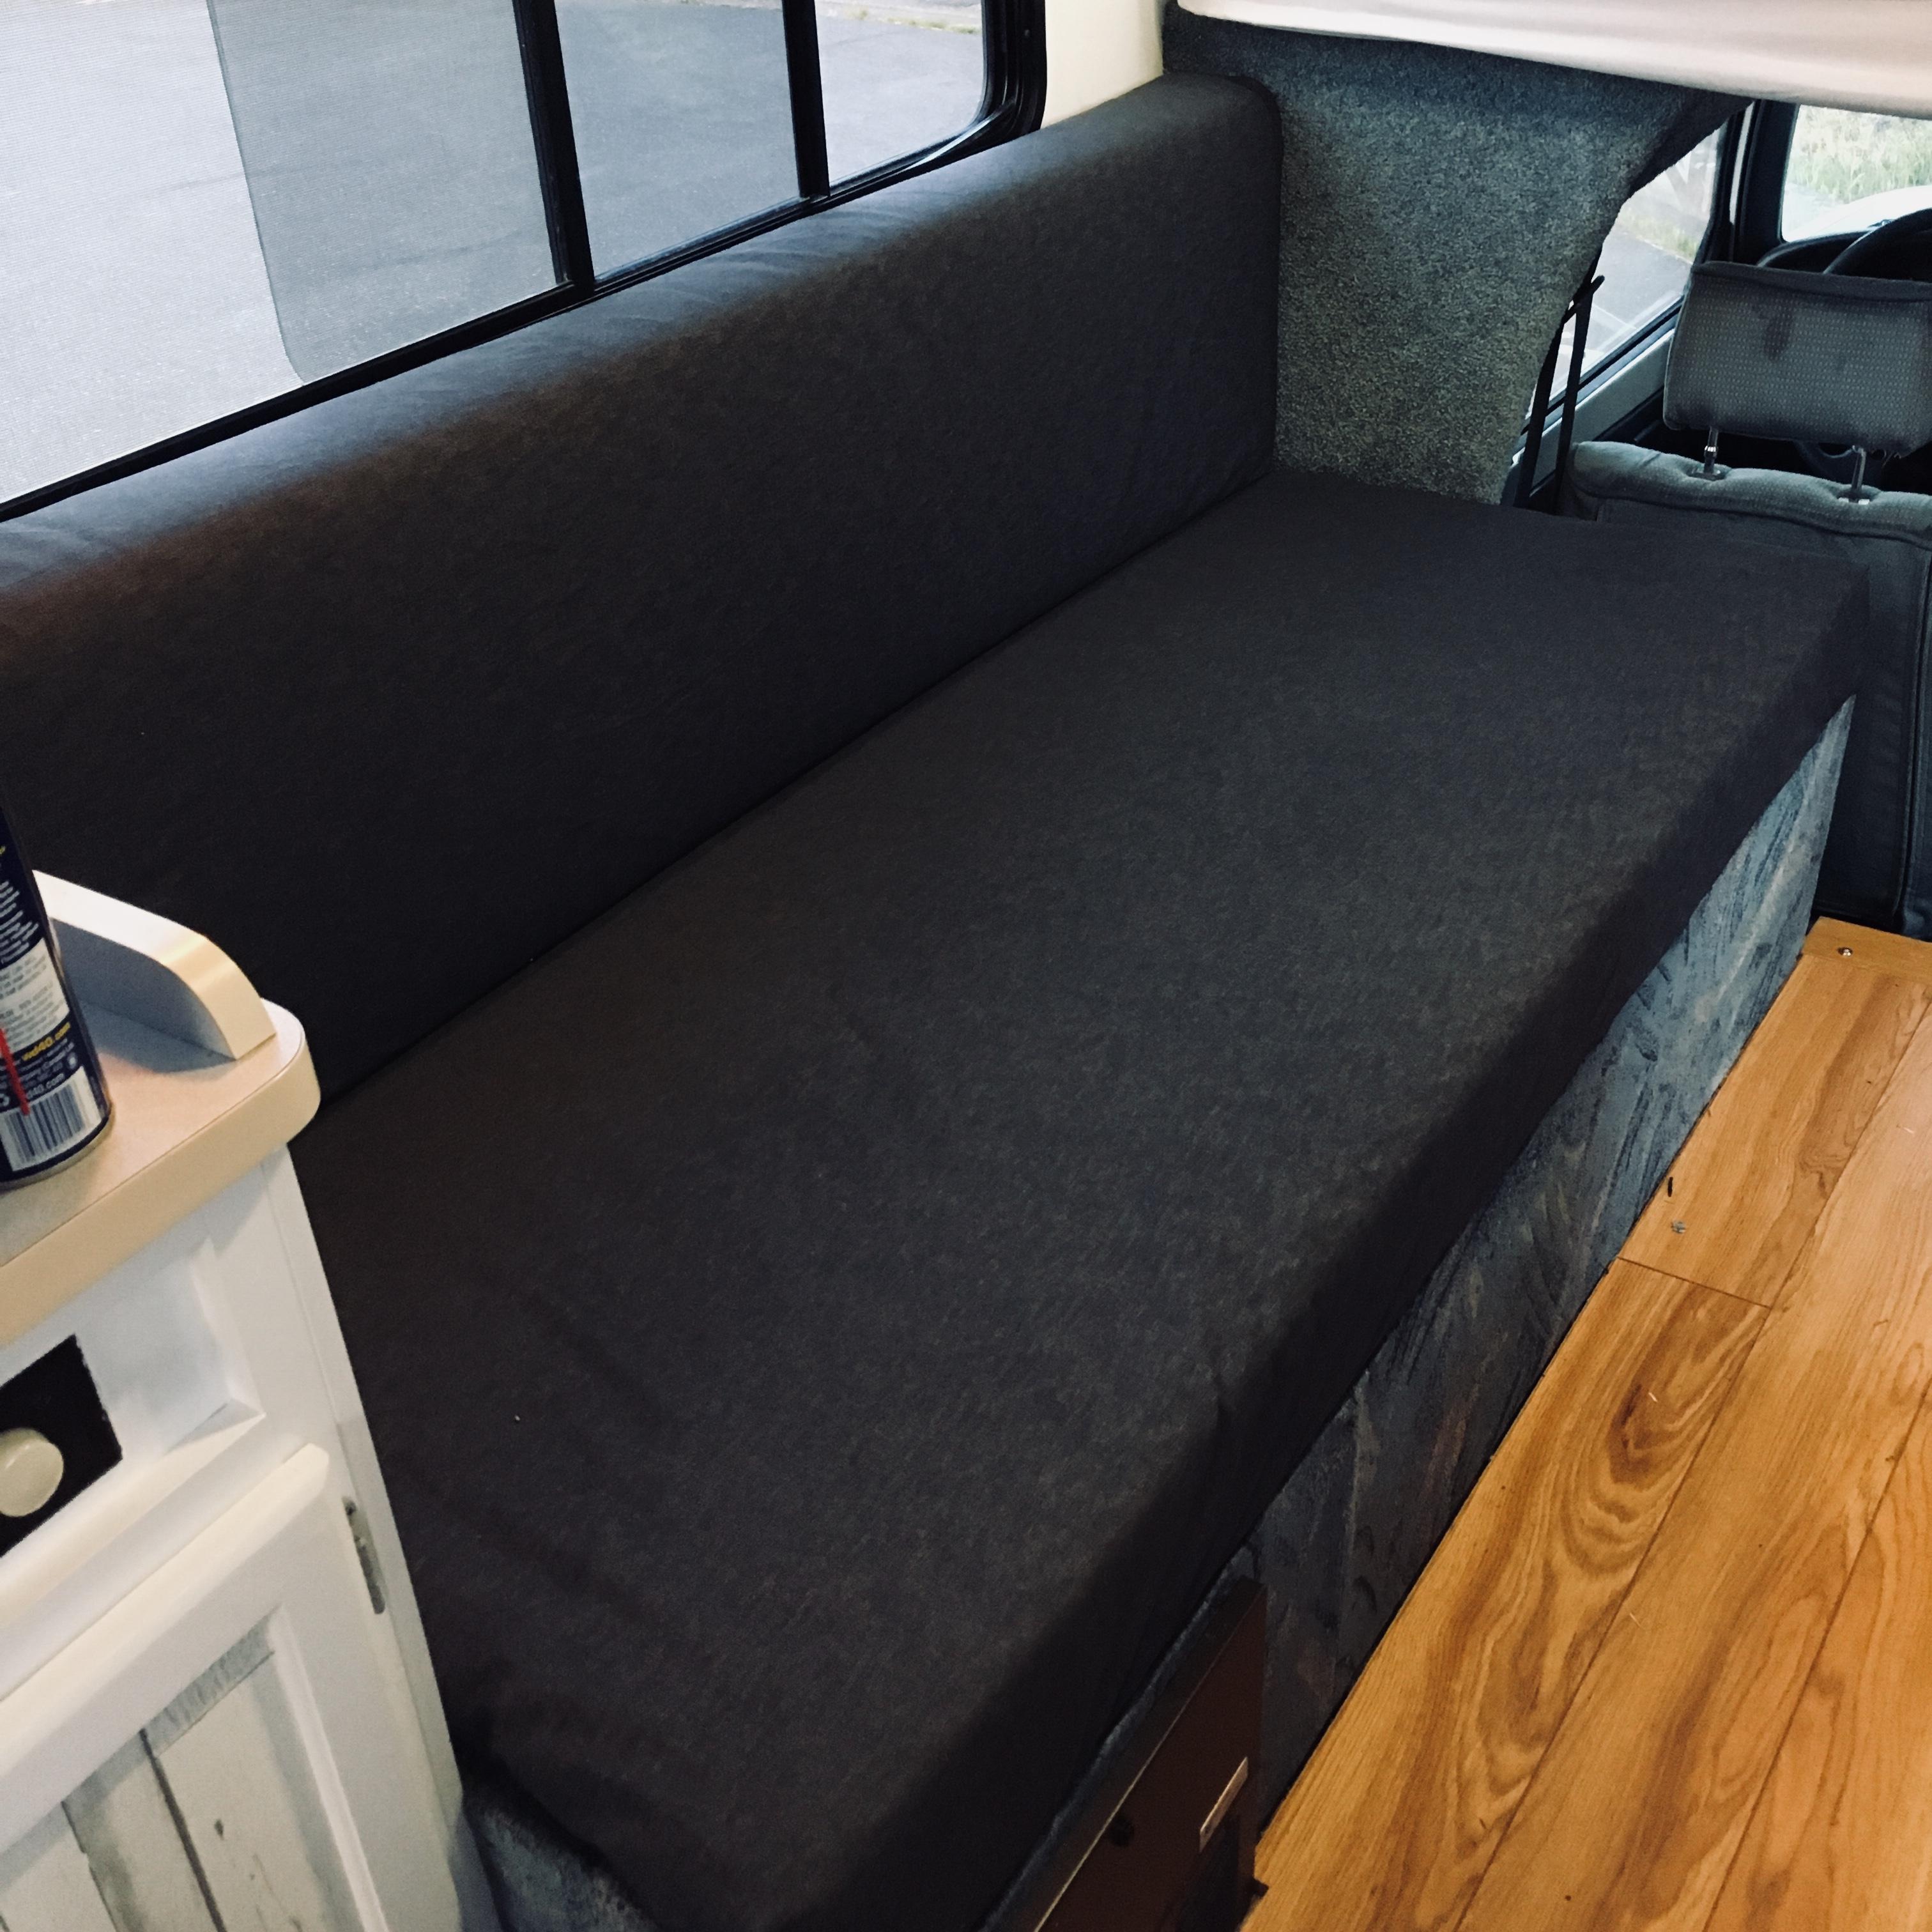
Pulled the jackknife sofa out (So easy! Only 4 large screws, and a 15 year old son's help to get it out the door!) Then, I purchased firm foam cut to size for the base and back. Home Depot supplied the 5/8 inch plywood, which I got cut there (great deal at 2 free cuts and $1 each after, but they only had to do 3 so didn't even charge me for the extra!) Wrapped the foam with batting to soften corners, stapled it onto plywood. Wrapped fabric around foam and stapled to plywood. It doesn't matter that the backs are bare as no one sees it. Then added a piece of the plywood that was cut off from the piece I bought from HD (it actually worked out perfectly! The measurements of the base and back added up to leave a 2 inch strip which had been cut to the same length as the boards for the sofa. This fit perfectly along the wall to hold up the back of the new sofa, while the front of the seat sits on the original frame. The generator box was also the right height for this strip to sit on top of, so extra support there too. Then, the seat fits in between the 2 raised ends of the original base, and the back sits nicely under the window! It all fits snuggly so no movement while driving. I'm so pleased with how it turned out!!

-
Thanks Derek!
-
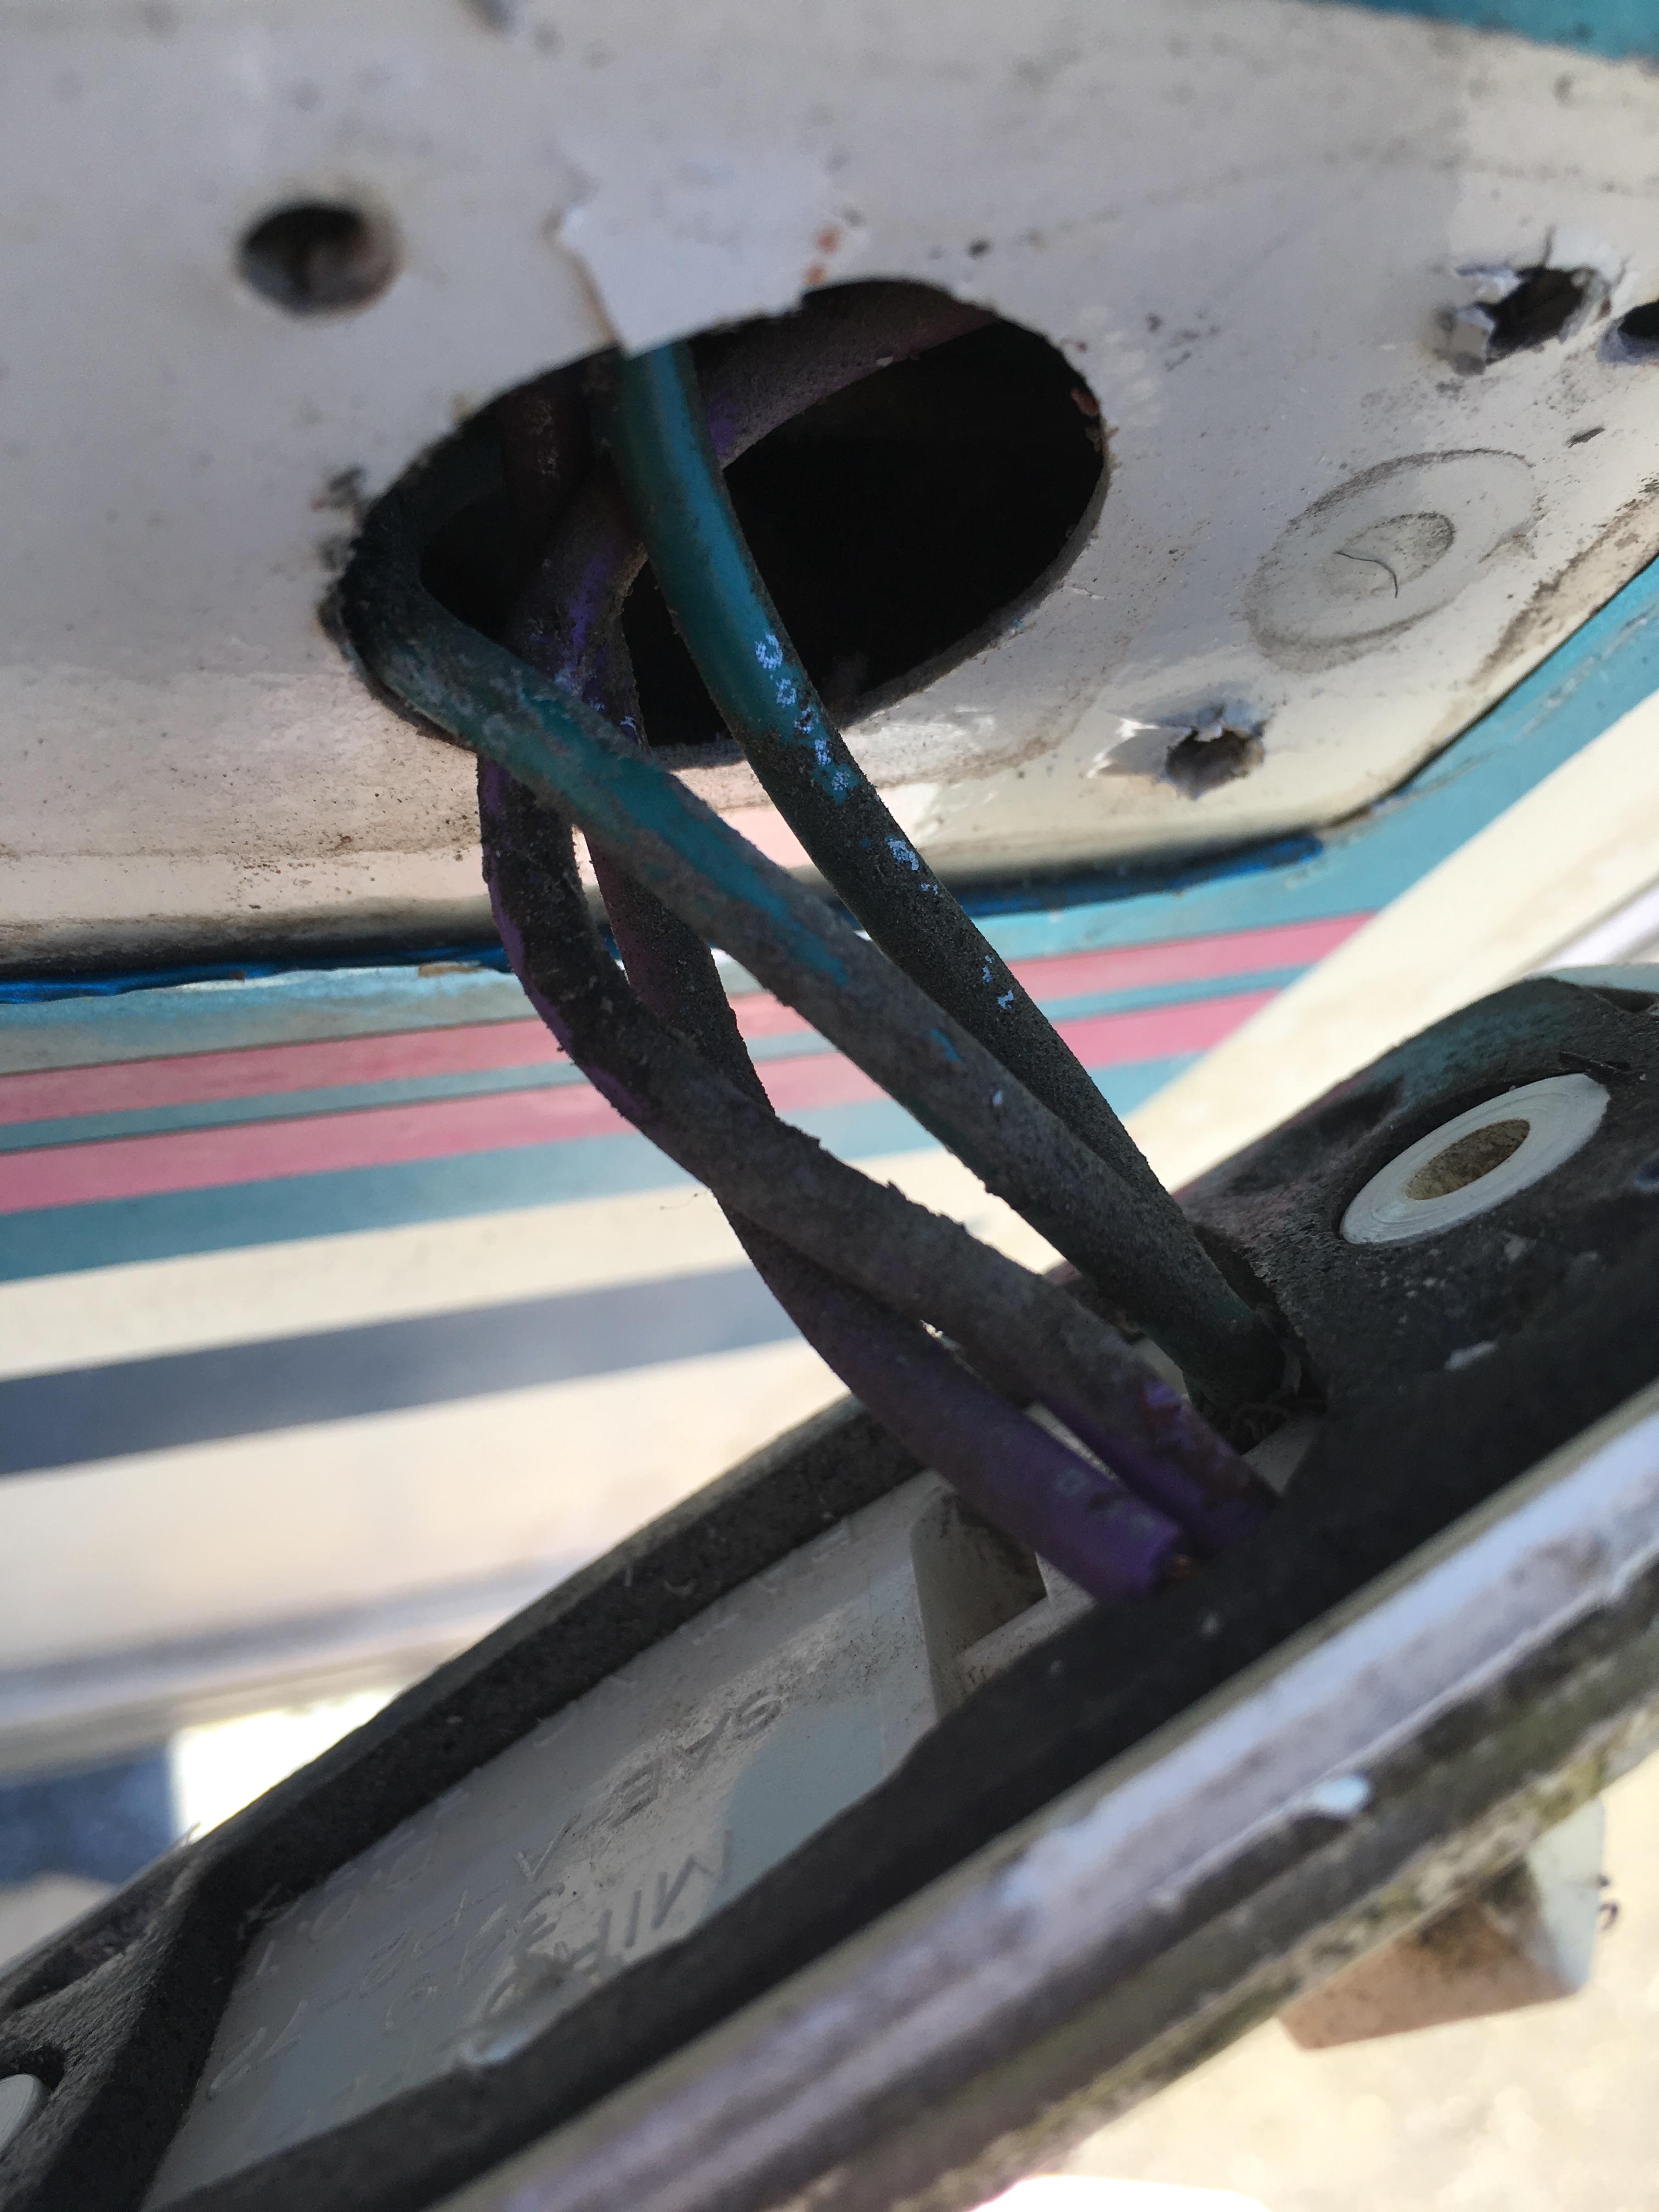
I'm about to begin the replacement of all of the marker lights on the RV with sealed LEDs. The top ones all have 2 wires. Not the red and black like on the new lights, but still, 2. The 2 side lights that are at the back end have 4 wires. Why? How do I deal with those? Do I need a different light?
-
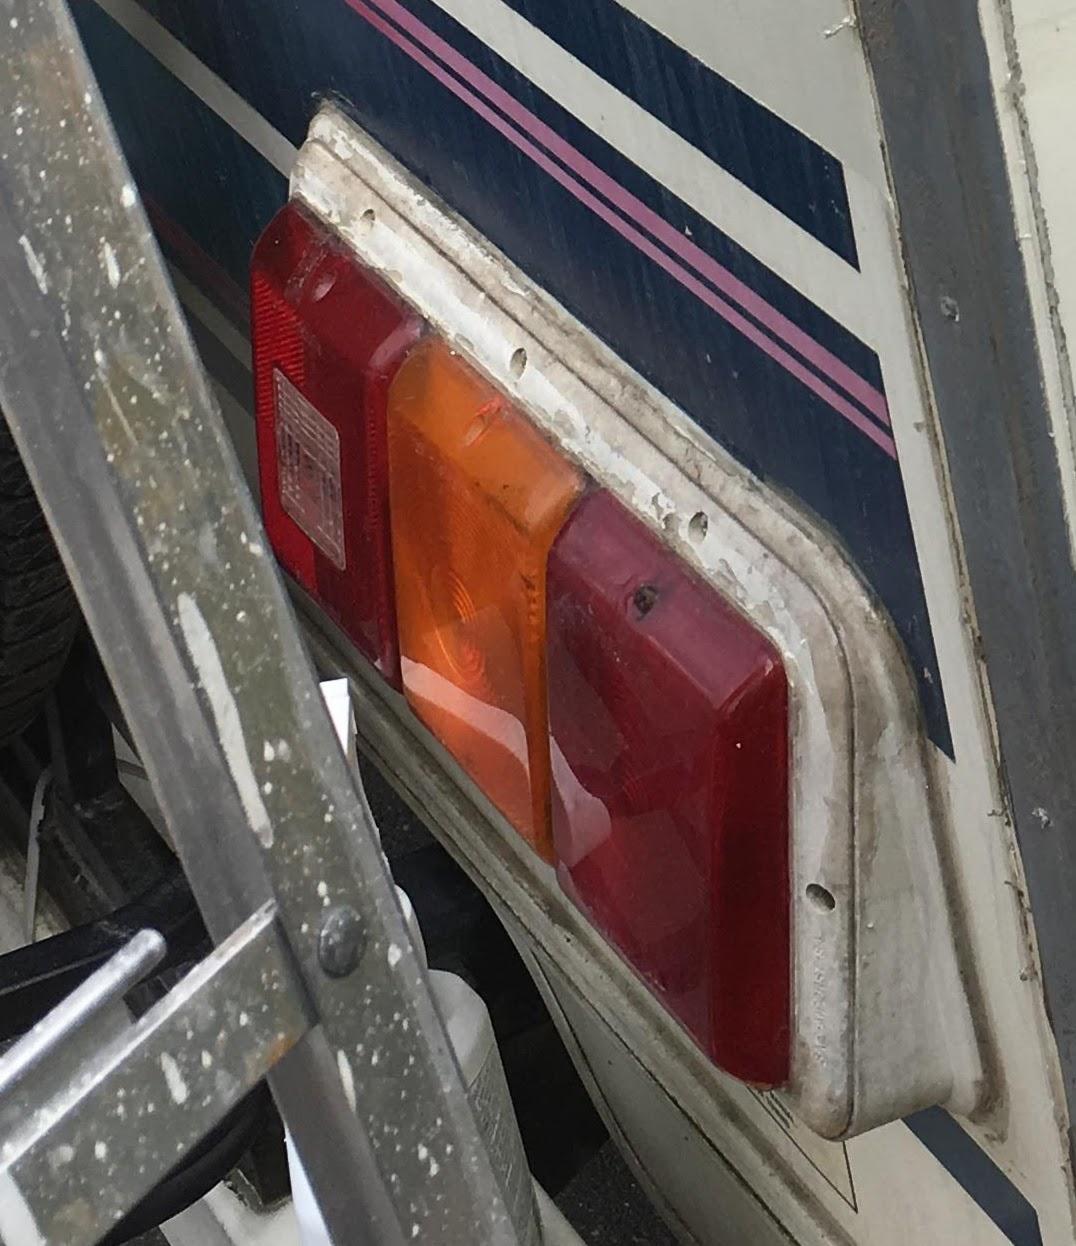
Thanks Stayingretired! I spent the afternoon removing, cleaning and reinstalling the taillights. New LEDs will wait for awhile. I left the wires all connected as to avoid any mixups, and just cleaned the fixture with a bucket of soapy, bleachy water. There was old sealant to remove and oxidation of the plastic. I ended up spray painting the wedge to match the colour I will be going over the original decals with this summer, (so the base is now grey). I removed all the lenses and cleaned inside as well. There was actually moss growing inside one! They look much better now!
-
I'm gonna go for it!!
-
Thanks Linda. Do you happen to know if there is a cut out in the filon under the wedge, or is that in place of having a cut out for the lights?
-
Amazon is sending me new marker lights as mine are pretty shabby looking. I'm pretty sure the front ones have caused water damage to the rig. The taillights also look like they could use an upgrade to LED. I've been searching online for replacements, but I'm a bit confused by what I'm finding compared to what is on my rig. Below is a photo of mine. They appear to have a raised wedge shape mount for the lights to go on. Just wondering if anyone else has dealt with this type of taillight. I don't want to go taking it off and then find I can't get a replacement and end up with a bigger project than I expected. Thanks all!
-
I fond this thread over on IRV2 about painting over decals... http://www.irv2.com/forums/f84/painting-over-my-faded-and-cracked-rv-decals-261418.html
-
92 Spirit - Foam Rubber Seal for Coach Door - Source?
LittleShack replied to 92Toy_IT320RB's topic in General Discussion
I have the same year and model RV...Mine seems to have been replaced at sometime with a thick foam tube. It's not great. I'm looking for the same thing, as well as any suggestions for door hardware. I find I constantly catch my sleeve, or something on the knob that sticks out of the frame. Also, my screen door does not close smoothly. One area rubs quite hard against a part of the frame, so it is impossible to keep the door and the screen door together when opening the door. Not sure if it is out of whack, or ?? Has anyone else had this issue? -
Thanks Linda!
-
Awesome, Linda! Thanks! I'd love to know what this guy used to paint over them. Any idea?
-
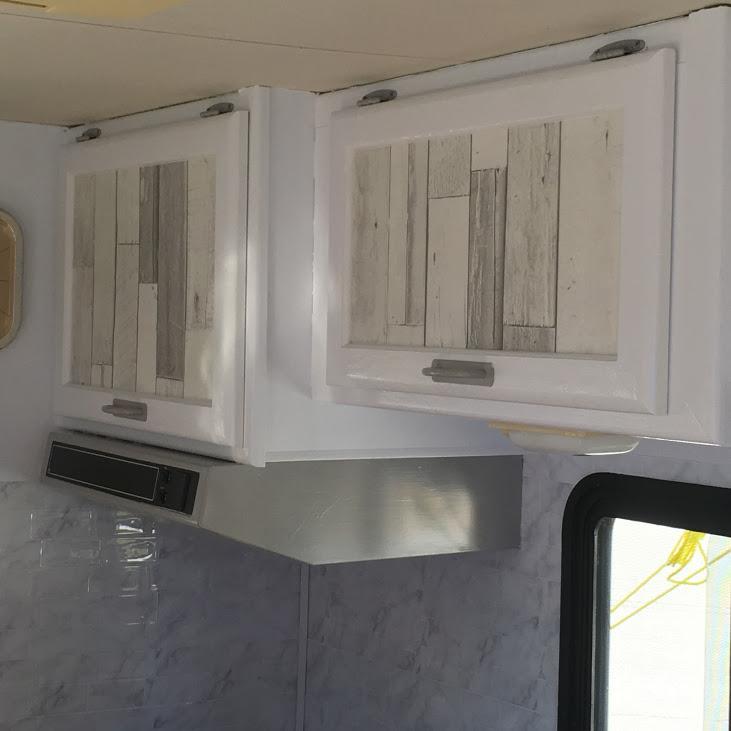
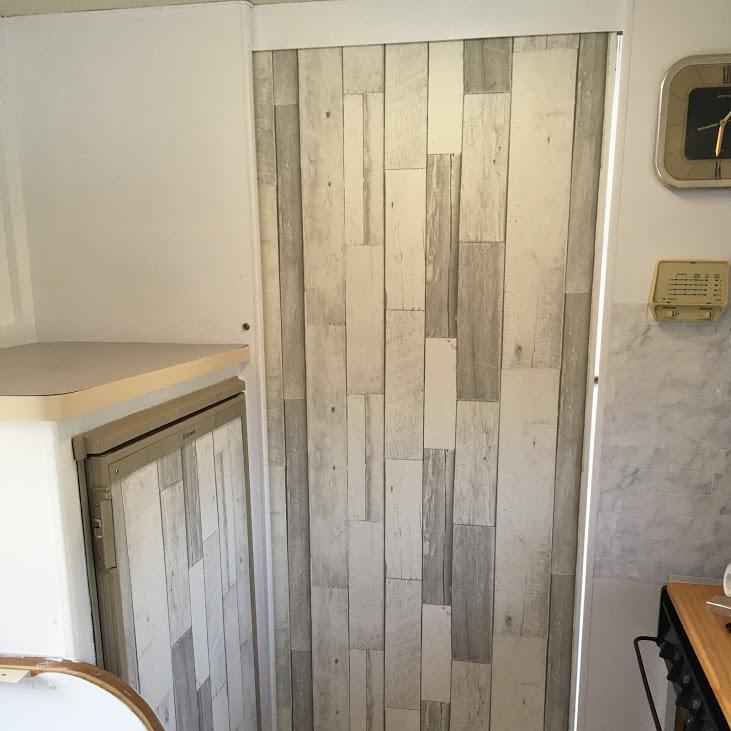
I started my RV makeover during the rainy, cold months this winter, so was limited to working on the inside. I painted the cabinets and used a wallpaper to cover the recessed cabinet doors, fridge and both sides of the bathroom pocket door. I have been sewing new covers for the dinette and am still thinking through the jack-knife sofa bed project. I will be making new window treatments next!
-
This summer I am hoping to tackle the exterior of Honey, my Itasca. She has filon siding and it is in pretty good shape, but needs to be brightened up with a good clean. I've read that Barkeeper's Friend is a good choice for cleaning the exterior. Is this okay to use on the filon? Then, once she has been given a good scrub, I would like to refresh the decals. Just wondering if anyone has tried painting over them and if so what they used. I would like to get it all looking spiffy and then do the Zep coat. Thanks in advance for any advice offered!
-
Lots of great advice! Thanks a bunch! Did more research on the FRP and found painting it is the way to go. Just needs to cover the opening for the over cab window.
-
What to use between top of cab and bottom of filon??
LittleShack replied to LittleShack's topic in General Discussion
Thanks to both of you. We ended using a marine sealant around the opening, applied very thickly. and then screwed the plywood to the metal. Finished it off with a tube of closed cell foam stuff my hubby found. We squished it into the space between the roof and the filon, from the outside. Seems to have done the trick! -
We are at the stage in our over cab rebuild where we are about to reinstall the filon under the over cab bed. The filon will need to be attach and sealed to the cab opening. What have others used to replace the seal between these 2? What was there was a black spongy tube like weather stripping type stuff, which tapered off to a tape stripping along the 2 sides of the opening. We have cleaned all of the old stripping off. Would butyl tape work? Thanks all for any advice!
-
Thanks joe from dover! More research being done!
-
Eternabond and Dicor Corner Seal Tape
LittleShack replied to LittleShack's topic in General Discussion
Thanks Mark! I will be leaving the roof seams on, just applying Eternabond over them. The side corner seams will be removed though as I think one has leaked a bit behind the shower, plus we are redoing the cab over bunk, so they are off already. Sue -
We are covering up the front over cab window in our Itasca and have been looking at the various options for material to use. We were given a 4'x8' sheet of FRP by a contractor friend and were wondering if anyone has used this product before on the exterior of their RV. It seems pretty skookum, flexible and can be used behind woodstoves. Just wondering how resilient it is to weather. Thanks!
-
I am waiting for a few sunny days in a row to reseal all the seams on the RV. I have a roll of Eternabond to do the roof seams and a couple of rolls of Dicor Corner Seal Tape to do the wall seams. Has anyone else gone this route? I will be removing all of the corner moulding and reusing it. I will give all the parts, and the corners a good clean up. Then resealing with the tape and caulk. What's got me scratching my head is...the corner moulding extends up onto the roof seam. I'm wondering if I should take the corner seal all the way up and around to the joint, or disregard the factory joint and begin the Eternabond at the point where the side corner becomes roof. Any thoughts? Thanks!
-
Dealing with a bit of rot in the cabover bunk base.
LittleShack replied to LittleShack's topic in General Discussion
Hmmm....I wonder if this would also take care of the leak??