

turtle
-
Posts
590 -
Joined
-
Last visited
Content Type
Events
Profiles
Forums
Gallery
Posts posted by turtle
-
-
I've gone 4.56:1 on two Toyota RVs and would do it as one of the first upgrades to ANY I own.
You can find a complete 3rd member (hog's head, pumpkin, whatever you want to call the housing) in most salvage yards.
The later model 4x4 and 4runners with V-6 engines and the bigger tires came stock with them so they are NOT hard to locate as a complete setup.
Getting a complete diff unit makes the swap a "do it at home" adventure if you have a good automotive knowledge (pull the axles, drop the drive shaft, unbolt the diff housing, then reverse the steps).
I've done it both ways. The first swap I did with Richmond Gear parts and had a speed shop do the re-gearing in my original housing. Second one was a swap with an SR5 4runner unit. NEVER again will I go the re-gearing. WAY TOO expensive when compared to a salvage yard diff housing.
Use the online salvage yard search tool and look for a complete diff assembly near you.
They are HEAVY so having one shipped adds a LOT to the overall cost.
In my V-6 shorty. 75 mph runs out at 3400 RPM and 68 MPH is 3000 RPM (2850 RPM @ 65 on the button).
This is with 4.56:1 gearing, the OD engaged, and a ratio adaptor to show the speed accurately on the dash. OH and I CAN cruise @ 75 all day long if I want to make some time. Granted fuel economy drops to around 9 MPG but..... as you know.... Time is money and if you NEED to make time you CAN make time (providing you are willing to pay for it in MPG drop). I've not been stopped for speeding (yet).
I got a ratio adaptor from an online speedo shop (I'll look for the info but most speedo shops will make you one). It is a small part that goes on the trans that the speedo screws into to reduce/increase the turn of the cable so that the ground speed is accurate.
The 4.56:1 in my old 65 HP diesel made it so that I could use 5th gear (on the flat). Still had to jamb gears when coming up on a hill to avoid slowing down too much. So I would imagine in a 4 cyl gas engine RV you would notice an improvement also

-
I like both of your mods.
Using dual running/brake lights is simple. Just add a jumper from the outside (original) brake/park light to the inside where the old backup light was. Then both inside and outside lights are park/brake.
I did this same mod on my old 1981 diesel toyota RV which had surface mount reflect-o-lite 1400 tripples that I had to rebuild. Worked great on those. Worked great on the newer Bargman lights
I didn't do the weld on trailer lights as I did not think of doing that at the time. Wish I had instead of using a 55 watt quarts driving light as a backup light
Page about the reflect-o-lite rebuild and mod: http://www.toymike.com/diesel/pics/Rear_Lights/
-
Get the proper flasher unit for LED lights.
-
I went with A column mounted gages (oil preasure, water temp and trans temp). I could not find a columm shift SR5 cluster
-
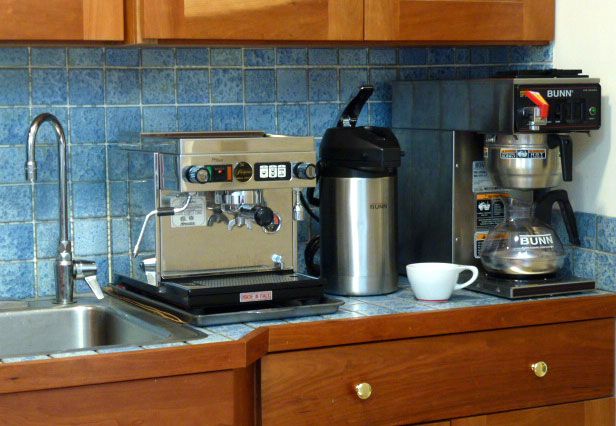
still use the old camp style open flame percolator my friends call it cowboy coffee nice and thick.....
Good old perc coffee is hard to beat, espically the aroma as it is brewing. A lot less needed to brew a good cup of coffee too.
-
I went one step further.
I use the center of the triple as the yellow turn
AND
BOTH the inside and outside as running and brake/stop lights
I welded on some trailer 4x4 box light holders with rear and side facing light cutouts onto the pop-shoot holder and put some diamond plate over the larger area.
MUCH brighter in the rear with dual running and dual brake lights AND the backup lights are about as bright as the headlights now
-
'Brand new' Michelins haven't been available for a long time. Better check the date codes.
I tried to get Michelins last time I "re-shoed" about 4 years ago. No luck.
Ended up getting Continental Vanco 4 - load "D" all around.
Little bit of a hard ride but they are wearing like iron. Twice coast to coast and no sign of any tread wear.
-
As WHM said, most all will pull their signal from the coil.
If you want higher revs and slower speeds you need to swap out your rear end gearing.
Stock is more than likely going to be 4.10:1 (there are some exceptions but not many)
I have always used 4.56:1 in my toyota RVs (well the two I have owned). If you change your rear end gearing you need to get a speedo ratio adaptor to match the speedo to the new gearing so that you are seeing the actual MPH in the speedo
In my V-6 shorty this gives me an interstate crusing speed of 70-75 in over drive with the RPMs around 3200- 3400.
I prefer the smaller US and state highways and staying around 55-60 which clocks in around 2600 -2800 rpm
BUT I can BOGGIE when I need to
-
Wow! That's great. The "stale" stuff and all that is interesting. From other circles, all of what you say is corroborated, except they're coming at it from the health perspective. Regular coffee is at best just caffeine, at worst full of nasty chemicals.
But good, clean coffee is actually really good for you (in moderation). But yes, it must be good quality coffee, not very old, very freshly ground and not allowed to sit. The antioxidants and other good stuff are very volatile and disappear if the coffee sits after it's ground, or after it's brewed.
Also that with the darker roasts (which I've always been a fan of), you are at some point only tasting the roast, not the coffee. So dark roast is just roast. The flavor of the coffee bean is gone. What do you think about that? I love the dark, oily beans (and yes I want that oil in my coffee). But I've gone a little lighter after hearing that.
I have a Hario hand grinder with me and an Aeropress.
None of this talk matters much, for me though, because I drink coffee at most once a week, but typically once every few months. I do, on the other hand, have a huge stash of green and oolong tea with me
Yes, the darker you roast the less of the bean flavor is kept. You lose the subtitle citrus and berry hints that lightly roasted coffee retain. Roast too light and you have lawn clippings (an unpleasant raw grass taste).
Some beans like Chiapas and the better estate Brazilian can take on a chocolate flavor when they start to go deeper into 2nd crack but care must be use to not go too far otherwise it is just burned charcoal and not coffee any longer.
A dark roast (full city +) should have light oiling (small spots of oil showing on the bean). Once the roast goes into Vienna or Italian (past 2nd crack) pretty much all the batch is good for is blending with other coffees to add more depth and even then in less than a 1 to 5 ratio.
"Store coffee" is packaged for long shelf life so it is treated and the air evacuated and replaced with nitrogen so that it can last longer before the bad taste becomes obvious.
Three bean blend showing dark, med, and light roasted
Couple of typical roasts for me
Darker espresso roast which is about all I will take this dark
-
Yours should be the deluxe grill which looks like chrome (shiney plastic). It is 3 pieces. Large center and the 2 outside light bezel rings. A used one should come with all 3 parts
You can use the RV salvage yard search engine and probabaly find one for less than on eBay but check both sources.
-
Gotta post photos!!!!!!!!
It is THE LAW
-
I am a "coffee-holic"
I live coffee.
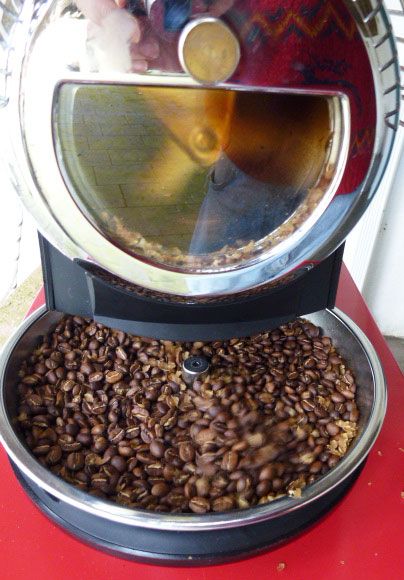
At home I roast single origin green beans in a small 1/2 pound batch roaster and roast 2-3 pounds at a time (4 to 6 batches) per week.
Now I can't take my roaster and all of my "coffee paraphernalia" with me on the road.
SO.....
I start out with a couple pounds of "my roast" then when I start to run low I google for artisan roasters in towns I will be passing through to grab a pound of fresh roasted to keep me going. I try to not let fresh roasted coffee set as roasted beans for more than 14 days as they start to stale after two weeks so I only take what we can drink in 2 weeks then when I am down to about 1/2 lb I start looking online for an artisan roaster that I will pass by and see what they have available.
That is how I "handle" my roasted, unground beans.
Brewing on the road......
I use an 8 cup (this is 4 "American size" 10oz cups) Chemex brewer.
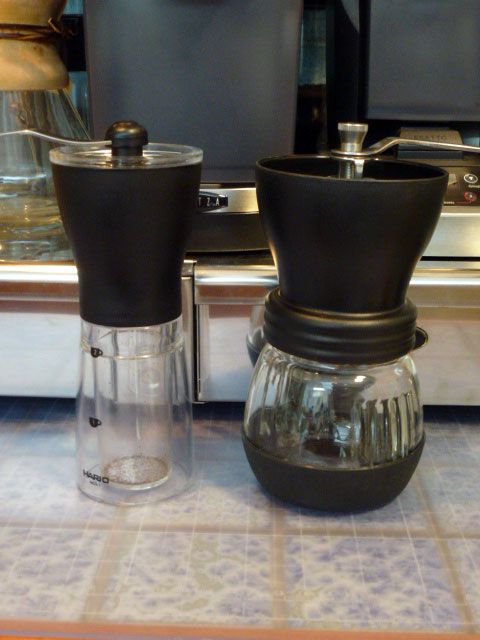
I grind my beans in a Kyocera CM-50 which has the Orphan Espresso PFP modification (extra bearing in the grinder for press and pour over grinds).
I grind just before brewing as coffee is only good for about 15 minutes after grinding before it starts to "stale" (told you I was a coffee-holic)
I use a small Revereware tea kettle to boil the water. First kettle of water goes in the Chemex to rinse the paper filter then into the carafe to warm it, second kettle of water brews the coffee, and a third kettle (of tank water) goes on to make hot water to wash dishes with.
Once the coffee is made I put two cups of the brewed coffee into our cups and the other two cups into a heated thermal carafe.
Sometimes I will make another pot to put in our thermos so we can have 2 more cups each (did I say I was a coffee-holic?)
Pics of Kyocera CM-50 (Kyocera on the right, the hand mill on the left is a Hario mini espresso grinder)
8 cup Chemex is the one in the middle (I only travel with 1 brewer and I like the silky smooth, coffee that a Chemex makes)
Oh I might as well add my home stuff to this post as I have already let it get out of hand
I roast outside because of all the smoke roasting beans make
Grinder line up
"Electric" brewers
-
On a completely different side note and to derail this topic
How I deal with fuel when traveling
If I am going to be running at crusing speed and just burning through the tank, I will fill up with regular.
IF I am going to be in mountains or on winding roads with the ECT engaged I will use premium.
This seems to be the best combo for me.
I don't worry about alchol based fuel or not as I rarely have any choice. When I need fuel. I get fuel. My only choice is what grade and I base that decision on how I will be driving that tank through.
-
A number of years ago I swapped out some BMW 320i seats in my old 1981 toyota diesel RV.
The BMW seats had straight through bolts (everything went right through the rail into the floor pan) so it was easy to drill new holes and install them.
A few pics
-
Post the make and model #.
there were many brands and styles of furnaces used and over the years many "others" have been retrofitted so without knowing what you have it is impossible to help.
-
I dont think Onan is exclusive to the market....
I have seen Kohler, and even a Honda liquid cooled RV generator set options in Toyhomes, .
This one was mounted into a 1987 Dolphin
Generac is another maker of them as well
These options are no longer made in the smaller size and footprint required by the small gen compartment on Toyota rigs. My understanding is that even repair/service parts for Kohler are no longer available.
You may be able to find these generators used but the cost of buying used then rebuilding to working condition could easily equal the price of a new Onan.
This is the main reason many have gone to home/contractor generators. The Onans are just too expensive and the other alternitives have dried up.
-
If one were to remove or bypass the fuel tank, mount their portable generator and run a fuel line directly to the carb with a small electric pump, couldent this remedy that occurance? I wouldnt suggest this for a bumper mounted one.
Unfortunately portable generators are designed to be operated out in the open (away from structures) not enclosed and defiantly NOT while driving AND enclosed.
The only RV option is Onan if you want to run a gen while you are in motion. Anything else is disaster waiting to happen if it is used contrary to how it was designed to be used. It would be like trying to use your RV as a boat. It might float for a while but it would make a very poor boat.
-
I ended up getting a 300 watt inverter from gopower.
My main logic is that anything that requires more, like a microwave or a roof ac requires a generator which includes a larger inverter.
I got it for 23 shipped. It works great it has one downfall.
If you leave it on even unplugged the fan will run and run the battery down.
It. Includes cigarette and aligator clips. I clipped it directly to the fuse box. It could be hard wired and then screwed in somewhere.
I nave a 90 watt laptop. Large gamer.
In general you need twice a devices peak so I was looking for 180
This runs it fine but would not run it right through the cigaretter lighter, only through the aligator clips.
I have removed the Progressive Dynamics converter I installed a few years ago (AC to DC and battery charger).
http://toymike.com/c...rter/index.html
The new 2kw inverter has a far more sophisticed charging system.
It easily runs both laptops, wireless router, and mobile 4g modem as well as the microwave with no issues at all. It "could" run the AC unit as it has a 4kw surge capability but with a single battery the duration would be only a few minutes but it is happy running the microwave for any length of time (within reason... no turkey cooking)
The search goes on for a use for the 12 volt recepticle in back.I have a dual USB lighter adaptor so that I can charge my cell, camera, and mobile 4g device. This has worked out very well.
If you get one of these, make sure you get the one that goes in flush as there is not that much room to give up as the cig lighter sticks out and a flush adapter is only as long as the actual cig lighter socket
-
Mike,
Are you interested in selling your no-longer-used Progressive Dynamics converter?
John
What would you be putting it in? 18' or 21'?
I had to modify the converter compartment to get it to fit. It is the 80 amp model with the internal charge wizard (9280)
-
im pretty sure the honda would do fine outside and on back cargo carrier.
I don't believe that Honda makes an inverter, only generators.
An inverter changed DC current (batteries) to A/C current (household electric current)
-
I'm well aware of what it is; was merely trying to see if you had it run from the battery which in turn was being charged by an alternator ... my goal: make the rooftop AC run while driving down the road without running genset off of alternator supply.
We had a prior thread on this where we were debating whether or not the stock 65 amp alternator could stand up to it.
I believe the common line of thinking we arrived at was that the stock alternator would be cooked from the massive draw and thus it would require the beefy aftermarket 180 amp alternator ($500+) and also that the draw would tax the inverter to possible fail as well even with the beefy aftermarket alternator.
The honda eu2000i seemed to be the cheapest lightest option for those of us looking to AC the coach while en route.
No the standard alternator could not keep the battery charged with a large draw such as an AC unit. A larger alternator or even a dedicated alternator wired with welding cable would be required. I would advise against this as the generator option for providing 110 to an AC unit while underway would be preferred.
AC (110v) while in motion should not be supplied by a contractor/homeowner generator. These have a separate fuel tank that will spill from the bouncing of an in-motion vehicle. Typically the fuel tank is mounted directly above the generator engine. I am sure you can guess what would happen if you spilled fuel on a hot running generator engine.
Portable generators should only be used when stationary and the generator should be away from the RV while running.
Unfortunately there are no current production alternatives to the Onan RV generators that I am aware of. The words Onan and cheap are typically not used in the same sentence unless it is something like "This $%#! cheap piece of &*$# Onan"
-
OHH OOH!!
1.) does this run off of your alternator
2.) Will it run your rooftop AC?
It is an inverter/charger. Changes DC current to AC current and when it gets AC in (from either shore or generator) it charges the batteries. Since it does the battery charging function I removed my progressive dynamics converter/charger as it was no longer needed. http://toymike.com/converter/index.html
It would run a roof top AC easily as it has a 4kw serge capability but a standard 125 ah RV 12 v RV battery would only last a few minutes running a heavy load like an AC unit.
I have a 2.8kw Onan that runs the AC when not hooked up to shore power (like being pulled off at a rest area to eat or relax). If the genset has too much demand the Xantrex moniters it and will kick in to add another 2kw from the batteries to the generator output while the demand is high.
All in all it is a very sophstocated inverter/charger. It is designed for large class a RVs that have a battery "farm/cluster" but it should do just fine in my little Toyota.
-
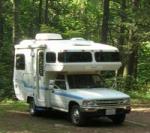
I had a 1981 toyota mini cruiser with a factory toyota diesel and 5 speed for about 16 years
-
Yesterday I finished the install of the Xantrex Freedom SW 2kw invert (yes 2kw is 2000 watts).
http://www.xantrex.c...12v_newgen.aspx
My 1.8kw Xantrex gave up the ghost so I stepped up to their newest model the Freedom SW.
Talk about a MONSTER. It weighs 60 lbs. It is all digital including the 30 amp transfer switch which kicks over in microseconds if it detects a drop or brown out in the incoming AC current (either from shore power or a brown out from the generator).
This one has a very sophisticated built in battery charger so I pulled my converter out completely since it would no longer be used.
Of course..... Here is the requited eye candy for everyone
The inverter next to the furnace (gives a good idea of the size of it)
http://i586.photobuc...ter/sw_2k-1.jpg
http://i586.photobuc...ter/sw_2k-6.jpg
http://i586.photobuc...ter/sw_2k-7.jpg
The unit has 2 cooling fans but I could not get it warm during testing even when running the microwave and TV continuously
http://i586.photobuc...ter/sw_2k-2.jpg
Because of the weight I did not want to mount it on the generator compartment so I built a shelf that is attached to the Surader's fiberglass shell for support.
http://i586.photobuc...ter/sw_2k-4.jpg
A few more pics (if you are not bored yert)
Used a Moroso racing DC cutoff switch on the DC line
http://i586.photobuc...ter/sw_2k-5.jpg
This is the DC fuse for the I/O positive line
http://i586.photobuc...ter/sw_2k-3.jpg
I used Moroso racing DC firewall pass through to get the battery lines out of the enclosed battery compartment. This is a hole in the compartment with a sealed plug having battery post connections on each side so that I have a completely sealed battery compartment. The grey phone line is the battery monitor line from the charger/inverter.
http://i586.photobuc...ter/sw_2k-8.jpg
The remote control for the inverter will be in today then I can button it all up and move on to the next project
Mike (AKA - turtle)
1991 V-6 auto 18' Sunrader,
Downey Racing air intake,
JET Performance ECU re-programing,
Prothane poly suspension bushings,
Firestone Ride Rite Air suspension,
Downey Racing rear suspension,
4.56:1 Rear end gears,
Bilstein shocks,
Xantrex Freedom SW 2 kw inverter,
Onan 2.8 kw genset,


Marker Light Sizing Question
in Coach ApplianceTech Issues
Posted
More than likely you have Bargman 99 lights for clearance markers (they are the most common)
http://www.bargman.com/content/products.aspx?lvl=3&parentid=8400&catID=8460&part=30-99-001
Replacement lens can be found EVERYWHERE (any RV store and online)
If you want to replace, I would strongly recommend the M2 LED markers from superbright. They are 12 diode, bright, and the holes are an exact fit with the Bargman.
http://www.superbrightleds.com/moreinfo/rectangular-marker-lamps/m2-series-led-marker-lamp/572/
The only bad thing about them is they do not come with a ground wire as they ground to a big rig cab or trailer which is metal. Our RVs have the coach body isolated so you must solder on a short ground wire but the lights have a pre-tinned (as in it has a blob of solder) on the back for attaching a ground wire.
I packed mine with putty tape, screwed them down and let it ooze out and cut it off with a razor blade. No leaks, no problems and no worries about burn outs.
AND...
They are spanking bright so will make it easier for others to see you in bad weather.