


campergal
-
Posts
21 -
Joined
-
Last visited
Content Type
Events
Profiles
Forums
Gallery
Posts posted by campergal
-
-
 Thanks to all of you, we actually drove off after our wedding in the arms of our new/old "Mrs. Putter" ( pun intended) I'll also get photos of bath, did the same procedure, all new. was sopping wet down to floor.
Then while hubby installed air conditioner (sans waiter's) I repainted exterior stripes and logos. Our little 88 looks great!
Homey and inviting now...no longer smells like rot! We're off to many many more adventures -
Great Idea! I cut out the cabinet today while waiting for the roof and side wall to dry out. How did you fish your power plug through the refer cabinet, seems pretty tight? When you drilled the hole for the air conditioner drain, did you take the factory bottom off the air conditioner? I'm still learning how to navigate this site and I can't find your pics of installing the air conditioner again. Thanks for all your help!
Great idea to pull side back in. Well do that. In terms of the air conditioner, would it work for us to install in the cabinet above the fridge? Is there enough air flow over the refer? Thanks much
-
Great idea to pull side back in. Well do that. In terms of the air conditioner, would it work for us to install in the cabinet above the fridge? Is there enough air flow over the refer? Thanks much
Refer the A/C unit - Read through the entire thread - there is a lot of discussion on how the condensate is drained (A/C unit modified and a hose is run down and exits out through the floor of the Toyhouse under the frig) and also some Infrared photos on the heat signatures through the top vet and the side vent.
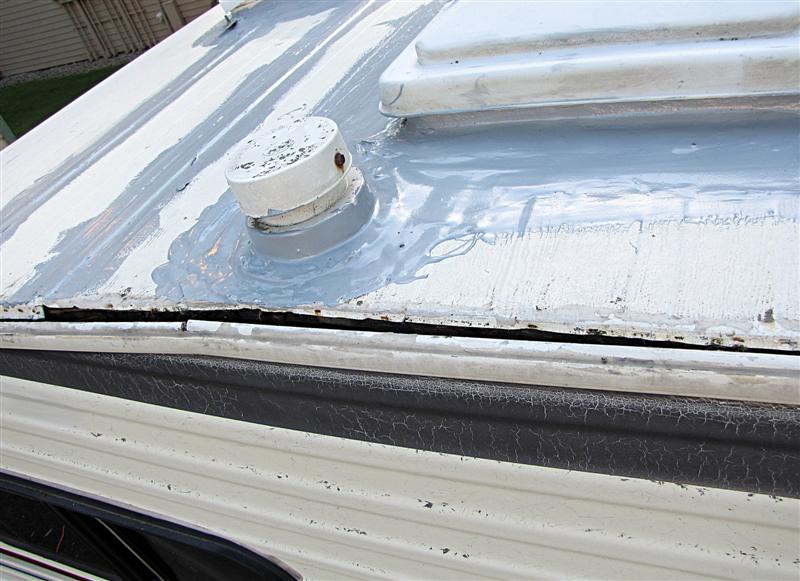
Refer to the roof - Look carefully, you'll find the side wall has bowed out, you should pull the sidewall back in so that the roof will fold back over the side thats shown in the drawing.
Stand behind the vehicle and look down the side, you should see it bowed out.
Its easy to pull back in, take the windows out on both sides, have two helpers hold a 2x4 across the outside of the windows on each side, then, from the inside, run a ratchet strap around one 2x4, across the inside of the toyhouse and out the other window, Wrap around the other 2x4. Tighten the strap and the bowed out side should pull in. Use a short 2x4 on the bowed side, use a long 2x4 on the straight side
John Mc
88 Dolphin 4 Auto
-
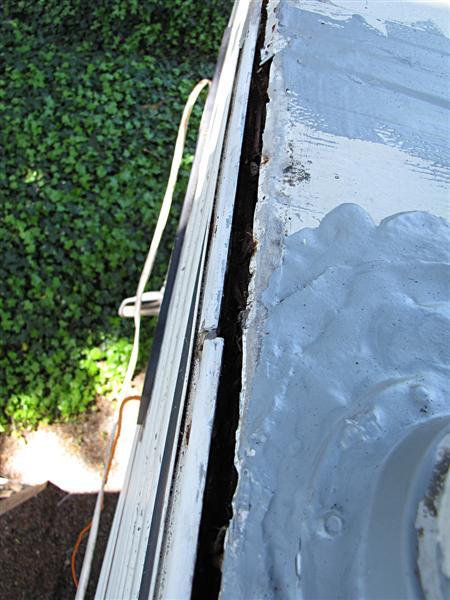
Hi Bajadulce, The problem seems to be that the roof has warped up away from the side wall by about 1/2 inch. then the metal has separated from the wood but is still laying flat. If we stand on the roof at the edge, it goes down a little, hopefully enough to screw in the side wall. I was thinking of putting self drilling metal screws with rubber gaskets from the top screwed down through the new metal flashing and into the 1 1/2 plywood of the roof top and then pressing the side walls in enough to screw them in through the trim, flashing and into the roof plywood side. Do you think that would work and if we cover the gasketed screws with roof seal wouldn't that mitigate teh problem with the screws? The other problem is that it is still damp in the seam and under the roof metal.
The extra flashing would definitely help keep water out of the seam and I like the plan. Little confused as to where the screws are going? If the roof metal is folded back over the wall as it originally was and the screws go through the folded roof section and then flashing, all would seem good. I wouldn't however use any screws on the "roof" part of the roof if that makes any sense.
-
Hi waiter, while we try and let the side wall and roof dry out before attempting to reconnect I saw your pics of the small air conditioner. We found one at home depot only 18 inches across and 15 inches high. We'd like to install over the refer like I think you did. Would the airflow from the refer "chimney" be enough for a small air conditioner too. What did you do to keep the condensation from running down your refer vent area? thanks in advance for your response. campergal.
Walls are about 1inch think (total) roof is about 1 1/2 total.
JOhn Mc
88 Dolphin 4 Auto
-
Hi there, Campergal here. We really love your camper carport. Since we just bought our new/old gal where could we find that nifty little rv tent? We're sinking all our money into fixing the unit for our honeymoon in July but would like something to cover our toy home when we are working on it. Also we're up here in the northwest with incessant rain. Thanks for your time.
Hi Ron and Sue
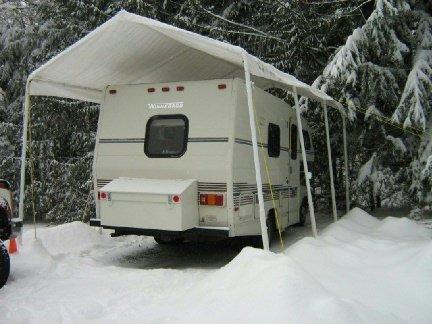
I live in British Columbia too, our cool, damp and wet winters are not the best climate for leaving our old Toys sitting outside without some protection, and any chance you could erect one of those pole canopy's? Picture below, I used one for a couple of years and it really did help in stopping water from pooling on the roof, the only disadvantage with the canopy is that you can't let snow build up on it, you do have to get out there with a broom and knock the snow off once in a while.
As for sealant I use "Pro Flex RV" I get it from our local RV dealer, as the others have stated there are two kinds of sealant, one for roofs and the other for windows and walls, we have had only one roof leak since we have owned ours and that was around the plumbing vent pipe, so was an easy fix, I wont mention the cab-over front windows!!!! but I do know what you mean with that hard grey sealant on our Winnies, it does have lots of cracks in it, and does look like a potential leak area.
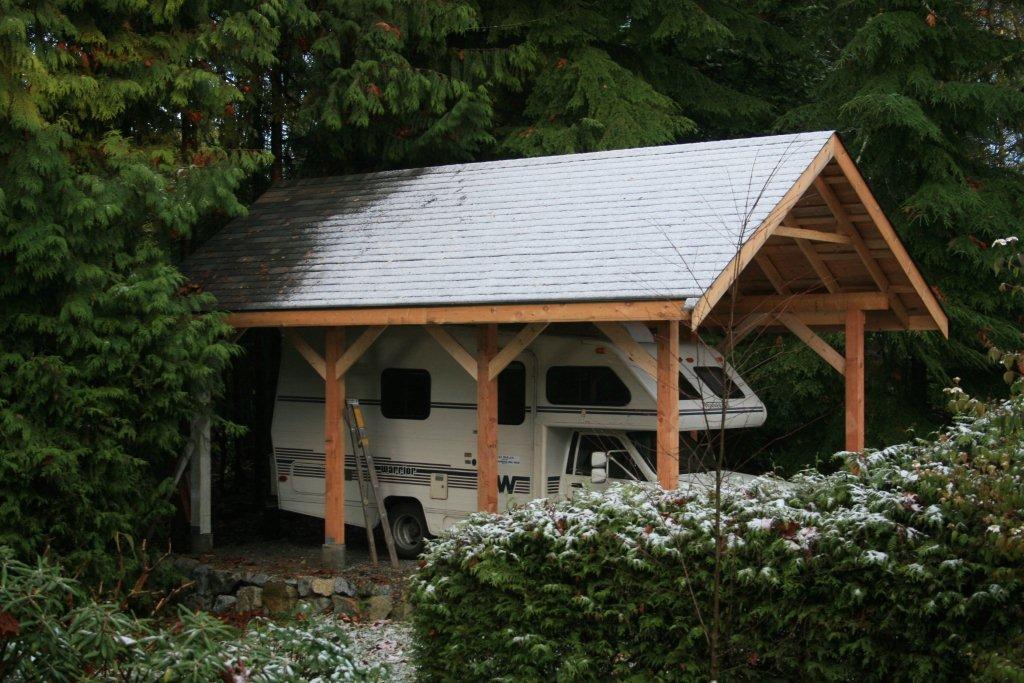
Last fall I built this carport for ours, now I don't have to knock snow off the roof!!! and no snow down my neck!!!
Mike
-
Hi John, The roof wood seems to be fairly solid. Was thinking about getting a 4 ft. peice of 90 degree roof flashing and sliding one side between metal and wood of roof and securing through metal to roof wood, maybe four 1 1/4 inch hex rubber washer screws with liguid nails under the flashing and then pre-drilling holes on other side of flashing to screw side wall back in. What do you think? We've already torn out all rot on the inside side wall and bed base. Putting new framing in bed base and new 1/2 plywood on side wall.
Hi Campergal,
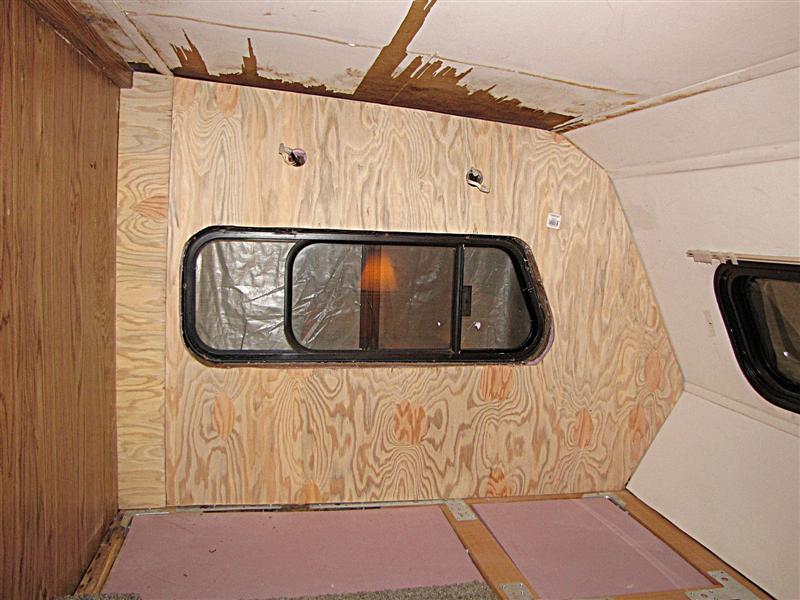
Looks like you've got a bit of a mess there. The wood framing inside the walls is probably rotted away and that's why the screws and staples holding your wall/roof joint together have let go. If you haven't already done so, I'd suggest that you remove the interior wall and part of the inside ceiling in that area so that you can see what's going on. Or did you already do so? (I wasn't sure after reading your message) The framing inside the walls is common lumber 1 x 2, stapled, screwed and, sometimes, glued together. The 1 x 2s are on the flat side so your wall thickness is about 3/4".
For a temporary repair, you're going to have to find a way to push or pull that side wall back into place and figure out how fasten it there for your upcoming July trip. Is there a piece of corner molding that goes over that joint? More pictures of inside and outside would help.
John
-
Thanks for your and Waiter's assistance, we'll try to get more pics of all angles today so we can give you and others a better view. We're a couple of 50 somethings getting married in July and this is our honeymoon vehicle so we'd like some kind of a temporary fix until we can find a place to work on it and the time to do it right. This is a model 500 dolphin. Pristine inside 50,000 miles with this roof problem and a water leak behind the shower adding more rot to this side of the rV. I had a dolphin for years. We want this to be our adventure mobile for years to come. Stay tuned for more pics, any help is good, my sweetie does really good with pictures to work from. He wants to know how thick the roof and side wall wood is to work with.
That looks pretty ugly. Sorry to hear. Can't really tell a whole lot from picture and am not familiar with that rig, but looks like you need to pull off some more stuff both on the inside and outside such as that white piece of trim. The wall needs to be put back into place so you can refasten the roof. You might be able to use a strap and pull the wall from the inside using your overhead cab cutout as an anchor or maybe push it back into place from the outside using a brace of sorts.
Looks like the roof was stapled at one time judging by those rusty looking slots. You'll prob want to use something else such as flathead screws and some construction adhesive. Question is do you have anything to fasten to? You might have to tear into the wall a bit to rebuild some framework, possibly add some sort of block or maybe even use some galvanized sheet metal brackets commonly used in framing. After all that, you might investigate into some of the metacrylic tape they use on mobil home roofs to wrap that seam before putting the trim back on.
definitely get some more pics up so others can chime in.
-
Hi all, Campergal here...still trying to get out camping. I'm going to try an upload some pics for you to see. In addition, we've torn out the side wall on teh overhead, using waiter's pics and it is sopping wet from the leak caused by the gaping ceiling and roof. We need some ideas since we'll be working again on it this weekend. Too confusing to load pics but to clarify, there is about a three foot area where the side wall is completely pulled away from the roof. Openings go from about 3/4 in to 1/4 inch. wall is warped away from roof. Cleaned out the opening as much as possible, took out rotted wood. Glue, no glue, screw down, drill new holes, sister new wood somewhere????? We need help
-
Hi all, Campergal here...still trying to get out camping. I'm going to try an upload some pics for you to see. In addition, we've torn out the side wall on teh overhead, using waiter's pics and it is sopping wet from the leak caused by the gaping ceiling and roof. We need some ideas pronto since we'll be working again on it this weekend. Too confusing to load pics but there is about a three foot area where the side wall is pulled away from the roof. Openings go from about 3/4 in to 1/4 inch. Glue, no glue, screw down, drill new holes, sister new wood somewhere????? We need help.
-
Thanks Linda, We'll check that out. You have the same interior I have. So I have some hope that this doesn't need to be as bad as I imagine. I'll post the results.
Mid chassis means rear dinette. There is a closet next to the bathroom right? Whats under that closet or does it go to the floor. My Sunrader has the bathroom behind the drivers seat and I can see the water lines if I remove the drawers beneath the closet. Even if you have to cut out a piece of wood from the closet wall it's still better than tearing out the bathroom.
Linda S
-
Thank you Derek, Yes it is a 500 and thank you for the 1985 toyota manual. You wouldn't happen to know where I can get an owners manual for the 500 1988? We'll be posting pics soon. Campergal.
It sounds like you have a Dolphin 500. You might have to cut access holes inside your wardrobe.
-
Thank you I'll check that out! Campergal.
You need to find out where the leak is.
You may be able to see something by looking up from the water heater area inside the coach, or mine has a access door on the outside that allowed me to see the bottom of the pipes going to the shower faucet ( and pick up parts that I dropped when replacing the shower faucet).
If it is the shower faucet needs to be replaced, you will have to cut the paneling on the kitchen side.
Waiter has an excellent write-up on this
Cheers
-
Campergal here. We got our new 1988 toy dolphin home finally and filled the water tank to test the system. I turned on the pump and heard a strong "spray" leaking sound behind the shower wall. Water began to leak on the ground. Looked under the carriage and water was streaming around the black water tank with the brackets on it. How can we access the water lines to replace them. It looks to me llike we may need to take the black water tank off or should we break open the shower, which in this toy is located mid chassis. Thanks folks!
-
Where is it that you're stranded and where are you trying to get to? Maybe someone can point you to a repair facility.
When the brakes lock up, how do you get them unlocked? Does sitting for a while unlock them?
You mentioned lots of parts being changed. No mention of the flexible brake hoses.
Do you know which brake is locking? Front? Rear? Left? Right? There will be a difference in the temperature of the wheel on the corner that's locking.
Hi Derek, I don't know yet how to hit reply all to respond to all the help! We got her home....thanks to all of you. Both front brakes were seizing and we had it towed back to the shop in fife washington. We had them put a new master cylinder and the connections to it along with everything else needed for safe braking. It worked!!!! We're taking pics to post. Thanks for your swift responses much more to come .
-
Campergal here again....Embarrassed to report we can't get our 1988 Toyota Dolphin home! We've spent hundreds on tows so far. New brakes, calipers, lines bled, new brake cable still locks up after a few miles and using the brake lightly. The unit did sit for many years. I need help you all. Does this sound familiar to anyone? Help!
-
Hi Mike, Actually, our 1988 toyota did not come with an air conditioner, I wonder how much it would cost to send to salem oregon? If you can tell me how much it weighs I could find shipping info if you'd be willing. I'm assuming it worked fine before taking it out. Thanks, Carol (campergal) newbie.
Thanks everyone for the suggestions. I pulled the air conditioner off the roof and replaced it with a Fan-Tastic vent. I jacked the roof up from the inside for awhile before installing the vent and the roof has recovered a bit. I figured that I rarely use it and if I travel to Arizona when it's hot, I will buy a small window unit. If anyone needs an air conditioner and lives near Albuquerque, New Mexico, please let me know.
Mike
-
Wow!!!!! Thank you, Derek, Walter, Waiter and Totem!!!!. You've given us some hope. We've got our "to do" list now. As we were taking it to get a tune up and fluid change the brakes seized and would not let it move. Unfortunately we had not acquired our RV road service card yet so spent a fortune to get it to a mechanic. We'll post our experiences here. Thank you for your time!!!!
After a long two year search we found our toy a 1988 toyota dolphin with rear dinette with 50,000 original miles and one owner....but before envy sets in, we found out that it had been sitting completely still for over five years. Being new toy owners we are wondering from the experienced owners what we need to do immediately to save this potential gem. We did find that no only did the seller tell us that it had an air conditioner, which it doesn't, she also told us the unit was "leak free". Well after pulling the contact paper down from the overhead cab there is plywood rot coming in about two feet from the edge and down to the curve in the cab. The outside is truly straight with decals intact and shiny clean windows. The engine compartment is filled with pine needles and leaves and is filthy. We plan to take our honeymoon in it (we're an older couple) and want a safe and enjoyable trip. Please be generous with an advice. My finance' is quite handy and can do carpetry. Thank you in advance for your time.....See you on the road!!
-
After a long two year search we found our toy a 1988 toyota dolphin with rear dinette with 50,000 original miles and one owner....but before envy sets in, we found out that it had been sitting completely still for over five years. Being new toy owners we are wondering from the experienced owners what we need to do immediately to save this potential gem. We did find that no only did the seller tell us that it had an air conditioner, which it doesn't, she also told us the unit was "leak free". Well after pulling the contact paper down from the overhead cab there is plywood rot coming in about two feet from the edge and down to the curve in the cab. The outside is truly straight with decals intact and shiny clean windows. The engine compartment is filled with pine needles and leaves and is filthy. We plan to take our honeymoon in it (we're an older couple) and want a safe and enjoyable trip. Please be generous with an advice. My finance' is quite handy and can do carpetry. Thank you in advance for your time.....See you on the road!!


Cannot put gas in tank
in Fuel Tanks
Posted
It's campergal here. I have a similar problem. I have a 1988 toyota dolphin and the outside of the fill line is quite rusty and missing one of it's screws to hold it in place. I just came home from a trip out of state and went to a gas station. It is absolutely on fumes, just about out of gas and they could not get any gas in. He even stuck his finger down to the metal stop and pushed it open but the gas would not go down. I'll look into the vent pipe, also check the fill pipe (since the exhaust system was completely rusted out) but what to do about the rusted part you put the gas cap on? Any help would be appreciated! I am afraid to drive it to a mechanic for fear of running out of fumes and then being stranded with no way to get gas into it. Thanks!