

Galvanized Knight
-
Posts
142 -
Joined
-
Last visited
Content Type
Events
Profiles
Forums
Gallery
Posts posted by Galvanized Knight
-
-
Welcome to the boards.
That looks pretty toasty!
 Watched the video and that's some chilly and rugged looking terrain up there in Montana. (duh).
The new chassis looks great and plenty of clearance. Doesn't look like you had to move any axles as the 4x4 was already a longbed from what video shows.
Since the start of the interior build I have taken this camping. For Valentines Day I took my girlfriend camping to Halcyon hot springs in Nakusp. The new insulation performed quite well. We just used a 1500w space heater and a generator and that was more then ample.
All the terrain in that video is from British Columbia but Creston is only a stones throw away from Montana
I did not have to move the axles. The longbed 2wd 1976 and the longbed 1980 4wd are very close. I will post a video of the frame additions I did do to keep the cab/camper seal from tearing apart while 4x4 ing.
You're probably all set in terms of doing any shell modifications, but would be fun to move the door to the side and truncate the rear (give it a slope for clearance). Even 10 more degrees of departure angle would be nice. A move like this would require to move the passenger window a bit, and the door looks like it might fit either in front of or to the rear of the wheel wells. Might give you some fun new interior options (such as bed or kitchen in rear) and something to ponder before you get too committed on a final floor plan.
I have considered moving the door to the side and the only reason I did not is I have another chinook I will be trying that with among I few other mods I 've been dreaming of... The 4x4 slant back; ( like the dakar uni mod s ) I have tapped the back end before and thought about the truncated rear fix. Here is a video of in getting close to bumping. Clearance Video ( Dark ) again a mod I'll leave for the Mark 2 version
. There are a few more videos in that link. With 48 sq ft any change effects the space in a big way. Rear kitchen or bed would be super cool ( have a booth style dinette that transforms to a 54" double bed with a huge rear window! ) As far as being committed to my current plan, I am super flexible and i will defiantly be taking all your guys great advise.For some additional insulation, you probably have plans to be able to close off the pass through when needed (maybe a sliding door?). No idea what your plans are for the pop-up in terms of insulating (maybe some rigid sides that are hinged?) Definitely the windows in the overhead cab have got to go just because they are too much of a liability!
The pass through was sealed off last trip with a foil face bubble wrap curtain, which worked really well but is too unfinished looking. I believe ill go with double cell top down bottom up shades with side tracks. the double cell will offer a great seal, light blockage and insulation value. The rear door may also have this same treatment. The ceiling I plan to fill with foam board but as for the pop top its a heat loss nightmare.....on passed adventures we would just leave the top down during the night but in the future i would like to leave it up. When I see my upholsterer I am going to pick his brain too. Coming up with solution to the pop top is a tough one. With the top up I would half my average R value estimate to R 5 before I guess it would have been an average of maybe R .5
Little leaky front windows...I have one out now and i am just not sure? I am not even sure what to do with the cab over at all. I do like the light they provide but normally that space is filled with gear. Do you think I should just fiberglass them in? I was even thinking of cutting out the roof of the cab?
2 fridges!
I like it. Tho I must say that a 12vDC fridge would allow you to not have to ventilate and lose heat. But 12v fridges require quite a bit of amp draw and that's another monster all together. I guess a fridge really doesn't need an INTAKE vent? I seem to remember sealing up my intake vent on a previous camper mostly because the pilot light was constantly getting blown out! The fridge suffered a bit in terms of the efficiency, but it wasn't a show stopper. Maybe you can get away without an intake vent as well OR some very well designed intake chamber. The stock vent that just floods air into the general vicinity of the fridge wouldn't seem to cut it for your cozy cabin.Their both 3 Ways. Those fridges are more modern and are direct vent style, where both the intake and the exhaust of the pilot are direct to the outside. I will need air flow to cool the fins at the back of the fridge to help the ammonium condense so I believe ill have two ways to do that depending on indoor outdoor temp 1# though the floor 2# though the kick space and exiting vents in the counter and out the wall at the top of the fridge. its a work in process.
Now that the camper is so tight,fresh air and moisture control are going to be a concern.
Floor seems a bit extravagant with the flash heater etc, but will be the talk of the camp!
fun stuff man! Thnx for sharing.
I agree the floor is over the top...lol
Thanks for all your commits , I really appreciated the feedback and ideas!
Lance
-
Lance,
What power source are you using to heat the water/antifreeze in the radiant heating? Great work, by the way, you're one clever guy.
John
John
I decided to go with the Marey 5L instant hot water heater
( as seen in my earlier pictures on the drivers side) My earlier choice was the Coleman hot water on demand
but after alot of consideration I went with the Marey. I want to have a thermostatically controlled system in the end and the Marey will be able to work in that application. As far as antifreeze, My basic choices are methanol, propylene glycol & ethanol. Right now I am set on Ethanol unless I have my mind changed. What do you think?Lance
-
)
Thanks Kevin.
I actually join this blog so i could look at your build photos
.I used the original seal and it worked great well, just discolored.if i cut out the roof i would use the original seal in conjunction with expanding foam and DAP or AXIS sealant useless i can find a gasket to replace the original. yes, i just cut out the cab, a saws-all with a metal blade made short and clean work of it. I look forward to your photos as well!
unless*
-
Nice work so far. Making me wish I had more time for the conversion project I started 2 falls ago.
Sounds like you cut the cab AFTER your road trip. How did you seal the coach from weather during your trip? I'll be curious to see if you cut out the roof and, either way, how you seal it all up.
Good luck, look forward to more.
Kevin
)
Thanks Kevin.
I actually join this blog so i could look at your build photos
.I used the original seal and it worked great well, just discolored.if i cut out the roof i would use the original seal in conjunction with expanding foam and DAP or AXIS sealant useless i can find a gasket to replace the original. yes, i just cut out the cab, a saws-all with a metal blade made short and clean work of it. I look forward to your photos as well!
-
Welcome!
I love the in-floor heating idea. I just put it in my bathroom reno at home... Sooo nice
Your 80 Truck looks to be in great shape, very nice job on the conversion!Andrew.
Thanks for the comment.
The truck is in great shape 103 000 miles. my mechanic went through it a couple weeks ago and beside for some front drive shaft work its all a ok. soon i 'll post some pics on this thread about the conversion itself ( I have a ton of pics and vids of that)
-
Here are some sketches to did of the interior.
Drivers Side
Passengers
These are just rough idea I had
oh and i drew the rake of the windows backwards ...lol... oh well
no toe kicks anymore..
-
Panel with Interior mock up
2 3way fridges on the Passengers side. 2 burner atwood cooktop and double sink on the drivers
Both panels installed. The panels are a white melamine 1/8 hardboard. Earlier I install threaded inserts into the metal frame of the Chinook so I could bolt thoses two lengths of angle iron to it ( the black stripes of either side ) The melamine is pinched between the angle iron and frame.
I also raised the overall height of the counter tops from 24" to 26" for a few reasons: to Accommodate the fridges, More comfortable to use( less bent over ), Slightly more storage space
Mock up of the water heater. You can see the lower radiant floor panel from this view.
These are my most recent photos from Wednesday night. I hope to have some time tonight and this weekend to work on it more. My goal is to have this entire project done by May long weekend, interior and Exterior totally finished.
Any ideas so far about the project?
-
Insulation:
I removed all the cardboard insulation from the original interior.
I foam the entire area around the window. this was done in stages so it could dry and between coats. I left all the extra length on the bubble wrap to be tied into the walls.
Then a complete lay of bubble up the walls.
Roxul insulation on the passengers 1-1/2" to 2-1/2" thick. The tape just to hold it in place till the panels are installed. That 3-1/2" Bat of Roxul is R 14 and with the bubble wrap maybe R 3?... arguably . I guess I may have an average R Value of 10?
Drivers side insulation. If foam is R 5 per inch I would guess the area around the window is R 9. The original cardboard insulation would have had a R value of 1 ? What do you guys think?
-
I have decided to go with infloor radiant heating for the Chinook. I wanted to do something different. There where alot of pros and cons to consider, I will list a few I thought about.
Pro: Very Comfortable, Heat will evenly rise up. Con: More complex then furnace or a space heater. Pro: May also be use to heat domestic water (non drinking) Con: Freezing up and the use of anti freeze. Pro: Quiet operation Con: Leaks! ...etc
Here is what I have been working on:
This is the front section of the pattern I made. Its made from 5/8" plywood. This will be used to uniformly route the PEX tubing. Wood slates temporary holding the pattern together before installation. I remade the tongue into the cab.
This is the rear section.
I installed a layer of double thick foil faced bubble wrap completely over the subfloor ( Chinooks existing 1 1/4" plywood floor). Then I screwed down and leveled out the front and rear patterns . Missing from these pictures are the lower floor,s entry way which I also installed in the same manner.
And this is how the floor is currently. I am working on others area so I can mount cabinets to the floor without risk of wrecking covered tubing.
-
So I am on the fence about this:
Should I cut out the top of the cab like the sunraider version or not?
I am designing this just for two people.
Also I am looking for a good replacement for the cabs roof seal to the Chinook and a rear door with frame.
-
Front of the Chinook, Gutted and I finally got around to cutting out the cab wall. I had a hard time because the truck only has 103 000 miles on it and i felt a little bad cutting it. ( The seats are from my first car a 1980 Toyota Celica gt)
If you look at these pictures you will notice the drivers "insulation?" is mostly removed and the passengers is still intact.
-
all set up in my shop ready to work. As you can see I gutted it all..... I even scrapped every bit of cardboard "insulation ?" off the inside of the fiberglass panels
-
drivers side original
vPassenger side original
mostly original, back in march I modded the interior a little.
-
Hello Everyone!
I just joined this site. I have been checking out some of your pictures, posts and ideas, wow lots of creative people out there
. I started this post because I would like to share my project with all of you and get some feed back for direction. Currently I have some pictures posted on my MSN page.http://cid-589fc982ff198ae8.photos.live.com/albums.aspx
These are mixed pictures but are all public so you dont have to sign in or register ( unlike some other sites ...lol) Start at album "April 7 10 Nakusp Halfway" and work forward in time. I have hundreds of pictures and video of this build (not posted anywhere yet ) which i'll start posting on here as time permits.
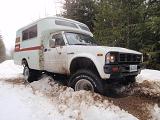
I originally bought my Chinook in march of 2003 and could not pass it through a safety inspection so it sat till mid march 2010. For the next three weeks ( afterwork and weekends) I switched the Chinook over to a 1980 Toyota longbed chassis , upgraded the suspension and set off on a 5 week vacation around BC s interior and coast. I had a few repairs to do during this time but after that its been all good and I have had a few great adventures in it without incident . February 2011 it was time to tackle the interior of this beast and modernized it. I am currently deep into the interior resto and I will post as things progress.
I would greatly appreciated all your comments, suggestions, and ideas ( good or bad )
Thanks and I hope you enjoy this thread.
Lance


4x4 Chinook Project Pop Top
in General Discussion
Posted · Edited by Galvanized Knight
Here is the link for the 4x4 Conversion Video.
I Hope You Enjoy It!