

Galvanized Knight
-
Posts
142 -
Joined
-
Last visited
Content Type
Events
Profiles
Forums
Gallery
Everything posted by Galvanized Knight
-
Are plans have changed. My girlfriend and I and our friends are not going to be able to make it this year. Hope it all goes well and drive safe everyone! GK
-
4x4 Chinook Project Pop Top
Galvanized Knight replied to Galvanized Knight's topic in General Discussion
Cool thanks Derek! I'll start taking measurements. with and without loads . -
4x4 Chinook Project Pop Top
Galvanized Knight replied to Galvanized Knight's topic in General Discussion
I have a wire on this 80's westfalia fridge I need help identifying. maybe a ground for the thermo couple?? I does not show up in the diagram on top of the fridge. More Fridge information I have four of these guys and the best two are going into the Chinook. -
4x4 Chinook Project Pop Top
Galvanized Knight replied to Galvanized Knight's topic in General Discussion
I wont be running them at that pressure. Just an example of the min - max . I did look around for specs but I couldn't really find anything. I originally bought these for my Dodge 1994 B350 but never used them. Here is the installation manual that came with them http://www.firestone...lation/2109.pdf All I can find is there min pressure of 5psi and max of 100psi. Once I get her loaded with gear I can play around with the pressures some more. Maybe end up running them at 50psi? If you run into a chart like that let me know. Still thinking about put some in the front too . Thanks GK -
4x4 Chinook Project Pop Top
Galvanized Knight replied to Galvanized Knight's topic in General Discussion
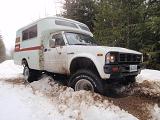
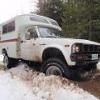
Had to kick the Chinook out of the shop today. Need some room to work. While it was outside I decided to snap a couple pictures. 1 2 3 I am trying to come up with some striping for the beast after its all been painted white but haven't come up with anything yet. What do you think? Tonight I hope to get that seat bracket drilled painted and mounted. I am thinking of storing my couch batteries and inverter under the front seats. 1 3000watt inverter 2 4 pack of batteries. I have 4 of these packs so 16 batteries all together. 115ah +/- 3 Details of the batteries. Not sure if their going to work but I had them kicking around the shop. -
4x4 Chinook Project Pop Top
Galvanized Knight replied to Galvanized Knight's topic in General Discussion
Drilled, Notched, and Rounded Corners of the air bag kit. 1 2 With that all done I painted and mounted up the bags. 1 (5psi) 2 (90psi) 3 (You can see both bags in this picture ) I still need to center the upper bracket and bolt them through the frame. Pumped up It can raise the rear about 5-6" 1 (Watch that first step its 36" 2 no more saggy rear end. eye pleasing forward rake. Big jump into the drives seat too (42") I'll be on it again tomorrow afterwork. -
4x4 Chinook Project Pop Top
Galvanized Knight replied to Galvanized Knight's topic in General Discussion
Fabrication photos: Friday and Saturday night. Jeremiah and I worked on a frame to bolt in the 1980 Celica seats into my 1980 Toyota Pickup. And Here is the beginning fabrication of brackets for the 3000lbs air bags. I know I said I was against them but I have them and its worth another try... What do you all think about airbags? Also I rolled over the vinyl edge of the tongue into the cab. Tomorrow we'll finish mounting the airbags...pictures to come -
He is our route and tentative schedule to the 2012 Vancouver Island Toyin. Maybe we'll run into some of you on the road. We'll be camping for the 22nd, 23rd and 24th. If anyone wants my contact info please PM me, May be easier to "run in" to each other that way. GK
-
4x4 Chinook Project Pop Top
Galvanized Knight replied to Galvanized Knight's topic in General Discussion
I starting working on the exterior. I removed the front fenders and lower valance. Then began to fit my new wide fenders. 1 2 3 They nearly stick out as wide as the Chinooks body. Hopefully more progress after work tonight. -
wow reserve not met at 4k..!?
-
4x4 Chinook Project Pop Top
Galvanized Knight replied to Galvanized Knight's topic in General Discussion
Thanks bajadulce. I ve done some wood working before but this is really my first go at cabinets. I did alot of research before I got started. I cant wait to finally just enjoy it all with my girlfriend this summer and relax. -
4x4 Chinook Project Pop Top
Galvanized Knight replied to Galvanized Knight's topic in General Discussion
Thanks for the great suggestion. I have started to research it. What kind of layout are you doing in yours? do you have any drawings? I mock up a whole interior out of 2x2 and osb and tested it before starting anything permanent. Did you gut out the walls too? GK -
4x4 Chinook Project Pop Top
Galvanized Knight replied to Galvanized Knight's topic in General Discussion
The Chinook moved ahead a little today. Its now mechanically sound for the trip to the Nananimo Toy-in. Only 3 short weeks away. Better get moving on this build. The work done: -New Clutch, resurface flywheel, New pilot and Through out Bearing -New Header ( pictured below). I only did this because I could not get the donut to seal in the manifold -Rebuilt Front Shaft ( with CV ball replaced ) and Rear drive shafts -New rear axle seals and bearings. Diff fluid replaced. -New alternator belt I found a Chinook roll over victim that I stripped lots of nice parts from. The shell actually fared pretty well in the roll over. I got a door, windows with screens, lenses, emblems, manuals. My friend James got him self a bumper ( best shape I've ever seen one in), hood ( near mint ) and door panels. I am sure there is more to that list. -
That is a pretty cool stripping packing on the cab of that yota.
-
Some one is going to be happy with this one. What a great buy. http://cgi.ebay.com/...44#ht_500wt_975 The axle and toilet must be upgrades.
-
4x4 Chinook Project Pop Top
Galvanized Knight replied to Galvanized Knight's topic in General Discussion
Kelly, Yes very possible. please check out this post where it was done with a 2001 tundra 2001 Tundra Chinook Link, Awesome Stuff If you have questions please PM me or email thehumanelite@hotmail.com I will be starting another project from scratch in late august and I will be documenting and posting the mounting process thoroughly since its the question I get the most often. Thanks! GK -
4x4 Chinook Project Pop Top
Galvanized Knight replied to Galvanized Knight's topic in General Discussion
Finally some progress again! Work has been busy so the project has been back burner-ed. I still have intentions of finishing for the June 22nd TOY IN in Nanaimo BC. I'll be traveing from Creston BC on the 20th with my girlfriend and Also my friend James will be take his Chinook and wife. Join the convoy! Here are some progress pictures on the Chinook. This is the double drawer underneath the sink. its notched for the plumbing. 1 2 3 4 I am trying to maximize usable space for storage so its making the drawer construction more complex. The lower drawer also is shorten because the propane storage compartment intrudes into this area from the outside. And this is the reason I spent the time building toe kicks. Indirect LED lighting -
4x4 Chinook Project Pop Top
Galvanized Knight replied to Galvanized Knight's topic in General Discussion
Ted, Are you looking for a cut list? The materials are 4 sheets 3/4" birch cabinet grade, glide-rite slides 18", some 3/8 ply,some 1/2 " ply, 7/8 veneer. 1 1/4 screws, 3/4 screws for the slides. My walls maybe a different thickness then stock. I can send you my sketch up drawing if you like. I used it as a guide. My cabinets have no backs or bottoms to save on weight. A Kreg pocket hole jig is key! Thanks GK -
Greetings from a newbie DIYer, insulation questions
Galvanized Knight replied to moroza's topic in General Discussion
PM'd you. GK -
2013 Toyota Chinook Newport Kootenay Edition
Galvanized Knight replied to Galvanized Knight's topic in General Discussion
Thanks..Photohack . I wish fabrication was only that easy. I'll start with a 1st gen 4x4 longbed frame so a believe about 24" That link blew my mind. Still trying to absorb all their ideas -
2013 Toyota Chinook Newport Kootenay Edition
Galvanized Knight replied to Galvanized Knight's topic in General Discussion
It's tight but hopefully when you get there you can be enjoying the outdoors. (Just had an idear, what if the back seats of the quad cab could transform into sleeping thus saving a ton of room in the Newport??) This is going to 4x4 for sure. Likely a 5" lift rear in the rear and 3" in the front ( like my current Chinook) . probably go with 33x10.5 or 35x12.5 for rubber. Get to those spots where RV typically don't. -
2013 Toyota Chinook Newport Kootenay Edition
Galvanized Knight replied to Galvanized Knight's topic in General Discussion
I was maybe thinking about third axle in the middle . . . -
2013 Toyota Chinook Newport Kootenay Edition
Galvanized Knight replied to Galvanized Knight's topic in General Discussion
Definitively, not far from usable even drinkable water in our neck of the woods. Thanks for the measurements. I've inputted them into Sketchup and I have been experimenting. -
2013 Toyota Chinook Newport Kootenay Edition
Galvanized Knight replied to Galvanized Knight's topic in General Discussion
No I am not. I have always done drawings though. A great way to get ideas out of your head. I dont know what the people at Chinook were thinking when they came up with the Newport, Omega and Futura but I love thier lines! I will likely put my current Chinook up sale when My next project in finished. I am thinking that one day I may have a family and it would be nice for everyone to go camping. I think I want to try to build in the amenities. I have done quite a bit of winter camping here in the Kootenays and going out for a pee at night when its -10 C outside, sucks. This also begs the question: How do you keep your liquid systems from freezing when subzero RVing? I just received measurements for the Newport from krj and I am a little worried about the size, seems tighter then I first anticipated. so I am up in the air about all this water subject. Thanks, options are very much appreciated ! -
2013 Toyota Chinook Newport Kootenay Edition
Galvanized Knight replied to Galvanized Knight's topic in General Discussion
Some butchershop I tried this morning there is 4 or 5 minutes of hard work here lol