waiter
-
Posts
2,282 -
Joined
-
Last visited
Content Type
Events
Profiles
Forums
Gallery
Everything posted by waiter
-
Diana, Sorry to hear about this, but as Derek said, Look at it from the sellers side also. I was surprised at how fast these things sold (even junk was selling fast). I looked for about 3 months before I finally found one. Before I made any substantial commitment to time or money, (car fax) Make sure you know what the sellers rules are. Before I drive 2 hours to look at a MH. Will the seller take someone else's cash before I get there, or will he wait for me to look at it. If the seller tells me he won't wait, I tell him; "I know how you fell, but I'm not willing to risk a two hour drive each way". Usually, they agree to hold it for a couple hours until I get there. Be Very Specific on your time.. i.e. If I'm not there by 3pm, It means I probably got in a wreck and I don't expect you to hold it past 3pm. When I flew to New Mexico to look at the MH I bought, The Seller agreed to a $200 non-refundable deposit to hold the MH for two weeks. I PayPal'ed him the money, and bought my airline ticket. I also made a commitment to myself, that if I wasn't totally satisfied with the MH, I would get a ride back to the airport or rental car, and walk away from my deposit.
-
WAY OUT OF MY LEAGUE!! For the price of three days rental, you could buy a good ToyHouse:o
-
Put down a non-refundable deposit to hold the vehicle for you for a specified time. This allows the sellor to still show the vehicle to other potential buyers,, but gives you first shot. If you don't take delivery of the vehicle before the specified date, the seller keeps your deposit and calls up the next person on the list. Then its up to the honesty and integrity of the seller!!!!!
-
These folks are definitely raising the bar - Very nice indeed. (
-
 Fortunately, my next door neighbor runs the local NAPA store. I think he sees it as a challenge to come up with any wierd or strange part!! So Far, hes come through on everything.
 -
Bought a roll of that vinyl trim stuff to replace the piece that was missing on the drivers side. Looks almost new Also installed two clips to hold the Refrigerator door and the Propane tank doors open.

-
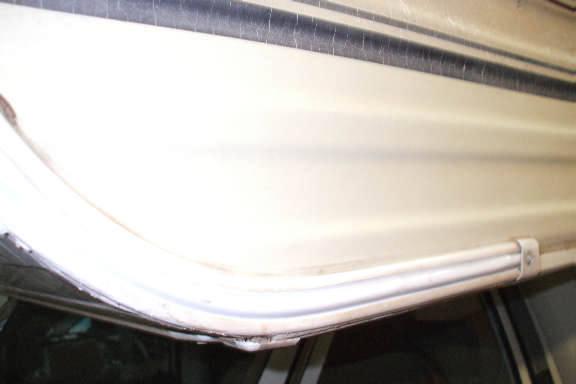
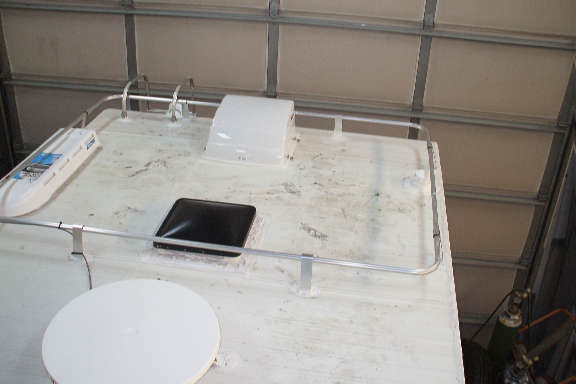
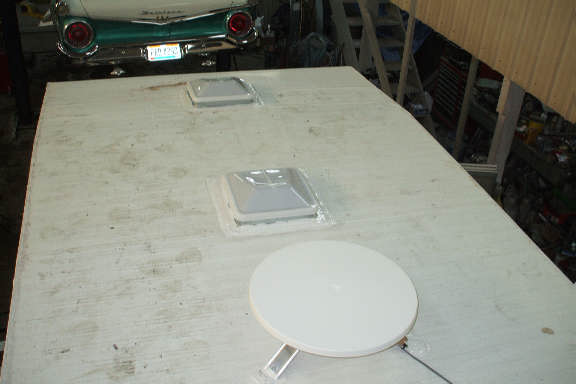
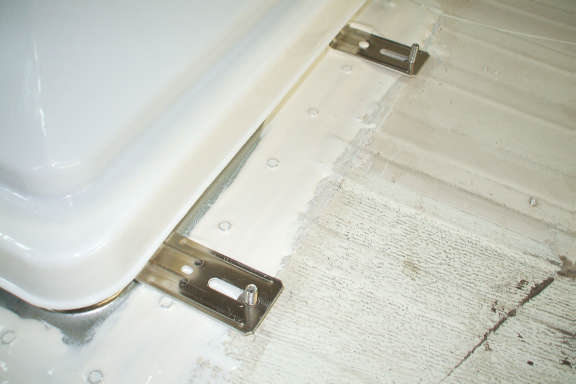
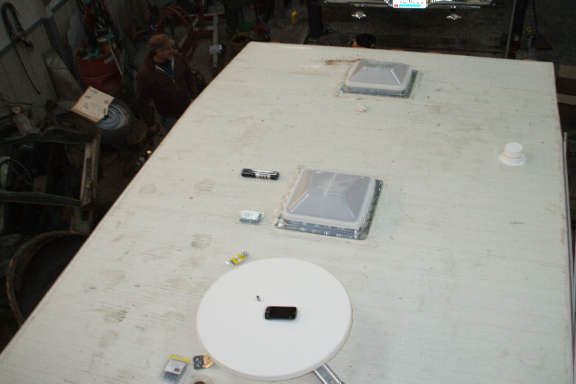
Finished on the roof. All the vents replace. Installed a TV antenna, replaced both sewer vents. replaced the screws holding down the rack and resealed. 20) A finished roof vent, sealed, and good for another 10 years 21) View AFT. Universal Refrigerator vent cover - replaced the one that was missing. The dark vent I did not replace, It was in good condition, no cracks, and has a powered fan TV Antenna toward the front On the vent all the way in the back, One of those fancy covers so you can leave a vent open, even in the rain. 22 ) View forward 23) Note the vent cover mount plates (The vent cover does NOT mount to the roof directly, but mounts to the flanges that are installed to the vent frame.
-
ALSO - if the seals were damaged. Obviously, to repack the inner bearing correctly, you need to remove the inner seal, if that seal was reinstalled, or the new seal was damaged when installed, well, that is the problem. I like to see for myself. especially on important matters. AND - God Bless Digital Cameras - Anytime I take something apart, I take a gazillion pictures, Its amazing how this has reduced the "Leftover Part Count" after re-assembly :-)
-
No problem with parts (I have an 88) We removed the plugs and put in fittings. Ipper and lower ball joint and a control arm.
-
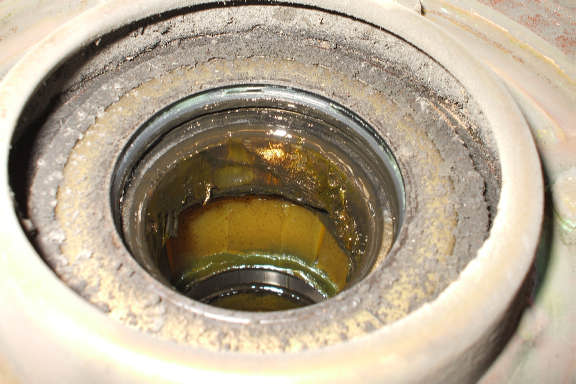
In order to get 90w to contaminate the rear brakes,two seals would have had to fail, the small one in the axle tube (allowed 90w to get to the bearings) and then the large one on the back of the hub (allowed the 90w in the bearings to get outside the hub).
-
The guy thats helping me (or I'm helping him!) wondered the same thing. And when I told him the rear bearings needed to be packed, he said Nah, they get lubed from the rear end. When he seen the seal he said; "I'll be darned, your right". (He works on big rigs, and I'm using his shop while things are slow) Anyway, there is a gasket on the axle hub, and the rear seal should keep 90 w from leaking. Before I make this mod, I would check to see if the fluid level in the rear end is high enough to get lube out to the bearings. I didn't see any fluid come out other than what you see in the picture. In the meantime, I'll repack and make a decision in 50,000 miles from now.
-
Yes, mine is the same as Dan's. There is a seal in the axle tube. When I pulled the axle, I could see the hub lube up inside the tube and the small seal on the inside of the tube was preventing it from flowing out and into the bearings.
-
These inspections build my confidence factor in the MH. So Far, everything I've looked at has been good and well maintained. I'll be looking at U joints and the aft transmission stuff tomorrow (replacing trans filter) Looks like I have a good machine for the Alaska Trip. Oh Yah, Forgot to mention that the air bags are pumped up to 90 psi and holding :-)
-
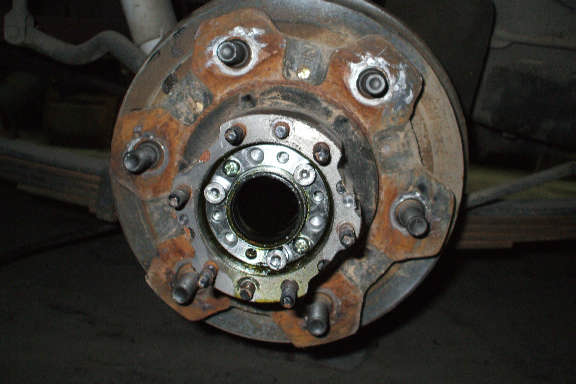
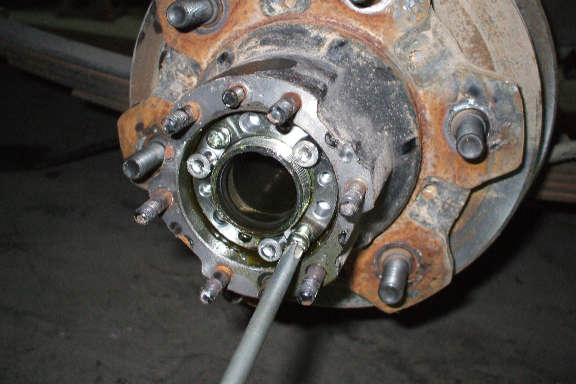
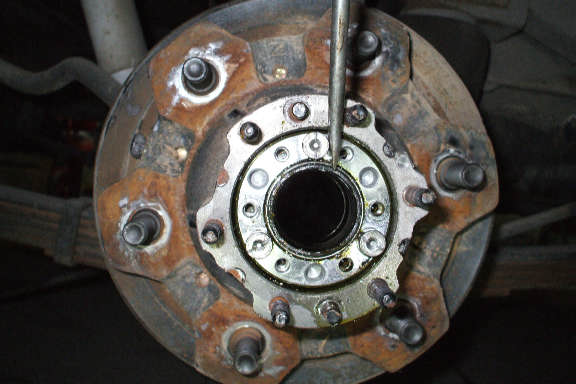
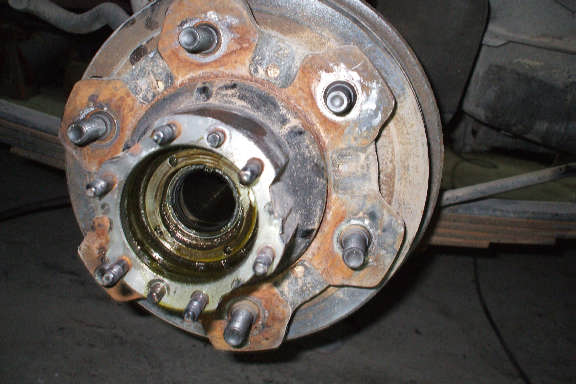
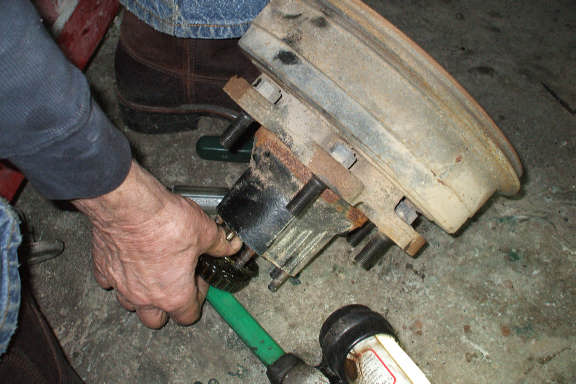
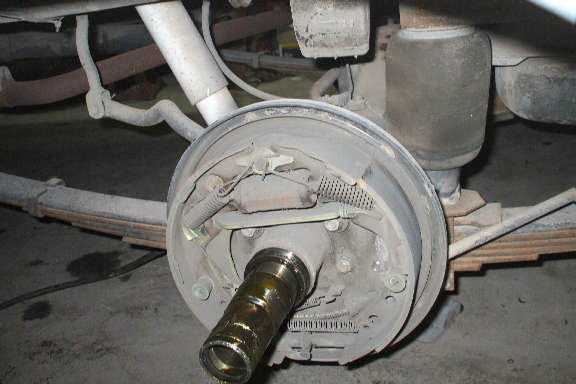
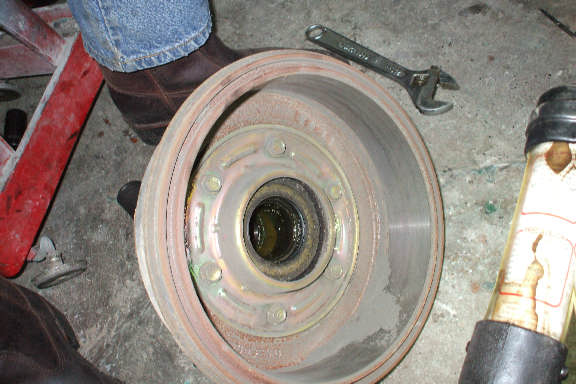
There has been discussion regarding if the rear bearings are packed or lubed. In my case, the back bearings must be packed, they do not get lubrication from the rear end. Remove the axle drive bolts and tap on the axle, it will pull out. 1) This exposes the inner keeper. 2) remove the two philips keep screws (may need an impact driver) 3) The keep can then be unscrewed from the axle. I used a flat screwdriver to tap the three lugs. 4 & 5) Once the keeper is unscrewed, the hub will pull off, and the bearings will fall out. 6) exposing the axle. 7 & 8) the inner bearing is held in place with a grease seal. 9) The outer bearing and keeper can be seen.
-
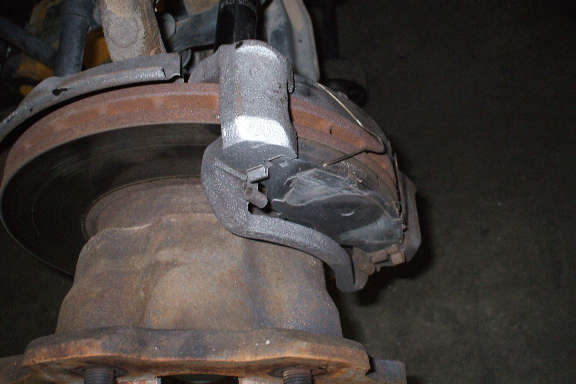
I bought a set of brake pads for the front, but looks like I'll be taking them back. We pulled both front wheels, the pads look new, and the bearings have been repacked. While we had it apart, we installed grease fittings everyplace we could. Front end looks very good.
-
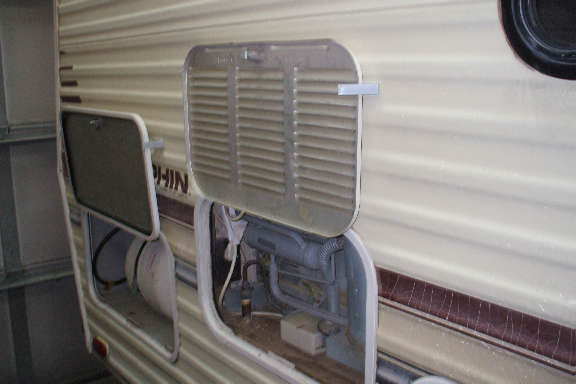
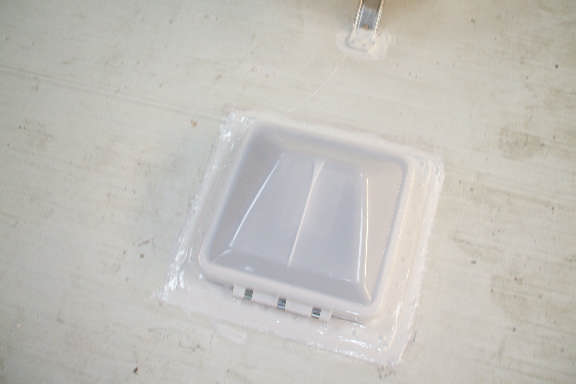
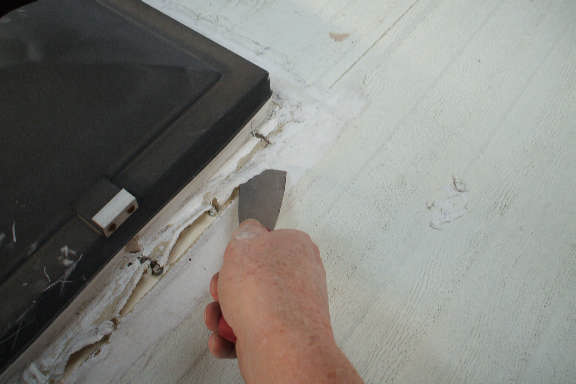
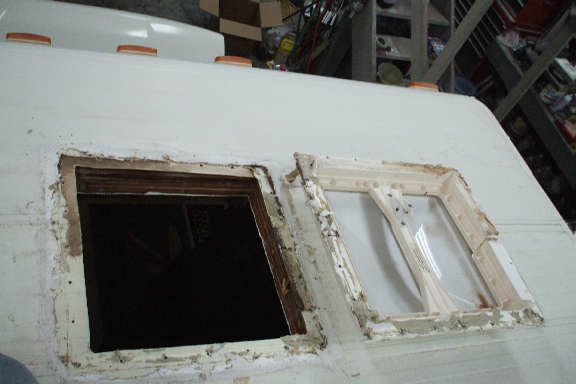
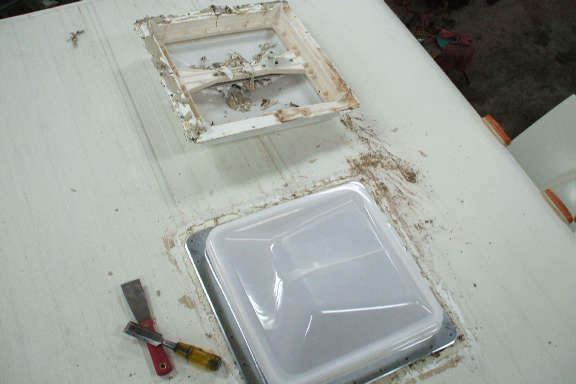
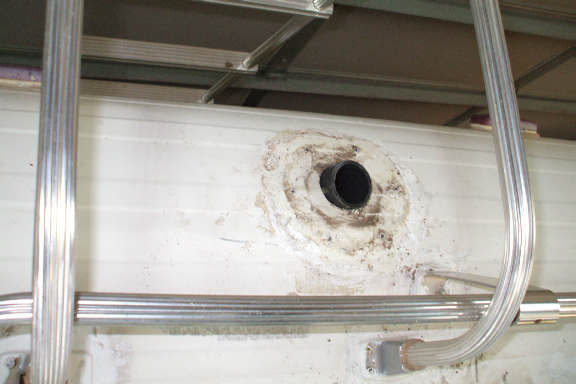
The Original Vents were cracked and leaking and needed replacement. New vents can be had for about $35 each. Try and get the ones with metal flanges, not plastic. 1) Right after I bought the MH, I did a quick and dirty patch around the vents and seams. This is the stuff that Deans RV recommended. I painted this stuff around all the vents and outer seams just to last me until I had the time and a place to work on the roof. 2) Even though I did a good job on the temporary patching, I still had a very slight drip. Only after watching carefully did I discover the water was sneaking past cracks in the plastic flanges. If you doing a roof patch, and you have plastic flanges, make sure you look at them for cracks. 3) I used a putty knife to expose the screws. 4) After the screws were removed, the old vent pried out. I cleaned the original sealant off with the knife, then used Lacquer thinner to remove the sealant from around the opening. 5) I laid down a 1inch wide butyl tape making sure it covered the old original holes. I then screwed the new vents on. I used #10 Self Piercing 1 inch hex head screws. 6) After I snugged all the screws, I used the putty knife to cut off the excess. Note - The four old corner holes are not being covered by the new vent. I put a small amount of sealant on a screw and just put a new screw in the old corner holes, just to cover the holes. 7) Two new vents and a TV antenna (NOTE - The sewer vent is just sitting there, that's not really the sewer vent location) 8) The far aft sewer vent was non-existent, this is removed and cleaned up. Because the sewer vent is trying to mount on a curved surface, I had to double up the butyl tape on the very bottom and very top to fill in the gap. This area will be painted with the white sealant when I do the rest of the vents. 9) The new aft sewer vent, Not you can see the new aft roof vent also. NOT SHOWN YET - I'll use the white self leveling sealant and a small paint brush, and paint the white sealant over the flanges and screws. I'll get a photo of this tomorrow when I finish. I still need to replace the screws in the Luggage rack, and then I'll reseal all the screws.
-
I was working on mine today (replacing Roof Vents) I weigh about 180 and made it a point to stay toward the edges. I'll do a short writeup on replacing the roof vents with photos.
-
rebedding sunrader sliding windows
waiter replied to Rocinante Sunrader 88's topic in General Discussion
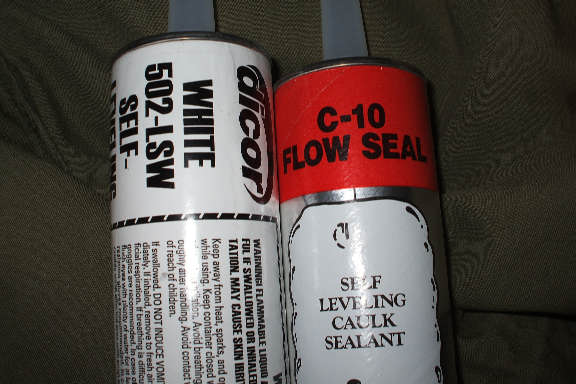
I used a self leveling sealant that I bought from Dean's RV Parts in Tulsa Oklahoma. I It was in a culking tube and puts down a thick paste that dries to a rubbery consistency. I don't know the particular brand, I'll look it up when I get back home and post it here. I did Google "RV Self Leveling Sealant" and came up with what looks like the stuff I used. (NOTE - When I picked up the ToyHouse in Albuquerque and was driving back to Ohio, I decided to stop along the way and do a quick and dirty roof seal job just to get me through the Ohio winter.) -
The HP calculation was meant to roughly show the impact Alternator use has on fuel consumption, a 50% efficiency for the Alternator would be a reasonable assumption. To throw just a little more math, Piston engines generally burn about .4 lbs of fuel per hp per hour. Gasoline weighs about 6.2 lbs per gallon 2HP to run the Alternator (50 amps at 50% efficiency) for an hour should consume about .8 lbs of fuel, or about 1/8 of a gallon of fuel. Oh Yah - "Your Nuts" But so are the rest of us, Welcome to the crowd. :-)
-
746 Watts per HP An Alternator putting out 50 amps at 14 volts P = I x E P = Watts I = Amps E = Volts 700 = 50 x 14 Just a little under 1 HP when the Alternator is pumping out 50 amps John Mc 88 Dolphin 4 Auto
-
I just put a universal replacement on the upper refrigerator vent (roof vent). I think it was about $20. Plastic, held on with four long screws. (Mine was missing when I bought it) As for the lower, I was up on E-bay looking for a piezo igniter for my refrigerator and seen some exterior doors. Maybe search for RV Refrigerator doors or Dometic refrigerator exterior door. NOTE - I think my lower door is actually made / sold by dometic as it has "Dometic" embossed/stamped on it. John Mc 88 Dolphin 4 Auto
-
Darn, Your setting a very high standard. Don't let my wife see these pictures :-) Very, Very Nice. John Mc 88 Dolphin 4 Auto
-
My wife is really getting into this. When I first pulled it into the driveway 4 weeks ago, I thought she was going to cry. After a couple weeks of cleaning and doing the little homey things, she's now talking to all her friends about this cute little motor home she has. She came home yesterday with a neat digital clock tha also displays Outside Air Temperature. She says; "Your not putting that original clock back up, See if this one will work". I'll get a photo of it after I get it put up. John Mc 88 Dolphin 4 Auto
-
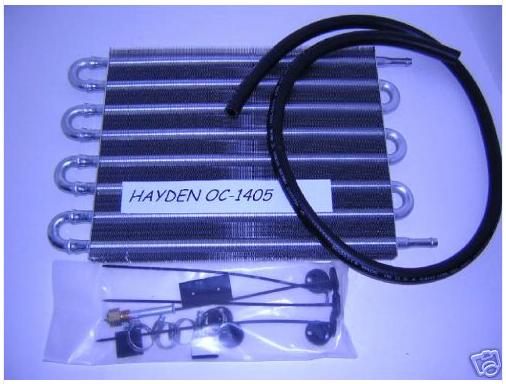
Just ordered a Transmission Cooler from e-bay ($50 with shipping) Hayden HC1405 26,000 lbs GVW 10 x 15 1/2 x 3/4 with mounting kit I'll put it on this weekend while I'm changing the trans fluid. John Mc 88 Dolphin 4 Auto
-
Paint looks very good, still need to do the trim. The entire ceiling is done, but I'm working my way forward on the walls, Need to do over the couch over the table, and over the cabover. I forgot to mention this.. On the ceiling, there were a couple spots around the vents that were stained from leaks. The Zinsser 1-2-3 did not cover this and the stains bleed through. I got a small can of "Kilz-it" and put two light coats of this over the stains. It covered the stains and they did not bleed through. In the "If I had to do it over again" catagory, I would paint over the stains first with Kilz-it, then when that dried, paint the entire ceiling with the Zinsser 1-2-3. John Mc 88 Dolphin 4 Auto