bufbooth
-
Posts
1,094 -
Joined
-
Last visited
Content Type
Events
Profiles
Forums
Gallery
Everything posted by bufbooth
-
Hello All, I am about half way completed on my Indiana to YellowStone trip. I am currently in Sheridan WY. I have seen about a dozen other Toyota motorhomes on my trip so far, about a 50/50 mixture of 4 cyl and 6 cyl models. I flashed my head lights at each one and received a light flash and a wave from each one. If anyone seen me on the road, I would like to hear from them, I was the 1990 Toyota Odyssey with the canoe on top. Just 5 hours into the trip, I found out the hard way that I have a 15 gallon gas tank. I read my Toyota truck manual and it stated that I either had a 13.5 gallon gas tank or a 17 gallon tank. Since I put in 14 gallons of gas on a past fill up, I thought I must have the 17 gallon tank. While traveling in I-74 just North of Peoria Illinois I noticed I was getting close to Empty. After driving for about 30 miles without seeing a single gas station (whats the deal with that?) I found three stations that closed at 10pm, the current time was about 10:30pm. I ended up running out of gas as I approached what I thought was a closed BP. The next morning I realized that the closed BP was an out of business BP. I ended up taking a one mile walk to a Casey gas station that was open, but only had a one gallon loaner gas can. The old girl fired up on the single gallon and I made my way to the Casey gas station and ended up putting in 14.8 gallons of gas. I made a new note of this and created a new driving policy, start looking for gas at a quarter tank. I still cannot believe that I could not find a gas station NW of Peoria, I expected to have this problem in the middle of WY, not Illinois. Two days into the trip, I noticed water leaking from my gray water tank area. It turned out to be the T-connector on my cold water line. I did an on the road repair, I pulled the water heater out in order to get to the leak, but I only had a 90 degree PVC connector and not the T connector that I needed, so I had to bypass the hot water heater in order to stop the water leak, the showers are a bit cold at first, but bareable. I was driving on highway 14 from Cody WY to Sheridan WY and was hitting some 7 and 8 percent grades, the old girl was doing okay at keeping above 30mph, but after about 40 minutes of this I noticed she was getting a bit hot, especially in the 92 degree weather. I saw a scenic overview and decided to stop, which was a mistake. I had stopped for about 30 minutes and when I got back to the motorhome, she started but ran really rough and would die. My first thought was a clogged fuel filter or a bad fuel pump, but when I looked at the heat gauge, it was pegged almost all the way to the right in the hot zone, I then realized I was vapor locking due to the heat. A motors hottest point is usually a few minutes after one turns it off. The newer engines have a fan that runs a few minutes after the engine is off to handle this. I openned my engine hood for about 5 minutes and noticed the heat gauge move a little to the cool side, so I tried to start it again and after about 10 seconds of very rough idleing, she powered up and within 10 seconds the heat gauge moved to the middle, I assumed the water pump send cooler water thur the engine and the fan helpped. She ran great for the remaining of the 70 mile trip. I had a water leak in the overhead bed the day before I left but I appearred to find the spot it was leaking and patched it. In Yellowstone I had three days of rain, two of them really heavy and did not find any water so I think I stopped the leak. I did noticed that my rear window channel did fill up with water thru the vinyal glass seal and it currently does not have any water vents like the side windows do, I will correct this after the trip. My front window channel also has some water in it, but it was due to the moister from the fast temperature drop a night. More later on the trip, so far a lot of fun and good sights. Dennis 1990 Toyota Odyssey (Mrs. Clark)
-
Attaching bars to roof to carry canoe
bufbooth replied to Charlie's topic in Coach ApplianceTech Issues
Hello Charlie, Regarding the best material to fill past roof holes, it depends on the type of roof that you have. My 91 has an all alumimun roof, and I have been happy with using Dyco 20/20. It kind of looks like white cake frosting and is easy to use. It is self leveling, so after you apply it, is will sink down a bit, which is great for filling gaps, but you might have to give it a second coat the next day. Dennis... -
Hello, I am not sure on the size of the wood that you need, but have you considered using a composite type board, the type they use for decking/patios? Another option is treated wood. Dennis...
-
Opinion on Canoe Rack, level or front lower
bufbooth replied to bufbooth's topic in General Discussion
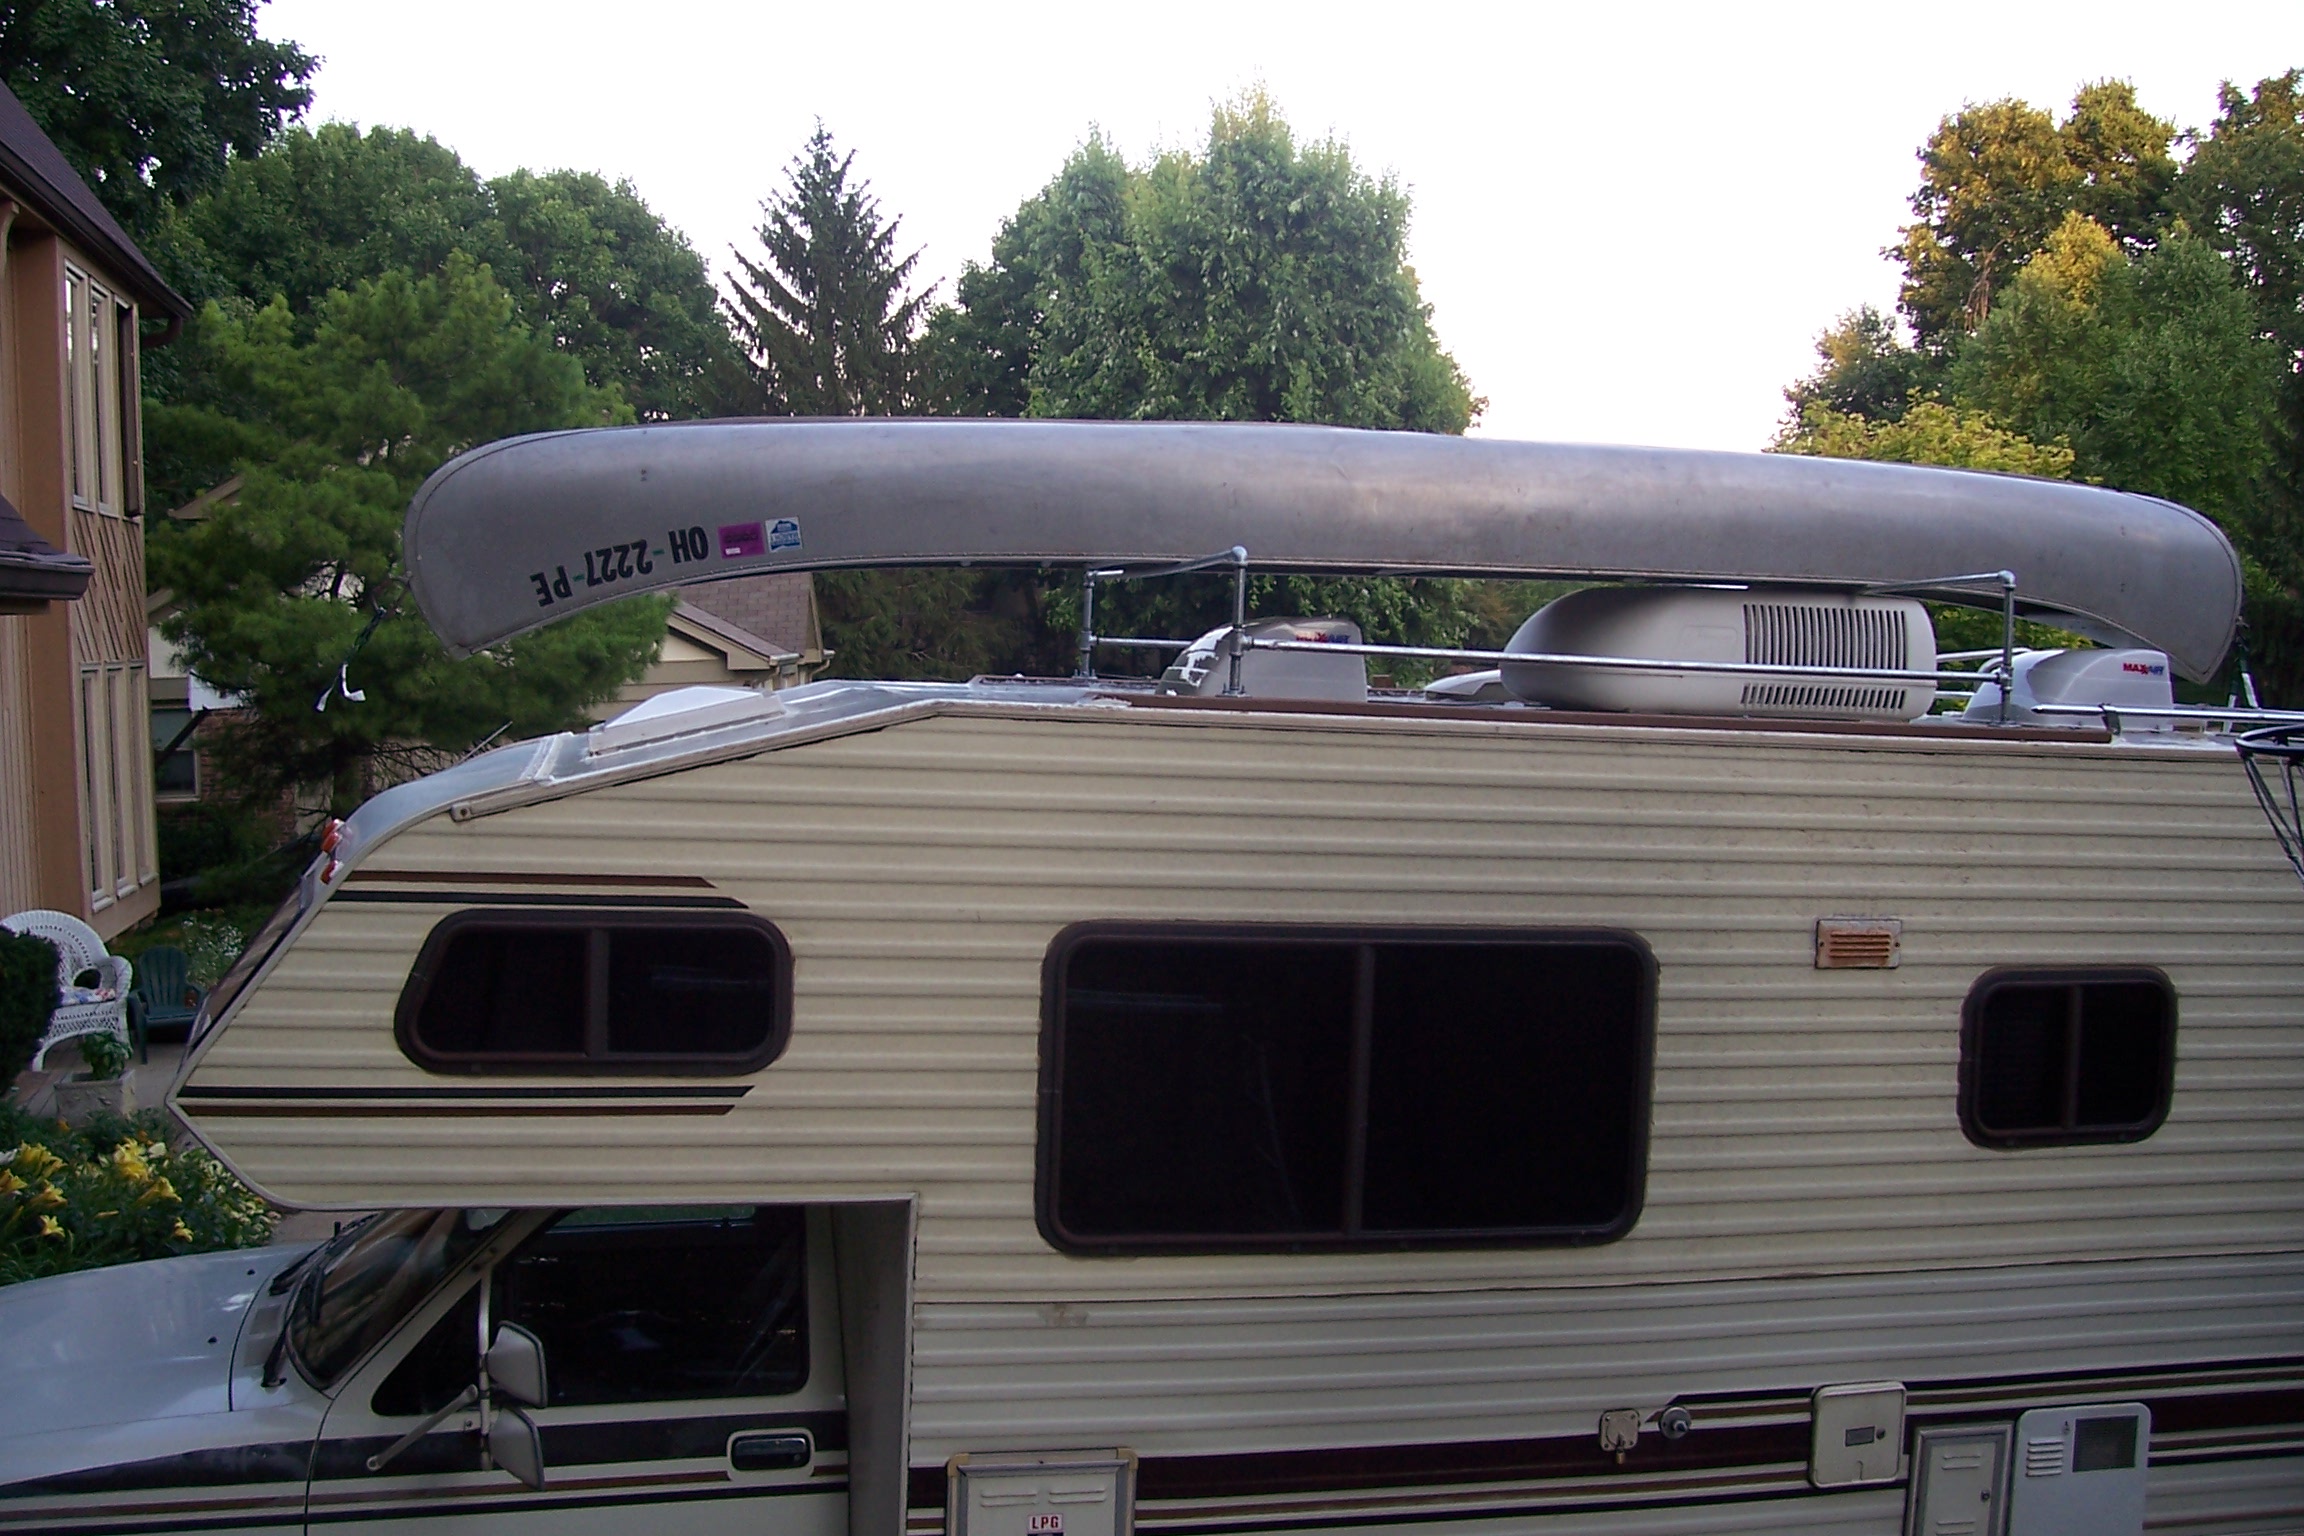
Hello Charlie, I used 4 inch self threading screws. I drilled a 1/8 inch pilot hole about 3 inches from the edge of the roof (on the sides) and passed through a thin steel support and what appeared to be a 2 x 4. The screws ended up passing through the ceiling in the cabinet and closet area, about ¼ to ½ inch through, and about ½ inch from the wall. They screwed down nice and tight. I took the canoe on a 220 mile road trip last weekend and it was great, the canoe did not move at all and about 200 of the miles was doing 55mph to 60mph on a two lane State route in which a few large semi-trucks passed by and did not notice any movement or problems. I will be taking a 3000 to 4000 mile trip next week (Indiana to Yellowstone) and will be checking the screws often. The way I designed the rack is that it is self supporting, that is it stands by itself, sort of like a bed frame. I secured two 8 foot by 5.5 inch, by 1.1 inch composite decking boards to the roof with four screws each, the rack then bolts to the decking board. The canoe is tied down by two straps to the front bumper and two straps to the rear bumper. All the screws have to do is keep the rack from moving forward/backwards and left to right. If I end up having issues with the screws, for example if they end up loosening up, I will replace them with 5 inch bolts and instead of using Fender washers on the inside ceiling, I will just get a three inch by 12 to 36 inch steel plate (1/8 or ¼ thick) and use that as a support beam to attached the bolts to, most hardware stores carry them. I puttied around the boards, but may end up scrapping the putty off and just using rubber washers on the screws (or bolts). Also, it was very easy to get the canoe up on the rack, actually, a single person can do it. I loaded it from the driver’s side. I just raised the canoe up on one end and placed the top end on the side rack pipe and push it up 2 to 3 feet and it balanced / leaned nicely on the side of the camper. I then got up on the roof and pulled the canoe the rest of the way up as I slide it on the side rack pipe. The canoe weights 75 pounds, but felt more like 20 pounds since all the weight was on the pipe. Once I had it on the roof (sideways) I just spun it around to face forwards/backwards and again, it felt like 20 pounds since I was on the pipes. I tied the canoe’s main support to the front rack pipe, and then used heavy rubber straps over the Top of the canoe to secure it to the front and rear pipes. I then secured the front of the canoe to The front bumper (the tow hooks) and used some rubber pipe installation to fit over the front of The hood to keep the straps from rubbing the paint. I then secured the back of the canoe to the Rear bumper. Also, I took 4 U-bolt clamps and placed one on each side of the rack pipe right Against the side of the canoe, this gave me a two inch high stopper to keep the canoe from moving left or right on me. Will provide a trip report when I get back. -
Hello All, I connected the coach battery and my check engine and brake light now goes out as it should, so I think all is okay. Dennis...
-
Your best bet is to use a combination of your cell phone and public Wi-Fi access points. It sounds like you need to beef up your Internet security, have you looked into getting a VPN (Virtual Private Network) service? VPN will get you an encrypted path through the internet. Dennis...
-
This might be a bit late, but two of the easier items that should get you a little better performance is the air filter and the exhaust. There are a number of oversized air filters that should be better than the OEM one, and look into a performance duel exhaust system. Dennis...
-
One concern I have is that if you go with a single tire setup, a blowout would be more dangerous than if you had one tire blowout on a duelly setup. Also, are you sure 4400 lbs is enough? My tires (185/75/14) have a rating of 1700 lbs, which gives me 6800 lbs (1700 x 4), about 55% more capacity than your single tire setup. My concern is that with 4400 lbs, you might be close to your max. capacity instead of at a working capacity. If one of your tires ends up under inflated, it is a +90 degree day, you end up slightly overloading the RV, you could be on or over the capacity line. Dennis...
-
Hello All, When I start the engine up, the check engine and the brake-on red lights will Stay on until I rev the engine up. While these lights are on, the radio, fan, and A/C does not get any power. This just started happening a week or two ago. I currently have the coach battery disconnected, if that matters. Any suggestions on what might be happening? Thanks, Dennis… 1990 Toyota Odyssey V6
-
Here is a $600 one with 38,000 miles, but needs a new roof. http://indianapolis.craigslist.org/car/339517030.html
-
Opinion on Canoe Rack, level or front lower
bufbooth replied to bufbooth's topic in General Discussion
Hello Turbo Greg, The A/C will not be a problem, the canoe is about 4 inches wider than the A/C cover, and it looks like if I drop the front of the canoe by 4 inches, I still may be above the A/C cover, so either way I will clear the A/C. The front escape hatch currently fully opens, and if I drop the canoe by 4 inches, I will still be able to open the vent part 100% and the hatch door by about 80%. Also, I will have two nylon straps in the front and two in the rear securing the canoe to the bumpers. On the front, the straps attached nicely to the two tow hooks, and in the rear to the L-shaped bumper supports. I will also have three rubber straps to hold the canoe down to the rack, and I am able to tie the front canoe support bar direct to the front rack crossover bar. I am in the process of adding blocks on the crossover bars so that the canoe cannot move sideways on me. I was surprised on how easy it was for me to put the canoe on top. From the drivers side, I stood the canoe up on one end and layed the other end on the canoe rack's side bar and then slide the canoe up about three feet. I then got up on the roof and pulled the canoe all the way on to the roof, with the canoe going across the rack like an airplane wing. I then slide the front of the canoe onto the front rack and then centered the rear of the canoe on the back of the rack. Since the canoe was on the bar, most of the 70 pounds of it's weight was on the bar. The canoe felt like it weighed 20 pounds as I was handling it. I will be swaping out the front 6 inch pipes for two inches to get the front down by another four inches. I will be taking a 200 mile trip this weekend, so I will be able to test it out before my YellowStone trip (a 3000+ mile trip) later this month. Thanks, Dennis... -
Hello All, I built my canoe rack to be 2 inches lower in the front than the back, but I am wondering if I should go lower on the front. I can go lower another four inches. Here is a picture: www.tipton-in.com/canoe/100_3447.JPG Thanks, Dennis...

-
I fixed my overhead window today, I had noticed it was leaking last week, looks like I caught the leak early, only some minor water damage, the plywood had one layer seperating. I used some Elmers (as in the Glue company) wood damage seal and repair product, seemed to do the trick, I brought it at Lowes (chain hardware store). I had some trouble with the putty tape, it does not seperate from the tape when it is above 80. I ended up putting it in the freezer for about 5 minutes and it got hard enough to be able to easily work with it. I started to check the other windows for water damage, and found one window, the overhead driver side window. It looks like it might have been leaking for a while, I have a 4 x 6 inch area that is a bit soft. I am 11 days from vacation, and fear that I may not have enough time, so I am going to delay the repair. I did seal the window frame last month, so I think I will not get any more water in, in the meantime. Dennis...1991 Odyssey
-
Hello, I found the diff. vent and removed it (12mm on my 91). It was covered in oil / mud, but looked like it was still working. I used carb cleaner to clean it up and then dry it out with some compressed air. Seems to work okay, the cap is spring loaded. Maybe my outer oil seal failed due to the age, they might of been original. Thanks, Dennis...
-
Hello All, I got the rack up on the roof and screwed down. The metal supports did appear to be pretty thin, but I hit solid wood below it. I am going to put the canoe up on the rack this weekend and do some final fitting, and then take it out for a test drive. I will take pictures and post them. The composite decking boards worked out nicely. Dennis...
-
Hello All, Where exactly is the Diff. Vent located? What does it look like? I think mine might be clogged. I pulled the axles in May to inspect the brakes and noticed my left axle oil seal leaking into the brake area. I replaced the seal and last week I noticed that my right side axle was leaking into the brake area. Last night (7/5), I pulled the right side axle and replaced the seal, but have not driven on it yet. I just read this clogged vent thread and thought to myself that maybe that is the reason I have two oil seals fail in such a short amount of time.
-
Hello All, The thin paper like gasket that goes under the outside of the axle, the one that the six bolts go through, is this gasket just to keep dust/dirt out? It does not seem to be strong enough do to anything else. Thanks, Dennis...
-
Lately, I found private message alerts in my spam bucket, I mark them as good, and I they still end up in the spam bucket (yahoo email). Dennis...
-
Regarding the question on my A/C, if I remove my middle support bar in the canoe (will put back in for use), the canoe will drop over the A/C unit and will have about 2 inches of room on each side. This will allow me to lower the canoe by 6 to 8 inches closer to the roof. I liked the idea of putting a stopper on the rack cross bars to keep the canoe from drifting sideways, I did this on my van roof rack and it worked great. Thanks to all on the canoe rack suggestions. My new design that I am going to try this weekend will be to build a one piece rack out of ½ inch galvanized gas pipe. Basically, I am going to Build a frame that looks a lot like a low single bed. The material list that I am looking at is: 1) 4 – 72 inch ½ inch pipes (2 for the rack that the canoe sits on and 2 for side supports) 2) 4 – 3 inch round pipe bases / foots. 3) 4 – T-connectors 4) 4 – 12 inch pipes (for the height of the rack) 5) 2 – 2 inch pipes (to all to the 72 inch pipes to get me to 78 inches) 6) 4 – 90 degree curves 7) 4 – 2 inch pipes (goes between round pipe bases and T-connectors) 8) 2 – pipe connecting joint (to connect the 72 inch and 12 inch pipes) The above will give me what looks like a low single bed frame with about a 15 inch head and foot boards. My camper is 82 inches wide and I wanted to stay close to the edges for the most support, so 74 or so inches should place me 2 to 4 inches from the each side edge after accounting for the pipe lengths, and curves and connector pieces. The four 3 inch round pipe bases will allow me to drop four bolts each to secure it down. My first thought was to look for two pieces of steel 3 inches wide by 6 to 8 feet long by ½ inch thick, but the best the local hardware stores could do is 3 inch x 3 feet x ¼ inch and wanted $25 a each. As a result, I am now looking at a treated 2x4x8 wood board or a 2x5x8 fake wood decking board. The decking board looks to be extremely strong and un-bendable and should not rot or warp. My plan here is to bolt / screw down the two 8 foot boards along the top edges of the roof in which the 3 inch pipe bases will be bolted to the boards. I will then use rope to tie the front and rear of the canoe to the rear bumper and the front tow hooks, plus tie / strap the canoe down to the pipe frame. I will either end up using self treading screws to go into my steel supports in the roof, If the steel supports turn out to be too thin, I will then punch through the ceiling into the top of cabinets and use a 3 foot 2x4 as a large washer / archor to tie together 3 of my steel roof supports.
-
Hello all, I just read that the purpose of the vinyl window glazing is to only hold the window in the aluminum frame and not to be a water tight seal? Is that correct? I noticed that I am getting some water behind the glazing, I can press on the glazing on the bottom of the window and some water will squeeze out. My glazing still looks good and is flexable. I also read that the older RVs did not have a drain hole in the aluminum frame (front channel) but the side windows do, and one of the reasons the front window leaks is due to water overflowing the front channel and then getting to the plywood . I confirmed the lack of drain holes on my front windows with my 1990 Odyssey, the side windows do have them. My current plan of action is to remove the window, clean everything up, repair the plywood (it is starting to seperate) with wood glue/wood putty, and to drill two drain holes in the outside channel of the aluminum frame, at the bottom, and put on new butyl or putty tape (which is better) between the aluminum frame and the coach body. Does the above sound like it will work, or should I be looking for new vinyl glazing. Thanks, Dennis... 1990 Toyota Odyssey
-
Hello all, I was reading that there was a difference between Butyl caulk tape and Putty tape. Is that correct? If so, which is better to use to seal a window? I have an aluminum frame type and need to seal between the frame and the coach body. This is for my overhead bed windows that face towards the front. Thanks, Dennis...
-
Hello all, It appears that the proper term of the product that I am looking for is a rubber / vinyl glazing, which is a rope like strip that goes around the front overhead bed window and snaps/pushes into the aluminum frame. Any suggestions on who sells this? This is for a 1990 Toyota Odyssey. I found the following website that explains the procedure, except it is for a cabin on a boat, however the dealer that sold the glazing is no longer around: http://www.catalina30.com/TechLib/LeakingW...kingwindows.htm Thanks, Dennis...
-
I have the aluminum frame type, and did notice on the inside that it looked like the rope / chaulk was used. My motorhome model is Odyessy. Also, around the glass is about a 1/2 rubber gasket that looks like it is near replacement, where can I purchase one of those? This is the type that the rubber gasket gets pushed over the glass edge and then the other side of the rubber gasket gets pushed into the aluminum frame. Thanks, Dennis...
-
Hello All, I have owned my 1990 Toyota for a year now and realized that the roof seam seals were probably done about 5 to 8 years ago, so it was time to redo it. I have a one piece aluminum roof, but needed to reseal around all the vents and the front/rear, and side seals. I scraped off all of the old stuff and cleaned every thing up, then used Dyco 20/20 to create the new seals. It looks great. I also noticed that the seal material that was around my front coach (overhead bed) windows was falling apart. It looked like a clear rubber type material. I scraped all of it off and used a house type clear window sealer. We finally had a good rain yesterday so I headed into the motorhome to check for leaks. All was good until I was checking out all of the windows and noticed my front window was leaking. I took the inside frame off and found some small water damage, about a 4 x 3 inch area. I am drying it out now with a fan. I think I might of found the leak, there was no sealant where the window frame comes together, either that or the rubber seal around the glass is going. Also, I think that the sealant around the windows that I added will not hold up over time. What is the recommended window trim sealer? Thanks, Dennis...
-
Less than 30 days for our YellowStone RV trip. We will be traveling from Indiana to Yellowstone National Park via I-80 and will be take I-90 back. Our first real stop will be Sidney NE, at the Cabelas Headquarters, then off to Cheyenne WY openning of their Rodeo Days (State Fair), then a day in the Tetons, then 5 days at YellowStone, a day in Cody at the Buffalo Bill Museum, a couple days in Sheridan, and on the way home Devils Tower, Wall Drug, Bad Lands, Mt. Rushmore, Corn Palace, and Wisconsin Dells. Dennis...