


gjewers
-
Posts
55 -
Joined
-
Last visited
Content Type
Events
Profiles
Forums
Gallery
Posts posted by gjewers
-
-
Nice job! I'm glad to see that you got rid of the windows. How many inches did you 'extend' your new cabover, forward? It looks to me that you re-designed about 6" more forward?
~Riverman77
Just looked at the photos again. I eliminated the front window, but did put in sliding side windows. Not sure if they add to, or compromise the wall strength. Not having the full length aluminum sheets lessens the shear but we welded in gussets and having a solid plywood floor helps too I'm sure.
-
Nice job! I'm glad to see that you got rid of the windows. How many inches did you 'extend' your new cabover, forward? It looks to me that you re-designed about 6" more forward?
~Riverman77
Good eyes! It is a 6" extension to the actual floor. With the new pointed nose it makes for just about a queen size bed in there. Really makes a big difference. I think the actuall point is between 6-8" horizontaly also. I had to put a cross beam on the interior ceiling to strengthen the roof even though there is a steel member up there. I tends to make head contact on ocassion and the screws sweat when cold out. Otherwise, completely happy with it.
greg
-
I tend to over-build everything. Adding steel frames and solid plywood for the floor really upped the weight. Front axle at the limit, rear a little on the heavy side as far as GVWR.
-
It's been a long time in coming but I am finally posting some photos of the rebuild of the Oak tree damage. Finished it a while back but the photos got lost in the meantime. Thought I had more of the outside finish work so will add a few more if anyone is interested. Also, the link is just photos, if anyone would like more info, let me know.
https://www.dropbox.com/sh/hbop50xb2jh18f4/AACK2mR_CK6g2a_7KRkBTIaSa?dl=0
Let me know if the link works. Thanks.
Onward!

-
Thanks for the posting of the photos and info. My shifter retainer was different than the photos. The cupped ring is larger and is one piece that has the pins going through it. Made of a hard plastic,(unless it is just old and should be softer). I had to get the entire assembly as I could not get the ring separately from the dealer and my local dealer didn't even have the retainer in his catalog any longer. I ordered the part from "Toyota Parts Overstock . com" Had a little trouble figuring out the right part from there web site but called them and they use your VIN to ID track down the right part.
Anyway, the clutch works like a charm; Smooth and easy. Not really any pedal difference for a "gold series" clutch but it feels great. Also changed the slave cylinder as it had a minor leak.
Now converting to a 2 battery system and then on the road again.
-
Hello all. I wound up installing a LUK clutch and flywheel. It was LUK that the local mechanic said were made in the USA. NOT! Flywheel from china and clutch fro s.africa. But what the hell. Ordered on the net for a good price and wasn't going to send them back. Got the "gold" series clutch which is supposed to have 30-35% more clamping force and figured this was a good thing. Perfect fit. Easy job using cut off longer bolts to slide trans in and out and the grease trick for the pilot bearing. Had enough room to stuff the trans back on the cross member and did not have to completely pull it. I welded up a cradle for a small floor jack and it worked like a charm so minimal armstronging.
What I need now is a diagram of a W series trans and the "shift lever retainer" parts. The nylon ball housing inside that the shifter ball sits in is all busted up. There are two pins that guide the ball and they don't seem to want to come out and look hardened so Probably aren't drillable. I don't want to pound too hard and crack the aluminum. Anyway I got the wrong part from the dealer and would like to get a better parts description for next time. (A friend picked up the part and the dealer is 90 mi. away.)
Soooo, Does anybody have info on good parts diagrams and experience with the shift lever retainer?
Thanks again!
-
Anybody recommend a brand of clutch and flywheel? My local shop swears by Lucas. Looking for something NOT made in china. What say the brethren?
Thanks again.
gj
-
Well, thank you ALL for replying to this post. Gives me a little insight and much to chew on. Now I need some nicer weather as it will be done outside in the dirt and right now it's snowing in the Sierras.
Merry Christmas to all and wishes for a new year of happy road trips!
-
I have an '88 Itasca with a 22r and a 4 speed manual trans. I need to replace the clutch as it is beginning to slip and there is no adjustment as it is hydraulic. Do I need to get a special heavier duty clutch for a 1 ton or will one slated for a pickup work? Also, any good links out there for r&r instructions for the clutch? Thanks. gj
-
Thanks. Playing phone tag with them now. Also found something called J-Wrap from interstatemetals.com that would work. Thanks again. gj
-
Having a hard time finding 3/4" high density foam. The dow blue isn't made anymore and I can't fine the corning pink stuff. Anybody know where to get this. Also can't find the roundy, large radius body moulding from my '88 Itasca. Know of any good salvage yards? I'm in norcal but would pay postage to find this stuff. Was told that winnebago had a salvage yard list for finding old parts but could not find anything on their web site. Any ideas. Trying to re-build my storm damaged unit. Thanks. gj
-
To answer the last two replies...Most adhesives require aluminum to be etched and prepped chemically whereas the stuff I found does not. Guess I would rather pay the extra $$ than put in the man-hours as I need to glue insulation board to the aluminum too.
I am going to laminate the aluminum to the new floor then attach it to the newly constructed metal frame with screws and probably some liquid nails for good measure as I don't plan on doing this again.
-
Thanks for the replies. Sitting in the Rv contemplating things I realized that the large "picture" window over the dining area slides both ways and it has never leaked. Hmmm... Maybe directional windows are only indigenous to ones that are shaped to fit body contours and such. Will keep researching. Thanks again. gj
-
Need to get new (used) windows for my rv. Left and right side. Current ones have fixed glass in front on both sides, sliding windows in back. Ones I am looking at don't specify right or left and was told there is "no such thing". Won't they leak if the sliding side is in front as the water would seep through the gasked between the two windos at highway speeds? Can' turn them upside down due to the weep holes. Any thoughts?
-
It is for the outside, (underside) aluminum skin. I found a 3m product in the meantime "contact adhesive #10" which is designed for aluminum without having to etch and prep the metal. Hard to get retail though and comes from the factory minimum of 4 gallons at a time. Thanks. gj
-
Need to replace the floor in the cab-over section of my rig. It was smashed by an Oak tree this winter and I will do a resto article on it later. Currently need advise on some kind of adhesive for applying the bottom side sheet aluminum to the cab-over flooring. Any ideas? Thanks as always. gj
-
You referring to the 3.4 V6? The bigger more powerful engine that actually gets better gas mileage? That began production in 1995 I believe AFTER Toyotota motorhome production had ceased (at least I don't know of any post 94 motorhomes?). There is a toyota super forum dedicated to the swap of the older 3.0 to these. Many have done this rather than replace their 3Z when its day was up. (reference link to this site I believe in the pinned engine swap thread)
Thanks for the info. So why do all the 3.0 sixes seem to be dogs?
May as well "put a HEMI in it!" gj
-
Ouch! Go for it. Start with looking for windows. Do you think you can salvage the sheetmetal siding. Is if you can, just bend that metal roof framing back, install a couple new studs to support metal framing. Save old wooden window frames and make new frames.Repanel the interior crushed section, install new/used windows and you'll be one your way. Good luck Oh can you tell me about your overhead bed set-up looks like you modified it a bit. Thanks
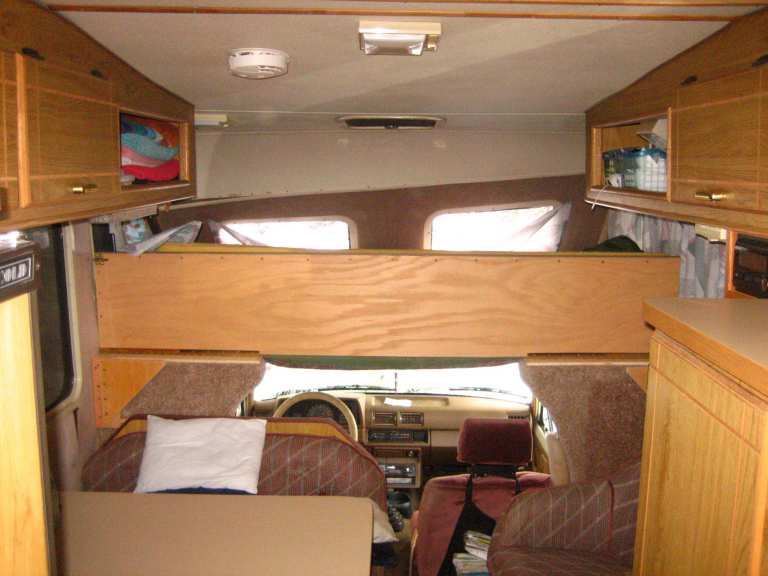
I'm probably going to eliminate the front windows and maybe the sides too for the sake of simplicity. The cab is fine. The side walls are slightly askew but not too bad. Thinking about reframing with steel studs. Will document the progress. It is insured and it was totalled and will be buying it back. (250.00$) The mod to the bed is a fold-down extension. 1/2" plywood reinforced with ripped 2x4's and piano-hinged to either side of the front walls. I added 16" to the width of the bed. Also made some swing-out brackets to support it when down. The top side has the reinforcing so I then glued in some appropriate thickness egg-crate foam. It stays in the up position with some gate type latch bolts that fit into holes drilled into the steel wall framing. Another pad covers the whole bed so you don't really notice a gap. Makes a big difference and we sleep better with the extra room. I used red oak plywood for looks. gj
-
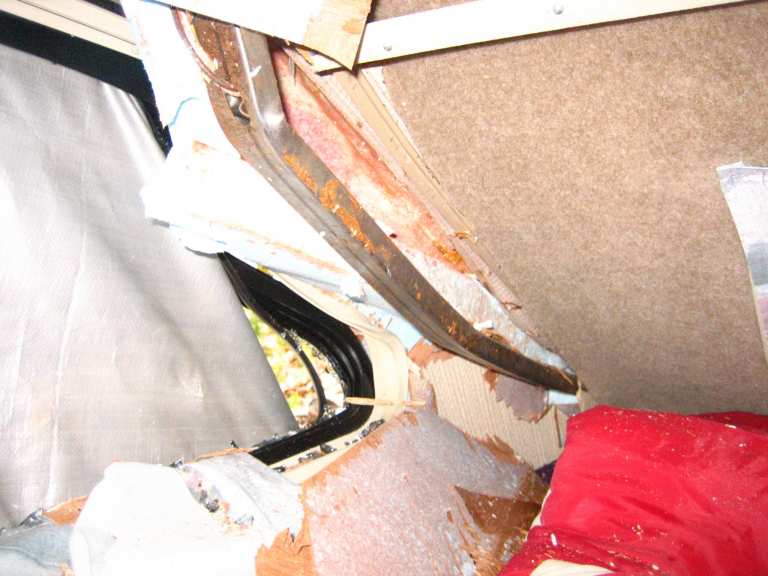
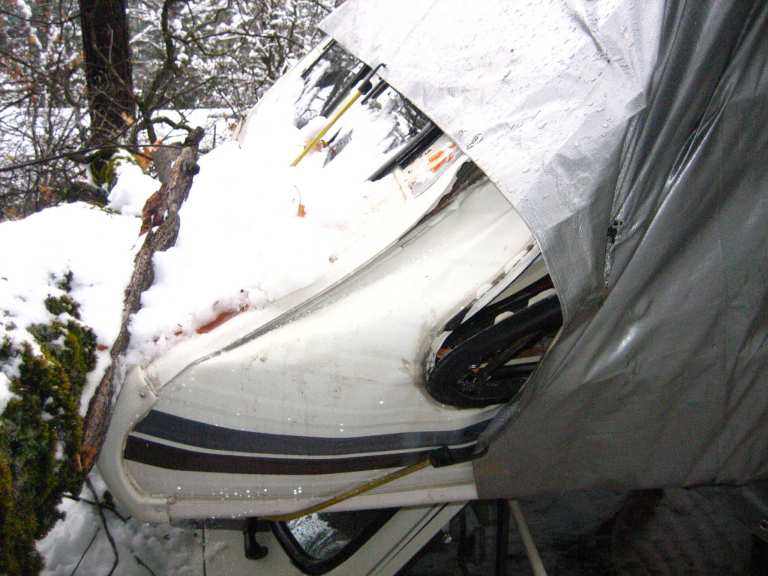
A nice heavy, early, wet, California snow (Sierra Cement) put an Oak tree down on the cab-over portion of our MH. It broke 3 of the front windows, broke the steel frame on one side, bent the whole front works out of shape and bulged the side walls just a tad. The coach to cab seal is intact and the cab was not hurt at all. I'm thinking of tearing it down from the front of the cab-over section to the back or the cab where the main coach body starts. Anybody have any pointers on conducting this intense of a rebuild? Stuff like preserving the sheet metal, where to get parts, windows, new sheet metal etc. What steps to take first. And how to redesign the whole thing. If I do this I'm not expecting a purse from a sows ear but any advise will be helpful. I,ve added a few photos so you get the idea. Thanks again. gj
-
Comparing 4 cylinders to the V-6, the older 6 bangers always seem like dogs. What year did Toyota introduce the new V-6 design? How can you tell at a glance? Did any motorhomes get these? Did any come with manual transmissions? Thanks. gj
-
Thanks for all the input. I'll sit and digest this for a little while. Getting ready for a TG holiday trip to Bodega Bay in CA. Getting things up to snuff but still dealing with a leaking window up front. Regards...
Just some follow up here...
When I originaly installed the inverter, it was recomended that I also install a circuit breaker in-line. I put in a 30 amp one. When I was installing the battery last time, I knocked it hard and broke it. I decided to by-pass it and give it a whirl. Lo and behold, I can brew a full pot of coffee while the inverter doesn't even get warm. The fan cycles on and off once or twice but that's it. The contacts must not be able to transfer the power efficiently enough. I got me a cuppa-mud making machine now! Here's to warmer weather and hot coffee.
-
I have a 1988 Itasca with a 6 gal hot h2o tank. It had the hot water "out" line at the top. I understand the need for winterizing and have read the talk of a bypass but not sure what fittings to use to install. My guess is a shutoff to the intake of the tank, preceeded by a tee which would feed to the the output of the tank but then I,m not sure how to plumb the output line so it doesn't feed into the tank from the top and when using the hot water heater, how to prevent back flow to the pump??? What d' ya say?
-
Just came back from another trip and now have another problem. (What else is new?)
My water system seems to be working fine, however the pump won't shut off when the system builds up pressure. It will slow down but not shut down. Have a new battery so there is plenty of pump RPM. There doesn't seem to be any leaks in the system. And It seemed to work OK last time around. There is residual pressure in the lines after the pump is shut off (manually) but I don't know how much pressure is supposed to be in the lines. Is there a check valve that could be leaking somewhere back through the pump or does the pump have something internal in it to prevent backflow? Is this a common problem? Sorry I don't have the pump info at the moment. If it is needed for an intelligent answer I'll put it in next time. Thanks again. gj -
Thanks for reply. I checked with Winnebago all they told me was they used four different ones. Great I have found three but not four. They also said I'd have to remove it to tell which one. No Winn dealers anywhere close but do have several RV dealers. With all the rain we have been getting here I rather have one on hand for quick change out than have it open for even a day. I'll try Winn about the manual. It appears this Itasca has several booklets on individual items but not on the whole coach.
Learn something new everyday. I thought they just had one design. There should be a serial # molded into the underside of the vent lid. Good luck & stay dry.


Oak tree VS Toyota
in General Discussion
Posted
I'm running late right now but in a nutshell, I have Triple A and they DID reinsure us. I believe the title says Salvage but will double check and get back to you.