1990sunrader
-
Posts
6 -
Joined
-
Last visited
About 1990sunrader

1990sunrader's Achievements
")
Newbie (1/14)
-
Storage Compartment Doors Repair or Replace
1990sunrader replied to 1990sunrader's topic in General Discussion
Oldgriz - great suggestions. Replacing the entire door or just the insides are my preference. I can't tell if I can get the old stuff out. If I can then I can use the inside panel to replace the old faded outside panel. I will probably use PVC board to replace the particle board inside the guts of the doors to avoid wood altogether. If I can't disassemble the doors, then I will take the cut out approach and use my multitool to make clean cuts from the back side. Any advice on how to make the oblong (flat on two sides) holes for the locks? ...it looks like a flattened circle... -
The locks on my storage compartment doors either spin or are loose. The particle board material inside the doors has eroded over time and no longer hold the locks in place. Any tips for how to repair this issue or where to find replacement doors? Thanks!
-
Locking gasket for Sunrader wrap around windows
1990sunrader replied to TheGrayOutdoors's topic in General Discussion
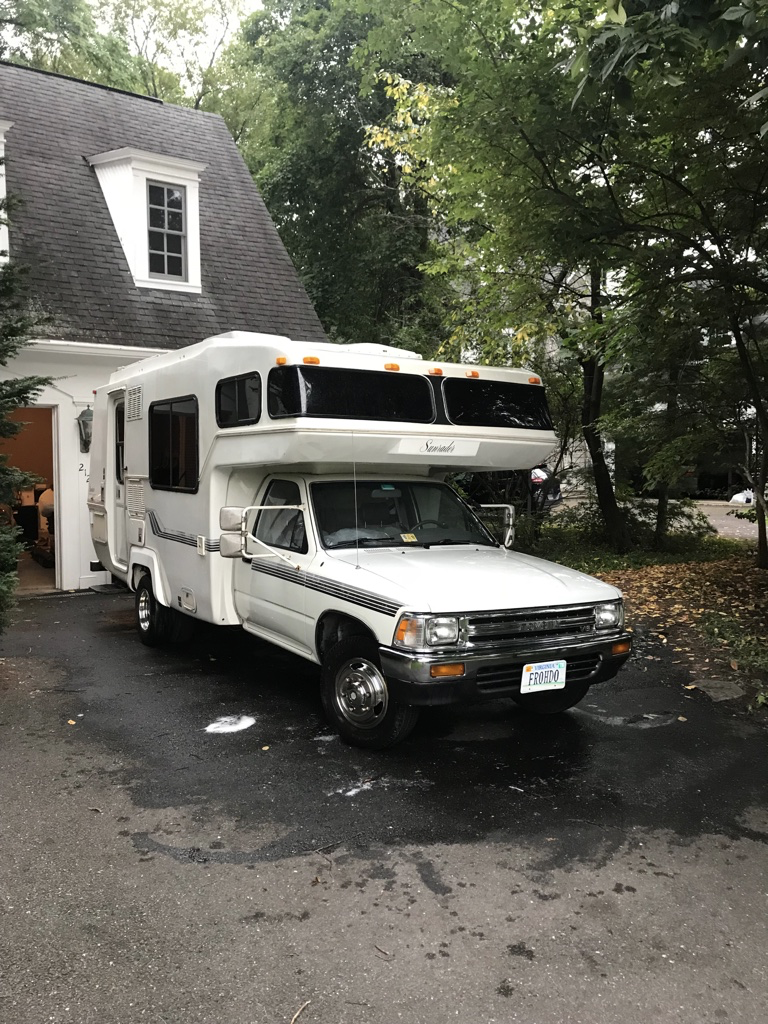
Job completed and the gaskets worked! No more leaks!!! Thanks to all who shared their knowledge above. I could not have done it otherwise. I found these videos very useful. The SunRader video needs to be watched over and over because of the fast-mo. I know why they did it - the job takes FOREVER. https://www.youtube.com/watch?v=3QGtJkAFPl8 https://www.youtube.com/watch?v=2NFd6A9lWvI https://www.youtube.com/watch?v=yVUL7Y-FBos https://www.youtube.com/watch?v=fbqarorplYE Here are my lessons learned... Wear gloves. The edges of the plexiglass are sharp. The plexi looks warped when installed but flat when removed. This is normal. The tension fit with the gaskets causes the bowing. When installing the gasket on the fiberglass shell, do not use soapy water because you want the rubber to really grab onto the camper shell. When installing the windows, use tons of soapy solution. I mixed 1 tbs of dish liquid with warm water in a quart size sprayer. It was enough to lubricate but not so much that it did not evaporate after installation. I found these tools invaluable and they save me a ton of time: Locking strip insertion tool Windshield Rubber Installation Tool Be patient and careful not to tear or puncture the rubber gasket. The installation tool is for pushing not pulling. Use it to nudge things into place or carefully move edges of the gasket. Expect to have to reinstall the gasket on the camper shell because it comes off easily. Same for getting the windows inserted. When removing the windows, I started on the sides and worked to the middle. I installed in the reverse order because I needed the added hold of the longer gasket while working on the corners. The corners are the hardest. Do your best to get the windows pushed fully into the center (long side) before starting on the corners. My windows did not look fully inserted evenly once I was done. Particularly on the sides. I was fed up and took a break. When I came back to the job the next morning, things had adjusted and were workable without removing the windows again. This is a WARM weather job. You need the gaskets to be as flexible as possible. Don't even try in cooler weather. Clean all surfaces very thoroughly. The seal needs smooth and clean contact on all surfaces to work. I used Goof Off (or Goo Gone) plus a new razor to remove every trace of residue from the fiberglass and plexi. My plexi is original and has some micro cracks that are visible when direct light hits them in certain spots. I was afraid that they would be brittle and break from the abuse but they were fine and I was very careful to not over flex them. The plexi was kind off dull traditional washing of the RV did not change the look. However, I noticed that the plexi was very nice looking where I was using the Goo Gone so I used liberal amounts on the entire exterior of the plexi followed by window cleaner. Now they look like new. I think that grime and grit settles into the small abrasions on the surface over time (28 years!) but my cleaning made them look like new. Here is the finished product (1990 V6 purchased from original owner in Kalamazoo with 32K miles - now 48K miles)...
-
Locking gasket for Sunrader wrap around windows
1990sunrader replied to TheGrayOutdoors's topic in General Discussion
Linda - Got it. Thanks! -
Locking gasket for Sunrader wrap around windows
1990sunrader replied to TheGrayOutdoors's topic in General Discussion
Hi Linda - I noticed that the description says "Fits 1/4” Glass and 1/8” Panel Edge" ...is this OK for the 1/8 plexiglass? ...want to double check before I take everything apart. Thanks! -
Locking gasket for Sunrader wrap around windows
1990sunrader replied to TheGrayOutdoors's topic in General Discussion
Hi Len - would you mind sharing details for where you found replacement plexiglass? ...thanks!