cdt5058
-
Posts
58 -
Joined
-
Last visited
Content Type
Events
Profiles
Forums
Gallery
Everything posted by cdt5058
-
 Apologies for bumping up an old thread. @linda s - been awhile since we last chatted and you gave me tons of advice. Do you know if these CT20 Turbo Kits are compatible with my 1981 Diesel? I'm finding conflicting information online that the CT20 kits are only good for 1984 Sunraders... Thoughts?
 -
Definitely keep us posted on this! My 1981 Sunrader fuel sender decided to go faulty on the last long drive I took it on. I'm about to embark on a cross-country trip in the next 3 weeks and would love to fix this issue prior to departing.
-
Luckily the lock seemed to fix itself. I left it at the shop to get a few minor adjustments under the hood - new water pump, timing belt, alternator belt adjustment, & new coolant. On Labor Day weekend, I spent the majority of my time focusing on cutting a hole in the rear fiberglass for a water heater vent. This proved to be wayyyyyy more difficult than I ever expected. As previously stated, my windows are all Lexan/plastic in the rear - when I purchased it, there was no water heater, fresh water tank, or water pump. On top of that, there appeared to be newer fiberglass mat in the passenger-side rear. Some other smaller improvements from that weekend included cutting some quarter round for the flooring, mapped out existing plumbing (and broken/repaired pipes), and connect sink with a downpipe. This past weekend, I went back to work on the camper all weekend once more. This time it felt like I can finally see the light at the end of the tunnel. I was finally able to finish the electrical control panel install by adding the solar controller, shut off switch, and solar power meter. (I peaked around 8 amps in Ohio!) After finalizing the control panel, I installed two 100W Renogy Solar Panels on the overcab roof to power the house. As well as hooked up the water pump and water heater to switches. Everything else was properly fused and the wiring was cleaned up with Zip Ties and wire clips. I also cleaned, polished, and waxed the camper with a Meguiars kit and my newly acquired buffer. This also allowed me to fix some gel coat spiderwebbing. The propane system was also finalized by connecting the water heater, stove top, heater, and adding an On/Off valve to where the fridge connection was. My thought was that this On/Off would allow us to connect a standalone grill outside the camper to cook on. Luckily, my mom has been willing to help out when she can - so, she helped finish the quarter round for the flooring and sew the rear curtains. Upon getting all the electrical sorted, I tried to follow this post about adding a separate inverter/mini-freezer, but I wound up overloading the 12V Stabilizer and need to figure out what to do from here... Once those items were completed, I needed to reinstall the passenger seat since I was driving my sibling back to Pittsburgh in the camper. If you all are interested in seeing my backlog of work and whats up next, you can follow along with my progress here. With the only major project being the plumbing, a possible shakedown trip to Allegheny National Forest is in store in the forthcoming month. I'd be happy to answer any questions you all have. -Cory

-
I need a little bit of help from the community here. I'm looking at replacing a few components under the hood with my local mechanic back home. Does anyone know anything about the gas gauge? Mine for some reason is stuck on Empty - even after a full tank fill up. What about the door locking mechanisms? The driver side door get 'stuck' and cannot unlock/lock - which jams the door shut. Anyone know where I can find the Factory Service Manual or wiring diagram for this truck/engine? We're looking at replacing the water pump. Thanks! -Cory
-
Looking forward to seeing these photos. You two should pop out to Bainbridge once I'm back in town and help me Zep my rig.
-
Sunrader Rescue (From the clutches of nature and neglect)
cdt5058 replied to Sigmaz's topic in General Discussion
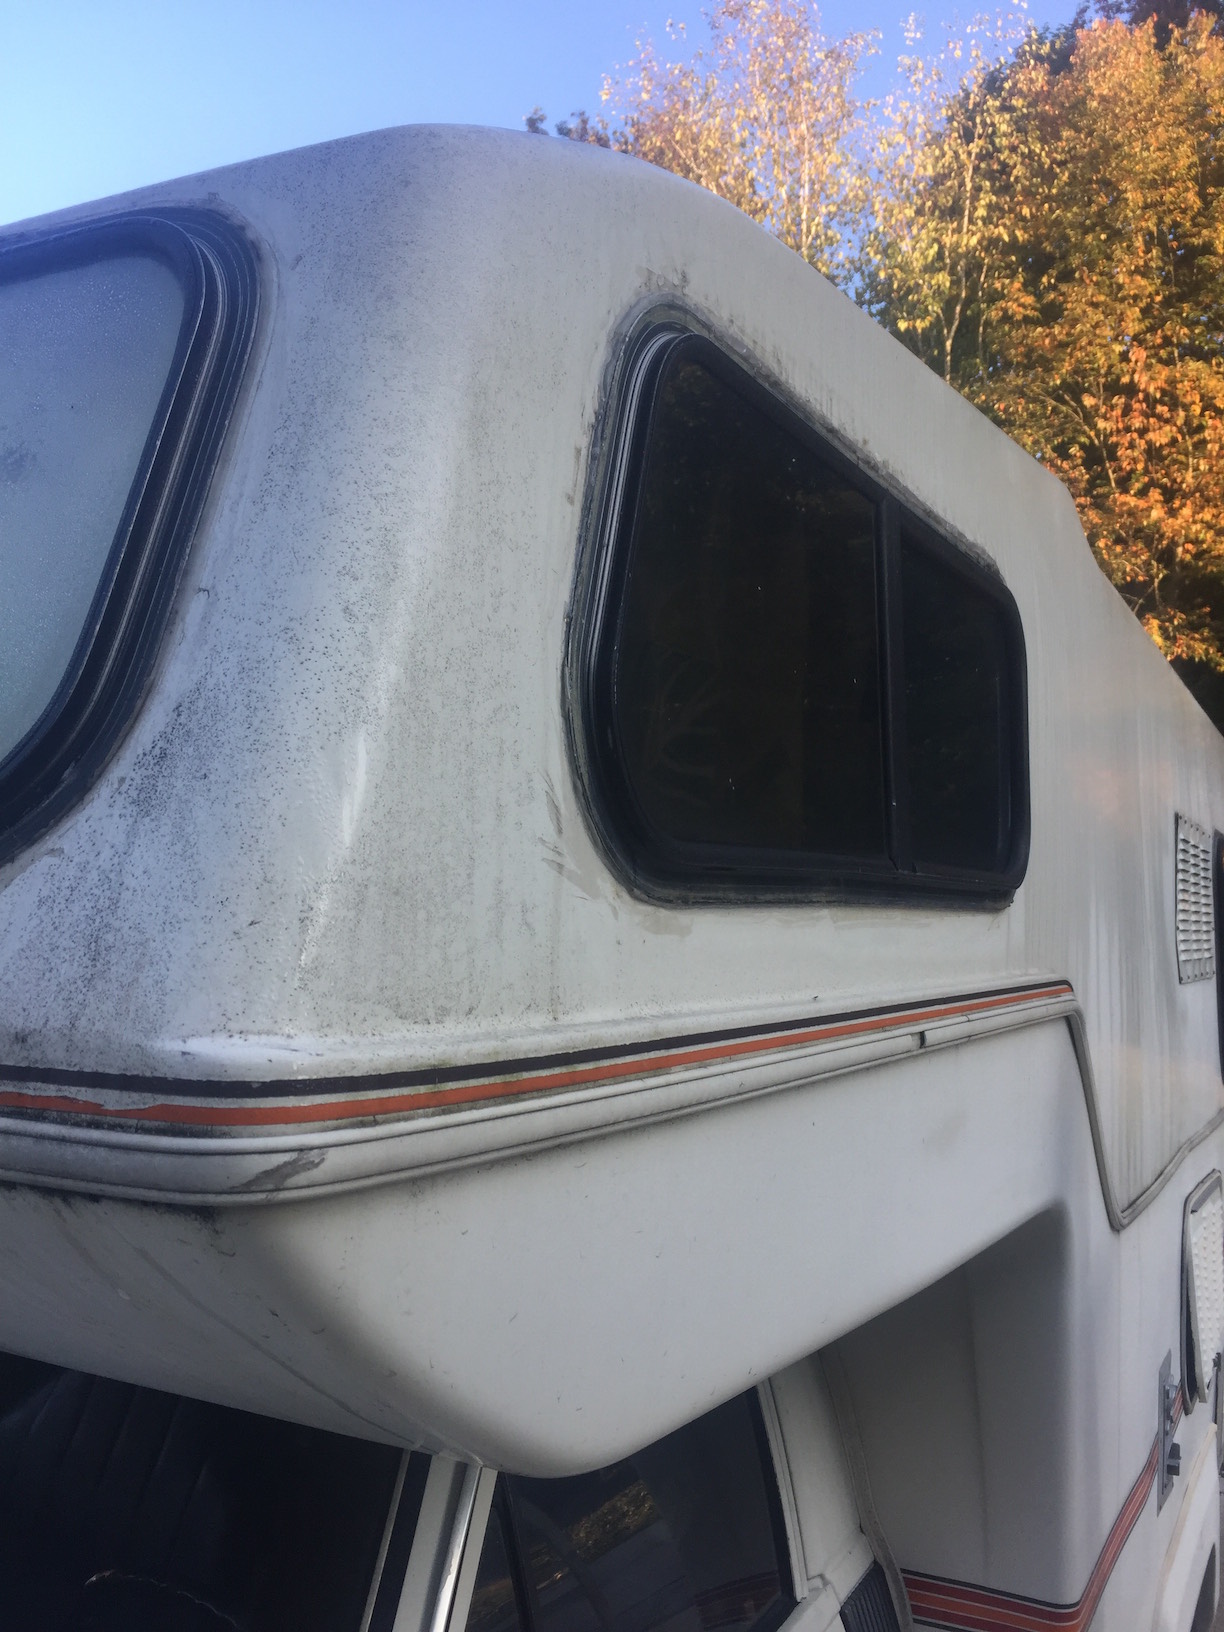
Dang! That ToyMo looks great after a pressure wash! I'm also happy to welcome another Pennsylvania Shorty Owner to the forums. 1. I'm not sure where to source the axle - fortunately, my '81 shorty came with this already. I had to buy a new set of tires due to dry rot on the old ones - between that and two new batteries under the hood. As far as tires went, I ordered from tires-easy.com and went with the Thunderer Ranger R101 185R14C D/8PR BSW. 2. Sourcing the large window may be tougher than you anticipate. I would check out or call a few places nearby to see if they have any large format windows. 3. Luckily for you, there are a ton of examples of people correcting this on here. You should also check out the floor to see if there is any dry rot or wet rot. It looked like your over cab had a bit of moisture up there. Perhaps check the window seals - resealing over cab windows are a requirement of owning a Sunrader. I slapped a coat of Killz All in the overcab and other places throughout the vehicle. Hopefully, you still have the fresh water, grey, & black water tanks. I'm currently searching for a fresh water tank for my Sunrader - I believe that they were custom molded for our motorhomes. If you have any questions, don't hesitate to message me or post on this thread. I'm looking forward to seeing your interior rebuild. -
Also, for my fridge, I'm going with a dorm mini-fridge that cost me $79 at Walmart + a handful of electrical components from Amazon that cost $80 + $10 in insulation. I'm following instructions per this thread - I'd much rather spend $400+ less on a fridge/freezer that just runs off an inverter than a propane/12V/120V combo model.
-
I used a cheap-o drill from Harbor Freight to drill my corners out then a Harbor Freight jigsaw to make the actual cuts. Pretty simple. I purchased this same model from eBay last summer from this seller and am looking to install it in the coming month or so. Since her items are Best Offer, I offered $127.30 + ~$13 shipping (so $150 shipped to my door). I've also purchased a water filter, heater access door, and a CO/Propane alarm from her. For what it's worth, the propane alarm cost me $30 and turned on when connected to my 12V system.
-
That makes a lot of sense - the fresh water tank, water heater, pump, etc on the passenger side was all MIA when I purchased the rig. I've got to map out all the plumbing & read the forums in the next couple of weeks before I install the fresh water tank, heater, pump, & outdoor shower in the next few months. Although, I need to be wary of the forums because I see everyone else's modifications & renovations and get more project ideas...
-
All of my Sunrader's windows are plexiglass, for what it's worth. @256bit - That reminds me - I need to remove the paint & other crap off of my windows in the rear.
-
So, the table that I used wasn't all comprised of particle board. It had about 1.5" of really tough particle board around the perimeter and then a honeycomb pattern in the interior space - similar to some Sunrader roof construction. The most comparable item on their website is probably this. I was able to reutilize the edging/trim from the portion that I cut off on the exposed side + a bit of caulking/sealant. I think that the PO of my rig actually reinforced the kitchen countertop - I found it to be pretty sturdy after I re-squared it with a few screws.
-
@neubie I believe that bar along the width of your Toy is indeed a TV Antenna. I've seen it mentioned in another thread on here. For your OEM Isolator - I would just test it with a multimeter and make sure it's pumping some voltage back to your leisure battery. A Youtube search should show you how to properly test the Isolator posts. For your countertop, consider using a lightweight IKEA counter - that's what I just installed into my Sunrader and it was a breeze to install the sink & stovetop. Unfortunately, I can't help you much more with the mystery roof vent and other questions you had.
-
@linda s I haven't touched them since I purchased the rig. They might be aluminium rings.
-
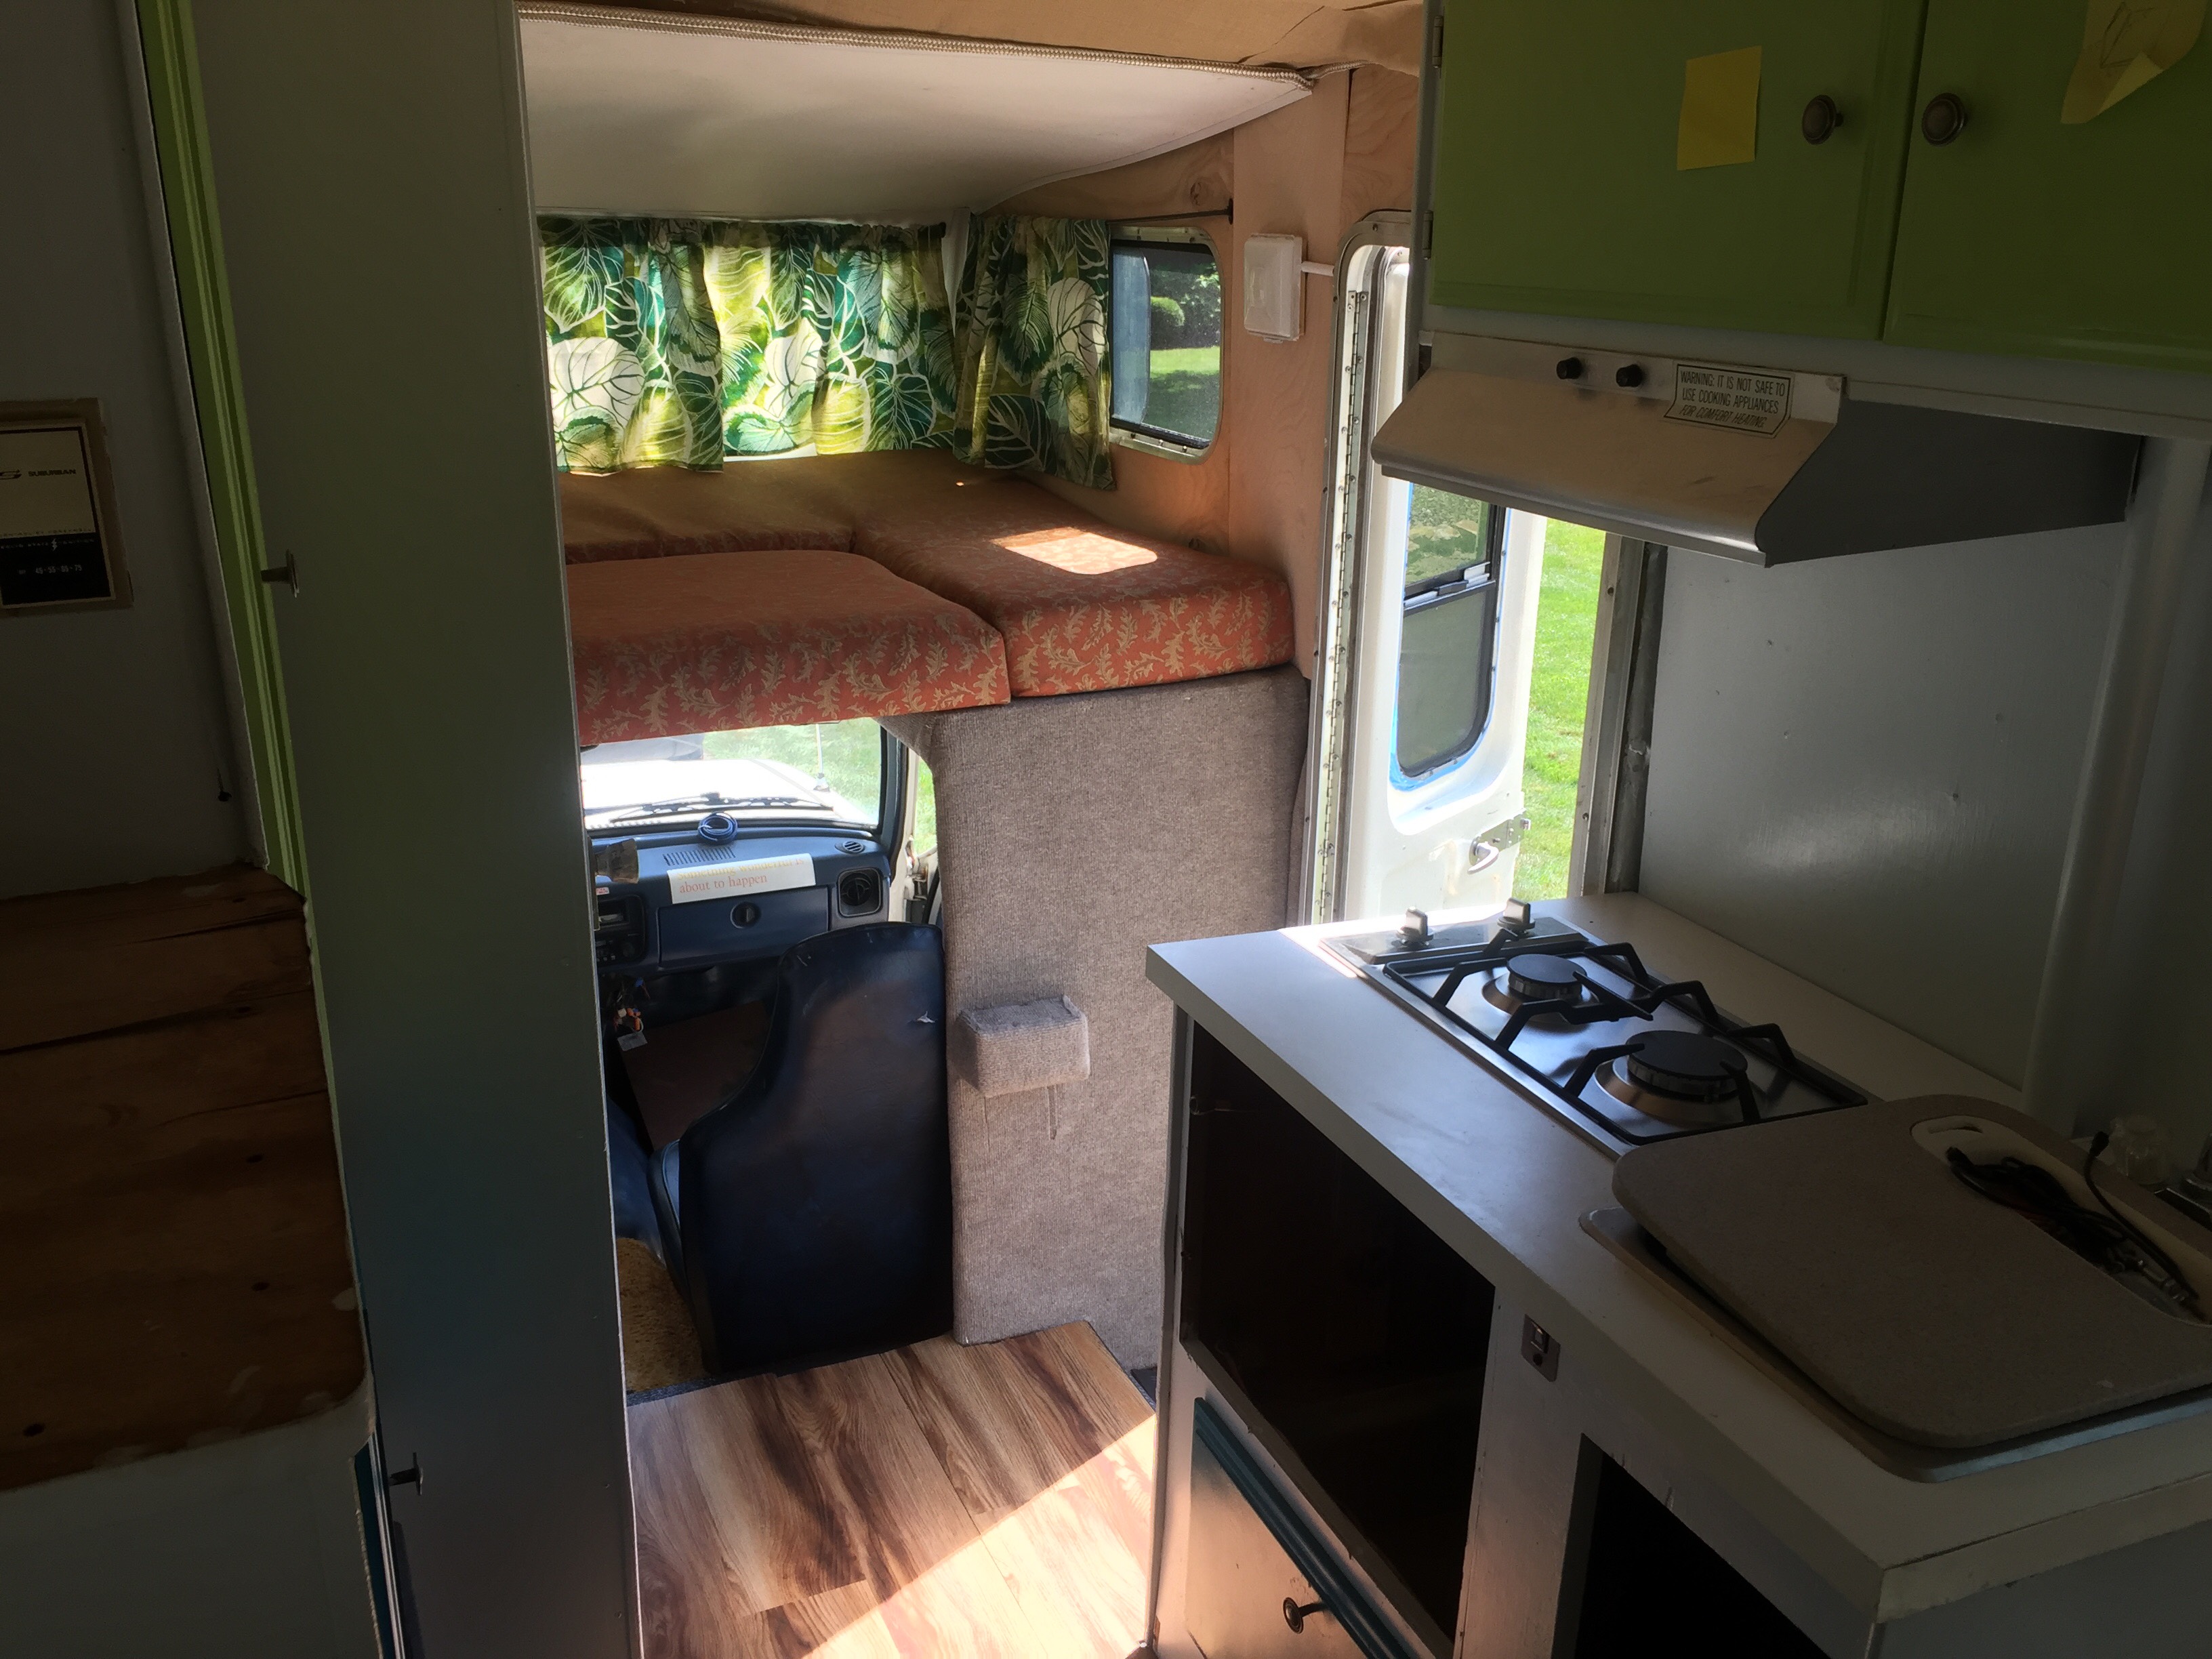
Wow. I cannot believe that I spent nearly 4 whole days working on the camper. I can't wait to help out other members with what I've learned. Feel free to ask me any questions. Here are some bulleted updates - Ceiling installed - burlap brown looking material (not actual burlap) held up with contractor adhesive. Trim is boating rope. Overcab completed - shelf created with USB Outlet + 12V battery display, cedar walls finished, old carpeting covered/replaced, FRP panelling completed, curtains hung up Kitchen sink & stove top installed and reframed - Ripped out the dry rotted MDF counter & replaced it with a desk from Ikea with the original sink + Ramblewood Cooktop (Model Number - GC2-43P) Electrical conduit plastic covers added to exposed wires in over cab area (you can see this leading to the shelf) Flooring added - Will be completed with quarter round as the baseboard in a couple weeks Fridge picked out & electrical components selected to make it be extremely efficient Tacked up custom made light covers with Glue Dots - A handful of months ago, I took a Dremel to some replacement light covers and they wouldn't stay up in the housing - this was my best solution. Tested shore power electrical via my 2,000 Watt Inverter (draws about 7-10 Amps when the breaker switch is on) Installed a CO and Propane monitor Laid underlayment and Click-Lock flooring Created an electrical control panel above the fridge area - includes 12V Bayite battery monitor, on/off for inverter, original 120V outlet, soon to had a 3 toggle switch & solar panel charger Bottle opener added to outside of the camper What remains - Install fridge insulation & electrical components Hook up propane to gas stove & water heater Secure kitchen countertop Add piano hinges to bench seats Clean the camper shell with MacGuires + Zep Polish Install 200W of solar panels Add fresh water container, pump, & water heater Hang the rest of the curtains & reseal the dining room table Maybe purchase new seats (thanks a lot for planting that idea in my head @Derek up North) Miscellaneous other items Compared to where the Sunrader was a week ago, I'm extremely happy with the progress. I think I can see the end of the renovations...
-
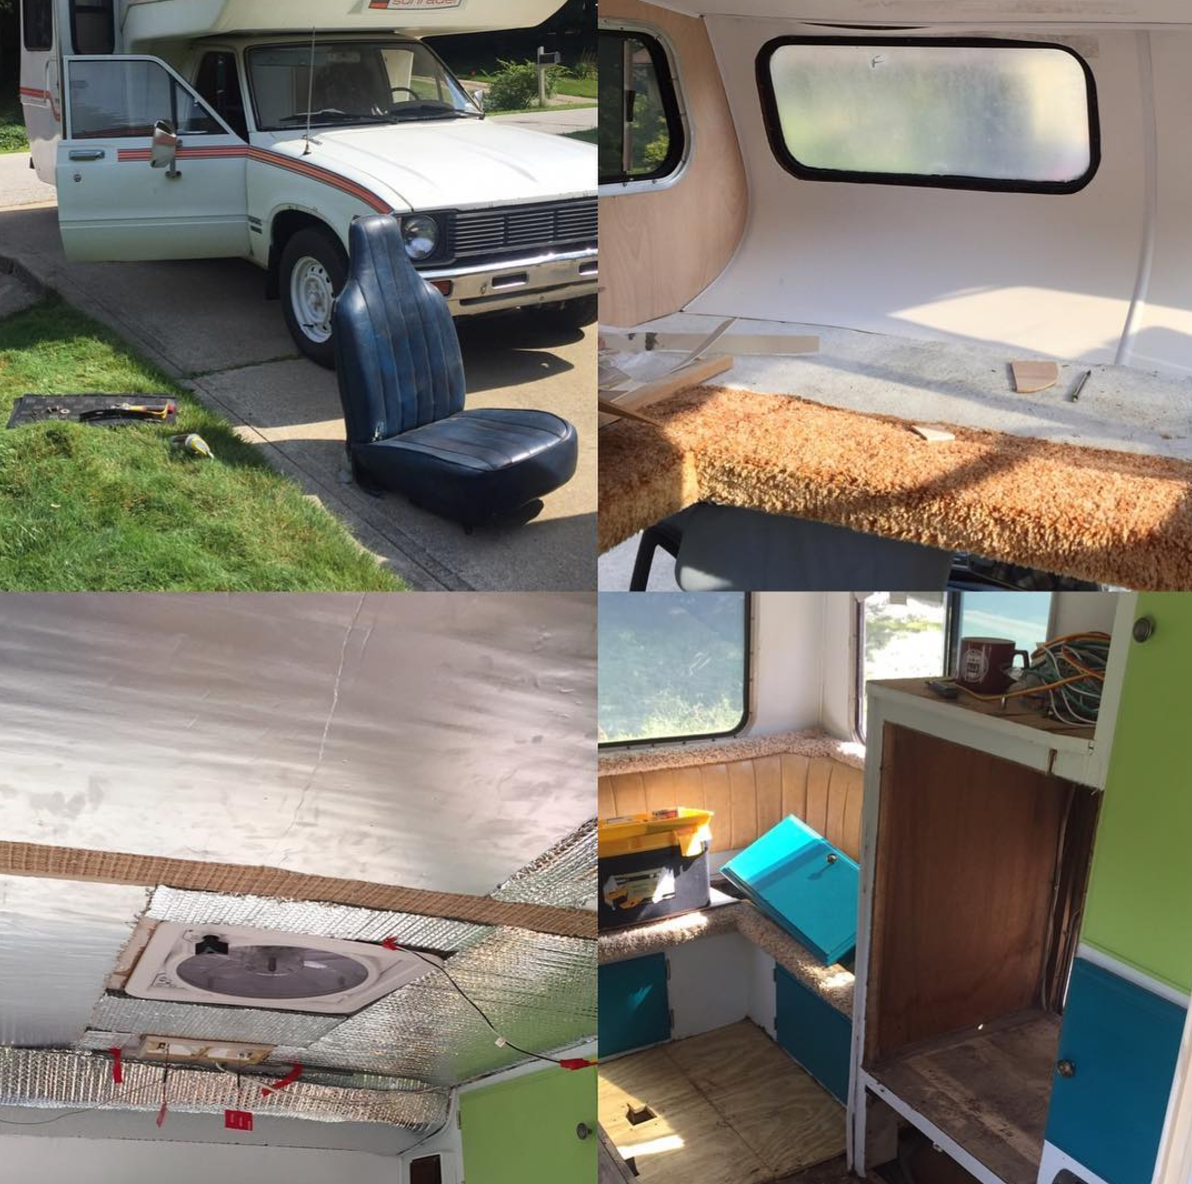
Hilarious @Derek up North... That must be one of those "Let me fix this one item - oh look! Another three things I can work on" projects... Today turned into a demolition/prep sort of day. Completed the following - Removed passenger seat Removed fridge, stove, & kitchen counter top Interior floor carpet removed (I need to talk to whomever from Gardner Pacific for their liberal use of staples) Insulated the back area of the camper Cut FRP panels for overcab window area - will glue up tomorrow Once the FRP panels are up, the overcab will be just about complete - I just need to slap on a coat of paint, add curtains, and then add another USB/Light outlet. Ideally, tomorrow, I can get started on the flooring and figuring out that beast since I had to add a 1/2" of plywood for a 'new' subfloor in a small part of the coach. Oh yea! I should probably include a photo for you all. More to come tomorrow...
-
@Derek up North Unfortunately, I was planning on getting it out sooner, rather than later so I can finish some other high ticket items during the week. I think I spent about 2 hours last night trying to get the fridge out without removing the passenger seat... I sprayed some PB Blaster on the bolts and let it sit overnight - once my coffee is consumed, I'll be back outside to remove the passenger seat to get it out. Here's what I accomplished yesterday - Installed new MaxxFan Re-test house electrical Get everything staged for working today
-
It's been awhile since I've looked under the passenger seat @Derek up North - I have a feeling that since I was Flinstoning it earlier, they're rusted solid... This'll be a fun problem to solve since the back window doesn't need to be resealed either...
-
Holy cow! It's been awhile since I've been able to work on the Sunrader (we got a puppy back in February), but I'm back with a vengeance. I've taken off from work for the next week to work on our camper with a pretty lofty list of items to complete. Some of which include - Finishing the over cab renovations (finish polywall ceiling install, hang curtains, & install a new 12V outlet) Ceiling (install new maxxair fan, insulate ceiling, install polywall Removing and replacing the fridge (is there any way to do this without removing the passenger seat? Also may remove the heater and use that as storage) Replacing the kitchen countertop area (remove oven, replace with new countertop with new stove + sink, reframe existing kitchen cabinets) Finish subfloor install + add click-lock flooring Electrical clean up (make a control board of sorts for house electrical system) As always, I'll try to post throughout the week with updates and any questions I may have.
-
Argh. That's infuriating and one of my biggest fears living in a city - just a big, empty, white canvas for the gutter punks to paint. Glad to hear you found a close match. Edit - This weekend, we didn't do too much on our camper, just got the proper hinges and clasps so we can rehang the cabinets this week.
-
Valid thought. If only it wasn't just me working on the camper this weekend. I took Linda's advice and if it doesn't workout for some reason, that'll probably be my next move. I wound up using 3/4" plywood and Loctite 3x strength wood glue to hold the boards together as well. Hopefully, this will remedy the issue at hand. Items I completed today - Finished repairing shower floor - sanded it down Attempted to hand up the cabinets, but the hinges squeak like mad Began to investigate putting in a 12V buzzer when I leave the lights on. I've done this twice and killed the batteries both times... *facepalm* Resealed the remaining two over cab windows Today is one of those days where I feel like I've bitten off way more than I can chew. Hopefully, I can keep this momentum on the rear 1/2 going throughout the week and into next weekend.
-
Always a wealth of information, Linda. I'm headed back to the store tomorrow to get smaller screws for new cabinet latches and hinges - looks like I'll be getting a bit of marine grade plywood too. How should I go about putting the new wood into the van? Just lay it on top of the old flooring or use wood glue/great stuff/etc to have some sort of glue. Earlier tonight, I also began to cut out the old battery box shell since I'm putting in two Trojan T-605's into a custom enclosure. Hopefully I can finish that off tomorrow as well. -Cory
-
Haha. Thanks for the chuckle @sweetleon. I would add wood on the interior as Linda mentioned and then bolt it. I would think that 1" would be sufficient, but I'm no expert. Funny story about my doorstep - I was spray painting it with Plastidip and wound up finding a spare set of keys to the coach door and to start the vehicle. Keep up posted with what you decide to do. Your sprint board is awesome, I've incorporated the same thing for my remodel.
-
Apologies for being rather inactive on here. Had an extremely productive weekend last weekend. I drove the camper back to Northeast Ohio to have an Extreme Home Makeover - Camper Edition with my family back there. She purred along at 65 mph on flat highways and anywhere from 45 - 55 uphill. I think the top speed was 71 mph - downhill of course. Here's the work we accomplished - Got the exhaust replaced the day before the trip Picked out interior fabric - Think green/blue banana leaf pattern and some other fabric. This was something the lady picked out, not me Picked out interior paint - went with Moonlight Rendevous for the main color and then a blue & green for the cabinet doors Cleaned the camper shell Checked the Ceiling Fan Electrical Replaced front-facing overcab window seals Tried to test the fridge on 12V for a couple hours, but nothing felt cold/hot. Grabbed knobs from Home Depot for the cabinets since 1/2 were missing Prepped the bench seats for Piano Hinges for easy access to the water heater, battery bank, and storage Resealed the coach door & little awning with QUAD sealant Other small things that I'm forgetting. So, I've continued with that momentum into this weekend and have started the following tasks - Fiberglass patched the shower floor Applied 2nd coat of paint to the coach interior Ripped up the remainder of the old 1981 carpet underneath the bench seats in the coach Painted the wheel wells white Replaced a corroded tail light Added 1500 lumen LED lights to the reverse tail lights This leaves me with some questions for the experts now - Do the photos below look like dry rot or sagging on the floor? If so, are there any writeups with how to deal with this? For reference, this is on the passenger side, rear of the coach where the water heater, pump, and tank should all be. However, I think that the vehicle was rear-ended at one point in time and patched up with sheets of fiberglass/lexan. Does the ceiling fan run on 12V or 120V? Thanks again for all the help and inspiration you all have provided me so far. -Cory
-
@Kale - Take the one you got from Amazon to an Advanced Auto Parts. They have free starter testing.
-
That AC is tempting after working in sweltering heat last weekend... There's a person on Instagram with a Sunrader that is trying to put in a 5,100 BTU Haier Window Air Conditioner where the stove used to be. I've also been keeping track of the ongoing thread on this forum as well.