Rooster87
-
Posts
15 -
Joined
-
Last visited
Content Type
Events
Profiles
Forums
Gallery
Everything posted by Rooster87
-
Maybe I'm missing something, but I just carry a large torque wrench with an extension and socket. They need to be torqued to spec anyways correct?
-
Yea brake lines are a wise thought for sure. Front brakes are fine and parts are readily available. I have replaced the master cylinder once already due to a leaky seal. I am stopping at a few friends houses on the way and I will have a full auto shop to use when I get to my destination which is gerlach nevada, and I will be there for 2.5 months so I will have some time to work on things, however there are no auto parts stores for many miles. Having parts on hand will be my main priority at this point. Do you have part numbers for the brake lines/ the bearings? Thanks!
-
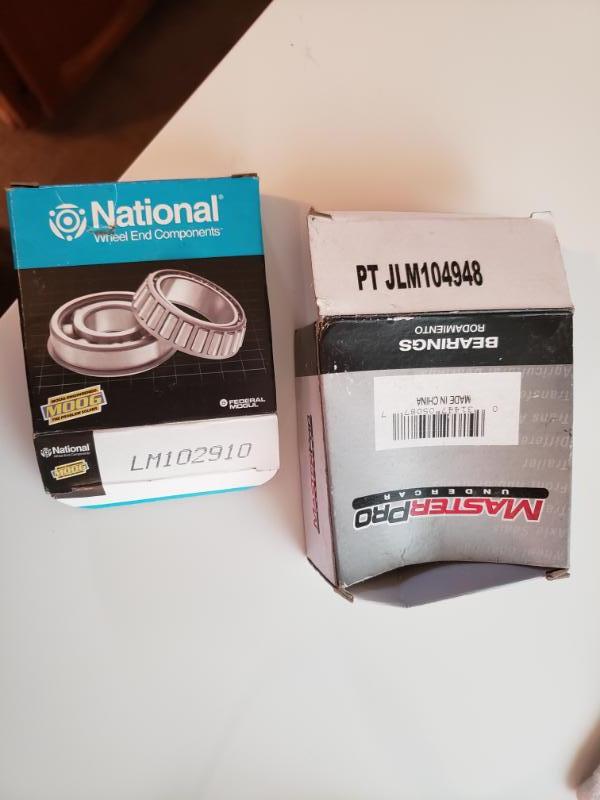
I am about to depart on a decently long trip and recently noticed that my drivers side rear hub is running a little hotter than the passenger side. I'm hoping to be able to purchase the bearings/seals and brake parts to have on hand just in case something goes wrong along the way. I will bring a laser thermometer to take semi regular readings of the hubs to make sure if anything seems to be getting worse, but I was wondering if anyone had a operating temperature range for the rear hubs? Also im looking at the rear axle parts diagram and do not see the 2 different seals that were provided in the parts list at the beginning of this thread, can someone explain where the 2 different seals go? I have done this job once before, but it was 10 years ago now and don't exactly remember. The other parts I have had a difficult time locating were the 2 bearings, does anyone have a Part number/source for those? I kept some empty boxes that i believe are the parts numbers for the bearings i need seen in the photos, can anyone confirm. Thanks!

-
Oh yea that makes a lot of sense. Thank you! Should I pre-lubricate or pack the open side of that seal with anything before trying to press it in? All of the diagrams have only shown one as far as I can tell. Is this the case? Also I found this resource that could be very helpful for someone, it appears to be a digital copy of the factory service manual https://www.yumpu.com/en/document/read/18124477/a43d-transpdf This wasn't exactly helpful to me since it describes a complete tear down. Maybe this resource is already well known but I thought I would throw it out there.
-
I think that is actually the correct part, thanks Linda S you're a savior! Hopefully someone can help with some installation tips??
-
Its an 85' but the rear end was never taken care of by the original owner, I sourced out the full floater and installed it myself.
-
Hello all I apologize in advance if for revitalizing a such an old thread. I really appreciate the breadth of knowledge on here and im hoping someone can bestow some of that knowledge my way. I am taking off on a several month trip and am trying to take care of a few laundry list items on the rig before they become bigger problems. The transmission on my 85 sunrader (75,000 miles) has a small leak on what I have learned is referred to as the manual valve lever shaft seal. I believe that this leak has been present for a while, and although there has been a presence of fluid, I keep a close eye on the level and rarely if ever have to add any. I ordered a seal from the toyota dealership and hope it was the correct one because the guy at the counter was of very little help. My questions are A. Does anyone know the correct part number(?) so if I did get it incorrect I can quickly re-order the correct part. B. Has anyone had luck removing this seal without removing and or disassbling the transmission? And if so do you know what specialty tool(s) i will need to tackle the job? C. Any other tips and or things I should be aware of before diving in? D. Am I being overly cautious in thinking this is something that needs to happen now?
-
I've had my 21' 1986 sunrader for about 10 years now, I purchased it with the "bad rear end" and tirelessly hunted down a proper full floater and did the swap myself. I am not a mechanic, but I have done a good deal of work on my own vehicles and am generally pretty thorough when it comes to taking on projects. With around 25,xxx miles on the floating hub rearend since the swap (no idea how many miles were on it before) everything has for the most part operated pretty flawlessly (knock on wood). I keep a laser temperature gun on hand and take temperature readings of different components somewhat regularly, but really I have only been looking for drastic changes from either side to side or from a previous reading. What I'm wondering is if anyone has put together a chart of critical components to check, and their proper operating temp ranges? This could be for other components other than the rearend as well. Thanks!
-
One of the things I have done to keep the window centered in the hole vertically is when you have the window out you can screw in 2 small screws into the ~5/8 plywood that is sandwiched in between the fiberglass and the interior paneling. Screw them on the outside edges lengthwise on the window cutout just inside of the rounded corners. Screw them in with their heads sticking straight up, and sticking up a little bit 1/8-1/4". Now you can dry fit the window frame into the hole. Stand back and look to see if it looks even on the vehicle and not catywhompis, if so then outline the flange with a light pencil mark. Take the window back out and see if the pencil mark's from your flange look like they are making good evenly distributed contact around the cutout, if not you can either tighten or loosen those screws that you put into the plywood until you achieve you're desired alignment. This will also help the windows from settling over time from gravity and the bouncing from your rig. If you are experiencing not enough contact with the butyl tape and there is a gap in between the flange and the fiberglass, the most likely culprit is that your bezel on the inside of the coach has been bent from the previous times it's been installed. You can tell if this is the case by laying the bezel on a flat surface and looking to see if the inner part of the bezel where the screws go look like they are curled inwards. If it does then you need to try to bend it back in the opposite direction by twisting the edges. This can be done by hand for the most part but the corners can be a little stiffer and you may need to use some type of pliers and a rag to protect the bezel from scratches caused by the pliers. This is the best way to achieve an even seal, if you double up butyl tape in some places and not others it can cause uneven pressure around flange and you can end up causing other issues. Likewise I would not advise to doubling up butyl tape all around as having too thick of a butyl tape seam will most likely be prone to leaking quicker.
-
Hydro Flame Furnace Direct Spark Ignition
Rooster87 replied to Ctgriffi's topic in Coach ApplianceTech Issues
I am doing a little bit of a hydro flame project myself, I discovered some water inside the coach around the furnace housing, at first glance the exterior vent seal looks to be in good shape, but on the underside it looks like there are some intentional weep holes for any water that blows inside of the vent. It looks like there is some RTV silicone obstructing these holes from performing what I am assuming is their intended function. My question is, has anyone else experienced this issue, and does anyone know that these are in fact weep holes?
-
Locking gasket for Sunrader wrap around windows
Rooster87 replied to TheGrayOutdoors's topic in General Discussion
It looks like you have just the standard flange and bezel type windows in the cab over bunk and you would reseal that with butyl tape and a sealant of your choosing, one that bonds to both fiberglass and metal (aluminum)safely and is also UV resistant. Heres another tip that I'm sure some will disagree with, but in my experience the bezel on these have usually been bent in the direction in which they are tightened, so on both boats and RVs when you go to reseal them you get to the part where you should be seeing a little bit of the butyl tape squeezing out, and there is nothing. I have had good luck with taking some sheet metal seamers and effectively bending the bezel back towards its original form, and maybe even past that a little bit. This will help by giving you a little more squeeze potential when you go to tighten things up again. -
Locking gasket for Sunrader wrap around windows
Rooster87 replied to TheGrayOutdoors's topic in General Discussion
I thought about that before I did it, and purchased 2 of these to deflect any blowing rain, but I've driven it many miles in the rain and never had any more water then what was coming out of the faulty seals themselves, or if there was it drained immediately...
-
Locking gasket for Sunrader wrap around windows
Rooster87 replied to TheGrayOutdoors's topic in General Discussion
I disagree, as a professional boat builder for 10+ years we often rely on redundancy, and as window gaskets are bound to fail at some point having a secondary "exit strategy " is cheap insurance. I have had these 3/16" weep holes for a few years now and have had no problems with them, as such I'm a firm believer in having them as a backup new seals or not. And as far as ladders go I'm sure 1 of the 15 that I already own should probably do fit the bill!! Time is what I'm short on, do they sell that on ebay? -
Locking gasket for Sunrader wrap around windows
Rooster87 replied to TheGrayOutdoors's topic in General Discussion
I know that this is an overworked topic, but I have a small tip to add. I have been meaning to replace the gaskets on my front windows for a little while now, and because of life I unfortunately haven't gotten around to it. But I do have a small tip that has saved my upper bunk plywood base from getting totally destroyed. In the very front below the wrap around windows there is a section at the very bottom that is all fiberglass and is lower then the area where the plywood is, sometimes its covered in foam and vinyl. That was the spot where small amounts of water would collect in my rig, and if it went unattended for too long it would fill up and start to get under the mattress and on the plywood. My simple/temporary fix was to drill small weep holes in the lowest parts of that all fiberglass section. Any water that gets into that area now has an exit point before it has the potential of contacting any moisture sensitive materials. I also mixed up a little bit of epoxy and sealed the inside of those holes and that general area, because exposed fibers can wick moisture and cause other problems. Like I said, this is not a permanent solution, but it has kept a small problem from becoming a big problem, and I hope this solution can help somone else . -
So the title more or less says it all. I had a bad starter that would not crank so I replaced it and it worked fine for a while until one day it started to not crank or click at all and then intermittently continue cranking after the key was disengaged. so I replaced the starter switch in the column which resolved the non cranking issue but now every time I try to start from cold the starter runs for several seconds after turning the key. I can sometimes even take the key completely out and the starter keeps going. I think there is an issue with the solenoid getting stuck in the engaged position which makes the contacts for the starter motor to remain stuck engaged therefore it continues to turn. I proposed this theory to the "professionals" at O'Reillys and they said that's impossible and it's probably a bad tumbler... any thoughts and or anybody else dealt with this issue?