Ctgriffi
-
Posts
630 -
Joined
-
Last visited
Content Type
Events
Profiles
Forums
Gallery
Everything posted by Ctgriffi
-

How to completely empty holding tanks for winter?
Ctgriffi replied to 84Dolphin's topic in General Discussion
I don't really worry about getting every drop out—just drain as much as you can, then chug a bunch of antifreeze into the john -
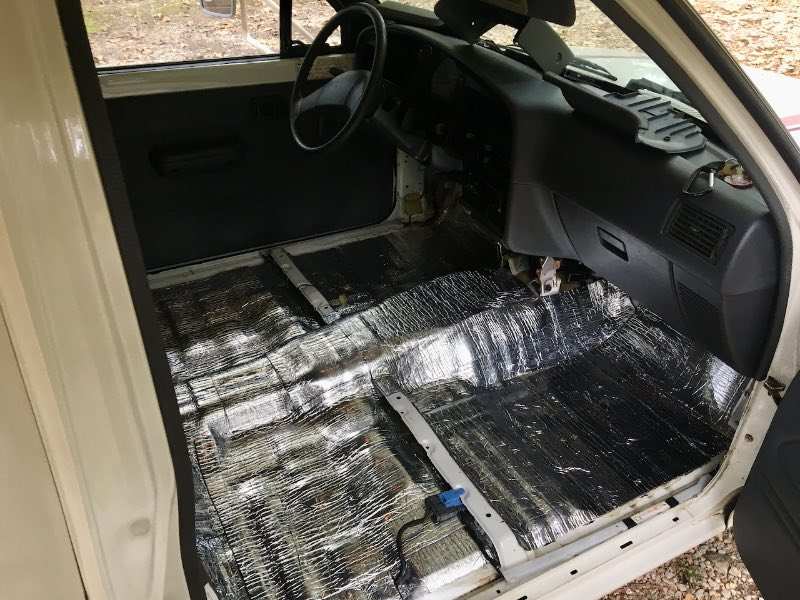
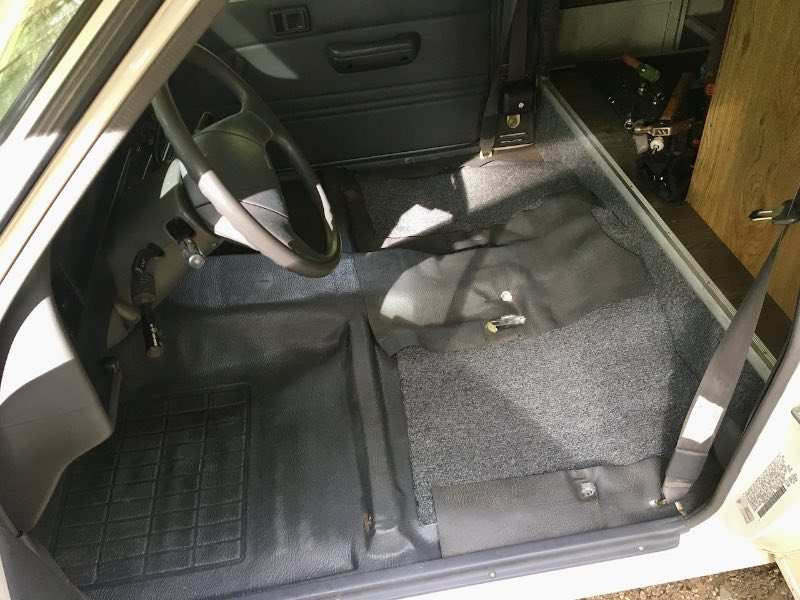
In the past, I've noticed quite a bit of heat coming off the transmission tunnel and across the whole cab floor in general. So, last month, prior to heading to the Deep South on our biggest excursion of the year, I decided to pull up the original gray vinyl stuff in the cab and add some more heat/sound insulation. (I was surprised by how little was in that area from the factory... pretty bare bones setup under there!) I went with a single roll (36 sq.ft.) of this Siless 157 mil product and a roller, plus some foil tape for the seams. The Siless stuff is like a big, rolled-up sheet of weather-stripping and not the easiest thing to work with, although it does cut nicely with scissors. It basically cannot be repositioned once it touches the surface, due to some very strong adhesive, so I found it worked best to cut roughly 12" x 12" squares and piece them closely together, rolling every inch firmly into the underlying sheet metal, and taping the seams. I splurged and did double-thicknesses all over the tunnel, too. I also ripped out the last scrap of the original, filthy "Pine Mist" carpet that lined the back of the cab and replaced with new, gray low-pile stuff. Very happy with that update. We just returned from our trip and, while the sound dampening improvement is hard to distinguish, the insulation made a huge difference in terms of heat coming off the floor: it's just slightly warm to the touch now, where it used to be surprisingly hot. Wish I'd had an infrared gun to measure the difference, before and after, cause it's very significant. Insulation Installed - Before Taping Finishing Up Install Tip: If you've never had the seats out, you'd better hit those bolts first with plenty of PB Blaster and/or use a torch on them from underneath the truck.

-
Link to Aleko Awnings Discount code is LDSALE
-
water heater unit replacement cost, new or rebuilt
Ctgriffi replied to rvplease's topic in Coach ApplianceTech Issues
They start at about $400 in terms of a brand new WH. Then you're probably looking at a couple hrs of skilled labor for the install, unless you can do the work. In terms of repairing an existing unit, propane water heaters (especially old units) are pretty simple and the parts are readily available. The big question would be: does the tank leak? If it does at all, scrap it and move on. If it doesn't leak and has been maintained, it might be worth installing a new gas control valve + pilot assembly, etc. Again, a lot of this depends on whether you (or a friend, family member) can do the work. If you need to hire out everything, these very old motorhomes can get real costly, real fast. -
Caulking can be nearly an art form, seems like. And it can make or break the look of many projects. One trick I've learned, in cases where you have the time and want a near-perfect line: start with a straight, continuous run of masking tape—one piece on each side of the joint—then, after you apply the caulk and tool the joint with a wet fingertip, carefully remove each piece of tape (pulling it at an angle, away from the joint) before the caulk sets up.
-
In case you like pictures... here's a basic, inexpensive Group 27 deep cycle that lots of folks use (and no, they are not fun to carry!).
-
Warrior floor will never be rock solid, IMO: it has a light sheet-metal underbelly welded between the frame rails, with foam board on top, and a final layer of thin ply. I think it's reasonable to expect some flex. Long as the sheet metal layer is intact and not loose, you should be okay.
-
That does look like some pretty good stuff, thanks—100% waterproof and has a temp rating of -25º to 155ºF! I'm getting a bit tired of the white/gray flooring you see everywhere, so the Sundance Canyon Hickory product is calling my name... two boxes would do it. WME, I've considered the vinyl sheet option and have worked with that in the past, but just think the planks are going to be much easier to handle in a small space with tight corners and weird angles.
-
Anybody used a good vinyl plank in their rig—something durable that's worked well over time, in heat and cold? Want to avoid any separation between planks, warping, and curling! Appreciate any specific recommendations and/or links.
-
I've had the leaf springs off my 91 Warrior and didn't have to cut. Soak 'em with PB Blaster for a day or two—next use a torch for a few minutes: on the nut and up and down the threads. Breaker bar and socket should get it then.
-
Most big box stores just stock one, maybe two, varieties, but you can definitely order many different textures and colors if desired. (Menards is local to me; I ordered two sheets of textured Nudo-brand FRP from them on my shower rebuild.) I’d definitely recommend practicing a few cuts on a small scrap; it’s not the easiest material to handle, not like cutting ply or lauan.
-
New MC seems to have done the trick. I haven't dissected the old but it was clearly leaking a bit from the main rear seal, all down the front of the brake booster (broken/bad gasket between the two as well). I went with the Cardone 13-2530 which was delivered in two days for about $55; seems like a decent part and came with new reservoir, cap and float switch (I did paint the cylinder to deter rusting). I did the bench-bleed in my vise before installing and then got all the lines bled pretty easily after that. Pedal feels good and solid, and all fluid is clean and clear. Back in business.
-
Yeah, wasn't try to give any crap... you've got the can-do attitude and ability, asking all the right questions. Just making a general observation about life with an old RV. I'll be quiet now and let you get on with the thread!
-
These old RVs are a ton of work, and I feel your pain, hamkid... I mean, I get a kick out of working on 'em and keeping things alive—man-vs-machine and all that. Also, don't know about you, but there's no way in hell I could ever afford to have somebody do all the work that's needed on this rig! (And mine's just a '91.) And like you've noticed, it's "hard to find good help," as they say, and not getting any easier. I'm sure opinions vary, but I would never recommend a 30+ year old motorhome to anyone who's not at least a decent shade-tree mechanic (or has one or two in the family!). To the general public, I would say: If you don't have the necessary repair skills, health, and time to keep up with constant, ongoing repairs—then you're probably better off spending bigger money on a newer, nicer rig in the first place.
-
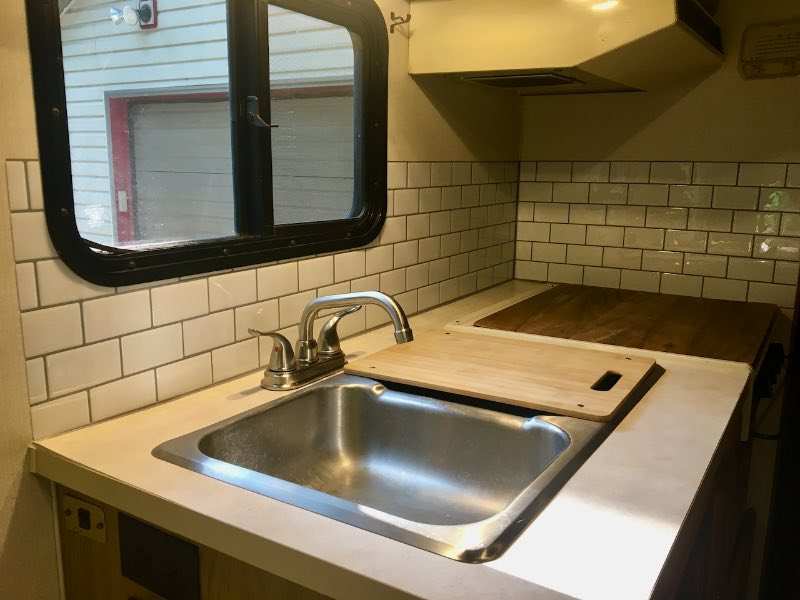
Spent a little time installing a subway-tile backsplash in the kitchen area, caulking the seams, and then installing a new faucet. Not easy to find nice options for a 2-hole 4" center faucet with long reach spout (and I didn't want to drill any more holes), but I'm happy with the result: Backsplash: https://www.amazon.com/gp/product/B08RJ6QVXC/ref=ppx_yo_dt_b_asin_title_o08_s00?ie=UTF8&psc=1 Dark Gray Caulk: https://www.amazon.com/gp/product/B0009XCLJG/ref=ppx_yo_dt_b_asin_title_o03_s02?ie=UTF8&psc=1 4" Center Faucet: https://www.amazon.com/gp/product/B07MJRK1KR/ref=ppx_yo_dt_b_asin_title_o01_s00?ie=UTF8&psc=1
-
Decided this would be a good day to flush old fluid and replace with DOT 4 synthetic. Not my first brake job, by a long shot... but anyway, started with removing some old fluid from MC reservoir then refilling with new. Next, began bleeding brakes at right rear and spent a lot of time there, pumping brakes and draining old fluid, until new clean fluid appeared, and then until all air was removed. Left rear went faster, but... when I started on right front, things just didn't feel right anymore... pedal would go way down and not seeing much fluid pressure at any of the bleeder valves—some, but not much. Never felt like I could get any of the four bled properly after that. (Kept reservoir topped off entire time and never let it get very low.) Been at this a few hours now and don't feel like I'm getting any closer. Not seeing any fluid leaks anywhere. Does this sound like a bad master cylinder possibly? Not sure how old the unit is—looks to be AISIN. Is it possible for an old MC to go bad in middle of job, due to lots of heavy pumping? Appreciate any ideas 🙂
-
Extech showed a good photo of some great tools... here's that same list, along with a few other items that I find very useful for repairs and general maintenance: -cordless drill (18v or better, IMO) -side-cutter pliers -5-in-1 painter's tool -jigsaw w/coarse and fine blades -needle-nose pliers -carpenter's square -measuring tape -channel locks -razor blade scraper -phillips and regular screwdrivers (multi-screwdriver w/nut-driver is great!) -carpenter's pencil -sharpie marker -small prybars: metal and plastic -utility knife -oscillating multi-tool (cuts, sands, etc) -caulk gun -extension cord -LED headlamp -cheap multimeter -shop-vac
-
As mentioned elsewhere, I'm currently using a Champion 2500w inverter generator to run roof A/C and fridge on the road. Seems to be working well, and I really like the light-weight and small footprint on my rear rack. On the flip side, this gen is loud when working near peak load, and the 1.1-gal tank lasts only a couple of hours—need to fill up whenever filling the truck tank. (My roof AC is a 2010 Coleman Mach Low-Profile 9,000 BTU w/EasyStart 364.)
-
When searching for parts, the model is really a Toyota Pickup, although it often comes up as 4Runner when I check, too. (Sidenote: many times, the year of a motorhome is one year after the production year of the actual cab-and-chassis unit—yours might be an 86 Toyota Pickup.) RockAuto.com works well for me and lots of others: good catalog and good prices.
-
The seal is standard, yes. You'll need to disconnect power to the unit inside and unscrew/unbolt it. After that, from the roof, you just lift the unit off and set it to the side. Remove the old seal from the roof cutout and clean the area really well. Put the new seal on the opening and put the unit back into place. Connect power and fasteners from the inside and done. If your roof is iffy, you'll probably want to use boards or plywood to span the roof while you're up there. Also, AC units are around 70-80lbs (?) in my experience, so it helps to be healthy and, uh, robust.
-
1986 Sunrader Motorhome 50k - $3,200 (Carmichael)
Ctgriffi replied to extech's topic in General Discussion
https://sacramento.craigslist.org/rvs/d/carmichael-1986-sunrader-motorhome-50k/7350939225.html -
I demo'd most of my shower last year and installed new FRP walls using Titebond’s related product from Lowe’s. Happy with the results. http://www.titebond.com/product/adhesives/b4b122ee-69f1-4172-b064-55c41b7fe900
-
Here are the Sway-a-way bars: https://swayaway.com/product/torsion-bar-set-84-95-toyota-pickup-2wd/ (available to ship by end of July, according to their rep. just now) I'd like to do the same on my '90 at some point—barely could get the ride height set correctly when I rebuilt the front end, most likely because my old TBs are worn out. Seems like new ones would help with the frequent banging/crashing up front, over what appear to be pretty tame road imperfections.
-
Finally sold off our old $120 Craigslist special, a 15 year-old Wen 3500, and upgraded to a new Champion 2500 watt inverter-style generator. First impressions: I really like the weight of this thing at just 39lbs dry. The old Wen was about 110lbs and very difficult to haul around, not to mention the stress on the rear cargo rack. Materials and build quality look pretty good, and I also like the fuel shut-off knob, handy LED status indicators, and rubber outlet covers to limit dust/moisture. 3-year warranty is another plus. I'm still doing the 5hr break-in period with the provided 10W-30, but I can already verify that it definitely handles the roof A/C on high, plus our Norcold in 120v mode. (My A/C has an EasyStart 364 Soft Starter unit.) Only holds 1.1 gallons of fuel, which means that it'll need refilling every couple hours with high usage—not a big problem when highway cruising and stopping regularly for gas, but would be pretty tiresome if boondocking. Not crazy about the noise level, which is pretty disappointing. This thing is supposed to be among the quietest, but when running near max-capacity, it's probably still 85% as loud as the old open-frame Wen! Of course, the Champion is much quieter in eco-mode, when you're only pulling a few hundred watts, but that's not how we're typically going to be using it. Always pros and cons, especially when you can't drop huge money on a Honda. Any thoughts or recommendations? Should I keep it? 😀
-
I’ve got same model. Brown wire might be power to cruise control if you have it. The metal tang on the end should be slipped in next to any fuse on the box near driver’s left shin.