Ctgriffi
-
Posts
631 -
Joined
-
Last visited
Content Type
Events
Profiles
Forums
Gallery
Everything posted by Ctgriffi
-
It is a cool rig with a lot going for it. Shame that it needed a new engine at just 40K though! (Crazy to think I bought my Warrior for about 10% of the Tiger's asking price, back in '15...)
-
Heat and humidity ventilation when not in use
Ctgriffi replied to wadingthroughlife's topic in General Discussion
Heat + humidity is often pretty bad in Missouri too (one reason we can only camp during 3-4 months of the entire year ), so I run a baby dehumidifier in ours, 24-7. https://www.amazon.com/gp/product/B01DC5PPWM/ref=ppx_yo_dt_b_search_asin_title?ie=UTF8&th=1 Pro Tip: You can dump the little tank every few days, or... you can drill a small hole and use a bit of tubing and sealant to let the dehumidifer auto-drain straight down the sink. -
I always start by turning on the campground spigot slightly and eyeballing the flow, dial it in where I know it's reasonable (~40psi or less). Then I shut it off, hook up my freshwater hose, and turn handle back to same approx. position. Maybe I'm living on the edge... 🤷♂️
-
It's a very creamy white, for sure, Linda—looks straight-up beige on my rig, but then again the paint is very old and not super-clean. Lots of places can mix up Toyota 033 in a spray can, of course... but prices were around $35-40 for a small-single, which I couldn't justify for this repair. So, kept looking for a close-enough match and landed on Krylon Fusion - Gloss Dover White, which I picked up at Ace Hardware. (Another option that folks mention on forums is Duplicolor's Wimbledon White, about $15 for a mini-can.) It worked out pretty great, after tons of prep, much sanding, etc. I'm letting the paint cure for awhile, before I try to blend old/new with super fine grit, but the color match is plenty good for an old motorhome. (New paint is much smoother and less orange-peel than what the factory did, too.) Photos below are the driver's door bottom right corner—one photo at the very start of rust removal and cleaning, then a final result after body filler/high-build primer/top-coat:

-
It does mention Toyota’s 033 there, but the cab is quite beige and matches the fiberglass coach. I’m assuming Winnebago painted the cab possibly?
-
Anybody know of a spray paint that's a decent match for the original beige cab of a 91 Winnebago Warrior? Not really looking for perfection—probably will just respray the cab completely at some point—but need a decent color match for some small repairs I'm doing. Thanks!
-
MC is pretty cheap and not too difficult to replace if you’re reasonably handy and have some metric wrenches and sockets around. I did it last year on my 91 Warrior. Best to have a second pair of legs around to help bleed, post-repair.
-
Plenty of info out there, like you noted, but I'll take a quick stab since my rig is also a 91... Front shocks: KYB KG5458 (KYB is not the gold standard in suspension, but these are quite good and also affordable) Rear shocks: KYB KG5438 Air bellows/bags: they don't really need servicing—they either hold air or they don't. In terms of replacement if they are punctured or leaking, lots of people like the AirLift 57113 LoadLifter 5000 package. You have shocks: two in front, two in back The shock installation, in my opinion, is just about the easiest (and biggest bang-for-the-buck) improvement that can be done on these 30+ year-old vehicles. You probably could find somebody to do a lift, but most would advise against it. I'm sure others will chime in on this. (Working air bags and properly set torsion bars might just get you a few inches of clearance.) In my experience, worn out rear-suspension bushings will also contribute to a very harsh ride.
-
Haven't come across one of these before, although my family had the standard Space Cruiser van in the mid 90s, when Dad was stationed in Europe. I remember the little mid-engine 6-cyl, just behind the driver's seat—that thing would generate enough heat through the carpeted lid to melt my little brother's crayons! (Also, I got it up to 100mph once, driving alone on a downhill stretch of the autobahn.) 😅 https://springfield.craigslist.org/rvs/d/springfield-1985-toyota-campervan/7485711182.html
-
Best converter to use for upgrade in 94 warrior?.
Ctgriffi replied to Don bird's topic in Electrical
What kind of fridge do you have? They’re not high draw units anyway, especially in RVs, so you don’t need to go big on converter amperage. I’ve used one of the Powermax PM3 units for the last 5 years (35A, I believe) and haven’t had any problems. Does a much better job of maintaining/protecting the coach battery, which is the main reason to upgrade from old Magnetek units. -
You need to be looking for the right rear wheel cylinder on a Toyota 1-Ton Pickup; it's all about the chassis, not the coach or RV model, when you're talking bout auto parts. Your chassis might be an 89 or 90, but anyway here are some options: https://www.rockauto.com/en/catalog/toyota,1990,pickup,3.0l+v6,1277793,brake+&+wheel+hub,wheel+cylinder,1952
-
I'm dying for a climate where you can say that ^ ...we can't drive anywhere in half the year without the generator running our roof AC, full-blast, especially if we head toward the southern states! 😅
-
I second this. Everybody feels some nerves, doing certain jobs that they either haven't done before, or don't do very often. Take your time, use a good jack and jack stands, make sure you understand what you're doing and why, and go after it.
-
I don't know why they put 4-burner units in so many of these little, old rigs—we don't even use that many in our home kitchen, simultaneously, and we both cook quite a bit. I'd like to find a good 2-burner, stainless-steel cooktop to replace the old, beat-up unit and to reclaim some precious real estate. Anybody have a product they'd like to recommend? Also, any recommendations on new countertop material? (Something close to the original 1.125" thickness would make the job easier...)
-
Re-mounting water pump, questions on orientation
Ctgriffi replied to Mackcm's topic in Coach ApplianceTech Issues
My 91 has the tank and pump mounted on the floor inside the dinette bench closest to the cab. Might work for you, although you’d need a different cutout for fresh water fill, probably. There is also a small covered area along the wall that takes wires/water-lines to the rear, in the vicinity of where your tank is now. Looks like a good project. Keep it up! -
Setup to tow
Ctgriffi replied to fred heath's topic in Improvement and Do-It-Yourself Projects you have done to Share!
Yeah, this is an interesting solution. Nice job. Do the mounting tabs on your custom bumper bolt directly to the bottom edge of the frame rails? Possibly straight through, bottom to top? Not so sure mine are in the kind of condition that I'd want to try something like that... -
Here’s an SMP ignition module from RockAuto for a 92 chassis (likely what yours is): $119+shipping. https://www.rockauto.com/en/catalog/toyota,1992,pickup,3.0l+v6,1277940,ignition,ignition+control+module+(icm),7172
-
Not to add fuel to the fire, but... with all the talk about alignments and duallies, etc, I'm curious: what kind of rear wheel alignment can even be done on these rigs??? I've had the rear axle off of mine a time or two before, and the leafs only fit up correctly to the axle one way—there wasn't any kind of adjustment to be done, far as I could see. Front wheel alignment is a very different story of course (my local shop was able to put the rig up on their rack and do the front alignment, no trouble—had that job done after I finished the front end rebuild).
-
I'm sure that others with more experience will chime in... here a few misc. thoughts on pump and water system: How old is the pump and/or what's the make/model? They definitely don't last forever; sometimes just a few years, I believe. Does your pump have a small filter mounted in front of it? Those can get jammed with crud. You mentioned your pump works—does it kick on and then run continuously OR kick on, run for a few secs, and shut off? If it just runs and runs, then it can't develop pressure because of a) possibly a faulty impeller which means new-pump-needed OR b) water is just running out somewhere from an open valve or break in your system (watch beneath coach while running pump to spy any leaks). A good, working pump in a watertight system should kick on initially for a couple seconds when you hit the switch and build pressure, then kick off automatically until water is called for and pressure drops. Hope that helps!
-
Looks just like the one on my 91 Warrior, which is a “Trimark Flush Mount Security Lock” PN# 060-0300. I looked for one awhile back but didn’t have any luck. Possible that yours is repairable though depending on the issues it’s having. They’re pretty simple to remove and disassemble.
-
Yeah, yours has got a pretty good tweak in it. Should be straight, with about 1/2" clearance between crossmember and oil pan. Since you've already got it unbolted, might be a great time to source a JY replacement (and front end alignment probably a good idea after that). Or, just live with it if it's not causing any obvious trouble 😀
-
Service Interval milage for Toyota rv with 3vz-e engine
Ctgriffi replied to ka6uup's topic in General Discussion
Here's Maintenance Schedule A, which is what you should probably use for these overloaded little trucks... 90-toyota-pickup-maint-sched-a.pdf -
Yeah, most recently, Brian at sway-a-way mentioned, "...shipping by end of November." Would love to hear how that turns out for you though, if/when you get them installed! (And, in case anybody's interested in this random fact: I measured my stock bars at 35-3/16" long by 25mm diameter.)
-
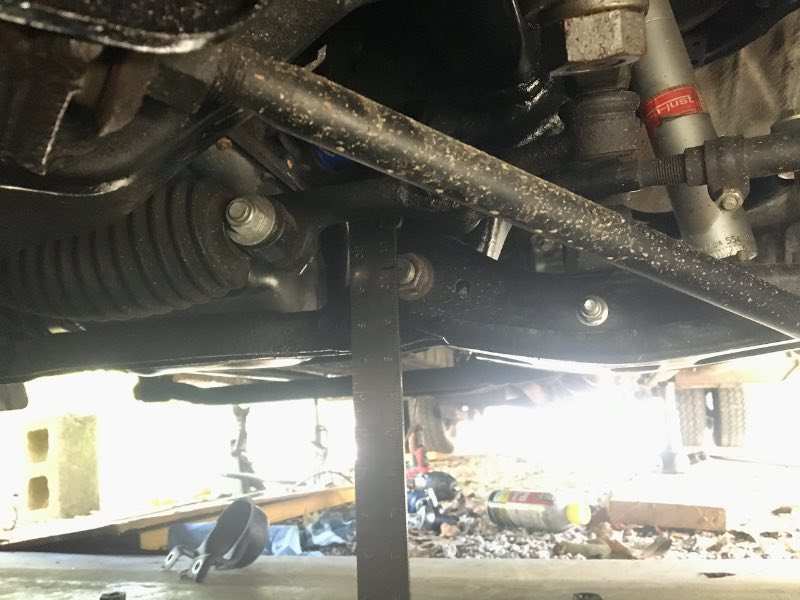
Decided to take a look at the Warrior's front end, post-trip, and sure enough the t-bars had sagged a bit since my big front end repair project, almost two years back. So, according to the service manual, this year and chassis model is supposed to measure ~10.3" from ground to center of lower control arm's main bolt (got to make sure your vehicle is level and tires are all at correct pressures to get a good read), and I was seeing about 9.5" for that initial measurement. This doesn't sound like a huge difference, but it can be an issue because there's not much room between the lower bump stops and the frame, even when the t-bars are dead-on correct. If you lose that small amount of clearance, your bump stops will be sitting directly against the frame, and your suspension travel will go to basically nil (my driver's side had gotten to that point). My aftermarket bump stops may also be contributing to the problem because they're close to stock height, but not exact and are beefier than the the original bump stops. I may trim a smidge off the height of those, to give me a bit more travel, although I was able to adjust my bars to spec (see below) and should have some decent vertical travel now. Measured After Adjustment:
-
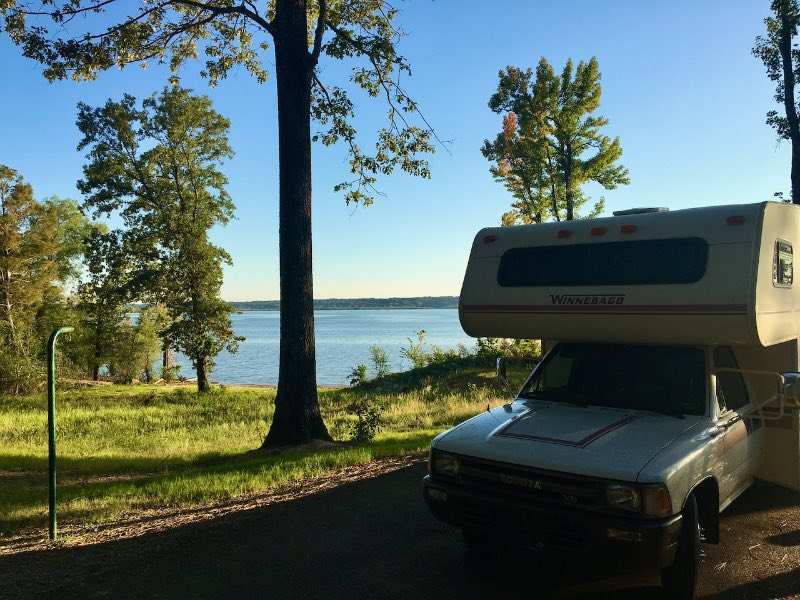
Our big trip of the year was 8 days, mostly on the MS Gulf Coast. We broke it up into two days of driving down, two days back up, which kept each drive-day to a bearable 300 miles or so. Camped each way at Hernando Point, an excellent National Park campground with many full hook-up sites, located on Lake Arkabutla. Rented a cozy pet-friendly house near the coast while we were in BSL, like we've done in the past. Weather was not awesome, due to tons of rain and very high humidity, but not completely unexpected in those parts. 😅 The Warrior ran great and averaged just a hair over 13mpg, which is as good as I've learned to expect. Always nice to have a vehicle that can maneuver around small towns safely and easily on trips like these! On the downside, there are some roads that still just hammer the front end with a vengeance (looking at you, Arkansas!), despite my rebuilding/replacing most of those components. I'm still considering swapping out the 30 year-old torsion bars for new, but am on the fence a bit due to cost/benefit concerns (anybody done that yet with the sway-a-way® option and have a good report?).