Ctgriffi
-
Posts
632 -
Joined
-
Last visited
Content Type
Events
Profiles
Forums
Gallery
Everything posted by Ctgriffi
-
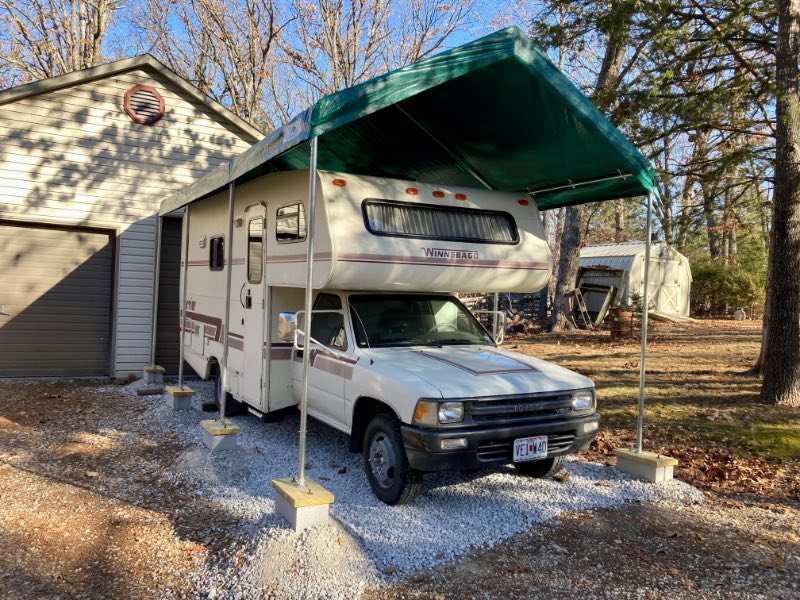
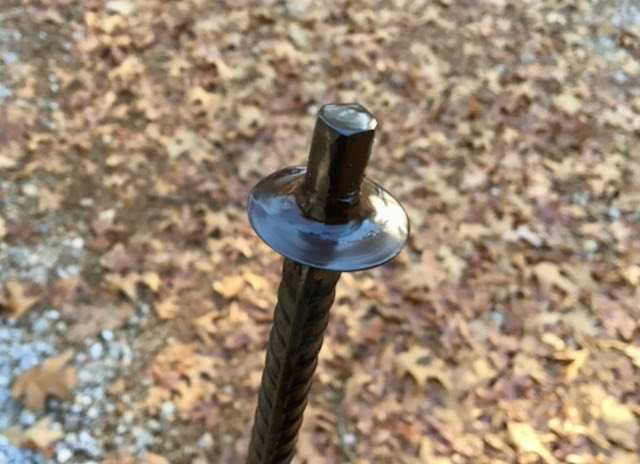
 If you're like me and never had a good, covered place to park your rig, well... it can just eat at you over time and make RV ownership that much more of a mixed bag. There are a variety of solutions out there (most of them, not cheap!), but here's what I did for my 20-footer: This is the 10x20 Advance Outdoor Carport Kit that goes for about $270+tax currently on Amazon. The kit is decent quality and adjustable in height, although I wouldn't go with the tallest setting, because the pole extensions just get too wobbly at that point. To make it all more secure and semi-permanent, I used 5/16-in lag screws to bolt the kit down onto sections of pressure-treated 2x10, each of which were staked twice through open-core concrete blocks with 30-in lengths of rebar. I started the whole thing by laying out string lines and using a variety of levels to get all the blocks straight, plumb, and on the same plane—gravel base mixture + a steel tamper is required to get a firm foundation for each block. The 30-in stakes were cut out of 10-ft pieces of 1/2-in rebar with an angle grinder and then given a "cap" by welding a thick washer near the top of each (see below), which helps pull the whole thing down tightly to the ground; perhaps similar stakes could be purchased ready-made, but I couldn't find anything locally, certainly not for less than $2 a stake! Once the blocks were set and staked, it was really just an hour or two to assemble the frame and get it installed, with the help of my wife. At this point, it's pretty sturdy and feels secure, although I do have a bunch of self-tappers that I'm going to use to pin each joint on the frame eventually, just to add a little rigidity. Hardest part, as you might imagine, was driving the 16 LONG stakes into rocky ground with an 8lb sledge. Overall, I probably spent about $430 for the entire project, and I'm happy with the cost/benefit. Feel like a load has been lifted
-
Block off (or clamp tightly) the brake booster hose for testing purposes, see what that does to idle. Bad vacuum leaks can definitely mess with the idle. If that ^ turns out to be a red herring, might look at the fuel delivery issue that was mentioned already: check pressure at the rail and look for ~40psi. Running a few bottles of injector cleaner through might be a good idea too, in case one of ‘em is gummed up.
-
Same to you! Looks fun, must be down south…
-
All is looking/sounding good from here. At what point in this process will you add wiring for, say, a vent fan, roof AC, and/or lights?
-
Thanks for bringing us along on the build; looking forward to seeing what you do with the old girl. (I’m not a Porsche guy, per se, but is that a 944 back there?)
-
Such a cool rig. Glad you found some help, and it didn’t ruin the trip! Guess you got to see what driving a 4 cyl RV might be like! 😬 I run Lucas Upper Cylinder Lubricant through my 3VZE regularly, but you got me wondering now… btw, what new injectors did you use? I’ve got a noisy one that I’m watching.
-
Just reporting back on the Gabriel 34073 Front Load Carrier shocks after a few trips behind us: I like them, quite a bit! Hard to say how they'll hold up over the long haul, although we don't really put that many miles on this rig anyway. For now, these shocks are definitely helping to keep the front end up where it should be, even when fully loaded for camping. There is far much less "bottoming-out" and jarring of the front end over rough pavement, versus the KYBs that we were running. On the other hand, when the rig is completely unloaded and I'm just running around locally, there is a slight floating sensation up front, but it's nothing crazy and not unexpected, given the add'l spring action. Overall, I'm really happy with the change, and I think it's a pretty good, inexpensive approach to weak torsion bars. For fun: just completed a long weekend at a new-ish state park, Echo Bluff. (Full hookups here, which is not the norm in MO and was much appreciated! Also another first: wild horses can be spotted roaming the park!)
-
Looking for some insight into owning a Toyota RV
Ctgriffi replied to Hill's topic in General Discussion
Just to clarify for mokabronze: the 3VZE (ie 6 cylinder) has a timing belt not a chain, unlike the 4-cyl… while an old, low mileage chain might not be a big concern, the belt is a different matter. -
We're back in bizness and feeling good! Man, I have to say that I love peeling off the extra butyl tape, once it's installed, haha. I'll probably run a good bead of caulk around it all too, for good measure, although I got a nice even "squeeze-out" everywhere with the Dicor butyl.
-
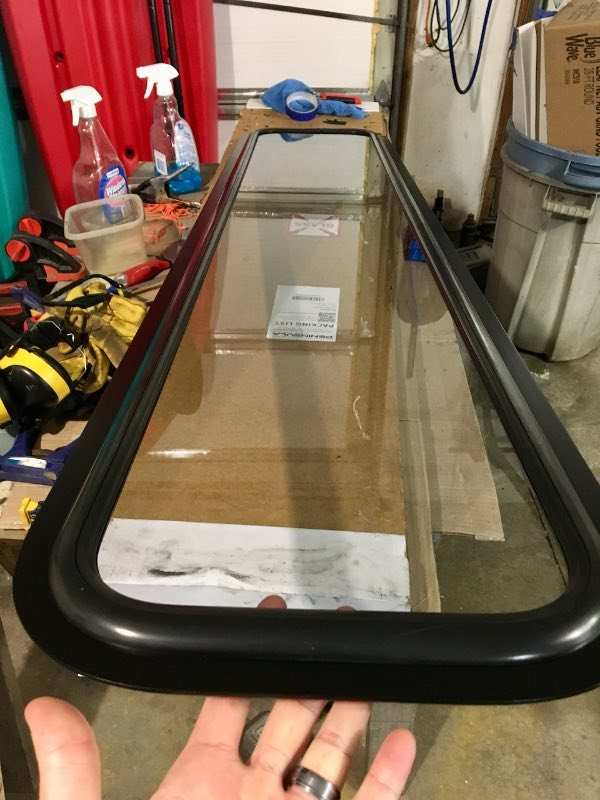
Got the tempered 1/8" glass last week from Peninsula Glass in Ontario, WA—took about 9 business days from the initial order. They did an excellent job with packing and measurements were spot-on, which was a relief. (If anybody's curious, price-with-shipping was $118 for clear, $135 for light tint, and $155 for dark. The dimensions needed for this Winnebago window assembly, #078533-09-B05, were 57-5/16" x 10-5/16" with 2-in radius corners, and I was able to confirm this with folks at WinnebagoParts.com before ordering.) Installing the new glass into the frame was challenging and pretty hard on the hands, because it is a very tight fit—in fact, I'm not at all surprised that some have split the frame to get it done! I didn't have much luck with the suggested string/wire method, although I appreciate the tips from everybody. Anyway, since I already had the frame completely removed and on the bench, I did it a little differently. Here are the steps I took, in case it helps somebody else out... Installing the Glass Remove all sealant and butyl from aluminum frame; clean frame and sand/paint (if desired) Lube the outer frame with soapy water from a spray bottle and then install the rubber, self-locking gasket to the frame, making sure to put the larger groove to the front/outside (thin groove holds the frame, thick groove is for the glass). Place the gasket so that the "seam" where the two ends meet is on the far right or left of the frame, halfway up. Unfasten the locking portion on the front of the gasket with a small screwdriver and (do I have to say this?!) your fingers. Spray the gasket down again with soapy water. Get one end of the glass started up into a corner and then, from that point, begin working the gasket slowly around the edge of the glass—a sturdy, plastic putty knife worked well for this, along with massaging the rubber gasket from the back side. I'm sure there are installation tools that are made exactly for this job, but basically you need something thin and strong that won't scratch or crack the glass, with a blade about 1-2" wide. You gotta be careful, obviously, and try to support the glass as you do all this... although I found that this tempered stuff is not as fragile as you might think. Once the glass is fully installed (and, yeah, the last few inches are tough!), work the locking portion of the gasket back down into place, all the way around. Clean off the soapy water and allow everything to dry, then close the small gap between the ends of the gasket with "seam-sealer" (black silicone RTV adhesive worked for me). If you want it to look "factory," mask off the gap carefully before applying your sealer, then remove tape before the stuff hardens.
-
Trailer tires are a no-go. They’re not manufactured to put power to the ground, just to be “passively” pulled along.
-
The threads on that fitting don't do the actual sealing in this scenario; you can clean them up a little with a wire brush, but it's the flared portion of the tubing, against the fitting on the gearbox, that needs the most attention (like extech said).
-
Interesting! I like it, might give that a whirl. 👍
-
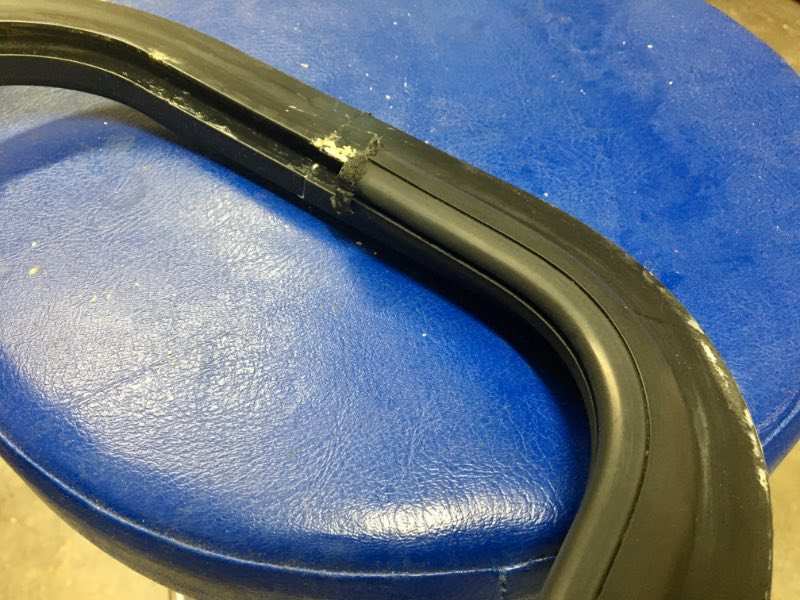
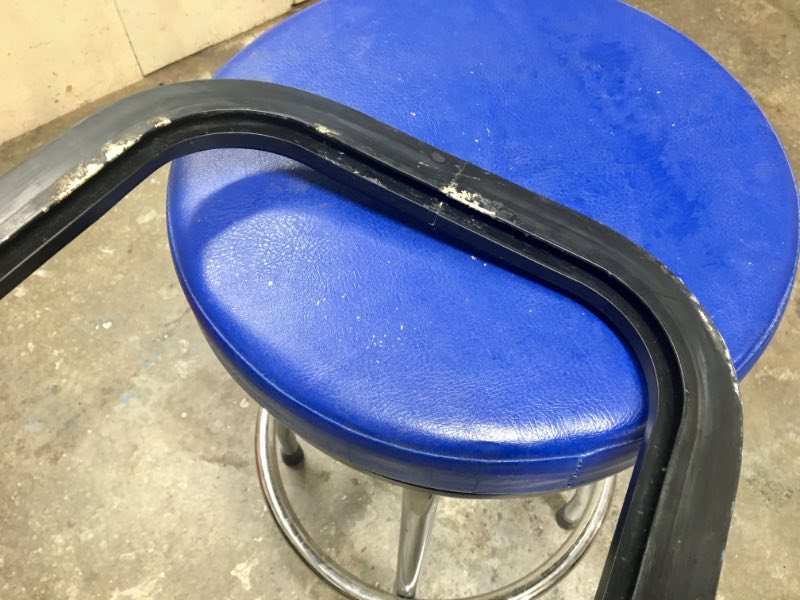
Not sure how the glass-and-seal could go in without cutting that weld, but I appreciate the feedback and here are some more pics! (Frame will get cleaned/sanded/repainted before assembly, don't worry.) Empty Frame - Front Side Frame w/Seal Partially Installed Seal Profile
-
Cool, sounds like you got a nice rig there. Would like to see some photos sometime. A lot of people do paint everything, which is fine... but the cabinet doors in our Warrior are all real oak and looked great after a sanding and re-poly. Still, all the original "pine mist" fabric had to go in mine, ha.
-
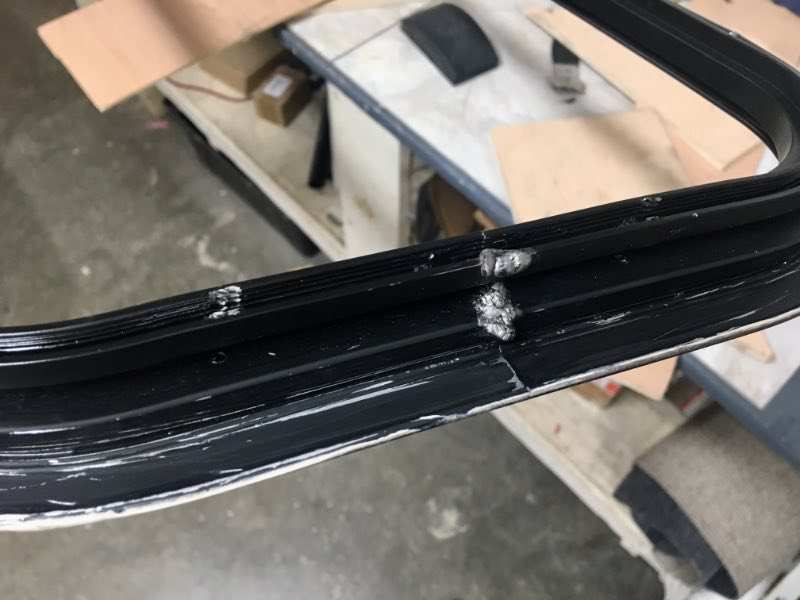
Thanks for the tip, Linda. So I got my old window frame completely removed and measured over the weekend—new tempered glass is ordered and on the way. But the plot thickens... somehow, I forgot that the main outer window frame, which tightly encloses the glass and rubber seal, is welded together at the joint! I guess I will have to take it apart with a cutting disc and then try to recreate a similar booger-bead during reassembly. I've done a bit of welding but never on thin aluminum channel like this, yikes. Part of me wonders if I couldn't just slather a good bit of JB Weld SteelStik in that area (which is hidden within the cabover wall), clamp it all for a good while, and cross my fingers...
-
Some of the interiors are better than others, but I tend to agree with the others. I would say, in general, all of these rigs can benefit from an extensive redo. (For example, when recently pulling down our old cabover window curtains for a wash, I was reminded just how much I disliked the original interior: I swear that Winnebago made those curtains out of some old-lady thrift store undergarments! They are just awful!)
-
Thanks for the tips, all! I'm looking at options and waiting on some quotes for 1/8" thick custom tempered glass. Careful measurements are crucial of course, but I'll probably put a CAD drawing together too 'cause I like to geek out on this stuff 😁 Btw, anybody have a product they like to use for cleaning/rejuvenating rubber seals?
-
It was tempered glass (small, not jagged) and looked to be original. It is a flat window but all corners have large radiuses.
-
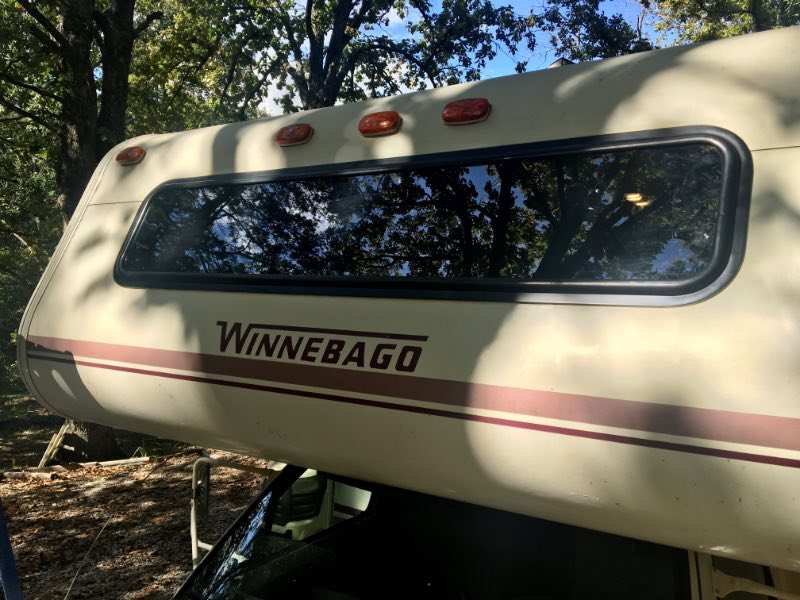
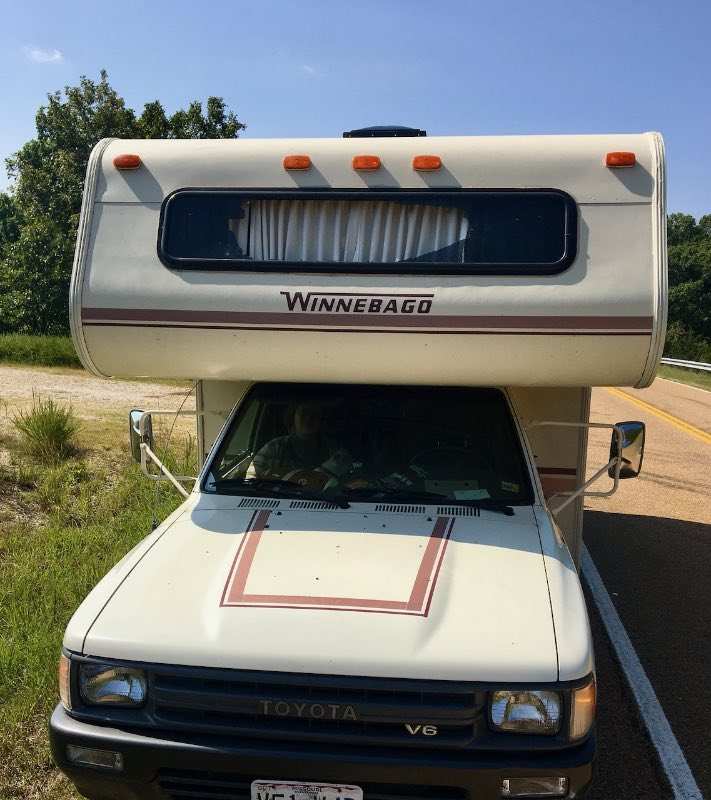
Just finished a nice little trip to Lake of the Ozarks SP over a long weekend. Great weather, nice scenery, and tons of surprisingly tame, white-tailed deer, right up around the Warrior for most of our stay. Brought our e-bikes along, per usual, and the wife and I had a great time buzzing around the area. Unfortunately, heading out of the park and down the main park entry road on our way home, a loud crash was heard overhead, then a few pieces of debris rained down on the hood. The large 59x12" cabover window is gone, as you can see—most of the glass ended up inside the window curtain and on the mattress. Not sure if a falling branch struck the window or if a large bird impacted or what - ?! We drove home just fine but kept it under 55mph. First time that's happened to us in our eight years of ownership. So the question is whether to try and replace the glass... or to block off that unlucky window opening completely. The large rubber window seal is in pretty good shape, it appears, but I know these Class C cabover windows tend to be problematic, even from the factory. I'm reading through the forum posts on the subject, but feel free to chime in here if you have any thoughts/suggestions. Thanks!
-
I’ve got 98K on mine and running fine: I expect it to go another 50K+. But like Linda said… all depends a great deal on regular maintenance. If the 3.0 you’re looking at hasn’t had much love, I’d probably plan on doing timing belt, water pump, valve adjustment, rad flush + hoses, accessory belts, tune up (cap, rotor, plugs, wires), fuel filter, and a few bottles of injector cleaner.
-
running lights not working in front top area
Ctgriffi replied to mini-wini-dan's topic in Electrical
You're right on both accounts, IF everything's still hooked up correctly and components are not kaputt. When on 120V (shore power) your converter/charger unit should juice up a low coach battery—a voltmeter attached to the battery, before and after plugging into shore power, should show you if that's the case pretty quickly. And, like you mentioned, the alternator will also charge the coach battery when the engine's running, if the wiring's still intact and if the isolator unit under the hood (keeps DC power usage in the coach from draining your starting battery) ain't broke. If none of the above is working right, you might wanna start a new thread in this section, Electrical; there are plenty of folks here who can walk you through everything. Welcome to the forum! -
Great to hear about the success of your first trip—what an awesome rig! Thanks for sharing all the details and pics, along the way. (9.5mpg doesn't sound too bad, all things considered.) 👍👍
-
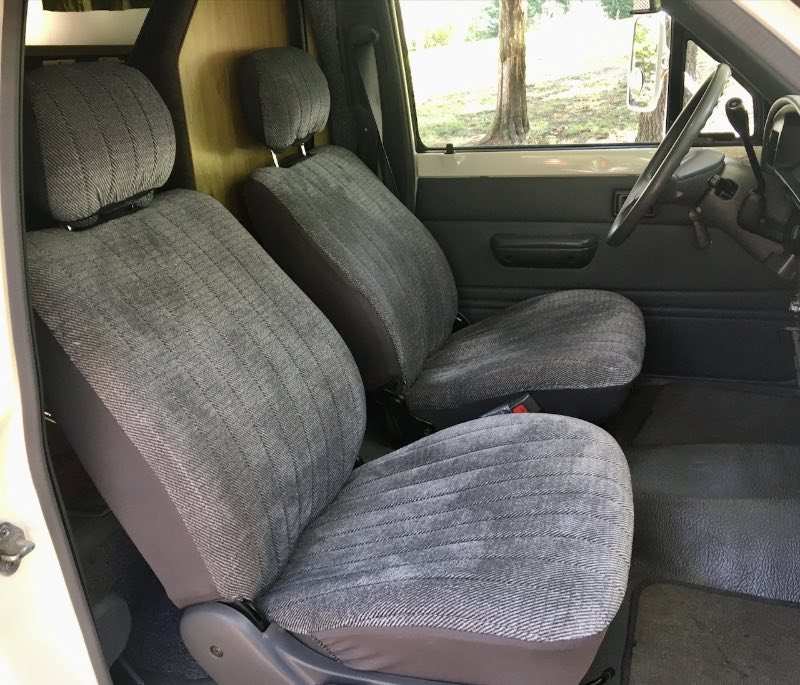
Seat Cover Upgrade
Ctgriffi replied to Ctgriffi's topic in Improvement and Do-It-Yourself Projects you have done to Share!
Hmm, I'm not seeing that—for a different year maybe? It's only been a few months since I got these for a 1990: https://www.rockauto.com/en/moreinfo.php?pk=3321546&cc=1277793&pt=1316&jsn=1202 -
I don't know if anybody's been thinking about buying a set of seat covers for your cab, but thought I'd just mention that the Dash Designs products (found on Rock Auto) are pretty good quality and recommended. I removed our original Winnebago covers years ago, leaving just the gray vinyl underneath, which was still in great condition but not very comfortable for long trips in hot weather. So, decided to upgrade the cab with these silver "Medora Velour" seat covers. They're very plush and have some decent foam padding on the underside; makes roadtrips a lot nicer and more bearable for all. (It's probably worth noting that the back-side that faces the coach uses a different fabric—just a simple, stretchy material.) The only problem I ran into with installation was that the provided headrest covers were WAY too big... but an email to the Dash Designs support staff got that straightened out quickly and easily (maybe some of these trucks came with different model seats or headrests?).