mustrmrk
-
Posts
136 -
Joined
-
Last visited
Content Type
Events
Profiles
Forums
Gallery
Everything posted by mustrmrk
-
Yeah, my old Xantrex was a 40 amp marine charger. I bought it as a refurb from Sun Electronics in Miami for $140 like new. They don't have any right now and a new one runs over $300. That's why I'm looking at a converter for less than 1/2 that.
-
This is a timely topic for me, as well. My old single-stage charger / converter is preparing to bite the dust. I just parked in the shade and plugged in at a friend's house in Tempe w/ the house batteries 29 amps down. It took the loudly humming charger over 4 days to bring the batteries up to full charge. I'm currently looking at a 3-stage 55a converter / charger - larger than I'd normally install if I was going to be plugged in more. Since we're not plugged in very often and won't be traveling as much as we have been for the past several months, we'll be relying on the generator to bring the batteries up when there's not enough sun to keep them charged. I want to put as many amps back into the batteries as quickly as I can to minimize generator run times.
-
I'll second JDs words about voltage drop. When working w/ 12vdc, it is very important to size your wiring to minimize voltage drop. It doesn't take much to starve an appliance of voltage, generate excess heat, and waste valuable battery storage. Yes, larger wire and appropriately sized over current protection are considerably more expensive than smaller, but in my experience, the increased efficiency and safety over time far outweigh the initial cost saving.
-
'87 Dolphin 900 Furnace And T-Stat
mustrmrk replied to a2ndopinion's topic in Coach ApplianceTech Issues
I would tend to agree with you - t'stat has no business being that close to the furnace - especially directly across from it where the hot air blowing from the furnace can satisfy the t'stat before the rest of the room gets warm. And I like Fred's idea, too - I may have to steal it if we spend much time where it's not warm <g>. Or maybe just insert a remote on/off switch into the control circuit. -
For what it's worth, our converted small chest freezer fridge works equally well in 30 to 110 degree weather. We do use more juice in hotter weather, though. Thank goodness for the solar panels. I think if I ever replace the fridge I'll look for something that's a bit more energy efficient. The current one does fine as long as it's sunny - if it isn't we have to either move or charge after a couple of days.
-
rkw, You sound like you're really looking forward to your new lives together. Have fun and enjoy yourselves. My wife and I have found this forum to be a great resource during our transition to full time RVing . And everyone here seems to enjoy "paying it forward", so ask away.
-
In our sailboat, we would add a couple of tablespoons to 60 gallons in our drinking water tanks every time we filled them with shore water. We had a 5 micron carbon activated whole house filter under the sink, and never had an issue with chlorine odor. Most of the time when out of the US we used our reverse osmosis watermaker, so didn't use bleach and had no issues with water quality. One thing to be aware of - aluminum tanks don't like bleach - and your hot water tank is likely made of aluminum. A high concentration of bleach sitting in your hot water tank for a long time can damage it. Peggy Hall is an excellent source of information regarding boat odors and water system cleaning - her nickname is "The Headmistress": From PEGGIE HALL’S LIBRARY OF CLASSICS (http://trudelutt.com/linker/phall_freshwater.pdf) Fresh Water Maintenance Most fresh water system problems - foul odor or taste - don’t originate in the tank, but in the plumbing, which is an ideal environment for molds, fungi and bacteria that thrive in damp dark places. Here’s the recommended method for recommissioning fresh water systems; this should be done at least annually. lst Fill the water tank with a solution of 3/4 dl. of household bleach per 10 litre tank capacity. 2nd Turn on every faucet on the boat (including a deck wash if you have one). 3rd Allow the water to run until what’s coming out smells strongly of bleach. 4th Turn off the faucets, but leave system pressurized so the solution remains in the lines. 5th Let stand overnight - at least hours - but NO LONGER THAN 24 HOURS. 6th Drain through every faucet on the boat (and if you haven’t done this in a while, it’s a good idea to remove any diffusion screens from the faucets, ‘coz what’s likely to come out will clog them). 7th Fill the tank again with fresh water only 8th Drain again through every faucet on the boat, repeating till the water runs clean and smells and tastes clean. Remember: cleaning out the tank addresses only the least of the problem ... most of the problem occurs in the lines, so it’s very important to leave the system pressurized while the bleach solution is in the tank to keep the solution in the lines too. People have expressed concern about using this method to recommission aluminum tanks. While bleach (chlorine) IS corrosive, the effect of an annual or semi-annual "shock treatment" is negligible compared to the cumulative effect of holding chlorinated city water in the tank for years. Nevertheless, it’s a good idea to mix the total amount of bleach in a few gallons of water before putting it into either a stainless or aluminum tank. People have also expressed concern about the possible damage by the rubber and neoprene parts in a water pump. Again, the cumulative effect of putting chlorinated water through the pump is more damaging than an occasional "shock treatment". Occasionally, water pumps have been known to fail after recommissioning, but they’ve always been older pumps; recommissioning only "pushed ‘em over the edge" a month or so sooner than they’d have failed anyway - which I consider preferable to finding yourself without water during the second week of a 3 week cruise. To keep the water system cleaner longer; USE your fresh water ... keep water flowing through the system. The molds, fungi, and bacteria only start to grow in hoses that aren’t being used. Before filling the tank each time, always let the dock water run for at least 15 minutes first ... the same critters that like the lines on your boat LOVE the dock supply line and your hose that sit in the warm sun, and you don’t want to transfer water that’s been sitting in the dock supply line to your boat’s system. So let the water run long enough to flush out all the water that’s been standing in them so that what goes into your boat is coming straight from the water main.
-
We tried a French press, but found that it used too much water to clean. Same with a percolator. We finally settled on a single cup Melitta drip w/ #2 paper filters. Filter and coffee go in the trash, and we save both water and grey water storage. Two scoops for the first cup, add one more for the second - both taste pretty good, esp. with a dark roast like Starbucks Sumatra or Trader Joe's Expresso.
-
A year before we quit cruising we bought one of these for our boat: http://www.isotherm-parts.com/index.php?main_page=product_info&cPath=4_34_107&products_id=1991 Way spendy for an RV, but it IS an awesome water heater for a boat. No propane, but that's a good thing on a boat - propane is heavier than air, so it tends to settle in the bilge and, if not purged, can cause an explosion. Every time we ran the engine we had hot water - I would love to have a heat exchanger hot water heater on the RV.
-
Thanks all - looks like I'll be in the market for one.
-
Sail Switch Location?
mustrmrk replied to Dolphinite no longer here's topic in Coach ApplianceTech Issues
Jim, Great suggestion - thanks. -
Speaking of bleeding the brakes, I'm wondering how it's done these days. Long ago, when I was first taught how to bleed brakes, we would have a helper sit in the driver's seat and pump, then hold down the brake pedal. Attach a piece of clear hose to the bleeder, run it into a bottle of brake fluid, then crack the bleeder till the pedal hit the floor. Helper holds pedal to floor until bleeder is closed, then pump and hold again. Repeat until fluid runs clear w/ no bubbles, making sure the master cylinder stays full and doesn't suck air. Start with the wheel farthest from the master cyl (e.g. right rear) then l. rear, then r. front, then l.front, assuming the master cyl. is on the driver's side. I learned this method about 50 years ago and have stuck with it ever since. Is there a better way?
-
I use a Viair 88P portable compressor: http://www.ebay.com/itm/Viair-00088-88P-Portable-Air-Compressor-/301779841575?hash=item46437af227:g:guUAAOSwo6lWKkQL&item=301779841575&vxp=mtr. It's a great little compressor. I had one that was made by Slime first, but it quit working after about 6 uses, the last of which was outside the warranty period. I bypassed the failed switch to get a bit more life out of it, but luckily, I chose to buy the Viair to replace it. What a great little compressor - I often compare it to using a SnapOn wrench - you can just feel the quality. My old air bags leaked from the day I bought the RV about a year ago. We didn't use it much until this past April, so it was no real hardship to pump them up each day before travel. However, once we started traveling a lot, it got old pretty quickly. The Viair made it bearable, but I was really glad when I replaced the old bags with Air Lift Ultimate 5000 bags. They don't leak and there's been a definite improvement in ride and stability. Now I only use the compressor to top up one rear tire every 3 weeks or so after it loses about 5 lbs from a real slow leak. Sometimes I let air out of one bag or the other in order to get a bit more level. It only takes a few seconds to get the bag pressurized again in the AM. One other thing to consider - if your propane leaks, possibly due to your installation, and your air bag leaks, also possibly due to your installation, it might behoove you to cure the problems rather than performing another potentially problematic installation that will just solve one of the symptoms. Just a thought....
-
If you contact Firestone and they are still under warranty they should replace the leaking one. Air Lift did that for me when one of my new ones leaked. Are you sure its the bag and not the valve or fitting or line?
-
A Brand New Toyota Rv Owner And I'm So Ignorant
mustrmrk replied to lterry's topic in Coach ApplianceTech Issues
Or you could try http://zoomthelist.com/- that's how we found ours. -
Veggies release water vapor. Opening the fridge door on a humid day allows water vapor to enter. That's why, if you have a freezer, it needs to be defrosted periodically. On our boat, cruising in hot, humid weather especially in Central America, we had to defrost the freezer every couple of weeks to keep the fridge cooling properly. In our RV, our well-sealed small converted chest freezer fridge needs to be mopped out every few weeks - and we don't replace nearly the amount of air with every door opening that a standard vertical door fridge does.
-
A Brand New Toyota Rv Owner And I'm So Ignorant
mustrmrk replied to lterry's topic in Coach ApplianceTech Issues
ITerry, Try looking on the door jamb / frame where the driver's side door closes. My Escaper has a "Damon Industries" tag w/ the VIN and some other information. You may find something similar on yours. Good luck, have fun, and keep asking questions! -
I've been kicking this around in my relatively empty head for a bit and have some ideas, but I thought I'd ask around here and see if someone smarter than me has already done something like this. I have the typical RV ladder on the back of my Escaper, but one leg is cracked from a PO backing into something. I also, being a pretty big guy, don't want to climb on the roof to do maintenance. I'd like to figure out a nice-looking way to replace my ladder with some sort of step ladder I could detach and use to clean the solar panels from the side of the rig and all the other stuff a 6' - 8' ladder might be useful for. Has anyone done something like this? Maybe one of those aluminum ladders that goes from being an "A" frame to an extension ladder or something would work. Or just an aluminum extension ladder section, or even a fiberglass step ladder, except that might not be too attractive. Doesn't really matter, though, as long as it doesn't look too "Beverly Hillbilly-ish", is sturdy and easily removed, and is at least 6 high'. Any experience / thoughts / suggestions appreciated. Thanks
-
Well, shoot - that could have been my problem. I made a point of buying mid-grade since I didn't want no steenkin' 85 octane fuel in MY rig..... I guess I know better, now.
-
Before we bought out Toyota, we looked seriously at buying a 2005-6 Sprinter and doing our own conversion. I did a cost comparison for fuel use and the difference between 25 mpg diesel ($0.60 more than gasoline on the east coast) and 15 mpg gasoline, including the price of each vehicle and no repair costs, IIRC it would cost us $500 or so more per 10k miles to run the Toyota. The difference in purchase price between the two vehicles was about $5k-6k, It would have taken 50,000 miles to make up the difference in purchase price, and I still would have had to do the conversion on the Sprinter - the Toyota was ready to go. The Sprinter, from what I understand, uses at least three different OBD protocols, requiring special software and hardware for diagnostics. Parts availability and price, and the complexity of the Sprinter vs. the comparative simplicity of the Toyota made the decision easy for us.
-
Pete, My '87 22re had a three-row radiator when I bought it. I had been having overheating issues and, after replacing the t'stat and fan clutch, ended up replacing it with a single row aluminum and plastic one from AutoZone...in their parking lot, while I was on the road. The bracket on the old one broke loose and allowed it to flop around, puncturing it. After I replaced it, my overheating problems were gone. I am very happy with the cheap replacement, but I suppose even a cheap single row radiator is better than a three-row that's been half filled with Bar's Leak by the previous owner. Glad you're happy with your new radiator and I hope it continues to work well for you.
-
Sail Switch Location?
mustrmrk replied to Dolphinite no longer here's topic in Coach ApplianceTech Issues
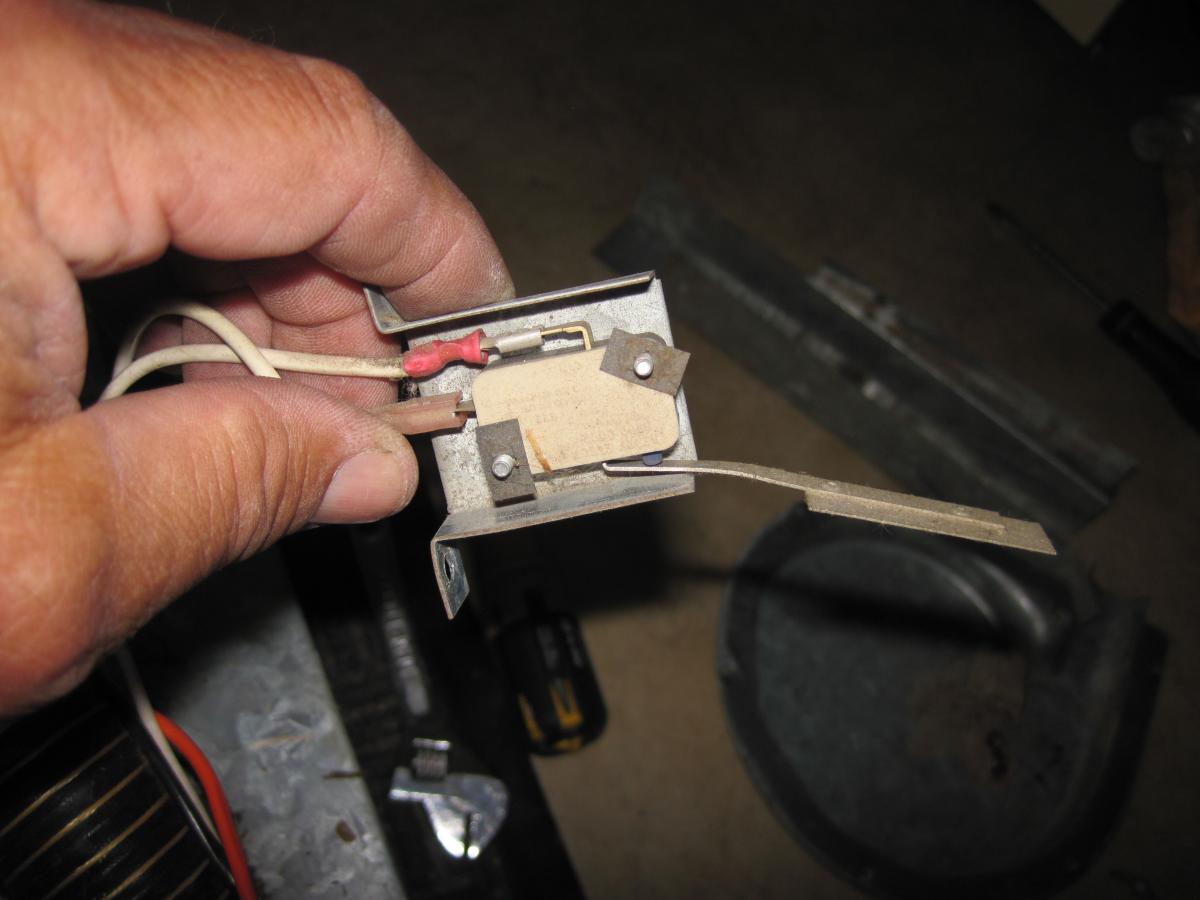
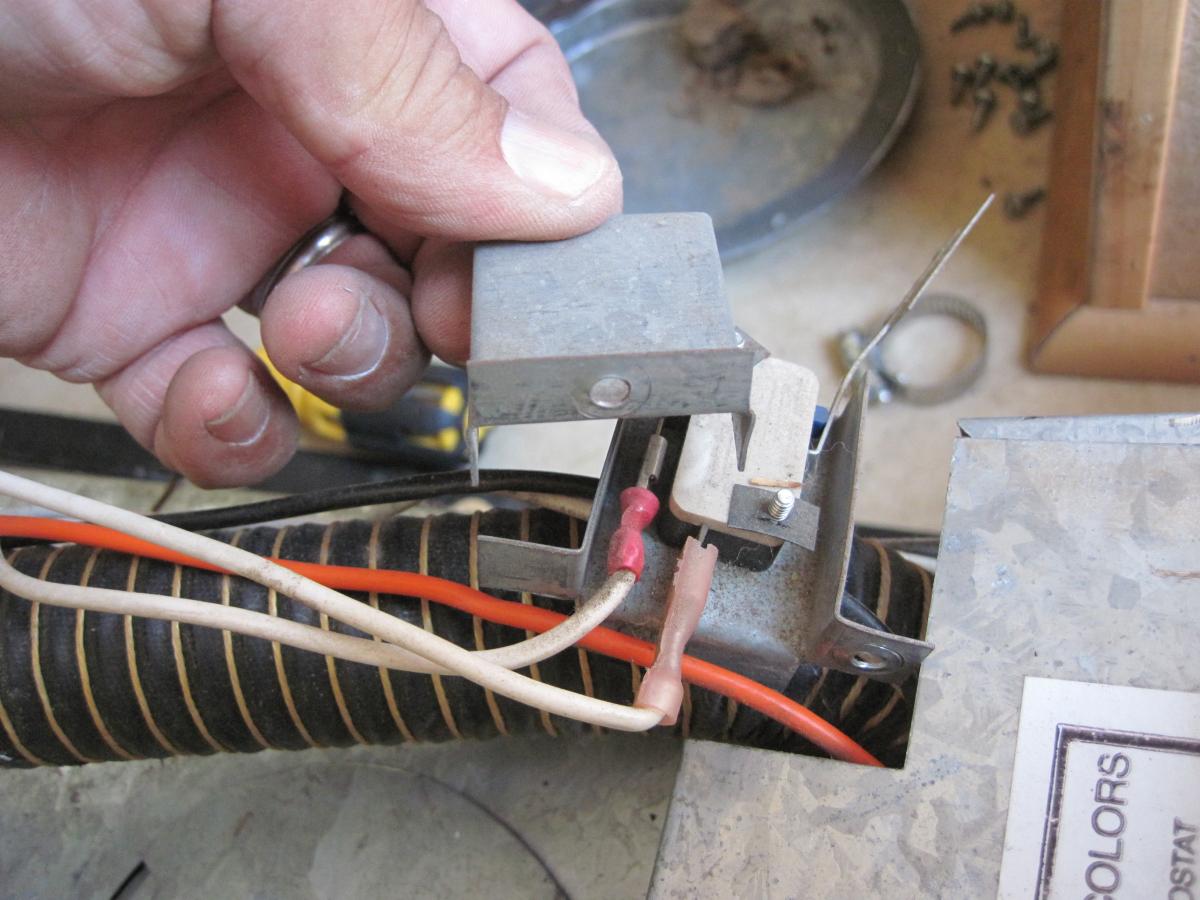
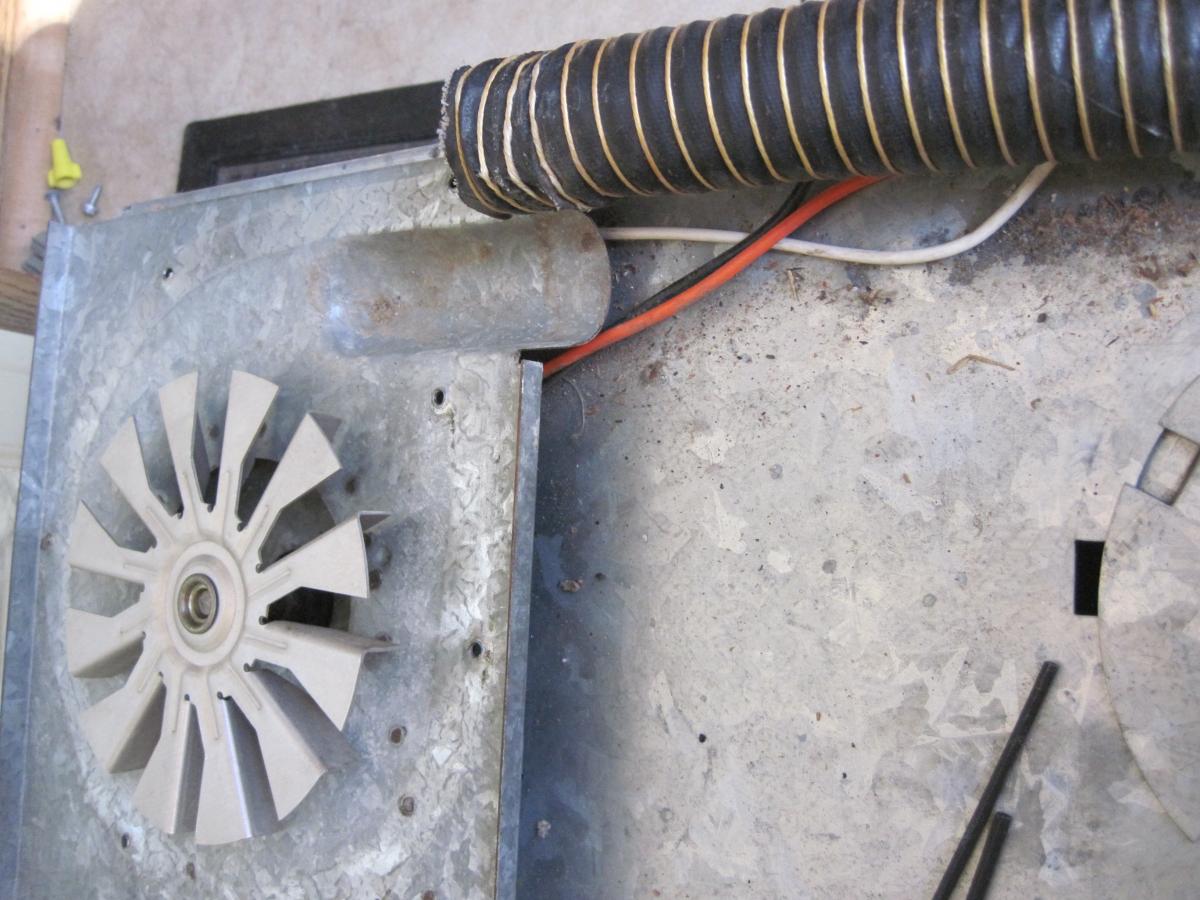
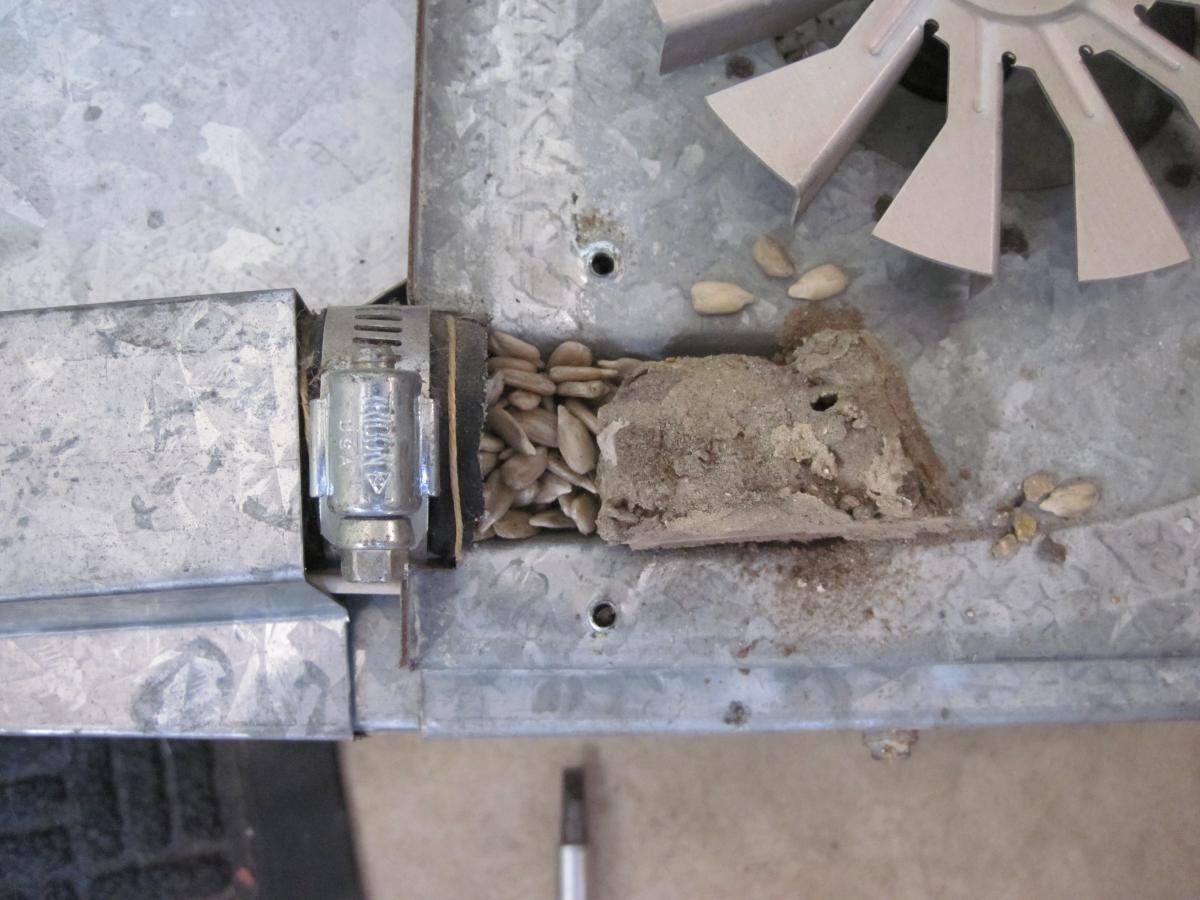
The hose between the fan and the burner was also packed w/ mud dauber mud. Took it all loose, cleaned it out, put it together, and it seems to be working. Here are a few photos that show the sail switch and its location. On my 12,000 BTU HydroFlame, facing the furnace, it's on the right side under the fan cover. I removed the two screws that hold the fan assembly onto the furnace (one on top and one on the bottom) and the whole fan assembly lifted right out. The sail switch is under the fan assembly - in my furnace, it's got two white wires going to it.
-
Sail Switch Location?
mustrmrk replied to Dolphinite no longer here's topic in Coach ApplianceTech Issues
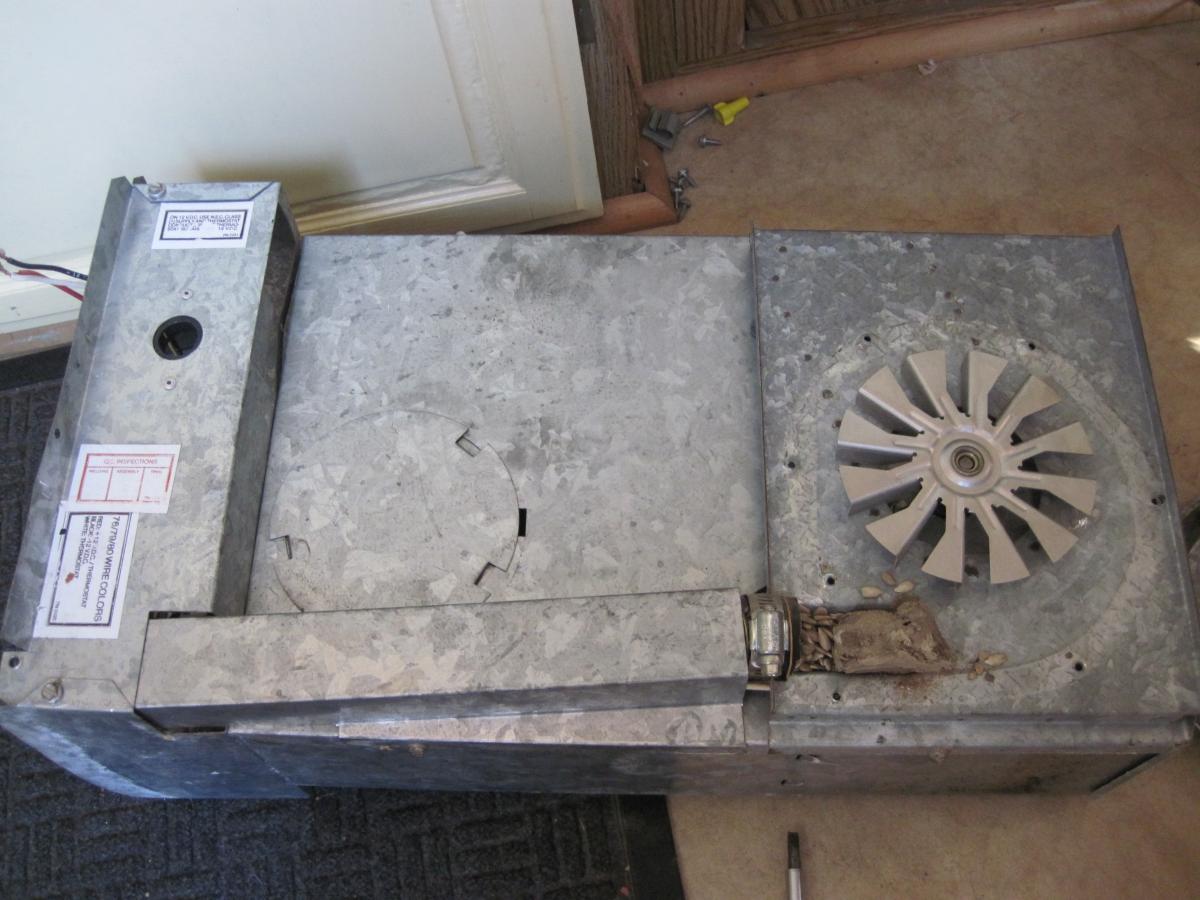
Nothing visible from outside, so I pulled the unit. Opened the blower cover and found .... a mess of sunflower seeds!!?!?!
-
BobC - As previously stated: 22re, new cap, rotor, plugs, wires, timing set to factory specs. TPS and MAF both test fine, both have new pigtails, and, as far as I've been able to determine, the TPS is adjusted correctly. WME - I didn't know the HAC was only available on carbureted vehicles - thanks for the clarification - I'll drop that line of inquiry. So, if the ECU automagically advances the timing for higher altitude / lower oxygen levels, is the manual adjustment suggested by JD, above, rendered moot? Is it possible my O2 sensor is sending an erroneous signal to the ECU? Guess I should test that, too. Maybe I just have too much crap aboard....
-
We have had a smell issue with our holding tanks a few times, especially as they get full. We quit using the blue stuff a while ago and started using washing soda and laundry detergent w/ very good results, but we still got a smell when we were cruising along at 45 or so w/ the vent windows open. After some research, we decided to spring for a "360 Siphon" vent from Camping World. The local store where we were at the time price matched the "discount" price we found online, so we bought it, took it "home" and installed it. It has made a huge difference. I like it because it's simple, w/ no moving parts, and it is really quite effective. Here's a link: http://www.campingworld.com/search/index.cfm?N=0&Ntx=mode+matchallpartial&Nty=1&Ntpc=1&perPage=96&affiliateid=3641&gclid=CPSdp9L52MgCFU6SfgodF94LTg&Ntt=360+siphon&Ntk=primary