showson1
-
Posts
19 -
Joined
-
Last visited
Content Type
Events
Profiles
Forums
Gallery
Everything posted by showson1
-
New RV owner
showson1 replied to the melanie's topic in Improvement and Do-It-Yourself Projects you have done to Share!
Thanks so much for posting this! We're fixing up our '86 dolphin and we're FINALLY at the point where we're painting the interior. After that we're going to take out the windows to reseal them and, while they're out, we'd like to paint it. Good to see yours turned out so nicely! -
I'm 40 and wife is... some age other than 40. If I mentioned her age I would no longer be able to post, as I would be too busy recovering from the flogging she would give me. Our rig is a 1986 Dolphin with the rear bathroom and middle dinette. Got it last spring, did some work to it and had a blast camping all summer. Did / am doing a BUNCH more work of the winter / spring and looking forward to our first campout of the year next month!!
-
If anyone is interested I've done a ton more stuff to our little guy since posting this.. it's all blogged at the site in my signature, but here's a rundown: Installed an outdoor shower, hooked in to cold and hot water Completely ripped out the horrible paneling the previous owners had on the ceiling and reinforced all the ceiling frame Installed a powered vent in the middle of the RV and a non-powered one in the bathroom. Re-insulated the ceiling and replaced all the ceiling panels installed a light in the ceiling just inside the door Reinforced the wall between the rear bench seat and the bathroom. Put 1/4 round trim in all the wall corners and between the Replaced the floor with laminate that we got for free from our neighbors Rebuilt the dinette bench seats To-do: Add 1/4 round trim between cabinets / wall and floor Prime everything Paint everything Coat the roof with sealant. Pop out the windows and re-seal them. Paint the exterior. On the site you can see what it looks like now and it changes on (almost) a daily basis.
-
Just to build off of what waiter said here.. I have (what looks like) the same model and was having trouble getting it to work off gas (at first).. couldn't get the pilot to stay lit. What I did was remove the covers off of everything that could be easily removed and, without touching anything under the covers, used compressed air to blow everything out. I also read that rust and other particles could settle in some of the components, so I lightly tapped the pipe (along the right side in waiter's picture above) and blew away anything that fell out (some very fine particles did come out). I kept repeating that until nothing else fell. Then I put the covers back on and bled everything through until I could light the burners on the range, then turned it off. The I held down the pilot clicked the ignitor twice and it fired right up. I used it this past weekend while camping and it stayed nice and cold. HTH..
-
Thanks. I did much research over the past couple of weeks and those are exactly the tires I'm getting and I found the best price I could and tires are already ordered. The mounting, balancing, etc.. for all six is going to be $95.40 ($90 + tax) total at a local dealership. All in all I'm right around $100 per tire, including mounting and balancing.
-
Definitely making progress on this beast.. some updates are: Got the water heater working.. didn't think this was going to happen. Hooked city water back up Re-routed fresh water overflow / vent hooked up fresh water tank drain Next on the list is to get the new tires (ordering tomorrow) and get the fuel fill line and hoses replaced (taking to mechanic tonight). Next month we'll have the belts replaced.. they're OK for now, but should be replaced next on the list. I'm so psyched because when we got it the guy said the fridge worked off AC only, the burners work and water pump.. that's it. Since then I've either checked out (including the fridge on propane), or gotten working (furnace and hot water heater) all the appliances! Looks like we're still on track for Father's Day weekend being our first outing.
-
Reconnecting fresh water tank drain?
showson1 replied to showson1's topic in Coach ApplianceTech Issues
Thank you SO much man, I really appreciate all the info. I spent ALL day working on the Dolphin today.. the majority of that was working on part of the frame as there was some really hokey stuff going on. Anyway, I got the city water and tank drain hooked up and I re-routed the vent / overflow from going through the floor to the connection next to where you fill the tank. I had to get some adapters to reduce the hose size, but got everything hooked tested and checked for leaks, it's all good! Thanks again, I was having a heck of a time figuring out how to hook that up! -
Starting the pilot on water heater - SIT-610 AC3
showson1 replied to showson1's topic in Coach ApplianceTech Issues
Thanks Davidadro.. since my hot water heater is working, I'm going to stick with it for now. A tankless heater is definitely something I want to look into.. but have a LOT of stuff on the list ahead of that. -
Starting the pilot on water heater - SIT-610 AC3
showson1 replied to showson1's topic in Coach ApplianceTech Issues
Thanks Linda. I know.. I feel so lucky that all the appliances work. We bought for dirt cheap "knowing" they didn't work, so what a bonus that they do! I don't mind buying parts and fixing, but replacing would probably have been more than I wanted to put into it.. -
Hi all, We bought a cheap Dolphin in rough shape that the guy told us the fridge, burners and water pump were the only thing working. Well, since then I've either tested or fixed the oven, furnace and water heater! yeah! My question is for the water heater, I got the manual for the SIG-610 AC3 online and figured out how to manually light the pilot.. it stays lit and when I switch it to ON it flames up.. good deal. Question is, is there a way to light the pilot other than manually lighting it. We have one of those long handle lighters so I turned to the PILOT position, pushed it in and lit it with the lighter. I didn't see any button to spark an igniter and the manual just talks about lighting the igniter but doesn't say how. Is there an igniter on these, or is manual the way to go? Thanks.
-
Reconnecting fresh water tank drain?
showson1 replied to showson1's topic in Coach ApplianceTech Issues
You were right on man. I took a look at it and sure enough there's a little hole next to where the place to fill it is. I looked at the back and there is no hose hooked up to that.. so here is my plan (please tell me what you think). Attach the new valve to the place where it's missing on the outside of the RV Pull the line (that's going from the top of the tank out the bottom) back up out of the floor and hook it to that vent / overflow spot next to the fresh water fill.. or run a new line from the tank top to that spot. Attach a new hose to the new drain valve, run it up through the hole in the floor (where the hose from the top of the tank was) and splice that in to the spot near the tank (indicated in the second picture in the OP). It's my understanding that this drain just works by gravity and I don't need to put anything between the splice and the drain valve.. is this correct? Thanks so much for all the info, it's been VERY helpful. -
Reconnecting fresh water tank drain?
showson1 replied to showson1's topic in Coach ApplianceTech Issues
Thanks, I don't remember seeing a connection for the vent on the fill port, but I'll check when I get home. So are you thinking that the drain should be going out that hole to the valve and not the overflow? Thanks. -
How to install a captain's chair in '86 Dolphin?
showson1 replied to showson1's topic in Coach ApplianceTech Issues
Thanks, I'm actually thinking about taking the front facing dinette bench out and putting the captain's chair where that was.. Anyone have information on how to securely attach that to the coach? Thanks. -
Reconnecting fresh water tank drain?
showson1 replied to showson1's topic in Coach ApplianceTech Issues
The only hole I saw is the one that the hose from the top of the tank is going through.. there's no other visible holes from the tank area to the undercarriage. -
Hi all, Not sure if this is the right area, but couldn't find anywhere else that would fit. We're thinking about removing the front facing dinette chair and replacing it with a captain's chair.. we have our reasons, but my reasons would lead to a whole different discussion so I'll leave it out. Does anyone have any information on how we would go about installing it? Does the captains chair get bolted to the frame through the plywood subfloor? Thanks for any information.
-
Reconnecting fresh water tank drain?
showson1 replied to showson1's topic in Coach ApplianceTech Issues
Hi John, Well yeah, that's what I was saying in the post. I got a new spigot, know where it goes and think I identified the line drain line that's split off.. just don't know how to run the line to connect the two. Do I put a new hole in the floor and run the line to the spigot? There is also a line from the top of the tank hat drains straight out the bottom... do i tap into that and redirect that to the spigot? Not sure where to rub the line to get it to the spigot I'm going to install in the place it's currently missing. Thanks -
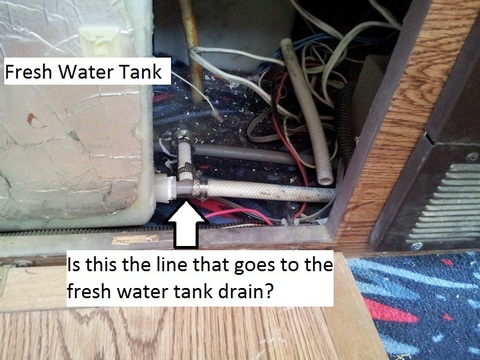
Hi all. A few weeks ago we got a 1986 Dolphin and I've been working on fixing stuff up (made another post in the improvements section if interested). One thing I'd like to get hooked back up is the fresh water tank drain. Right now the little "T valves" that drain out the bottom work when the pump is on, but the fresh water drain is missing. I got a new valve and think I have identified the line. Right now the fresh water tank is under the bench and I believe I identified the drain but it's cut and capped (see 'fresh_water_drain.jpg attachment). I also identified where the valve should go in the 'dolphin_drivers_side.jpg' attachment... it's labeled as 'Missing connection, not sure what this was...' (I've learned a few things since I took the pictures... haha) Anyway, I'm not sure how to get a line from where it's split off by the tank down to where the drain is. There is a line going from the top of the tank, through the floor and draining out the bottom. I'm assuming that's an overflow, so do I splice into there and run it to the valve or do I run a separate line, put it through the floor and out the the drain, or am I missing sometihng? Thanks so much for any info!

-
Thanks so much. The tankless water heaters are definitely something that we've considered and it may be something that we add in the future. What generator are you using? Thanks a lot
-
A couple of weeks ago my wife and I just got our first RV / Motorhome - 1986 Dolphin. The engine is in good shape and just needed a tune-up, hoses and belts replaced and the fuel filler line. The hoses and line will be done early June and I already did the tune-up. It needs new tires and found some 185/R14 tires for about $600 (for all six) online and found a place to mount and balance them for $15 / tire. The inside is a little rough, I think it must have had a leak at some point and the cabover and rear have had some surgery done. As far as the inside, they did a horrible job re-paneling the walls. the carpet was hideous and they only appliances that were working were the burners and the fridge off of AC (or so we were told). The water heater is there, but I'm not going to try and hook it up again. It's set for bypass and the hot water lines are cut.. since the shower is gone I don't think we'd use hot water anyway. I started checking out the appliances and after confirming that the fridge works on AC, I totally blew it out with some compressed air and was able to get it working off of LP as well. The guy said the furnace never worked (they only owned it 2 years) and wasn't even hooked up. I got all the manuals online and started checking it out and it LOOKED like it was OK, just didn't have the thermostat hooked up.. which was disconnected and just laying in one of the upper cabinets. I figured out where to hook that up and fired it up (with LP off).. the fan came right on.. good sign. I turned the propane on, it tried three times to light and didn't. I turned it off and back on again and it lit on the first try and within a couple of minutes we had nice hot air coming out! All four burners and the oven work.. don't imagine we'll ever use the oven though. The electrical outlets work off of AC and the DC lights seem to work fine as well. Toilet is there and works, but rear sink and shower are gone.. there's a closet where the shower used to be so I built some shelves in there. So far we've replaced the floor, made covers for all the cushions, added shelves, fixed drawers, made some window coverings, got the furnace working, got fridge working on AC and hung a toilet paper holder (saved best for last). We have a few more things to do before we take it out, mainly the hoses and tires and we plan on taking it out for Father's Day weekend. Over the winter I'm going to gut it and replace all the walls and ceiling, as well as build some additional cabinets. I've created a site if anyone is interested in looking at / tracking the progress: http://86dolphin.blogspot.com I have some before and progress pictures and I'm trying to update it at least every other day. I'm on the Yahoo Toyota-campers group, but just signed up for this site as well and it looks great! Thanks.