ToyoGuy
-
Posts
331 -
Joined
-
Last visited
Content Type
Events
Profiles
Forums
Gallery
Everything posted by ToyoGuy
-
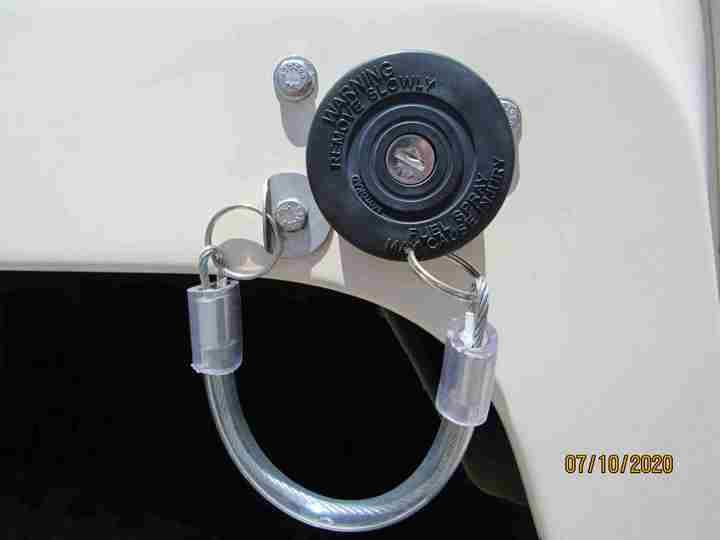
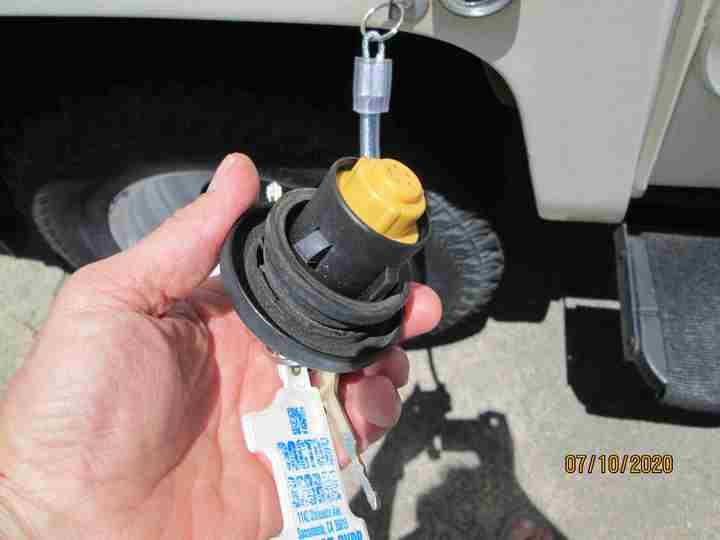
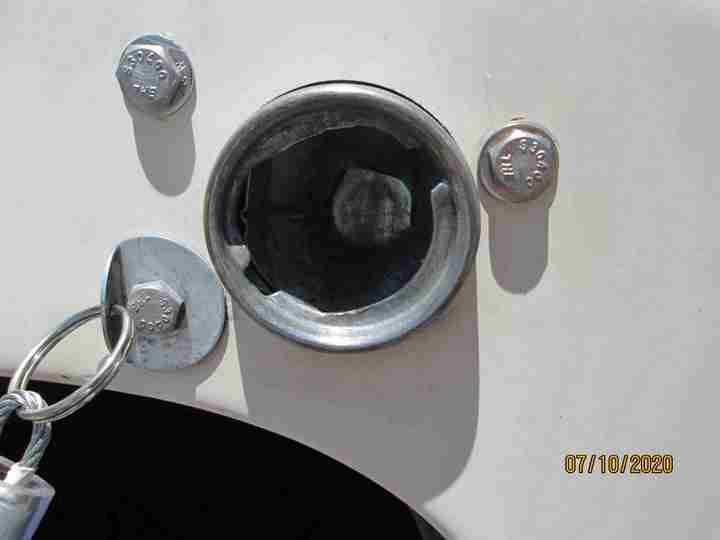
Mine is a replacement, plastic push-to-lock, non-screw-in. I bought it in Missoula, at O'Rielly's I believe. Sorry, no part# on it. I vented it by drilling a 1/8" hole sideways in the rubber seal because the system pressurized too much when the tank was absolutely full and outside temps were over 90 or so. You'll note, the throat looks able to accept both screw in and twist-lock. Also note, because my 4x4 fuel filler pipe is shorter and located in the wheel well, it sits a little lower and stock 2wd might tolerate a non-vented cap a bit better. You can see I don't intend to lose many more caps in the future. Somewhere on another plane of reality, there's a bunch of my unmatched socks and gas caps. Hope this is helpful. (the first part) BR, TG

-
 Hey Bigdog, I added power steering to my '84 SunRader years ago. What a difference in a 4 WD!! I bought the pump and lines together, used on Craig's List, but they should be available through a regular salvage yard. I think I paid $125 for all of it, then about $200 to have it installed (Note: prices from 6 yrs ago). If you have the dough, I say go for it, it's a game changer in parking lots at low speed and on tight parking. I don't notice an appreciable load on my 22R motor at any speed. You might have someone rebuild your pump or at least have it inspected prior to the install. BR, TG
 -
I can find plenty to buy, but I am curious to know whether stock '84 and '85 trucks are supposed to have vented or non-vented gas caps. I currently run vented in my '84 Rader Monterey and non-vented in the '85 stock PU. Some caps on the RockAuto site under the either "vented", or "regular" description, show "emission control" whatever the heck that means, is that maybe "sorta-vented"? Also, it seems like even a vented cap would have a pressure threshold before it releases? So much to want to know... TG
-
Extremely LOUD inside cabin with campershell
ToyoGuy replied to Northoak's topic in General Discussion
Might consider that the flat steel surface beneath the back window, behind the seat in the cab, has no stock insulating or vibration dampening properties whatsoever. It is possible that it's susceptible to sympathetic vibration from the driveline that might occur at a certain speed. (No mention in your original post as to low noise vs high freq noise) I have had 5 early Toyota PU's of various years, regular and Xtra cab, and one ('84?) with a setup pretty much exactly like yours aluminum camper and all, and never had an issue. Have you ever had the camper off to see if it's the problem? Just a thought or 3. BR, TG -
Interesting what seclusion drives normal men to...... Also interesting that the 3/4 ton load spec is making a comeback over there. (or maybe never left) As usual, the fiberglass-coach Stallion bears an uncanny resemblance to an 18' Rader, even with the single rear wheel tucked so far inside the wheel-wells. Hope the suspension and weight-distribution has some provision for that. And, as always, the coach entry-door looks so weird to me on the driver's side of the coach. Good stuff Derek, never a dull moment with you. BR, TG
-
Hey Iflyfish, I PM'd you on this, I could use some parts d/o the cost. Thanks, ToyoGuy
-
Yeah, my LSPV is history as well, no love lost there. The rest all makes complete sense, thanks. TG
-
Yeah, if the smaller calipers will fit over the thicker rotors I guess that would work. It would sure save money for the spacers and new calipers too. (Hadn't figured on the spacers, yikes) Have you set any of your Yotas up this way? Also, for comparison, any idea what your rig weighs? I'm at 5,800 lbs.,and that's un-provisioned too. Thanks, TG
-
Hey there '84 4x4, Was cruising through stuff and saw your posts and eventual completion. Good tight looking rig and somewhat unusual. Sometimes I think I could use an extra 2' and sometimes I like the angle of departure that I have at 18'. I am for sure not getting the sawzall out again anytime soon though. I am however, interested in how much braking power you gained when you swapped up to the V6 vented rotor system up front. Was it quite noticeable? Is it a worthwhile mod for the dough? Before I knew of the upgrade, I replaced the stock solid rotors and all equipment up front. Coming over the Sierras, on the downhill side of 89/Monitor Pass, there's still "room for improvement". Thanks and stay safe and healthy, BR, TG
-
Hey there Royal, been there and done that on the furnace invasion with the mud dauber nest in the squirrel cage. It was not cheap for the new motor that was already blown. There are exhaust vent covers available for pretty reasonable for those who don't know. (below) Do make sure that you get a good quality stainless one however, my first was a cheapo and rusted. Possibly consider buying some additional screen to cover the louvered vents (from the inside) to the water heater, genny and LPG doors. It's a nasty surprise on a sunny afternoon to open one of those doors and be greeted by an angry wasp or three. I cleaned the inside surface and used clear caulking to attach it. BTW per your "Interests" tag, like you, I love fixing stuff but am noticing that more and more of the new stuff I am buying needs fixing right out of the box. Thanks for your post and fix. BR, TG
-
Here's an outside look for how I ended up. The clearance at the middle and up the straighter portion is about 3/4", then it tapers off. Bear in mind this is where I ended up and just my approximation of what stock should have been on my rig. Depending on your PO's work, and wear and tear, things may be different for you. Good luck, TG
-
Hey Rick, Stopped in and saw your question/reply. I live a block from another 18' owner now, exact same model etc. and have studied other coaches as much as possible. My opinion is that none are exactly the same, at least from what I have seen. I also met a guy who worked in Vallejo at the west coast factory. He knew way too much about my rig to be blowing smoke and regaled me with "tales of the crew" for a bit. They did their best, ......most days.... The finished product, dimensions, quality of work and flaws varied and as Linda said, any previous fiberglass work can also affect how much you can correct distortions and weaknesses. I just tried to get the sides even-looking and reasonably straight. My side braces had about 1" space at the middle/apex on each side, so there is a very slight bow to both sides. I filled the gaps with foam appropriate to fiberglassing then encased most of the length, as you have seen. Linda is spot on in her observation, in my opinion. Long term force and heat over time can distort sides and roof. As she mentioned, make sure you can get a good seal on the window flanges and that they sit as flat as possible. Hope this helps. TG
-
SunRader Interior Walls/Roof Support for rebuild
ToyoGuy replied to whittlesey001's topic in General Discussion
Thanks Rick, You know, I've been haunting this website for 10 yrs now and I still find stuff I "wish I would'a known then". Also, as far as textbook, bear in mind, it did sit in my back patio for 3 yrs.... A lot of people were out and on the road having fun while I was still figuring some of these things things out. Based on your post, you have some challenging projects ahead. Maybe get the rig water tight and ready for a summer-break and leave some cosmetic interior stuff for next winter. I ran a heater inside sometimes during the winter to get my hands thawed out and stuff done. (plenty of ventilation at that point) BTW, IMHO, get a good friend to help you with those front windows, you'll likely need it. There are some excellent entries here on how to go about it. Thanks again for your kind compliments, TG -
SunRader Interior Walls/Roof Support for rebuild
ToyoGuy replied to whittlesey001's topic in General Discussion
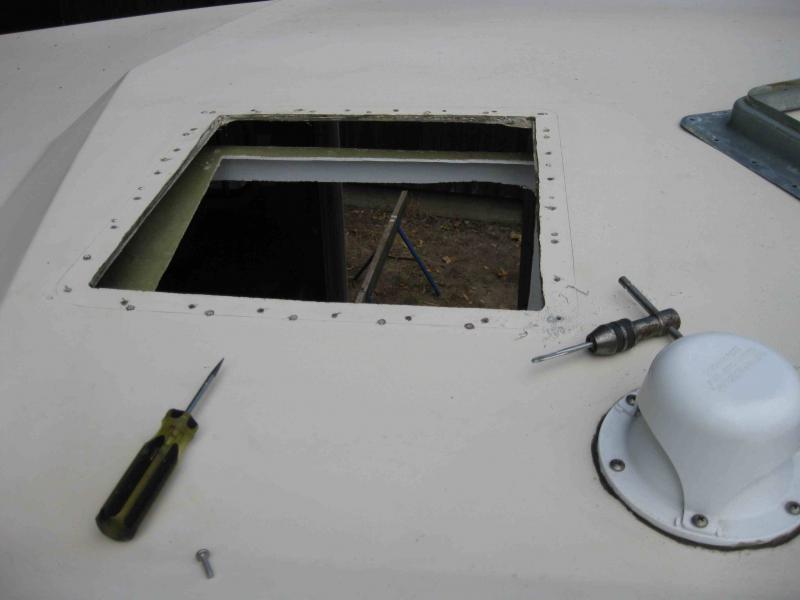
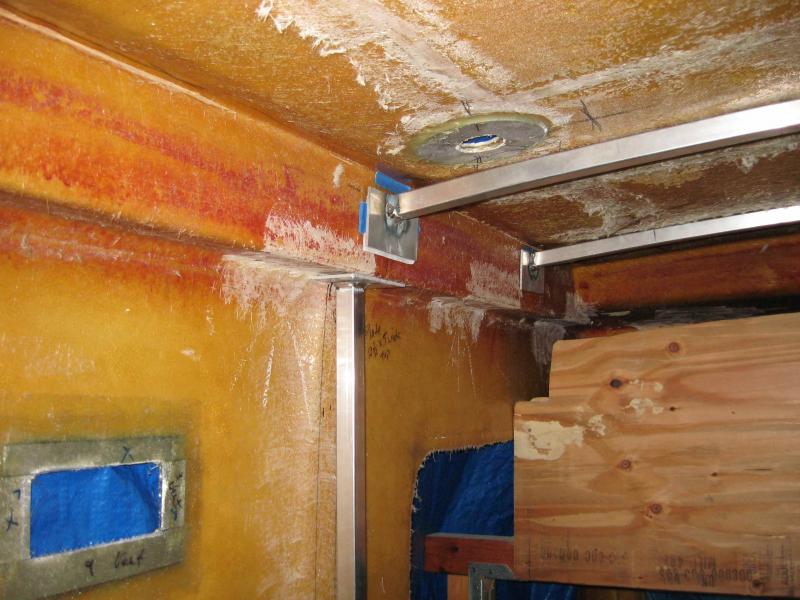
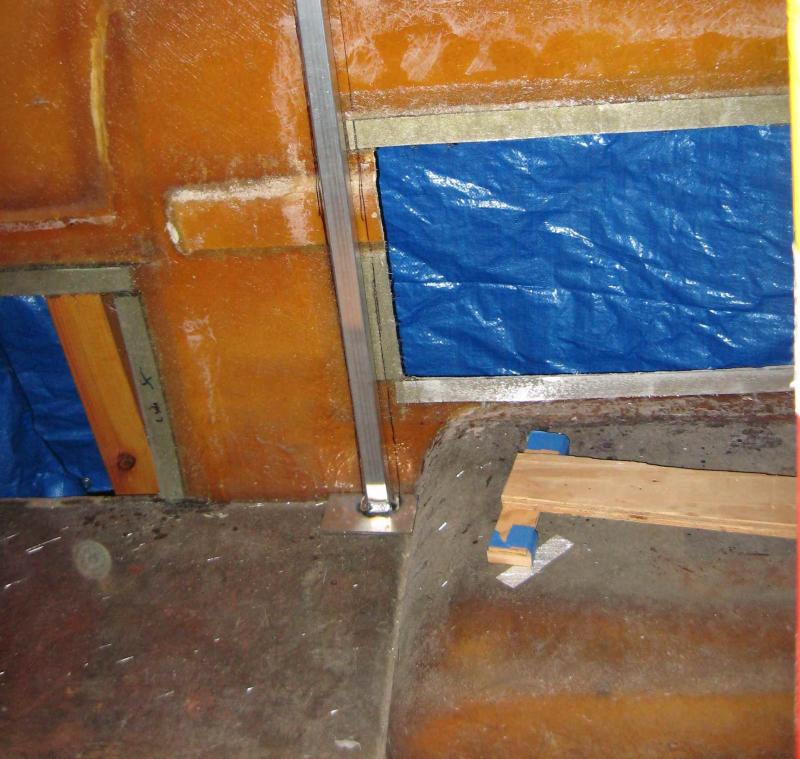
Hey JaySam, I meant installing 2 more braces in the overhead-bunk area. In the 18' Back-dinette model, with solid (new) flooring, the bath and shower-stall seemed to support my middle-ceiling well. I went with wood bracing in the bunk area, but now I'm spoiled by the great resilience in the back and, in hindsight, I wish I'd gone the extra-mile up front too. Just a personal fabrication quality thing. On the other, I fiber-glassed the end-plates to the wall. (photo below) I used alternating random and oriented weave cloth over the plate, as advised by my friend who owns a fiberglass construction company. My last confession, on the screw thing, as an obscessed yard-sale engineer, is that I machine tapped the screw holes for stainless machine screws in backing plates for everything that mounts from the outside of the coach. (top vent photo only) I did the ladder, stove vent top racks, LPG port, Wtr Htr port etc. I have no regrets, particularly when I have a repair or maintenance to do, and everything screws back together nice and smooth and tight, time after time. After initially tapping 10 or so holes by hand, I discovered that with two drill guns, I could drill the hole through the backing aluminum with one drill, then lube the tap bit I had mounted in the other drill gun and, at slow speed, carefully tap about 1 hole per each minute or so. Again, just my method, not for everybody. Hope this helps, TG
-
SunRader Interior Walls/Roof Support for rebuild
ToyoGuy replied to whittlesey001's topic in General Discussion
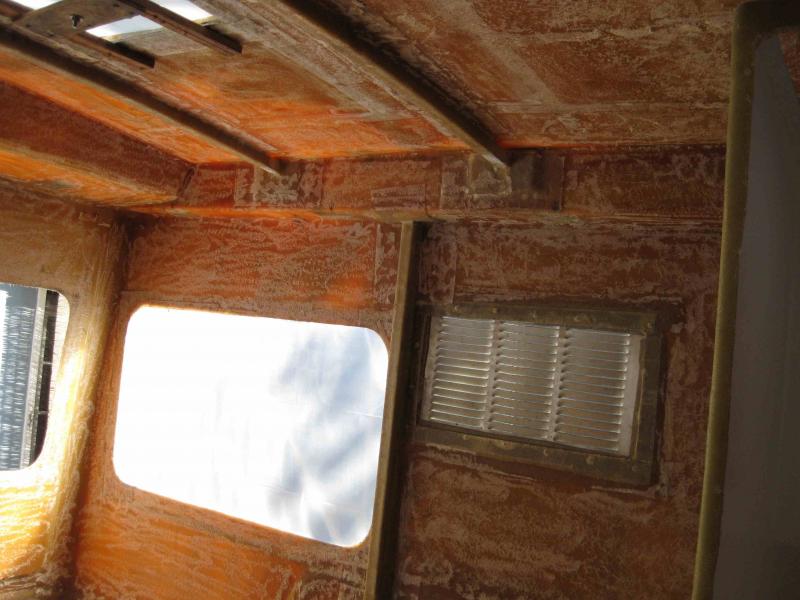
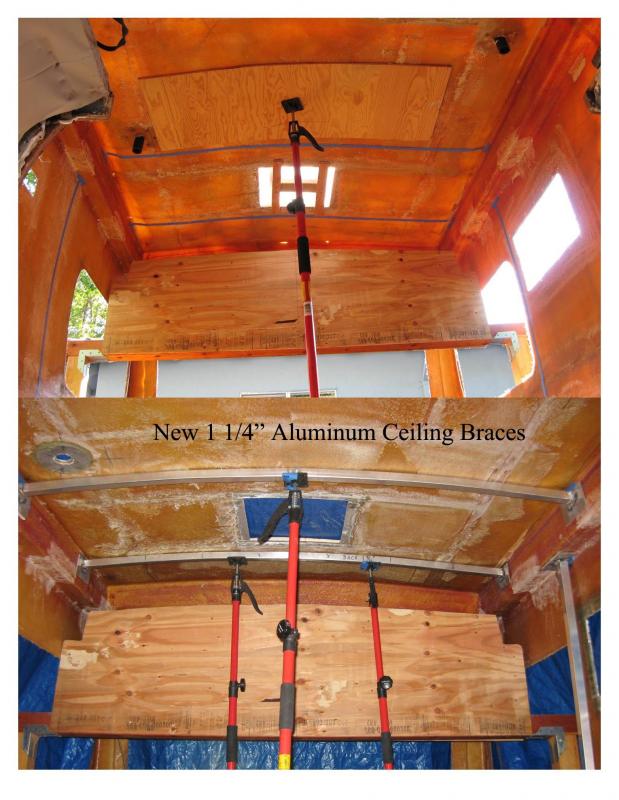
Hi JaySam, My roof, like many, had been the victim of an unsupported A/C unit and as a result, had sagged probably about 2" +/- allowing the back to collect water and leak at the vent port causing all matter of rot in the interior paneling and mounting cleats. I had the same concerns you do about restoring the original arching too quickly, but I did it in the heat of summer here in Kali and went a bit at a time over a couple of days. Also, though I recalled a 3/8" piece of plywood against the interior roof, in my prior entry above, it may have been 1/2' or 5/8". It seems to me I experimented with different scraps I had laying around until I got what "looked right" to spread the load under the roof and got it sort of matching the forward contour over the bathroom, where it's more supported by the shower stall under it as original. (mine is the rear-dinette model). One inch may do you, it all depends on how "pushed-down" your back roof is... A big help is if you can look at another SunRader, if there's one close by. I had no such luck, so I tried 3 jacks under the plywood, then 2 jacks and ended up using 1 as shown. After some time, it just looked like a sort of graceful curve, correct and not stressed in the middle. BTW, if you are into a complete interior re-fab, I HIGHLY recommend using something like the construction jacks pictured above,.Something very closely like them can be bought at Harbor Freight, or if you have a friend who does drywall work, he may be able to lend you something. After all, you will need something to hold up the finished braces to bond them to the ceiling (with 2 free hands) anyway. They were exremely useful when re-doing panelling and cabinets as well. Once I got the arc right, I made a cardboard template for each of the two brace locations, and folded them in the middle, overlapping one half over the other, then trimming both sides a bit to average them and get the (unfolded) arch even side-to-side on both. I didn't form and bend the tubing myself, since I can't weld aluminum anyway, and I had no stock, so I had it done. I likely paid too much, about $200 for material, and labor on 4 braces (I DID say $ Kali $, after all), but I also got this extremely good welder to strengthen the wanna-be welds on the roof- ladder without blowing-through the thin ladder tubing and that was definately worth doing. The only thing I would do different, if I were to do it again, is make and install 2 more braces for the front roof, that's all. Just take your time and do lots of test-fits, stop, have a cup of joe and sit and look at it. If it doesn't look quite right, either come back to it tomorrow with a new head of steam or fix it. Remember, if you compromise, every time you walk under it, you're going to wish you hadn't. I got stuff wrong and went back to fix it. It's how we get to be better fabricators. Don't forget to leave a bit of space at the corners/ends of the uprights to pass wiring through, at the top of the sides, if you're going to re-wire the coach. I suggest an opening at least the size of a nickle, more, if possible, as you may want to take the opportuniy to upgrade to larger gauge wire. See strips in above pix. PS Consider backing fridge vent panel and water heater door port screw-holes, as well as any other exterior screws prone to stripping, with 1/8" aluminum sheet to give exterior screws a lasting bite. Most of my exterior coach screws were either stripped, or ready to go. If you're loaded with jing, go with stainless screws. I'm gonna stop here...... May the Hardware Gods be with you, BR, ToyoGuy -
SunRader Interior Walls/Roof Support for rebuild
ToyoGuy replied to whittlesey001's topic in General Discussion
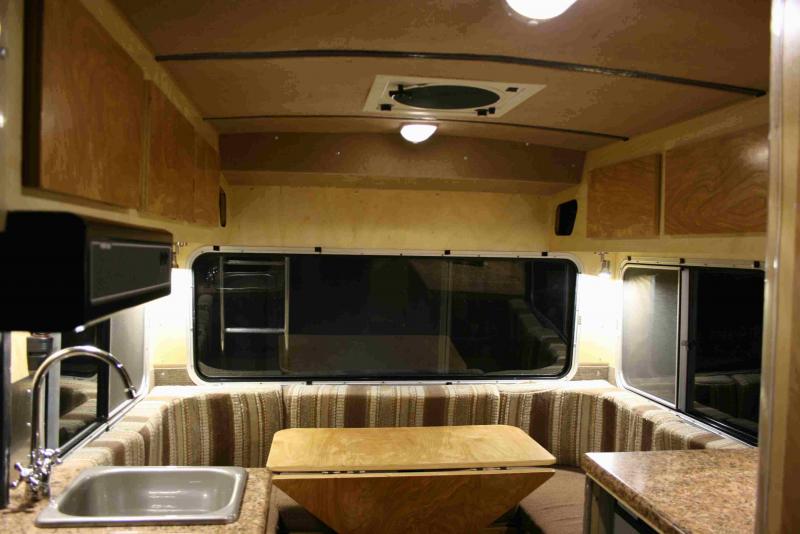
Well Hello All, I have been too preoccupied with other matters of late and after visiting for the first time in quite a bit, happened across this thread with some regret. I am not sure what the original poster ended up fabricating, but, indeed the same thought occurred to me before him some time ago and I went with it. I'm not saying this is the "best" way, or the only way, just "another" way that has been done. My usual disclaimer, "It worked for me". My reasons for arching 1 1/4" aluminum tubing to the roof contour, (created by using a brace and spreading the load with a piece of 3/8" plywood as pictured below), instead of going straight across and filling the space in the arch, was to create as much headroom as possible. I am 5' 9 1/2" and can now comfortably walk around in my finished rig with a smidgen of head space. I considered the remedy that was used by BFNW, but I also wanted to correctly re-arch the sagging roof as well anyway, and wanted to install straight upright braces to strengthen the walls, to prevent what some RV builders call "oil-canning" or booming in the walls when driving in forceful winds. I do not regret either modification and, after about 3 yrs, have found no downside to the mods at all. The tubing was/is wrapped and attached to the walls/ceiling in 3 alternating layers of fiberglass .(oriented strand cloth, then random strand cloth, then oriented strand cloth) It is a challenge to 'glass upside down, but do-able. (For any large piece of fiberglass-work, I recommend buying a tyvek suit to save your work-clothes and clothes washer, use the hood or a hat and also wear goggles) In the end, with a layer of reflectix stacked on top of a layer of 5/8" rigid insulation against the interior shell between the braces, and topped by 1/8" ply that is upholstered, the finished ceiling came out flush with the 'glassed-in tubing and the braces are flush. (See finished pix below) Anyway, I hope this might be helpful to anyone questioning the feasibility of a similar solution. I hope all are warm, dry and well. BR, TG
-
Well, whatta deal, just got home and checked in on this thread and was grateful to find data and pictures from more experienced folks on this hydraulic stuff. (That must be why you guys get paid the big bucks) This proves particularly beneficial with regard to how to do the mechanical plumbing on this simple-sounding but somewhat mysterious mod I've heard discussed for some time, but never had explained mechanically, top-to-bottom. I may be wrong, (imagine that ), but I think the time spent outlining the nuts and bolts of this commonly overlooked system's operation and the possible alternative solutions will help a lot of members stay safer. (Not to mention the ability perform a very useful maneuver called stopping, when and where you want. well, .....as close as possible anyway) Many thanks to AtlantaCamper for the very helpful photo and DerekUpNorth, Linda s and Maineah for the diagrams and experience. BR, TG
-
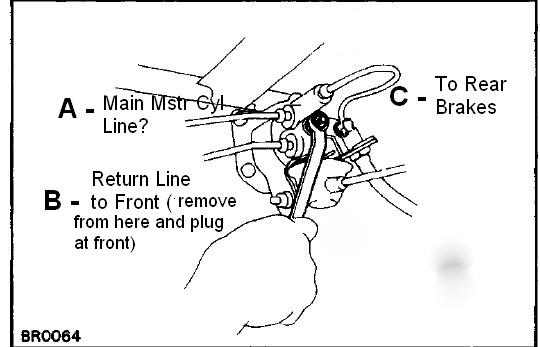
Thanks to all for checking in on this meaningful topic. In the picture below, it seems like the top port (A) should be the main pressure into the valve from the master cylinder, right? So, If I get this right, Line A gets connected to line C by whatever means possible.. brass block, or L-shaped steel manifold,( hopefully without having to cut or modify it), and Line B, the re-direct or return line gets plugged / terminated (somewhere) up front and is eliminated altogether from the rear brakes. Or, do I have Line A and Line B labeled bass-ackwards?
-
Hey Linda, Thanks for your thoughts on this. Yeah, after a go-back, I held the grumbling brake shop's feet to the fire on the rear adjusters, and I think it was you that finally told me there are Ford brake parts that would retrofit for missing Toyota stuff. At any rate the rear adjusters work now. On hydraulic flow, in principle, I agree with you, but when I ask people to make a definitive statement about what's most cost effective, safe and functional, everyone kinda goes squishy on me. On the youtube video, I'm confused about a couple of notes the guy makes in his initial disclaimer, and then 2 years later... In a portion of the initial heading/disclaimer: " do not delete the LSPV. There are mixed opinions on this topic but I stand behind mine. The LSPV system is a constantly variable proportioning valve. No manual proportioning valve can claim to work as well. Also, when I removed the LSPV the rear brakes never worked as well. For reasons unknown, the automatic brake shoe adjustment system ceased to work after this mod. I dealt with this for less than a year before installing a functioning LSPV from the junkyard. " Then 2 yrs later, same video he has added: 5 years ago If you remove the LSPV then you must cap off the third line from the junction at the front brakes and install a proportioning valve for the rear brakes. I will also add this: I didn't leave it like this for even a year. Removing the LSPV caused the rear brakes to suck and the auto adjustment for the drums stopped working correctly. I get fed up with it and installed a working LSPV from the junkyard. I recommend refurbishing your OEM system rather than doing what I did with the LSPV. Not sure what to draw from this ummm, ...."ambiguity"? Sure like his front brakes though. TG
-
Thanks jjrbus, I used a Harvard Freight infared heat-sensing gun, I think it was about $25 on sale. It was one of those "oh, what the hell, this looks like it may be useful" purchases, and it has become invaluable for troubleshooting cooling system, brakes, over-worked alternator, plus checking the fridge-alcove, inside of the floor of the cab and walls of the coach after installing insulation etc. I also use it for checking cooking temperature on the BBQ and oven temp when I'm baking cookies. My wife uses it to check the tub-temp for baby baths, go figure. Thanks Markwilliam1, I'm leaning toward just replacing the valve assembly and wiring the valve all the way up. No one seems to have experienced a massive performance leap after eliminating the stock valve altogether, bending brake lines, re-flaring and refitting to a generic "T" fitting, so why pay for, or do all that? I'll give it a couple of days to let anyone else chime in, then invoke my usual SWAG (Scientific Wild-behind Guess, for you non-military types) process and swap it out. BR, TG
-
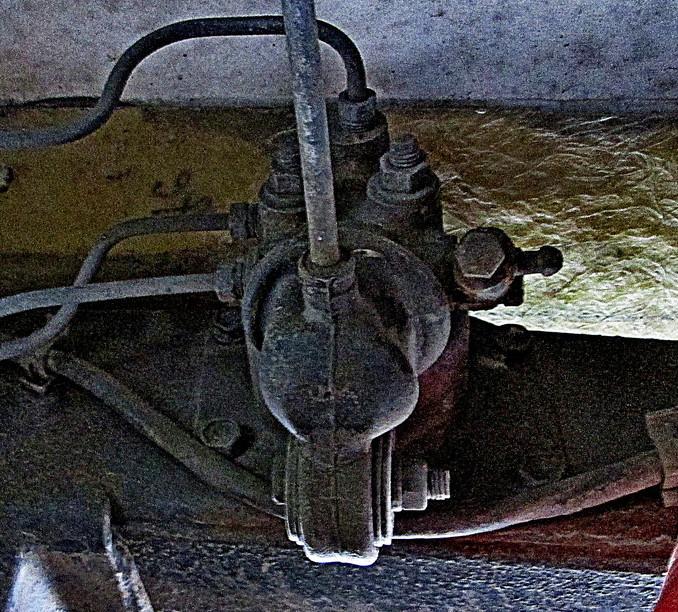
Well, I'm late to the discussion as usual, but after doing a significant amount of research above + beyond, I have a few questions that I'd like to pose to members who have tackled the LSPV valve or "un-balanced braking" issue, or those who may be in the process of modifying their system. But first, my situation is this: I have an ‘84 4x4 SunRader. The current LSPV is one with 3 ports. See Below. About 8K mi. ago the vehicle underwent a brake system inspection and subsequent stock rebuild. This included new stock rotors and calipers in the front (next time I’ll replace them with vented LandCruiser units), new master cylinder and turning drums and new rear shoes. Prior to this, I had wired the LSPV valve all the way up, after reading related posts and data ad nauseaum. It appeared to had little to no effect. I have always noticed front-heavy braking and lots of brake dust accumulating on the front rims, but no side-to-side pulling on an even road crown. Most recently, I have felt some slight pulsing in the pedal, feeling suspiciously like rotor warp possibly caused from over-heating. In an effort to arrive at a better understanding of WTH is going on, I recently took the rig down a very steep local grade on a very chilly day, using only brakes and no downshifting to slow down. At the bottom, I slid underneath and checked the temperature of the brakes of all four wheels. Both fronts were 175 degrees (even side to side) and both of the rear drums were 65 degrees (even side to side). According to my wheel and brake guys, this seals the too-much-front brake diagnosis and I now want to deal with it. It seems clear that the valve is faulty. My question is this: Is there any performance difference between replacing the stock LSPV valve (retrofit at about $165.00) and wiring it open / up, and/or plumbing in a “T” ? (swaging tool needed and possibility of acquiring the ability to swage steel brake line x 3 ?). For some reason, local shops seem to think this "T" modification is worth about $600.00 and claim it’s not as easy as it seems. The rumor is, bleeding the system is an absolute pain, even with a vacuum bleeder. I know Maineah replaced his, but I don’t know if the unit was functional, but lacking when he did, and if it improved any with the addition of a T, or if his valve wasn’t functional, like mine, and that was his motivation. As always, thanks for any useful input.. BR, TG
-
It's so cool that you took the time to finish up, do the pictures, the video, and dot the i's and cross all the t's,... for Amelia. She's rolling down the road out there somewhere. I remember emailing Owen right after you guys bought her. We were going to meet up here in Ca and you guys were going to look at my build for ideas, but the timing didn't work out. As far as most of the stuff/problems you shared about that shaped your difficult decision, I think I can truly say, "been there, done that", .....except for the selling, of course. I remember sitting there looking at a 1/2 finished coach with all the seemingly impossible problems and thinking "I'm just too far in to stop now". Being older and wiser now, after finishing, when people ask me what it takes, or how hard it is, I just say "If you can manage 2 engineering miracles a week, you'll do great". My build ended up costing about double what I thought the project would as well. The trap is, you just can't compromise after the work and material hit a certain level. Hearing that the two of you (+ Dad) took 9 months,....wow, unreal. Seemed long for you, but I took 3 years. I can't imagine how you did it that fast and held the bar for money, time and quality. So impressive. Myself, I just remember saying "just please let me finish it, I'll settle for that" . Of course I didn't. (settle, I mean). There have been some handsome offers that were hard to pass, but I love my rig and she's done as right as I know how. I do admit, I chuckled about the "death-grip" while driving an 18 foot, top-heavy, 5,500 lb, 9 1/2 foot high RV with hot brakes down a steep winding road. The handling on a stock 4x4 Rader can only be improved so much... I have been known to utter some very impressive expletives and make a face or two myself at the wheel of my own 4x4. For the record, I absolutely understand your decision based on your criteria. No need to mention here the 2 best days in the life of an RV owner... And,I know what you mean about learning from the project. Best of luck to both of you, btw, great new rig. Maybe we'll meet on the road some day. We can have some cocoa and you guys can see how I addressed some of the same challenges you two tackled. BR, TG PS Can't help but wonder what Dad's working on now that he's got his garage back.
-
Having removed and re-installed the shower-stall / bathroom in an 18' Sunrader, (rear dinette), I would concur with Maineah, Linda and Derek. You have to cut the shower stall up into pieces (very messy - fiberglass dust etc) and then you have more work to rebuilt the space. In my mind, two things,...... 1. You may meet a camping partner who would be mightily impressed with such a convenience , and, 2. If you must abandon the loo for grossness abatement, why not consider just removing the toilet and covering the waste outlet with a caulked and sealed plate screwed to the toilet flange. You could then utilize the area for storage or a closet. IMHO, the tear-out is very messy, and the rebuild is a pain if you change your mind. Congrats on your acquisition, TG PS For those with inquiring minds, I took mine out (and put it back) whole, under / through the back of the frame while the floor was out and the coach was jacked up.
-
Thanks Linda, That's the cheapest I've seen them. TG
-
Thanks maineah, It's true that most of the input I've gotten from mechanics on trips reflect the attitude that "If you're not in the neighborhood long enough to re-jet it, don't worry about it". TG