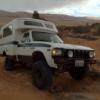
Iain Posted April 1, 2013 Share Posted April 1, 2013 Don't worry, you won't have to see this thread here for a year+. This build started Jan 2012, took 9 months to complete and the builders/owners have already returned from the 9,000 mile journey we originally built "Miles" for. We took a lot of inspiration from Galvanized Knight's build thread and I always wanted to give back to the community for all the ideas we gathered here. If anyone has any questions Please ask away, I will update this thread with the build details as I have time. We started with this: We "finished" with this: An awful lot happened in between those two photos and hopefully this thread will be of use to someone else who wants to build this same dream. Quote Link to comment Share on other sites More sharing options...
Iain Posted April 1, 2013 Author Share Posted April 1, 2013 When we went to buy the Chinook, we found that the owner had been using it as a mobile storage unit for many years. We had to unload this pile of stuff to even look inside. When we put the roof up we saw that the canvas had come half off and there was considerable water damage. After a little haggling on the price and fiddling to get the truck running we were ready to drive it home. That was a very frightening but interesting drive home. The truck needed a carburetor rebuild badly, the front brakes didn't work, and only half of the lights came on. It didn't overheat though and managed the 15 mile drive without stranding me so all's well that ends well. Shortly after getting the truck home it snowed and the project was put on hold for a week... This was also a great way for us to find ALL of the leaks in the camper! Quote Link to comment Share on other sites More sharing options...
XPSunrader Posted April 2, 2013 Share Posted April 2, 2013 Possible interest, more photos, info and price , Please. Location ? JohnBoston Quote Link to comment Share on other sites More sharing options...
Iain Posted April 3, 2013 Author Share Posted April 3, 2013 Thanks for the reply John but the truck isn't for sale. I just wanted to contribute to the board with a thread about how we built our truck. Quote Link to comment Share on other sites More sharing options...
Iain Posted April 3, 2013 Author Share Posted April 3, 2013 We started the build in Jan 2012 after most of the snow melted by rolling the truck into the garage and tearing the interior down to the frame. The water damage was quite extensive due to the OLD sealant around the frame and all the darn holes that the factory drilled through the fiberglass when assembling these things. There are some design elements in the Chinook that are very well thought out and well executed while there are others that were so half-assed it was almost offensive. It's a wonder more of these old trucks haven't burst into flames over the years. Bad water damage around the front of the camper area. There was a tiny bit of rot under the fridge area but not bad enough to tear the floor out to fix. The 12v wiring in this camper was atrocious. The boys in Yakima cut some major corners here. The walls are covered with this cardboard honeycomb as a stiffener for the walls. Ours was completely soaked and moldy from the leaking windows. It was glued on with an adhesive foam and it took us a couple nights of scraping to get it all out. After the "deep clean" we brought the trash to the local transfer station and unloaded over 300 pounds of ruined camper interior. We kept all of the appliances, the bed frame, and a few of the interior panels to use as patterns for the build up. Quote Link to comment Share on other sites More sharing options...
bajadulce Posted April 3, 2013 Share Posted April 3, 2013 300#'s is a lot of junk! How's the interior progress going? Is this a work in progress or finished? Pics or it never happened! it took us a couple nights of scraping to get it all out. I know a good Bday present for your wife or gf in that picture... Some nice work gloves! Fun fun fun. Quote Link to comment Share on other sites More sharing options...
Iain Posted April 5, 2013 Author Share Posted April 5, 2013 Gloves would have been a good idea! haha. Everything in life is a work in progress but this truck is mostly done. The build started Jan 2012 and we took a 4 week trip in the truck Nov 2012. After we gutted the interior we decided that the best way to work on the roof and the top rim of the lower body was to go topless. The roof on these trucks must weigh 200+ pounds and it was a nightmare getting it off with only two people. With the roof off we removed every bit of old sealant from the top and the main body. The goal was to seal up ALL of the leaks. We also wire brushed and painted every bit of the exposed rusty metal on the inside. Quote Link to comment Share on other sites More sharing options...
moroza Posted April 5, 2013 Share Posted April 5, 2013 Hey waitaminute, you've got a -78 cab in the first shot, and a 79-83 in the second... cab swap? Why? Staying tuned... Quote Link to comment Share on other sites More sharing options...
Iain Posted April 13, 2013 Author Share Posted April 13, 2013 Less of a cab swap and more of a camper swap... So with the Roof off we sealed up EVERY hole through the roof itself and the top rim of the camper. Our camper was full of holes and leaked everywhere, even from the tail lights. It was quite an exercise finding new leaks and filling each and every one. We wire brushed and painted all of the metal frame inside the Chinook body. EVERYTHING was rusted, some of it was just surface rust but other parts needed some repair. This is the front hoop where the worst rust damage was. Quote Link to comment Share on other sites More sharing options...
Iain Posted April 13, 2013 Author Share Posted April 13, 2013 We used motorcycle inner-tube rubber as a gasket and all new stainless hardware when we put the sliders/hinges back on to attach the roof. And a month after this all began, the arrival of this beauty started phase 2: This is how you pull the camper off the back side of a Chinook single handed in your driveway. I built these extra tall jack stands out of 2x4 pieces, jacked the truck up higher than I estimated the frame on the 4x4 to sit, put the stands under the camper and slowly lowered it down with all the bolts removed. I had to pull the bumper off and bend the tail pipe to clear the 2x4 stands but this really was a 1 man job. This is how the camper sat for a couple of months while I was busy with work and planning how best to proceed. Quote Link to comment Share on other sites More sharing options...
zero Posted April 13, 2013 Share Posted April 13, 2013 I don't recognize that curved rusted steel "hoop." What part of the camper did it come from? Is it something only visable after the top is removed? I assume with that curve it goes in front. Quote Link to comment Share on other sites More sharing options...
Iain Posted April 13, 2013 Author Share Posted April 13, 2013 I don't recognize that curved rusted steel "hoop." What part of the camper did it come from? Is it something only visable after the top is removed? I assume with that curve it goes in front. The curved part is the front support hoop that the rides just above the front windows. The 3 tie down loops for the front of the pop-top are mounted to this bar. Quote Link to comment Share on other sites More sharing options...
Iain Posted May 11, 2013 Author Share Posted May 11, 2013 Sorry for the delay, the next step was to pull the bed off the 4x4 and get to work on the support frame for the camper. This heavy frame is mounted to the truck frame in 8 places with big soft rubber mounts. After the frame was finished up I just backed the truck under the camper. I had to let the air out of the tires to lower the truck enough to fit under the camper. With one helper I was able to push the camper around fairly easily to center in on the truck. We used a heavy ratchet strap to pull the camper body hard against the cab. I used some rubber weather stripping to seal the floor to the back of the cab after cutting them to roughly the same shape. With the two pressed together I drilled through the floor and metal frame to bolt the camper down. The next step was to cut the pass-through. This feature is the main reason we wanted to have an RV rather than a pickup and camper. The original Chinook pass-through was too hard to get through so we tried something a little different. The original setup with our 76 Chinook supported the camper body by just riveting the fiberglass shell to the back side of the cab. This resulted in the cab of the 76 being cracked on both sides. There was way too much side to side flex in the front side of the camper without being attached hard to the cab. I build a sort of headache-rack that bolts to the camper floor to support the fiberglass structure and give us a spot to mount grab handles for the pass-through. Quote Link to comment Share on other sites More sharing options...
Rusker Posted May 14, 2013 Share Posted May 14, 2013 Wow, this build is awesome. My plan is to keep the Chinook with the original truck body, but I'd eventually like to swap it onto a new 2wd, or a 4wd one day. I can't wait for more updates! Quote Link to comment Share on other sites More sharing options...

Recommended Posts
Join the conversation
You can post now and register later. If you have an account, sign in now to post with your account.