


AtlantaCamper
-
Posts
269 -
Joined
-
Last visited
1 Follower

About AtlantaCamper

AtlantaCamper's Achievements
")
Explorer (4/14)
-
 Rare
Rare
-
 Rare
Rare
-
 Rare
Rare
-
 Rare
Rare
-

Recent Badges
-
 I have also been doing well with these tires and I will continue to buy them. However, I have had one of them go bad after two years because of what i assume was a delamination. But it was my own fault because I let it sit in the off season and didn't move it. That was precisely exactly where they went bad - at the contact point with the ground. Probably only 10k or 15k miles on them, plenty of tread. Normally I try to put her up on jack stands in the winter for this very problem, but I forgot last year and one went bad on me. I can tell when it's happening now because it feels like an out of balance tire. This happens in the back only where the weight is. It blew out on the freeway but didn't cause damage. Kids got nuggets at KFC while I swapped it out and we were back on the road. Has this happened to anyone else? A related tire question. a front rim was really hard to balance last time I changed tires and I had to take it back to recheck. Tire guy did a more careful check and saw that the rim was just slightly bent in one spot. Maybe I curbed it, not sure. Nobody around here would repair it so I started hunting for another rim, but they are like hen's teeth here in the South. Finally found one and I've got it in the garage ready to refurbish it and swap it out. Anyone else have this kind of issue/experience? I hope y'all are doing well, I've been scarce on the forum here but my rig is running better than ever.
 -
Did you check the voltage on the alternator when the truck is running? It should be in the range of 14 to 14.7 V DC. If it's not then the alternator would be suspect. How did you determine that the alternator is the source of the current draw? If the alternator regulator is bad then perhaps I can see how it could pull current, but is it possible that the draw is from somewhere else? This is how I replace the alternator (from memory so it may not be exact). I prefer to take the radiator all the way out, but it can be done with it left in there. You have to remove the fluid and hoses anyway and at that point it's just 4 bolts to get the whole radiator out. I've caused damage to the fins on the radiator when I've tried to do it with it left in because there is so little space to work with if the radiator stays in there. Procedure: Disconnect the battery negative wire(s). Remove Radiator. remove upper air intake tube, drain the radiator, disconnect upper and lower hoses, disconnect and plug the transmission lines that go through the bottom of the radiator if yours has them, remove the 4 bolts from the radiator and pull it out with the plastic fan guard still attached. If you are going to keep the same belt then just loosen the alternator belt with the 12mm bolt on top of the alternator. If you are going to replace the belt(s) then take them all off. This is a good time to do any belt replacement. Disconnect the main charging wire on the alternator. You may have other wires to the alternator depending on what type it is. Remove the 12mm bracket bolt and then the nut on the main alternator mount (14mm I believe). Getting this bolt out can be tricky. Don't mess up the threads as you do it. You should be able to get the alternator out at this point. Reverse the procedure to assemble. You probably won't be able to get all of the radiator fluid in at first so run the engine and it should burp the system and give you the room to get the rest back in. Test the voltage when running to make sure it's above 14V and thus charging. I'd start by checking the wires carefully from the battery to the starter. It could be a lack of current due to a failing connection for example.
-
I had a similar issue with my steering box. I had a very difficult time getting the correct steering box when I ordered a 'remanufactured' one. There are like two companies that do pretty much all the remans and both companies have the same messed up database with regards to my particular box in a '87. If you go the route of buying a rebuilt box just make sure you are getting the right one.. I can't remember all the details but likley I cold dig up some info if necessary. I believe it's the 1-ton vs not 1-ton that is the problem. Note that one 'rebuild' I ordered that turned out to be the wrong one had worse play than the one I wanted to replace. When talking to a person at one of these companies he said that wasn't uncommon - they have pretty loose tolerances for the rebuild and some are just plain lousy but with good seals. This is a reason to go with having your unit rebuilt instead of getting a reman from an auto parts place. He also thought that my issue with not being able to get the right box for a 87 1-ton was because neither of these 2 reman companies have a rebuild protocol for that specific unit. Just beware of this issue - it cost me a lot of time and trouble... I decided to have my box rebuild instead of getting a remaned unit. I paid $300 to Marty at powersteering.com, shipped it to him, and he got my steering box tightened up really well (plus the seals, etc). (edit: just noticed his price now is $339 plus shipping, but still a great deal IMHO) These heavy rigs put a lot of stress on the steering gears and it's very noticeable having a newly rebuilt one. Much less sway from heavy cross winds for example. I'm very pleased with the work Marty did. My suggestion would be to asses the wear of your box and if it has any significant play in it then consider the Marty rebuild. Whatever you do, do NOT give anyone your box until you are 100% certain that you are all set.
-
Soft line between propane outlet and regulator?
AtlantaCamper replied to Odyssey 4x4's topic in Fuel Tanks
What a great result! It's always rewarding to see the quality collaborative DIY projects documented by this group. -
Horizontal ASME Propane Tank Refurbishing Questions
AtlantaCamper replied to AtlantaCamper's topic in Fuel Tanks
It sounds like the setup I run into at the Atlanta UHauls is more of an anomaly and so this is really a non-issue. I can see that being useful in some situations. -
Horizontal ASME Propane Tank Refurbishing Questions
AtlantaCamper replied to AtlantaCamper's topic in Fuel Tanks
Perhaps it is a U-Haul thing? I've seen them at several local U-Haul fill sites. I assumed those are the normal thing for fast fill of the larger ASME tanks. In central Atlanta U-Haul is pretty much my only option for propane fill locally. It would be interesting to know if that fill nozzle is uncommon. I saved that label by carefully removing it and I have some adhesive that could put it right back where it was. I'm still on the fence about putting it back or not. -
Horizontal ASME Propane Tank Refurbishing Questions
AtlantaCamper replied to AtlantaCamper's topic in Fuel Tanks
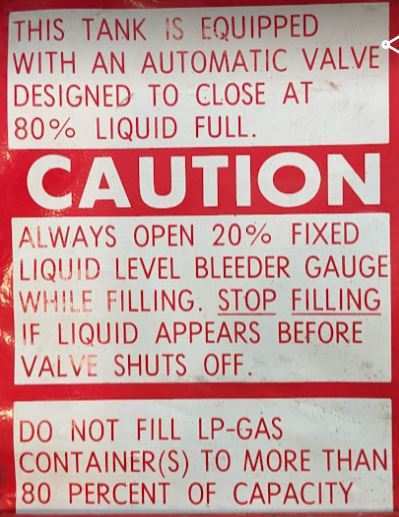
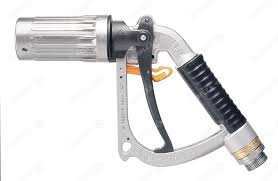
DOT vs ASME fill stations and "fill to auto-stop" vs "add XX gallons" strategy for filling: At the U-Haul today they had two different filling systems. One was for DOT tanks and it fills slower and has this kind of nozzle plus various adapters: The other system is for ASME tanks and has this nozzle for the 1-3/4″ Acme threads: The ASME filler fills FAST (ASME tanks are usually large and DOT are relatively small) and it could fill my entire tank in in like 20 or 30 seconds. This concerned me a little because I'm not sure how sensitive or accurate my OPD (Overfill Protection Device) is. My strategy with these "fast fill" systems is to ask to put a specific amount in rather than going to "full". An overfull tank is not a good idea I'm told (too much pressure, possible damage to regulator). The tech said they are told to not use the vent valve. They will NOT fill my tank with the vent open to see liquid come out if the OPD fails to shut off the flow. Using the ASME pump I had the tech stop filling from empty at 3 gallons and then pause (reading was exactly at the "1/4" full mark on the gauge), and than at 5.1 gallons and pause to let the gauge settle (pretty much right at 1/2 on the gauge) and so I feel pretty confident now of the gauge readings at these two points. (5.1 is half of the 10.2 gallon capacity of my tank). Normally I run it down to 1/4 on the gauge and then have it filled. Fills to 80% are always right at 4.5 to 5 gallons this way. My original tank had this sticker on it: I'm not going to put it on the newly refurbed tank because nobody seems to pay attention to it anymore. Everyone's training says to not open the bleed valve. The fancy ACME filler is supposed to have an auto recovery system for the propane like a regular gasoline pump. They don't want any extra propane getting out so no venting, certainly no liquid coming out (I noticed there was _zero_ propane smell during the entire fill process so i guess that system actually works). So fine, if that's the way they want to do it I'm just going to go with the "put 5 gallons in" method when it's at the 1/4 mark and this puts me right at 80% full. I can monitor the fill with the slower DOT pumps to tell them to stop near the full line, but the ACME filler is so fast that the gauge isn't accurate during fill because so much liquid is sloshing around in there. Either way I'm just not all that comfortable relying on the system to automatically shut off at 80% Anyone have any advise on this issue? Am I being over-cautious? If anyone has more insight on tank filling please let me know or correct any errors I have in this post.
-
Horizontal ASME Propane Tank Refurbishing Questions
AtlantaCamper replied to AtlantaCamper's topic in Fuel Tanks
I got it mounted and then got a UHaul place to put 6 gallons in it and all is well. No leaks, all seems fine. And once the air in the line from opening it up was purged out the stove it burns clean and blue. With the new regulator I think I have a tad more pressure than the 1987 one. it runs my stove better and with more consistent variation in flame with the dial. -
Horizontal ASME Propane Tank Refurbishing Questions
AtlantaCamper replied to AtlantaCamper's topic in Fuel Tanks
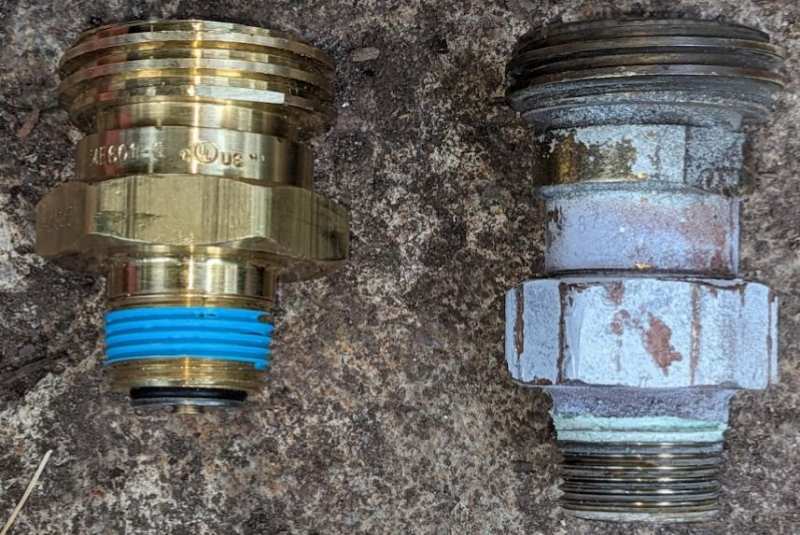
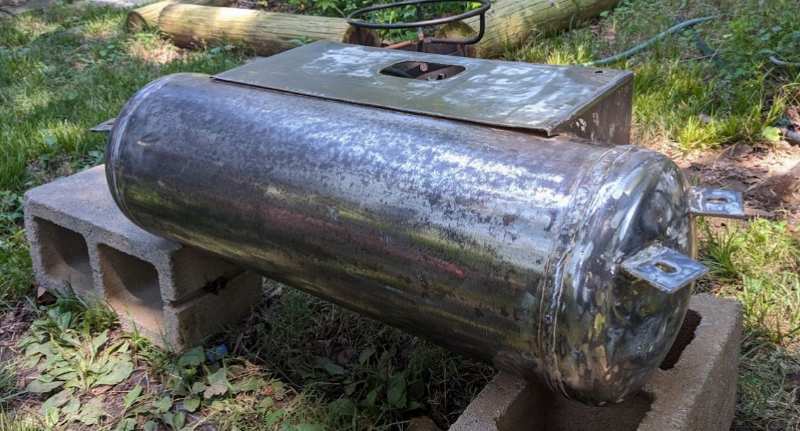
All is going well and the tank is ready to re-install in the camper. It took a full 48 hours to burn off the propane in the tank. I cleaned it up and did a primer/topcoat and then took the valves out and installed the new ones. I pressure tested by connecting an air compressor to the service valve with some brass fittings and pressurized to 100 PSI and did a bubble leak test. No leaks were observed. NOTE: I used DRY air to do this by running the compressed air through molecular sieves to remove the water. Otherwise you are going to get water in the propane tank doing this step in the same way that you get water collecting in the air compressor tank. In the humid South a lot of water comes out of the air when compressed. I'm confident I didn't introduce water. I then purged the tank with propane gas from a portable cylinder by injecting low pressure propane into the service port and then venting with the bleed valve. I did this purge cycle six times so I have only low pressure LP in the tank now. I can now install the tank, new regulator and new soft hose and then go fill it up. With regard to the odd 1" NPT fill port mentioned previously, it turns out that the fill port from 1987 was an odd two piece fitting with a standard 3/4" NPT into the tank flange but two halves that have a 1" NPT threads. The new fill valve is shorter so I hope there isn't an issue connecting when it's time to fill. Here is the new/old valve: For reference, here is the tag on the tank once the grime was removed: It's 10.2 gallons. When it says 1/4 full and time to fill there is still about 2.5 to 3 gallons left. I typically get about 4.5 to 5 gallons into it at a fill, which would then be a total of about 7.5 to 8 gallons at the 'full' mark, which is right near the spec of 80% propane = max full. The tank was not too bad under the grime. I used 60 grit sandpaper by hand to get corners but mostly flap disc sander on a grinder to remove the paint/rust. Took about 3 hrs total for the prep. Here is the tank just before painting: Here is the tank hanging where I painted it and it's drying and still getting the last of the propane out with the turkey fryer. This is quite the redneck setup: I painted with the old valves on, then took them off and put the new ones in. I used a big 1-3/4" socket for the fill valve and that tool I made to put the service valve in. I wrapped the thick yellow PTFE tape 4 rounds over the blue sealant as propane warehouse recommended. Bleed pot and fill gauge were left as they were. Here are the valves: I'll give a final update once I have it reinstalled with a new regulator and soft line and filled.
-
Soft line between propane outlet and regulator?
AtlantaCamper replied to Odyssey 4x4's topic in Fuel Tanks
I didn't realize that was a permanent install tank, my mistake. I don't suppose you could insert a NPT male to female 45 degree fitting like this between the POL and regulator input? It might angle the regulator into the upper right corner and give you the room to attach a low pressure soft line to the output of the regulator. (edit: this may be a bad suggestion as the regulators are designed to be vertical or horizontal. Angled might be a poor choice). I am replacing my original soft low pressure line from the output of the regulator to a hardline under the rig that feeds the rest of the system. I was told that a softline in this place is what acts as a shock absorber so that the movement of the tank when the rig hits bumps doesn't get transferred to the rest of the piping due to the softline. -
Soft line between propane outlet and regulator?
AtlantaCamper replied to Odyssey 4x4's topic in Fuel Tanks
The soft hoses are rated at either high pressure or low pressure based on what I've seen at Propane Warehouse. It's possible some metal flex line is rated for high pressure. Just make sure the hose you get is rated for full ~350 psi if you go that route. This would allow you to mount the regulator somewhere else like outside that compartment. It would make it easier to move that tank with just a flex line to the POL fitting. You could even get a hand tightening POL (with the o-ring instead of hard copper end) and you wouldn't even need tools to get the hose off the tank when it's refill time. I'm assuming you have to remove the tank from the vehicle to refill. -
Horizontal ASME Propane Tank Refurbishing Questions
AtlantaCamper replied to AtlantaCamper's topic in Fuel Tanks
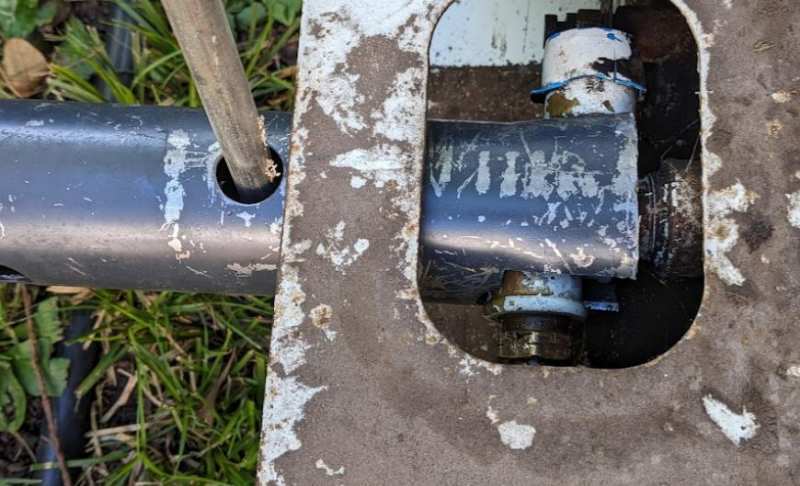
Yea, it's big and in the way. I had to really wangle it around to get it out through the bottom of the rig. In order to empty the tank I'm burning off the propane with a turkey fryer burner. Slow but effective. In the last 16 hours I've burned off about 30% to 40% of what's left. Still a while to go though... I've contacted them but no answer yet regarding my seemingly odd fill valve inlet size. Once it is empty and I can take the old valve off and inspect the mounting flange I may get more info on this NPT inlet thread size issue. Excellent suggestion! I looked up the tool and then fashioned one myself from a part I found in the garage. It was just strong enough to move the valve so I think it will solve this issue of getting the service valve off/on. The old fill valve has two flats on it for a wrench and I think I have just enough access around that big metal guard to get that off and the new one has six hex flats so getting the new one on should be fine too. I'll have more room to work on that once the service valve is out too. Here's my DIY tool:
-
Horizontal ASME Propane Tank Refurbishing Questions
AtlantaCamper replied to AtlantaCamper's topic in Fuel Tanks
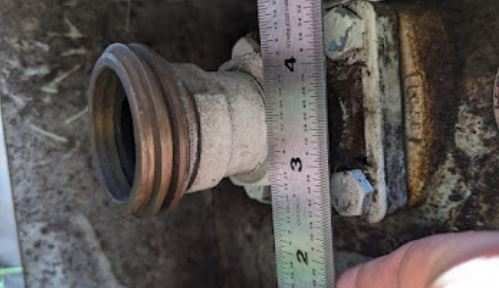
It seems I have an odd fill port size. Standard sized are 3/4" NPT or 1 1/4" NPT into the tank. Mine measures 1.2" OD (with calipers, not the ruler), which seems to be 1" NPT according to https://www.ultimatewasher.com/dimensionschart.htm: This is a 1987 tank, all original parts. The service valve (with integral relief) seems to be normal size at 3/4" NPT. For the fill I'm thinking of just using the standard 3/4" NPT part from Propane Warehouse with a 3/4" to 1" NPT adapter like this: If anyone thinks this is a poor choice or has insight into this NPT fitting size issue for the fill valve I'm all ears. As long as I don't have leaks it should be ok. I've not found a Fill valve with 1" NPT. The tank itself is pretty dirty but I think it will clean up ok. Issue now is that it's 3/4 full. I have it hooked up to a turkey fryer burner to get rid of the propane. Might take well over 24h to burn off at the rate it's going.... I'm also realizing it's going to be difficult to get a wrench into that confined space to get the valves on/off....
-
Horizontal ASME Propane Tank Refurbishing Questions
AtlantaCamper replied to AtlantaCamper's topic in Fuel Tanks
Thanks for the tips y'all. While I'm looking for a place to do the leak test and purge I'm going to go ahead and get started with the tank refurb. I've ordered the new valves and I'll get the tank off the rig now. The only 'service' I'll need is to leak check and purge. There isn't any need to certify my type of tank. I'll keep trying to find the right person at the right place (good idea on that place Linda). -
Horizontal ASME Propane Tank Refurbishing Questions
AtlantaCamper replied to AtlantaCamper's topic in Fuel Tanks
Thanks for that Linda. A lot of useful info there. Hopefully I won't have as much trouble with leaks... I've been calling all the propane companies around Atlanta and I can't find anyone that will do a purge and/or leak test on a tank like this. Camping World said no too. Hopefully I can find a place to do the proper test and fill once the refurb is done.


.png.dbaf6e74fca67fa5673141c0f6d0e234.png)
