

wetboy
-
Posts
43 -
Joined
-
Last visited
2 Followers


About wetboy

wetboy's Achievements
")
Newbie (1/14)
-
MY tank rusted up twice from the inside in 2 years, so last year I coated it with POR-15 and when I pulled it this year to do the fuel pump...It was perfect! I highly recommend it if you are having chronic rust issues, as these Toyotas all did. Easy to do, and not that expensive.
-
 It appears to me you have the upgraded axle...they called it "semi-floating", I think. That's the kind I have and it seems to be holding up well, even with my extreme overloading. That being said, if you really want the piece of mind, go ahead and have the full-floater put in, then load her up! As an experimental aircraft test pilot and skydiver, I tend to live a life a bit more on the edge than most. That being said, if someone came up with a cheap axle offer, I'd probably take it.
 -
Thanks for the information! I just uploaded a photo in the axle section of the forum under 1985 toyota oydessey. As you will see it looks more like your wheel than the regular 5 lug shown in the .pdf...however, it is not exactly like yours..it looks alot more like yours than the other ones 5 lug i have seen. also, the dealership says my vin shows a heavy duty axle..THANKS!
-
Only 2 Qts? You should be able to squeeze at least 4 out of there, especially with the added amount in the cooler. They hold about 7 plus whats in the cooler and lines. Consider just a pulling the return hose off your cooler and running the engine. The pump should get about half that out, with the rest remaining in the Torque converter. Changing that much out every 6 months should keep it fairly fresh... My service schedule is probably overkill, but with the loads those poor little trannys have to pull, i think it's cheap insurance. I think the 340 model is supposed to be more robust, but I'd still probably baby that too. Tranny fluid is relatively cheap to replace on that kind of a schedule...
-
ooops....yeah, I did. I change it about once a year or every 10-12 THOUSAND miles. Hahaha. That being said, for the price they were asking, and not being able to test drive it first....I think caution would be the order of the day. When I flew out to see my coach, I bought a round-trip ticket. I had no problem walking away from it... if it wasn't what I wanted for the price. As I see it, spending a few hundred in order not to make a $19,000 mistake is quite good insurance. Just make a little holiday out of the trip, and if you like the coach for that price, you can consider it a bonus. If not, you had a nice weekend getaway. Besides, if you don't look too eager, they will probably bring down the price MORE than enough to offset the trip. But there is no way I'd send that much $$, for a coach sight unseen. Not unless it came with Megan Fox...and even then I'd ask for a discount, what with all those tattoos of hers...;-)
-
So....Rader85....did you survive the trip?
-
I live full time in my 1985 21 ft New Horizon. How are you using your RV? If you are moving around, then mechanical is primary. Engines are already pretty good in these, but trannys can have real issues. Check out the tranny pages on this forum to see what to expect. If you are going to be hooked up most of the time, then you can start focusing on inside issues, like fridge, micro, stove, hot water, leaking roof, leaking plumbing, etc. These things are not alot of room for two people living full time. I wouldn't even CONSIDER it with anything less than a 26 foot rear bedroom model. Only exception would be if you are staying in one place and can extend an awning out, perhaps make a room out of it, etc. The biggest problem is storage. Both food and essentials. It doesn't take much to fill up existing closet/storage space with just a few clothes, shoes, coats, etc. I travel light, and still fill up everything PLUS my storage pod on top. If you want to try it, find one small 8x14 room somewhere. Or make an area of that size. Then fit EVERYTHING you two want to bring in that RV. That includes, clothes, books, computers, small TV, toiletries, couch, chair, and bed. Simulate the layout for a typical Toy RV. I'm not saying it CAN"T be done. You have to use every available nook and cranny for storage. Just be realistic. It's just one step above camping in a tent, and two steps above being homeless, when 2 people are involved. Just taking my GF out for a weekend at the beach is a major production. I lived in the Outback so I'm comfortable going very primitive, but women tend to need alot more room for their "things". Even when they 'downsize". Try the experiment. A couple friend of mine did, and quickly moved their sights to to a 29 footer. They live in that full time...just barely without killing each other... Toys are not too expensive to maintain if you have basic automotive skills, but from what you said...neither of you two may be mechanically inclined. That means most of what you will need to do/fix for the inevitable problems will be at the mercy of your local mechanic or RV guy. I'd rather hit on19 at the blackjack tables than trust them, but you may have no choice. If you had the extra cash it would be not be a problem. But when your HOUSE is broke down on the side of the road with $40 bucks to your name...and you have no clue how to fix it, that is not a good place to be. On the other hand, if you are just going Bohemian out in the woods, and just need an (occasionally) leaky roof over your head, it might work. Or if you can keep some cash aside for inevitable repairs. I got a GOOD coach, and have still put $2000 into vehicle/coach repairs in 1 1/2 years. That doesn't include another 2K in personal upgrades like paint, solar panels, cabinet upgrades, etc. And that's with me doing it all myself. If I had to pay someone to do all this I would be in the $5-7K range. She was originally up for sale for 4K, but I got her for $3200. And that took me 6 months to find and flight to Salt Lake City from Florida. Oh, if you do get one, especially a cheapie, MAKE SURE she has the upgraded axle. Read all about it here in the forums. A really cheap Toy will almost always be with the bad axle, and even if you didn't load it much it would fail. With two people, it is near guarantee. That is REALLY important. I passed on about half a dozen cheap ones because they had the 1/2 ton axle. So, decide what your primary use is going to be, then make your choice. Personally, I'd rather pull double shifts at McD's for 6 months to get a coach that fits and is in decent shape, then an undersized junker that's gonna be the bane of my existence on a daily basis.
-
G'day...from a Northern Beaches (Sydneysider) native here in the U.S.! I live full time in my Toy and can tell you they are adequate for hill country. Not much passing power, though. The real problem is not the engine. The 22re engine is near bullet-proof maintained well, and it's specifically why I bought my Toy. The real "strain" is on the tranny. The autos just were not meant to lug all that weight and wind resistance around. You will burn through your tranny fluid at much higher rate, and a large aftermarket tranny cooler is a MUST. I run pure synthetic, and still change it every 10-12 miles! I don't know what kind of tranny you have in yours, there were several different models put in over the years. Mine is A43D, and as such has a particular issue with the rear 3 sealing rings going bad. I had to replace mine, as I lost third gear after 5000 miles. Look up Spungo's posts on that matter on this forum if you have that tranny. The most important thing I would check out is ANY slippage in the tranny. Go up hills in drive and you should feel good, though underpowered, pull. Testing the tranny goes like this...When going from Park to drive, you should feel a solid "hit" as the torque converter locks up. Do it again for Neutral to drive. The time lag should be under 1.2 seconds. The tranny works entirely on pressure differentials, and this "lag" test determines how well the system keeps pressure. Very "mushy" trannys will probably require a rebuild in short order. There are other tests, but they require a RPM meter, and you likely wont have one. But those, along with a "seat-of-the-pants" test on hills will tell you much. Again, don't expect a lot of acceleration, but as the engine revs up past 2000RPM, you should not feel any slipping. These tranny's lock out at 1800 RPM, so if your engine is winding out and you are not accelerating much, you have a slipping tranny. Hope that helps. BTW, while the coach does look good from the pics, that price in US dollars would be considered EXTREMELY high here, even for a low mileage, showroom Toy. Those can fetch $8-10K here. I looked around, waited, and got mine for $4K with only 29,000 miles. Of course, supply and demand is everything, so look around for anything comparable locally on which to base the price. But I would try to bring that down considerably...say $12K U.S.D. oooo, I'll send you mine for $9K- with all the upgrades and fixes! I stuffing her into a Cargo hold is a pretty penny though. Is NZ as bad as Oz when it comes to importing vehicles? I'd love to ship mine don there and spend a few years exploring. Later on, maybe we can switch for few months and you can explore the U.S. in mine, and I'll do the same in KiwiLand in yours! Ah, to dream...
-
For most Toy owners who have just one Group 24 coach battery, I would agree that a mechanical isolator would usually do the trick. Their coach battery will rarely get completely filled though, probably only 80-90%, since the alt will stop producing any significant charge once the smaller capacity engine battery tops off first. This is fine if you rarely depend on your battery for any extended camping. But if you are going to spend alot of time out, you will need a bigger coach battery reserve, AND a much more efficient way to charge it. That is why I took the alt's primary voltage sensing OFF of my starting battery, and ONTO my coach pack. Properly isolated, the starting battery rarely sees even a 1% drop after starting and during the course of driving will easily get charged back up. My coach pack however, which is (4) 120 amp hour deep cycles, will need HUGE amounts of charging after heavy use. That's why I use THAT pack as the main sensing mechanism for the aftermarket alternator. Also, by wiring them directly together, I don't have any voltage/current loss through the diode. That was giving my alt real sensing problems early on. Until the pack voltage gets charged back enough to equal the starting battery's voltage, almost all the alt's output goes into my coach pack. I think that for people who rely on their coach batteries more, they should make THAT their primary battery on the isolator (the side that always receives charge) as well as the sensing source for the alternator. The idea that the higher voltage from the starter battery will quickly "flow over" to the coach battery doesn't work very well in practice. The voltage difference between the two isn't high enough to cause a significant current to flow. Additionally, the higher voltage sensing from the full starter battery will 'trick" the alt into thinking it doesn't have to put out that much charge. I have actually measured this with a sensitive ammeter. It will charge the coach pack, but at a trickle charger rate. It is better that the alt's output go first into sensing & charging the depleted coach pack. When I tried both arrangements, my ammeter jumped from about 10 amp output, to 120! Now if you spend 12 hours a day on the road, this might work. But if you drive just a few hours a day, and deeply use your coach battery at night, it is likely that it isn't getting fully re-charged. ESPECIALLY if you are just using the puny stock Toyota alternator. That is why I did the alternator upgrade here: http://www.rocketcit...e%20Project.pdf If you want to add coach battery capacity, I highly recommend you download that PDF file and upgrade. This allowed me to go generator free, as I can just idle my Toy in the morning, and get over 100 amps (1200 watts) charging into my coach battery if necessary. The stock Toyo alt will burn out long before it can recharge more batteries. In fact, I feel that re-charging just ONE discharged coach battery, as well as running all the other 12 volt demands from our Toys, is why our stock alts burn out so often. I went through two new ones in as many months. And if they aren't burning out, they are blowing regulators or fuses all over the place, causing all sorts of inconvenience. This upgrade should be one of the first for anyone planning to boondock, IMHO. After a better alternator, the question is, how to isolate the batteries? And for the most part, mechanical isolation for me is just too problematic, especially when handling the higher currents of a high output alt. The higher current creates alot of arcing inside the isolator that leads to early failure. In conclusion, I think that the electrical demands of our coaches today are just too great for the original alt-isolator packages that came with our Toys. Both needed to be upgraded.
-
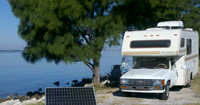
Welcome...and take the time to peruse the pages here and just about any question you have will have been asked...or can be answered. My Toy is my first as well, and I completely gutted it and rebuilt it the way I wanted it to look. I live in mine full-time off the grid with solar and wind power... They are great as you can park them anywhere and they don't stick out like the big coaches. I'm sure you'll have alot of questions as time goes by, and you've come to the right [place to have them answered!
-
I highly recommend pressure cookers if you do extended time out on the road. It has cut my propane use by 2/3! The healthy foods like Rice, beans, steel-cut oatmeal...all cook in 5-12 minutes instead of an hour. My roasts cook 3 times as fast, and are sooo much more juicy. Veggies are great too. I'm still learning new recipes, and as a full-timer, my propane budget is thanking me! They even have some baking recipes using it like a Dutch Oven, so that's next on the list. Mmmmm, fresh bread! If you do try it, go with the newer style cookers like Fagor, not the old cheapie rattle top ones. They are annoying, and fail quickly in regular use. Good luck!
-
Hmmm...I think I'll try a manual setup so I can just go down the road with the thing on all the time...give me a better view of what's behind me anyway. Do you see a problem with that? I'm assuming the cam and monitor are rated for continuous duty. I'll wire it to my huge coach pack, and just remember to shut it off. I travel alot at night, so how is the night vision? I have the same issue with handlebars hitting right at the "bulge", after I drove it onto the rack. Had to extend my rack out a few extra inches so the bike would *just* lean against the coach while I got the straps to tie it down. I designed it so the straps pull the bike down and into the coach, so eventually, the left handlebar dug into the aluminum... so I glued a hardwood plank back there after making it look pretty with some scrolling and polyurethane. Looks like it belongs there and keeps everything tight going down the road Since you don't have to roll your bikes onto the rack, do you think you could just weld in another set of wheel chocks like the front one onto each end..., and then DROP the bikes into the groove so created? . That should keep everything from moving around front to back, and left to right...especially if the wheel fit is snug. Alternately, a simple strap through the bike frame pulling the bike into the front wheel chock while compressing the suspension would work too. I learned the hard way, the only way to keep those bikes secure is to compress the suspension. I watched in horror in my rear view, as my BRAND NEW KLR took a dive after being 4-way strapped to a trailer...all because I didn't compress the suspension enough, and the rear tire slid out! Never again! (I'm still going to therapy for that trauma)....
-
When I first got my Toy in Salt Lake, it was developing stuttering problems by the time I got to Vegas. I thought it might be a clogged Cat. Stopped at this little Mexican guy's shop on a Sunday afternoon and had him cutoff pipe in front of Cat, weld new 2 1/2 in pipe to that, and install new basic muffler. The rear 6 ft 90 degree bend ending behind tires was left off, as I had a section of that at my destination in FLA. Total was $120 cash out the door. I didn't solve the problem (turned out to be massive rust in the tank) but it sure helped my low-end torque! FLA doesn't require inspections anymore, so I didn't care about the Cat. If I ever have to register it elsewhere, I'll have a cheapie put on. Eventually put on that rear section using flexible exhaust pipe, and it def helped with fumes in the coach and quieted things down on the highway, fashioned some hangers with some stainless steel strips I had. Originally had coat hanger twisted up, and they were still good after 6000 miles! Is there anything some duct tape and some coat hangers can't do? The thing that REALLY pissed me off was, I told them to throw the cat in the coach, as I knew I could pay for the whole job just selling that back in FLA. But I was in a rush and didn't double check that. I was in San Diego before I figured out those wily Mexicans got my cat! Grrrrrr! That rear section is starting to develop some rust, so I'm gonna hit it with some rust converter, then a butt-load of high temp BBQ paint I got laying about. It gets hit with all that tire fling, so it deserves a good coating.
-
I'm, with Greg....a solid state isolator is the way to go. Since I boondock full time, I have a very high powered setup to charge my (4) 120 AH deep cycle batteries. My Alt is a 160 Amp PowerMaster. The problem with the mechanical isolators are they: (1). Can be Finicky about when they combine the starter and the coach batteries so that the coach battery can begin charging. (2). Even when they do combine both, when the smaller battery (usually the starting one) says it's full, the alternator will taper back it's output. This tends to leave the coach battery less than fully charged. The ONLY way to avoid this with mechanical isolators, is to have identical batteries for both starting and coach. If you run down the road with 12V on your fridge, forget about it!. That battery will probably never top off. That will quickly ruin the coach battery. Since we usually just drive a few hours to our next destination, you want all the alt power going into that battery in the least amount of time. A solid state isolator will do that much more efficiently. I had to put my NOCO 200 Amp isolator behind the seat because the engine compartment was just too hot for the diodes to handle. The main body is a heat sink, and there was just no cooling in there to dissipate the heat. Keep that cooling requirement in mind if you opt for a SS Isolator. The only downside to the isolator is that you will experience about a 1/2 volt drop from the alt to the battery. No problem if it's putting out a full 14.4 to 14.8 volts. But if it's a marginal 13.8, that drop is going to hurt your charging. The OEM alts that came with most of our Toys were not up for the task of charging a large coach battery, plus supplying all the engine and lighting requirements. I'd say the minimum I'd go with is 60 amps. A worn down coach battery, plus riving at night will use every bit of that, and then some. If you use your coach battery only very occassionally, and run from hook-up to hook-up, you probably don'n need to worry as much. But if you plan to actually USE the battery alot, Invest in a good charging setup, a group 27 battery at the least,,,and add more if you plan on weekend boondocking or more. Just make sure they are ALL THE SAME. I see people all the time with different capacity batteries all slung together, wondering why they can't get their system to charge properly! The alt will STOP CHARGING when the smallest battery in the circuit says it's full.\ Here is a pic of my Isolator setup: The 2 Ga Red wire in the middle comes up from the Alt through the floorboard behind the seat, It connects to a Ammeter Shunt that lets me keep an eye on my output while I'm driving. The red wire at the other end of the shunt leads directly to battery pack (where the old water heater used to be). The black wire leads back to the starter battery. Normally, you'd wire each battery from the end terminals, but in my case I direct-wired the coach pack to the Alt. This both eliminated my voltage loss and massive heat build up when pushing 120+ amps through the diode, and gave better voltage sensing to the alt so it knew what it needed to feed the coach pack. That battery is what I live off, so it gets priority. What is left goes to the engine battery through the diode, thereby still providing isolation.

