JaySam
-
Posts
99 -
Joined
-
Last visited
Content Type
Events
Profiles
Forums
Gallery
Everything posted by JaySam
-
I don't think ABS affects anything, I swapped in a 4.88 from a 94 4runner with abs and I just cut the wires at the sensor and had the shop put the gears in. I believe anything from 85-95 with work for the 3rd member but not positive about the year spread. Any pickup or 4 runner 3rd member should work. I found this page useful for locating a used 3rd member and making sure it would work https://lcengineering.com/toyota-4x4-gears-and-differentials/ There used to be a wonderful junkyard in Denver called the Yota Yard but unfortunately they have gone out of business. You might try calling LC Engineering and asking them where to source a used 3rd member, when I was at yota yard looking for one last year I called em up and they talked me through how to identify what I need on the spot. Very helpful guys. And the 4.88 upgrade made a world of difference, overdrive actually works!!
-
Ok well a heat shield didn't change anything but I did swap out the wire to a smaller gauge and that seemed to get it more into line. I may try the resistors as well but for now it's usable. Thanks everyone for the help and information!
-
This is the sensor I installed in the block https://www.lceperformance.com/ProductDetails.asp?ProductCode=1067001 I think it's for the dash gauge but maybe I'm mistaken? Would teflon on the threads mess with the grounding and throw off the resistence?
-
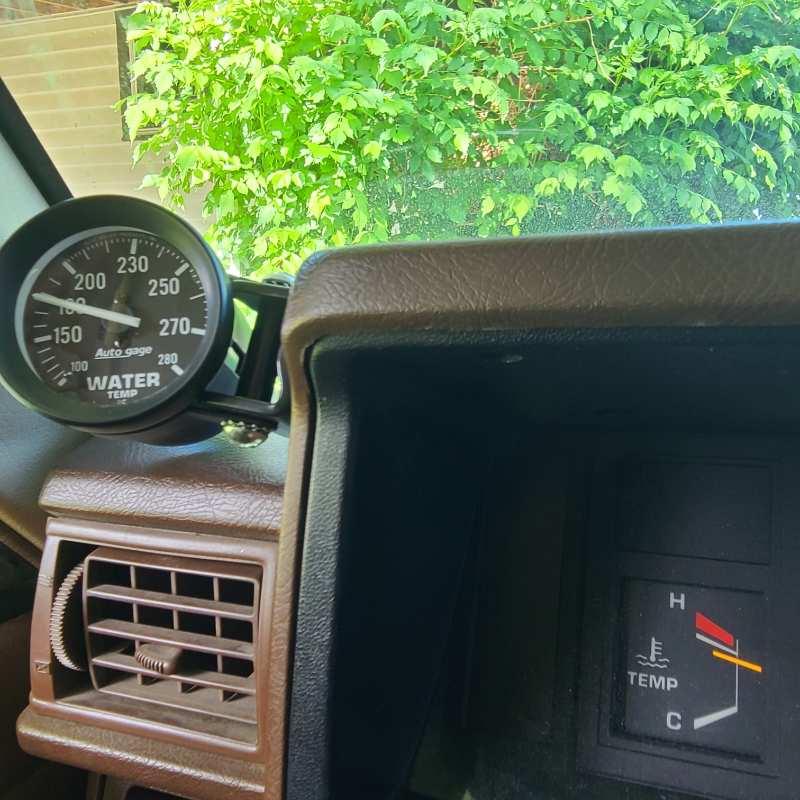
Can you calibrate the temp sensor? I thought it was just a passive sensor and nothing you can adjust or calibrate on it I'm not getting wild readings while warming up, the pic is showing the gauge after fully warming up and driving around for a few. It maintained itself where its at I just figured it would be sitting in the slightly-below-halfway mark like it always used to instead of up near the red line like the pic shows. I'm going to try shielding the sensor from the manifold heat and see if that changes the reading at all
-
lol well now that's a new one to me! that's what I thought so I'm confused why it would read so much hotter at the block than the intake? could the exhaust manifold be a contributing factor? still need to learn how to leave well enough alone i guess
-
I don't understand why the coolant temp in the block would be so much hotter than the coolant temp at the intake, but maybe part of the temp is coming from the block itself? The reason I'm trying to install a secondary gauge is because twice now the auto gauge sensor hasn't kicked on until after the t-stat opened and it gave me concerns about it going out so I wanted to add a backup. It's a new sensor I bought from LC Engineering. I've thought about adding a t at the intake port but it'd be nice not to drain and refill the coolant system again haha. I guess I'm still just confused on why the temp sensor on the block would read so much higher than the temp sensor on the intake. Is the coolant that much hotter in the block before it gets to the intake?
-
I recently had a new motor installed in my Sunrader and when I did I had the mechanic add an Auto Gauge Water Temp gauge so I could monitor temps a little more closely. When he installed it he just replaced the factory temp sensor with the auto gauge one so the dash gauge no longer worked. I wanted to re-hook up the dash gauge so I could have 2 gauges and more closely monitor the temp and when I might be treading into dangerous territory. Today I installed a temp sensor into the block drain plug location and reconnected it. The gauge works but is reading extremely high, almost into the red even though the actual temp on the auto gauge is only 180. I'm guessing this is because of the location of the sensor but I don't know, would this be the case? Could the exhaust be heating up the sensor or wire maybe and making it read high? Or is there a better location for a secondary temp gauge sensor? I have the upper radiator hose manifold kit to install the sensor there and had it there but it read hot as well and only kicks on after the t-stat opens so i was hoping for a spot that would read the block temp.

-
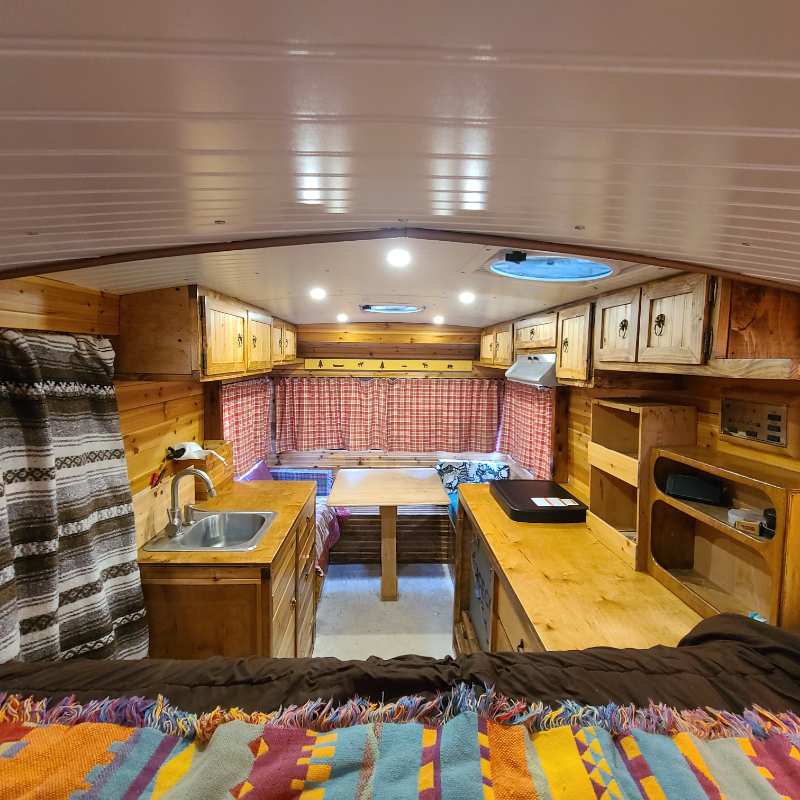
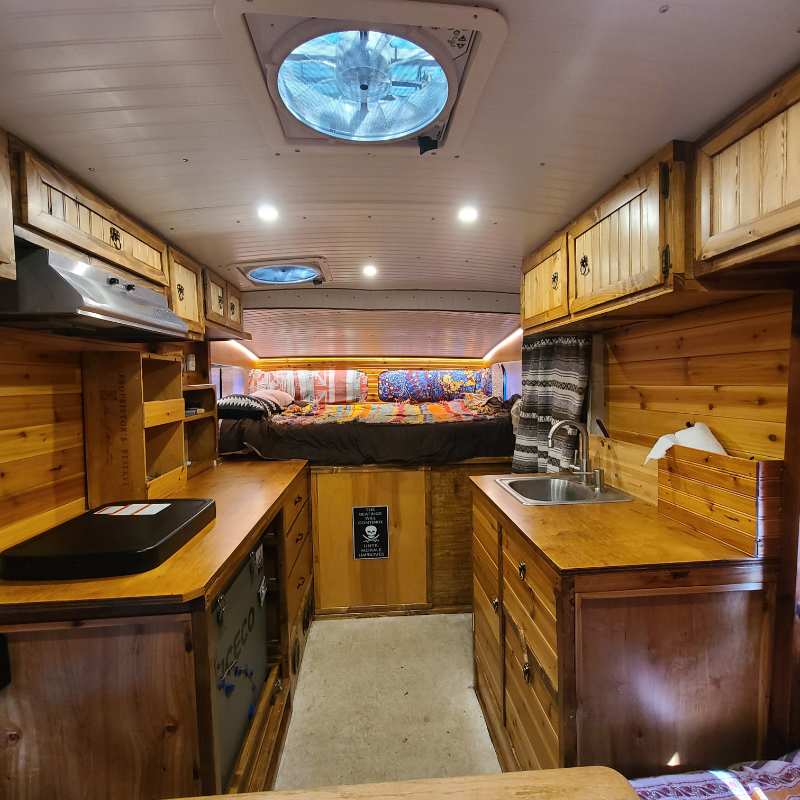
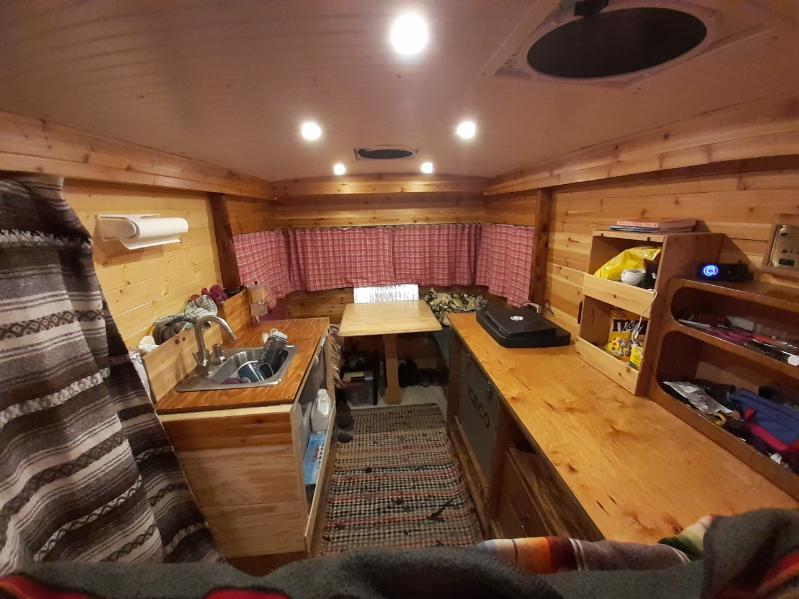
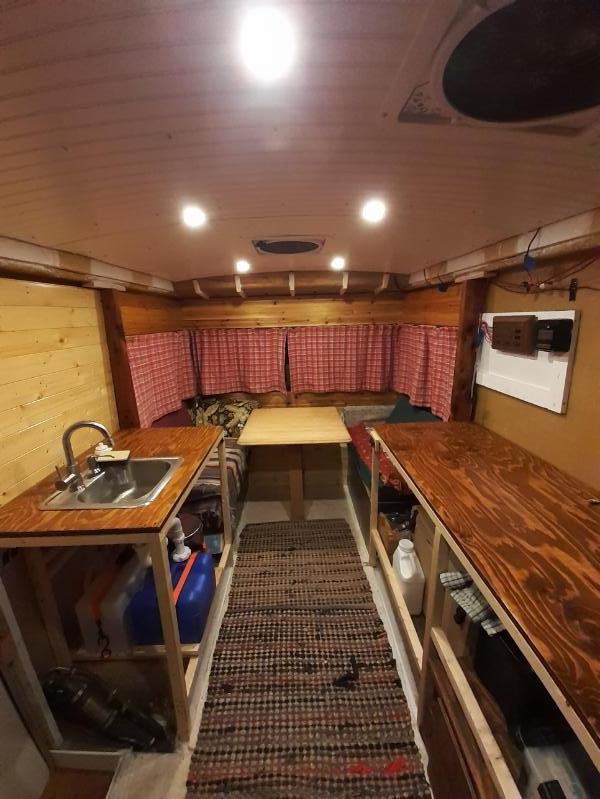
Ok well it's been quite awhile since I've posted any updates so here we go. Long story short I've now got a new motor, radiator and I swapped out the rear end to 4.88's. It drives like a completely different vehicle now, and by that I mean it almost drives like a regular truck. I can use all of my gears now including overdrive, and the motor seems to work much less and is much happier overall. I'm just getting past the first 500 miles on the motor so still have some time to break it in and everything but so far I'm really pleased with how it turned out. I weighed it a few weeks ago dry and it came in at 4670lbs. The door sticker says 5500 so if that was accurate I've managed to drop over 800lbs out of this thing. Of course the bathroom and other appliances were probably a good portion of that but I also worked hard to try to not overbuild inside and keep a mind towards weight which I think has paid off. I also relocated most of the weight from the rear of the camper to sit over the axle instead; the water tanks and fridge are located directly over the axle, the furnace moved in front of it and just the battery and propane tanks sit behind it. Moving a lot of the weight from the very back of the rig to sit directly over the axle has really improved the handling and drivability of the camper as well. Inside I've managed to get most of the major things done; I still need to finish off a few things and put the hardwood floor back down but I would say a good 80% of it is completed. I still have plans for new cubbies, shelves and cabinets for the sink area and on top of the counter next to the bed but the major stuff is built and installed. Overall I'm pretty pleased with how it has turned out and the rig I now have for some sweet adventures but it's certainly been a long road. When I purchased it back in 2019 my intention was to buy something I could just use and enjoy, I never intended to rebuild an RV from front to back top to bottom. But here I am a few years later and I'm glad I've stuck with the project and made it to the other side of it. Thank you to everyone on this site for the information, suggestions and tips for rebuilding these things and all the knowledge and expertise everyone has provided, it's been a huge help throughout this process and its hard to imagine trying to wade through the rebuild of one of these things without it. Thanks again to everyone who contributes and shares their knowledge and experience.
-
Ok yeah that's kinda what I thought but good to know, thanks for the info and help Maineah. I think as long as the motor seems ok I'll have them do the head gasket, machine the head, timing chain, guides and potentially cover if it's been worn down and a water pump. Thanks everyone for the advice and knowledge, I'm feeling much better than I was a few days ago lol.
-
Ok good to know, thanks for the advice and info Fred! I'll probably have them do a water pump even though I can do it myself later, and hold off on a oil pump for now. Are there other components or parts that I should have them check while we're this deep into the motor? Budget is a concern but less so than making sure I do things right
-
Yeah I figure if i'm going to get the head gasket done it's time to do the other routine maintenence that will be needed at some point anyways, so now I'm thinking of having the timing chain, oil pump and water pump done as well. Although maybe the oil pump is overkill? What's a usual lifespan on one of those? Water pump and oil pump I could also do myself at some point down the road. Is the dual row upgrade worth it if I'm replacing the plastic guides to metal? Is it mostly helping prevent the chain stretch and slap that happens with a single row? I guess I'm not clear on why upgrading to dual row is necessary but would love to learn
-
Is that the seal right behind the crankshaft pulley? Cause I just did that with a new pulley last week
-
I thought the reason was the different metals between head and block and old felt gaskets that don't work well to compensate the different expansion/contractions of the two metals. My understanding was the MLS gasket solves this issue; is there something else you may be referring to? If i'm having the head gasket done seems like it makes sense to do the timing chain now as well? I don't think it's ever been replaced so seems like a good time for a new chain and steel guides? Are there any other things I should maybe consider while I'm in there? Thanks everyone for the help and suggestions!!
-
Hey Everyone, So I was driving through Wyoming when the head gasket went out on my rig. I have a 1985 Sunrader with a 22re with 85,000 miles on it. I'm looking for some advice on what to do going forward. Since doing a head gasket is such a big job and requires so much labor I'm wondering if it's worth just having the motor rebuilt at this point? Or potentially have a new motor installed? The motor seemed decent before the head gasket blew, I had tested the compression maybe a year ago and it was at 135-140psi across all cylinders. But she did get extremely hot and was out of coolant when the gasket blew and I got it pulled over, I'm slightly concerned about warped/cracked head although I was able to limp it to a shop after it cooled down and I refilled the radiator. I'm wondering if I should be looking into rebuild/replacement options or if i should just have the shop do the head gasket, check everything else out while in there, replace what's worn out and move on with the motor I've got. I'm on the fence with this decision and would love some advice on the matter if anyone's got some. Thanks!
-
I would recommend using gorilla glue heavy duty construction adhesive ultimate for gluing wood to the fiberglass. I tried liquid nailz fuze-all and didn't have success of it bonding wood to fiberglass after letting it sit for a few days. I could just pull the strips away by hand. Also make sure to clean the fiberglass well with acetone before trying to glue anything to it, makes a huge difference in the adhesion and bonding. as for taking down the old ceiling, when i got to that stage i just use a paint scraper and hammer and chiseled the wood strips away from the ceiling. in the few spots i couldn't chisel away i used a sander with 80 grit like toyoguy
-
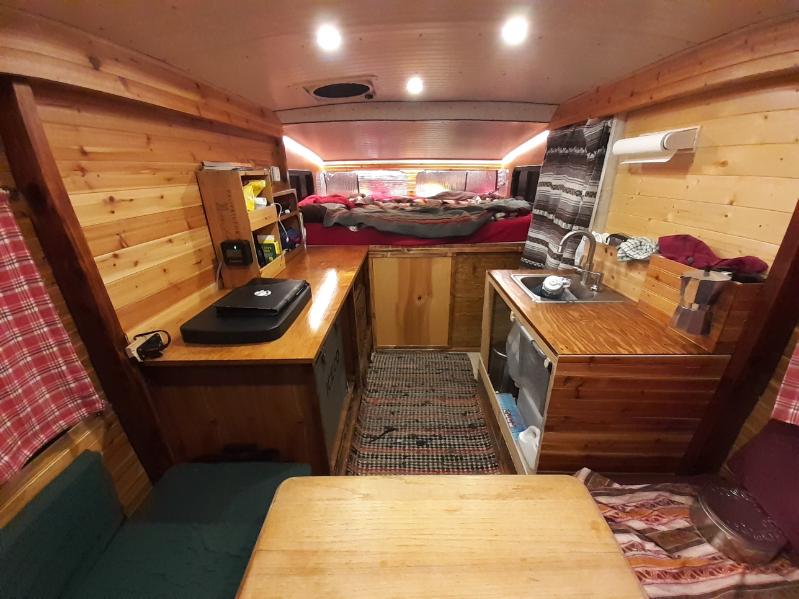
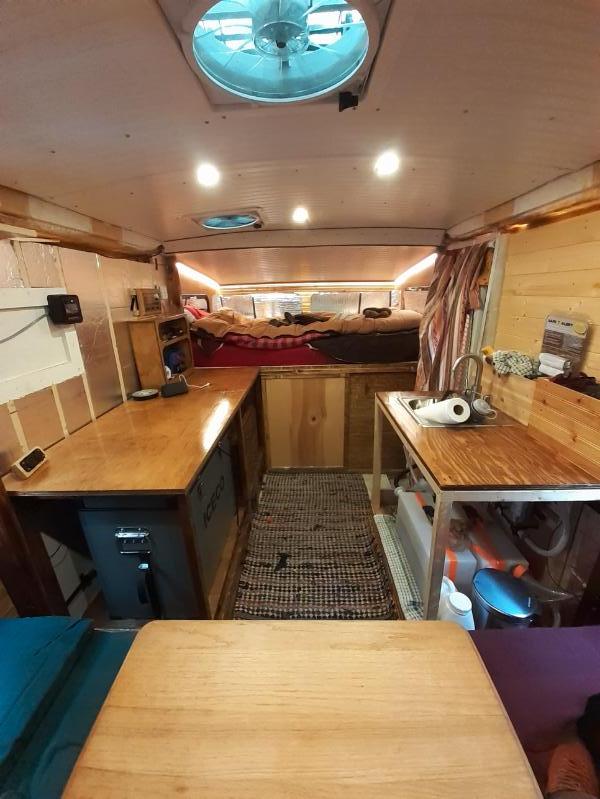
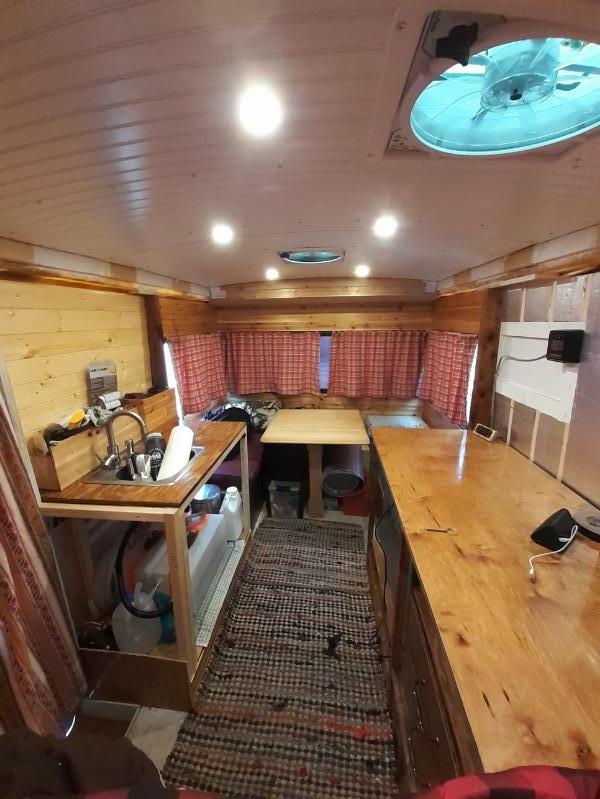
I haven't made it over to the scale yet to see but I'm interested as well, I think it's maybe in the 4500 range right now? But honestly I have no idea after gutting and then rebuilding it, I'll try to make it over soon and will let you know when I do! Thanks Rick! Pretty please with it so far, although now that i've rebuilt everything I wish I could do it all over with the knowledge and skills I have now haha. I heard once that your first camper you build for your enemy, your second you build for a friend and the third you build for yourself. Seems to ring true! This is my second btw As of things left to do I still wanna add the upper cabinets back in, finish out the two cabinets with drawers and storage stuff and then put in the flooring. Plus a ton of little stuff but that's the major building left to do. I've only done a couple of short climbing trips so far, but man it's been a pleasure! Hows your rig coming along? Have you been getting out in it much?
-
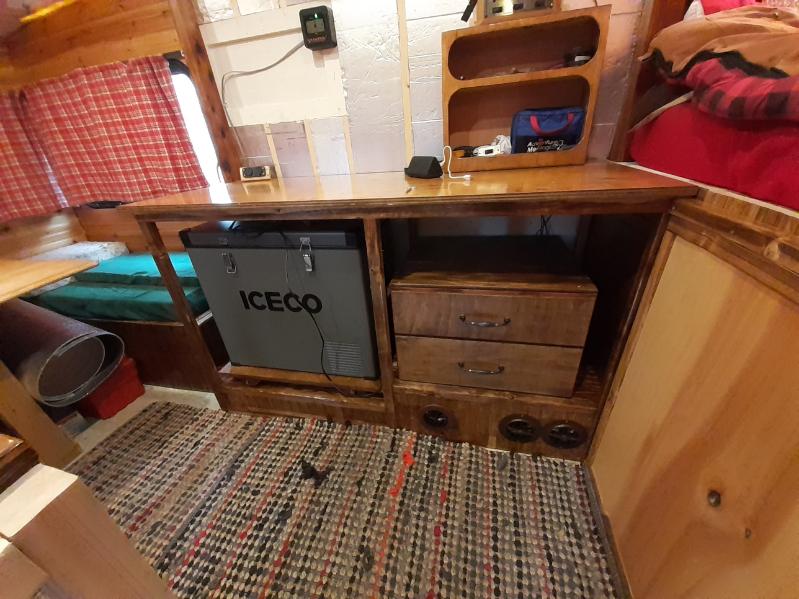
A few updated pics on the rebuild, the walls and all the appliances are all in although I plan to rebuild the sink cabinet and finish out the long cabinet on the drivers side. And add cabinets up top, a range top, drawers, shelves and a host of other things still left to do. It's a never ending list but she's in a good place now and it's been a pleasure living in it.
-
Installing an olympus wave heater, which size?
JaySam replied to Ruby's topic in Coach ApplianceTech Issues
Sorry for the late response, but I would get the wave 8 if it were me. And it was me a few years ago, I bought the wave 6 which worked great in my slide in truck camper but in my 18' sunrader it wasn't enough for comfort in 10 degree weather. You can always turn a heater down if it's too hot, not much you can do if it's not. -
It's an instant grab type of glue, I literally just push the furring strip against the fiberglass and hold it there for a few seconds and it stays in place. For the ceiling I used braces to hold things up but on the sidewalls just pressed the wood strip against the wall.
-
Hey thanks Randy! I tried to jack the floor up before I put the braces in underneath but it didn't really seem to go anywhere. I lost a little over 1" due to floor sag at the sides. Jacking the ceiling up didn't bring the floor up at all, it just raised the center portion of the roof but didn't 'pull up' the floor on the sides at all. I did jack the roof up probably 3 or 4 inches overall; I started by jacking it up maybe an inch, letting that sit for a week and the raising it up another inch. It seemed to let the fiberglass adapt and accept the 'new' shape as I slowly raised it over a few week period. I just kept pushing it up until I felt like I was entering a zone where I would start to crack the fiberglass shell or cause damage to it. It also helps to do it while it's warm out. I think one of the only things I would do differently is add a strip of wool or felt paper between the metal beam and the fiberglass roof, the direct contact between the two materials leaks a lot of heat out. You can see where all the roof beams are when it snows cause the snow melts along those lines long before the rest does. Other than that I've been very happy and pleased with everything. I know what you mean about it never seeming to end, the list only seems to grow sometimes. But keep chipping away at it, slowly but surely things will come together and get accomplished.
-
I've been using Gorilla Glue's version of liquid nails, Gorilla Construction Adhesive Ultimate and it's been working well holding everything together. The only thing I found that seems to bond wood to the fiberglass shell securely.
-
I think it's johns manville board insulation or something. I didn't find much on the website either but when I called I just asked if they stocked 3/4" board insulation and they were very helpful. Just drove down and picked up some 4x8 sheets of it. They'll sell however much you want, even if it's just one sheet.
-
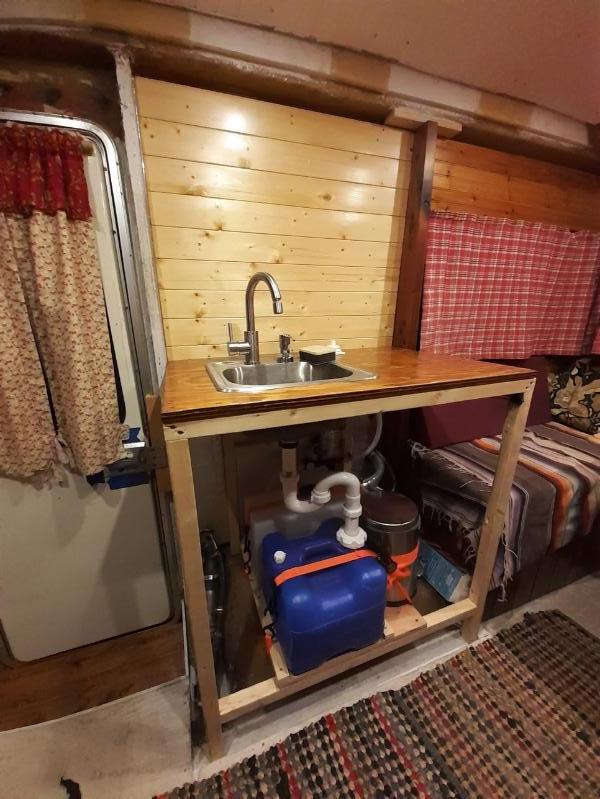
Hi Ernie, Thanks! I did just what you described, I glued furring strips across the ceiling and then screwed the paneling into that. I used 3/4" rigid board foil faced insulation for everything. There's a insulation company in north Denver called Eagle Rock that carries a ton of different insulation and they'll sell it direct to the public, it was the only place I could find 3/4". Would've loved to add more but didn't want to lose the head space either. I found that Gorilla Glue Heavy Duty Construction Adhesive Ultimate works well for bonding different materials together, it's what I used for all the furring strips throughout my rebuild. Seems to be the only glue I found that will glue stuff to the fiberglass. Heres a few updated pics, I just finished installing the furnace.
-
Damn Rick looking good! It's coming together beautifully, nice work!
-
Nice Rick, sounds like things are moving along for you as well. I agree, spending time using it before it's completely built definitely helps with design decisions and understanding how you want to utilize the space most effectively. Living in a slide in camper in my truck the last few years definitely helped me learn what I wanted out of a rig and what I didn't need which has been helpful. I'm getting towards the last appliances install now, the water is halfway in (just need the grey water tank and drain hose) and then it's just the stove and potentially a furnace left. Mine eats quite a bit of oil as well, the previous owner said a mechanic checked it out and had a leaky head gasket which is pretty common on these i think, there was a recall on the head gasket for a number of years so that might be the same issue your having as well. Unfortunately it's rather expensive to have a mechanic do it because it requires taking apart quite a bit of the motor to access the gasket. I put the solar panel on the side because I didn't want to drill any more holes in the roof and it allowed me to use the old access hole for the antenna in the back to run the wires into the coach. I will probably add another panel down the road on the other side of the camper in the same manner after I add a second coach battery. I'm really pleased with how the mounting came together and it was pretty cheap for the aluminum bars running across with a few bolts to hold it all together. Here's a few more pics of the most recent additions