V6 Seabreeze 92
-
Posts
61 -
Joined
-
Last visited
Content Type
Events
Profiles
Forums
Gallery
Everything posted by V6 Seabreeze 92
-
Hi Linda I removed the elbow you mentioned and other items, took with me the find the exact sizes. I plan to put them back. Thank you, you have sharp eyes. One more question: what to use to bond and seal framing parts of the new floor. There are several existing material like wood, styrofoam, metal and even fiberglass on one side. Something like liquid nails but works better on Motorhomes ? WME and Extech Thank you. Adding a new waterfill little above the existing could solve the gravity fill issue. I will look into that. Also want to get your opinion on several comments I read when I was searching on line for water hose: they claimed the corrugated water hose does not provide water tight connections and it leaks. I know in my rig they never leaked. Is there a proper way to install the corrugated water hose and tighten the clams.
-
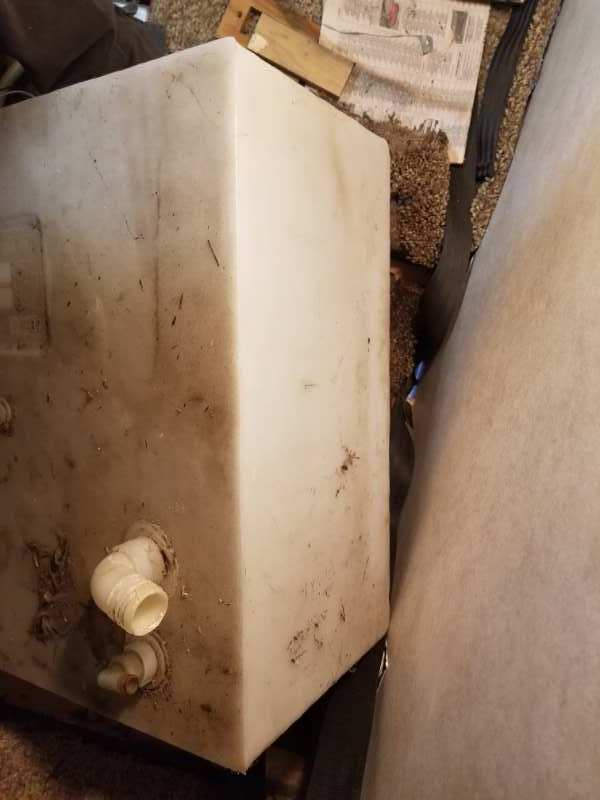
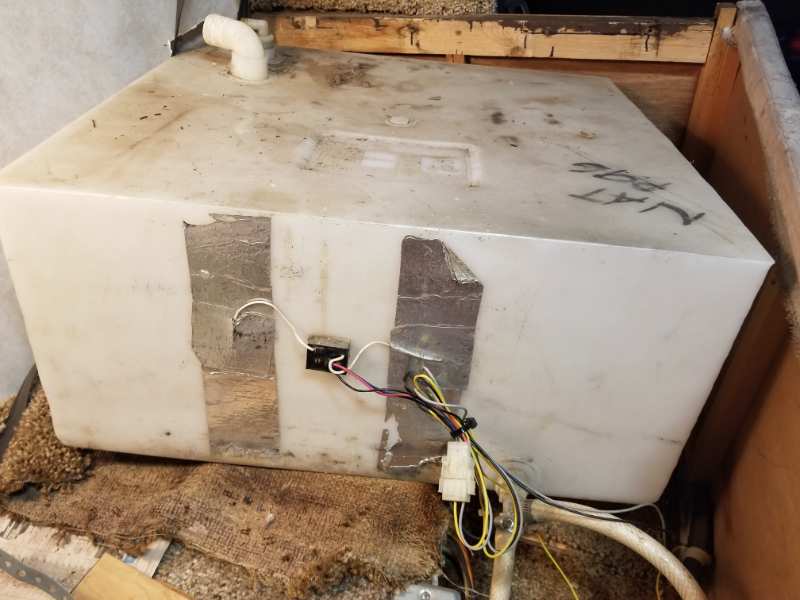
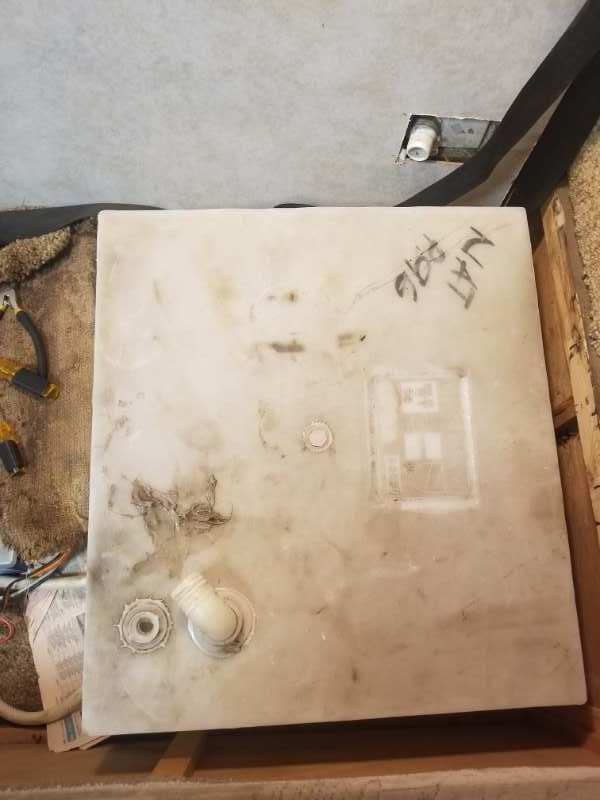
Linda, thank you for your help. I spent lot of time looking for the parts. I still have not found the elbow hose connection. Attached are the photos of all sides: Outflow side Second photo shows a unused outlet at the far corner which is vent hose size. I can use this as new outflow by adding a elbow and close the current outflow. You mentioned flip the tank. Well I tried and turned the tank hose connection side away from the wall side and it seem to clear the bar on the sofa. See photo: In this position sofa clears the hose connection elbow. However Still higher than the fill point at the rig wall. Fill hose and vent hose both will be much longer around 3'-6" long. I wonder if that will be any issue when filling the rank. Thank you.

-
I forgot to mention: one more problem I ran into by the raised height of the water tank: the sofa does not retract, the hose connections on the top of the water tank are too high. In fact this was the main reason for the thought of relocating them to a side wall. Linda I see your point about leaks, I also thought of laying a water proofing membrane to contain, in case there is a water seepage. I was looking into raising the sofa height couple of inches, not more, otherwise the seat will be too high but not sure if that will clear the sofa metal frame. There is a long bar in the back of the sofa which moves when retracting the sofa. So far I have not nailed or glued down anything, until I have all pieces and problems worked out. Still in the brainstorming mode. Thanks
-
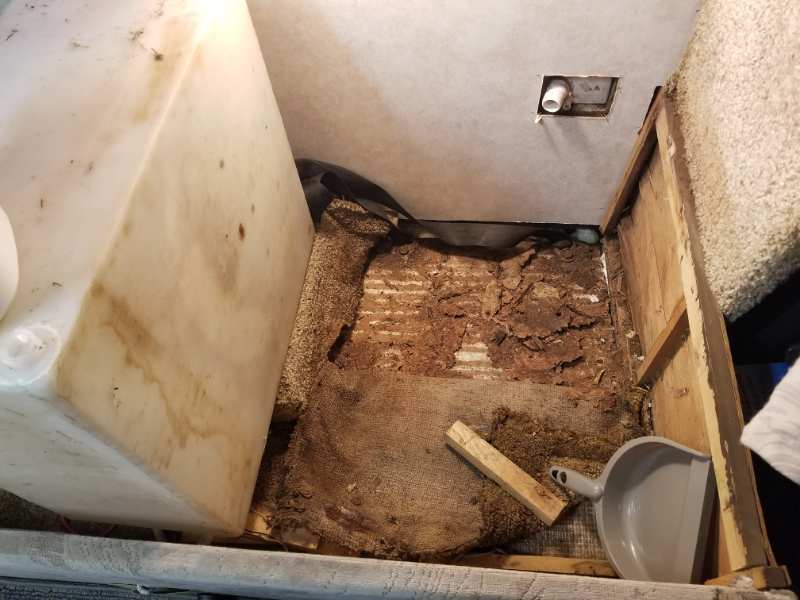
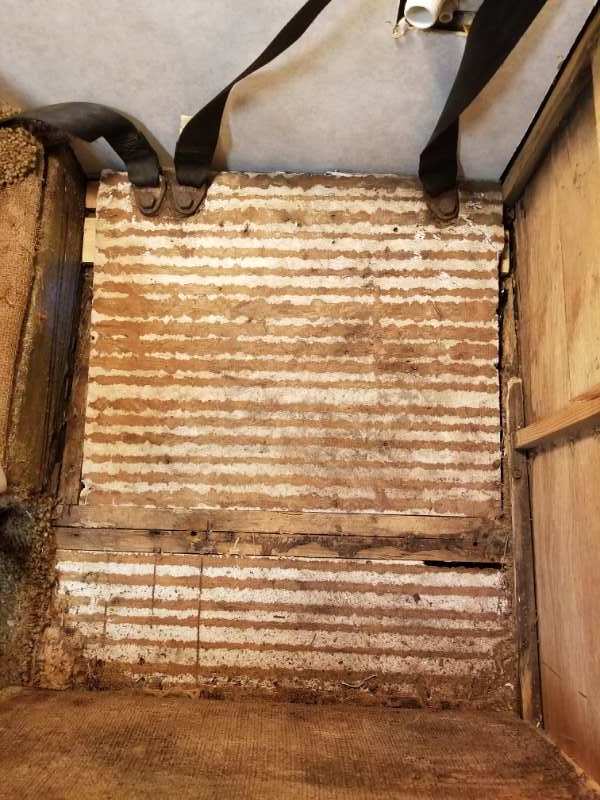
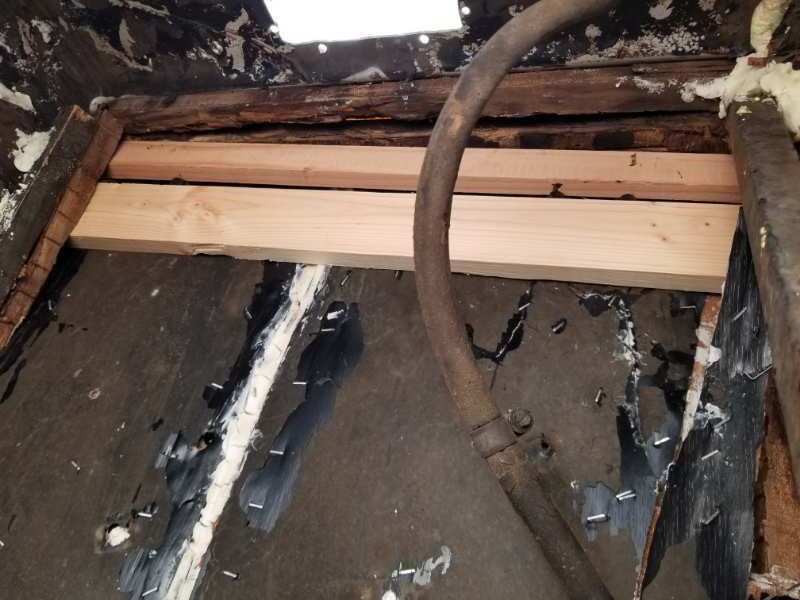
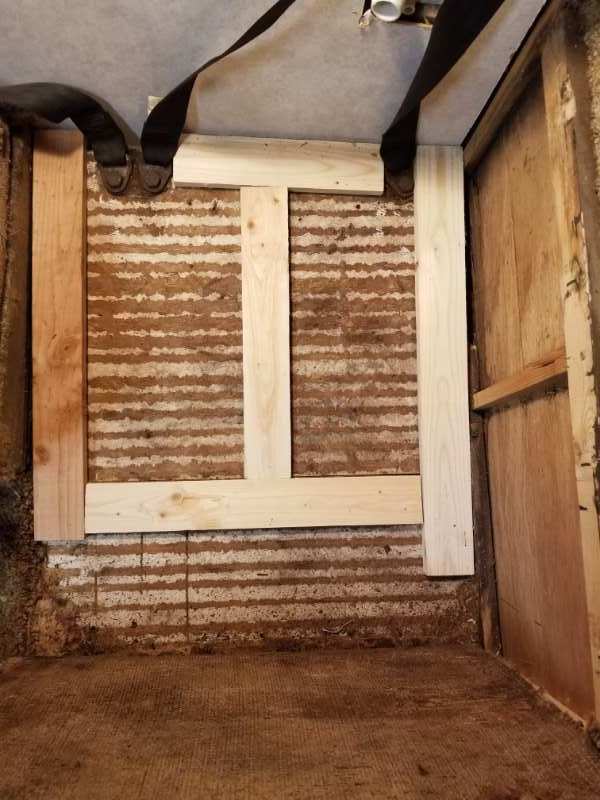
Hello all I discovered my fresh water tank was leaning towards the outside wall. Looking from under side I noticed the floor had sunk down. One thing leads to another and I ended up removing the sofa, and the water tank to redo the floor. Lot of water damage, I am discovering as I fix things in this rig: therefore the floor supports are gone and floor sank. Had to support the styrofoam from below and and above for the new plywood floor. Problem I am running into now is that it raises the water Tank so that the hose connected on the tank is higher than the wall filler end. I am looking to remove the hose connections from the top of the tank and drill a hole and connect the hose on the side. I understand side is not the ideal location. After providing supports for the new floor the water tank sits much higher than before. Any ideas about the fittings and way to drill hole. I guess there will be crud in the tank after drilling holes. What kind of fittings and adhesive to use so the tank is leak proof. Generally I do not travel with lot water in the tank, not even half full. For drinking I use recycled jugs. Will Appreciate any advise, recommendations. Support the floor from below frame for the new plywood to sit on This is after cleaning the rotted wood T
-
I agree Linda, the manufacturer needs to know the product is not the exact replacement. Noted, i will write to KYB with photos. Keep you posted on what develops. Best !!
-
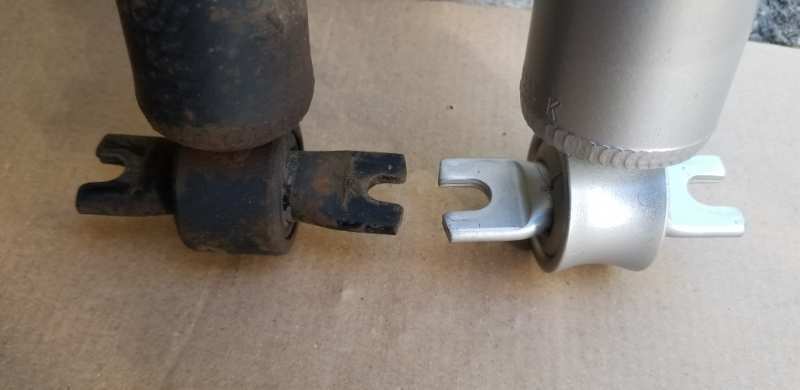
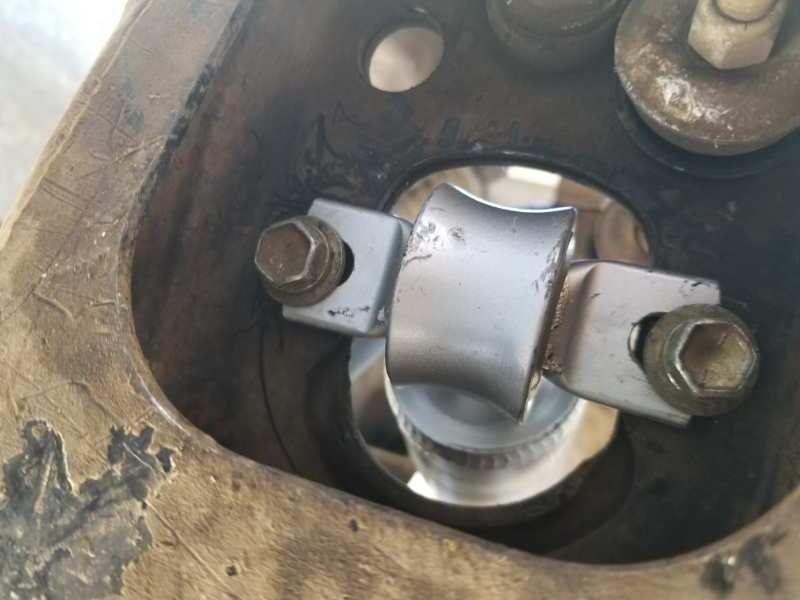
It took me few days to get to it. I think I found the solution to the problem. Attached are few photos: First photo is old and new base of the front shocks. You can see there is small difference. The new shock wiggles as the fork where the bolt sits is too wide. Shock even slides out from one end if not held tight. Second photo shows with new shocks with old bolts and old washers. You see the gap. Third photo is with new shock , new bolts and much bigger washers. I wonder if anyone else came across this issue that the new shock is not exactly the same, especially where it is fastened to the frame.
-
Thank you Linda, you are the best. Always value your to the point answers. WME agree, photos will clarify the issue, it is none of the above. Tomorrow I will raise the front end, go under, take couple of photos and post them for further discussion. I just hope it is not a hot day like it has been lately. Thank you.
-
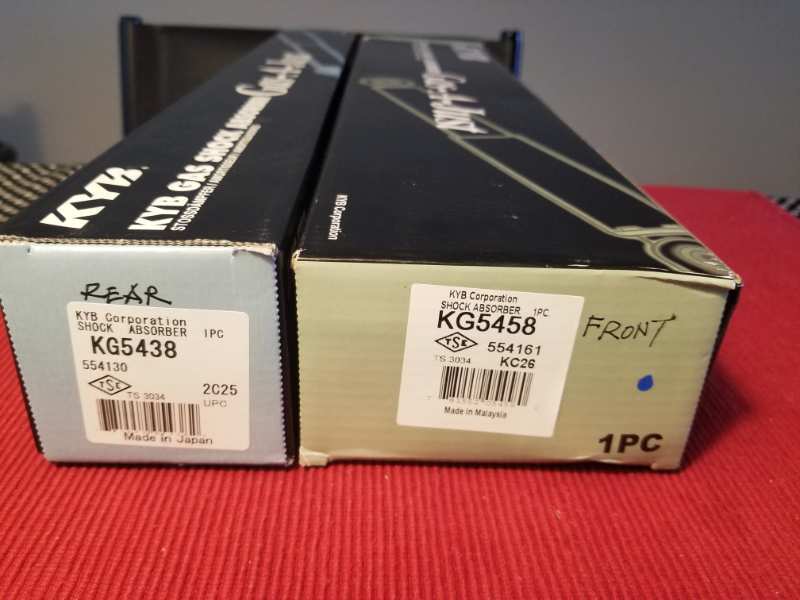
I have checked and compared old and new fully extended and they are both the same length. My issue is the base. I wonder if I ordered the correct part. Part Number I Ordered is: KG5458 Could someone help me verify if this is the correct part for my rig. Thank you
-
I am installing new shocks ordered from RockAuto. In fact they were delivered very fast, and months ago but just getting around to do this. No issues with the rear shocks they went in with some jacking around. But wanted to verify if I ordered the right shocks for the front. See attached photos: They sure look different. I have installed one on the passenger side and found that the base which Attaches with two screws from the bottom has lot of play. Looking closely at the base of old and new I can see the they are not exactly the same. While installing i noticed there is a lot of wiggle room around the screws. I am afraid the shock will get loose. I thought of useing bigger washers so it does not fall off the frame. I thought I will check with the experts before I go any further.
-
Thank you all, this will help.
-
Hi all Want to get some opinions on winterizing issues while traveling: I am on three weeks into a two months trip covering sevdn states, 10 National Parks and just as many National Monuments, it will cover 4000 miles to see "America the Beautiful". When I started from Oregon my rig was winterized. Now traveling Utah, through Arches NP and west on hwy 95 temperatures have been in high 80s so I started using sink and toilet. As I head towards Bryce Canyon National Park it is getting colder. Nights in could get into low 30s even in high 20s Now here is my question: How do you prepare for such variations in temperatures ? At what point I rewinterize and the de-winterize ?? Walls, floor are foam insulation therefore it is like a inside space. Should I be worrying about freezing the water tank and water lines. Please enlighten me, thank you.
-
I am looking to replace my two house batteries they are regular Interstate batteries from Costco, three years old. Now looking for Group size 24, deep cycle, 100 AH or more. I can use some help to narrow it down. Another important part i believe is to buy from a nation wise store like Napa or walmart or similar incase need help while traveling. I do not believe my rig has space for group 27 battery. Last week I ordered: Two EverStart Marine Batteries with 101AH from Walmart for 74.88/ each. Two days later they texted me order cancelled not to come to pick them up. That order was cancelled. I have tried few other auto parts shops like Oraily's, Napa, Advance and few more. Many places do not even know the Amp Hours of the deep cycle batteries they sell. Many of the deep cycle batteries I see are Starting deep Cycle batteries. What are the important specifications to look for in a good house battery at a reasonable cost. I do not think I want AGM or Lithium. Below is Napa battery I was told it is 120 ah battery for $119 or so. https://www.napaonline.com/en/p/BAT8302?cid=paidsearch_shopping_dcoe_google&store=26542&campaign=GSC-Batteries&campaign_id=6478913224&adgroup_id=109581694475&adtype=pla&gclid=CjwKCAjwxOCRBhA8EiwA0X8hi2QFg3lG8biK6DYzQ_zCen-gFam3mf9zmtzVuXhCgVIblpHV2ik2nBoC3u4QAvD_BwE&gclsrc=aw.ds&
-
Thank you all. I ordered the one from Walmart. Thank you Linda. You are the best.
-
Reviewing this old posts as I have the same light fixture on my rig. The lense just broke to pieces. I tried making one from a milk carton but have not suceeded. Yet !! Looking for ideas. Thank you.
-
Shopping for Tires
V6 Seabreeze 92 replied to V6 Seabreeze 92's topic in Whoops, Mishaps and Murphy's Law
thewanderlustkin: That explains why the tire shops told me I do not need wheel alignment on my rig. Back on Shopping for Tires issue, It was an experience, however I am not sure if i saved any money. I did end up buying 7 Nexen Roadian tires online from Walmart. Tires shipped from Walmart were made in June 2021. Discount tires had Yokohama tires in D rating. I cancelled that order because these tires were three years old. Installation part was little hectic. I checked with 4 different shops. The installation price ranged from $240 to $350. Finally I took the rig to a tires shop called Industrial Tires, They are on NE Killingsworth St. and 72nd Ave. in Portland, Oregon, some 12 miles from home. He charged me $200 cash he said, for all 7 tires and installed extenders on the inside tire Valve stems. That was couple of months ago so far so good. Cost wise this is what worked out: 7 Tires @ $97.85 = 685 Installation = 200 -------------------------- $885 works out to be $ 126.40 per tire. Piece of mind one for all new tires on the rig and they were made this year, hopefully they will be good few years. -
Shopping for Tires
V6 Seabreeze 92 replied to V6 Seabreeze 92's topic in Whoops, Mishaps and Murphy's Law
I have had bad experience with Les Schwab, bunch of crooks. They sold me D rated tires but installed C rated. I was on the road and did not check. When I got home after my long road trip and looked. Les whatever they are, it is the last place i will ever go for tires. It was too much hassle ordering Roadian Tires on line, Walmart sells them for $97.98 but they do not install in any RVs. I am now working with Discount Tires in my area, Gresham, Oregon. Yokohama tires, $104.99/per tire plus the works comes to $892.50 for all 7 tires, Installed. Have not ordered them yet. I asked them to make sure they are not old tires, I will check before they install them. He told me they will come from the factory direct. I need to order couple of TR 544/545 valve stems for the 2 inside tires. Discount tires just carries regular valves. I am not sure of the length yet. What do you think of Yokohama 185R14 D rated tires ?? -
When you plug in at the power hookup Box at campgrounds Often the power switches are at OFF position. Just flip them to ON. Could be a simple fix.
-
Shopping for Tires
V6 Seabreeze 92 replied to V6 Seabreeze 92's topic in Whoops, Mishaps and Murphy's Law
Linda You are correct: Walmart would not install tires on any RVs. I checked today. jjrbus Thank you for TR-544, now I see many possibilities. -
Shopping for Tires
V6 Seabreeze 92 replied to V6 Seabreeze 92's topic in Whoops, Mishaps and Murphy's Law
Thank you Linda !! Another tires related question: what kind of Tire Valve Stem are you using on the inside tire. ?? Short stems are so hard to get to. Any photo/ dimensions will be helpful. -
I am looking to purchase tires for my rig, below is from Walmart. Could someone confirm if what I am looking at is the right tires to order for 21 foot Seabreeze. Thank you. https://www.walmart.com/ip/Nexen-Roadian-CT8-HL-185R14C-8-102-100T-Tire/845193737
-
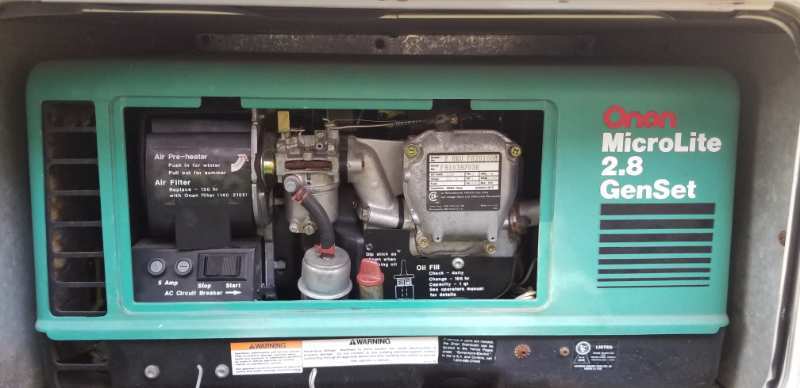
This is Onan Microlite in my rig. I have been able to order parts from CUMMINGS, they are nationwide. My contact in Portland Oregon area is 503 289 0900. They did ask me for the Model Number when I ordered tuneup parts. They were all original Onan parts. Not expensive in my case. Hope this will help.
-
Attached are couple of photos of my canopy. Sun beating on it has faded the canopy fabric. Is there a way to bring it back to looking good again. Faded part is only the end part, rest of the canopy color is fine when it in open position. Was there supposed to be any lighting in these old canopies, mine does not have any lighting. I also do not see any sign that there was any lighting. It would be nice to have a strip of LED. Any ideas for how to run one. I would love to see some photos if someone has added a LED strip.
-
Thank you Linda Now you know how much I know of this roof stuff. You are correct, I was removing the sealant around one of the vents. Later I did try using heat gun and it was much easier. Still not sure what I am doing but willing to try. So let me ask you couple of more questions: 1. Would you recommend Eternabond tape or Decor self leveling sealant for roof joints and around vents and other penetrations ? 2. For metal roof is Henry's Tropical Silicone white roof coating a good option ? I love this forum, it is a wonderful source of information. Thanks to all of you.
-
I am having heck of a time removing old Butyl tape from around the roof vents, is there any easier way to remove this stuff. Please help.
-
Hi Friends I am gearing myself to refinish the roof and can use some advice. Over sometime I have read few posts related to roof issues. I remember one post a while ago where this member systematically wrote the whole process listing materials used. I searched for this post again but I cannot find it. This is my first time doing resurfacing roof. Roof of my rig is metal, sagged in few places but in general it still drains reasonably well. I see the roof finish, white, is peeling and cracking at places and there is a small drip over the bed and over the hand sink areas. My rig remains covered with a oversized tarp In the raining season, which is 3/4 of the year in around Portland, Oregon area. But that was not the case with the previous owner as I have noticed wood rot in some areas. The notes I have taken in the past call for Dicor Lap Sealants Self leveling and non Sag, Butyl Seal Tape, Mineral spirit or Accetone for cleaning, Henrys Tropical Silicon coating. I also read somewhere use of Eternabond tape for sealing around penetrations and vents and such. As you can tell I have not done this before, I would appreciate learning from your experience. Thank you.